> ## Documentation Index
> Fetch the complete documentation index at: https://docs.ale.run/llms.txt
> Use this file to discover all available pages before exploring further.
# GitHub
> Guide for adding GitHub OAuth to `ale`
> Adding **GitHub OAuth** enables GitHub login and allows dashboard users to deploy services by selecting repositories from their GitHub accounts.
***
## Create GitHub App
 > Navigate to **Settings > Developer Settings > GitHub Apps** and click [New GitHub App](https://github.com/settings/apps/new).
### Provide Basic Information
> Navigate to **Settings > Developer Settings > GitHub Apps** and click [New GitHub App](https://github.com/settings/apps/new).
### Provide Basic Information
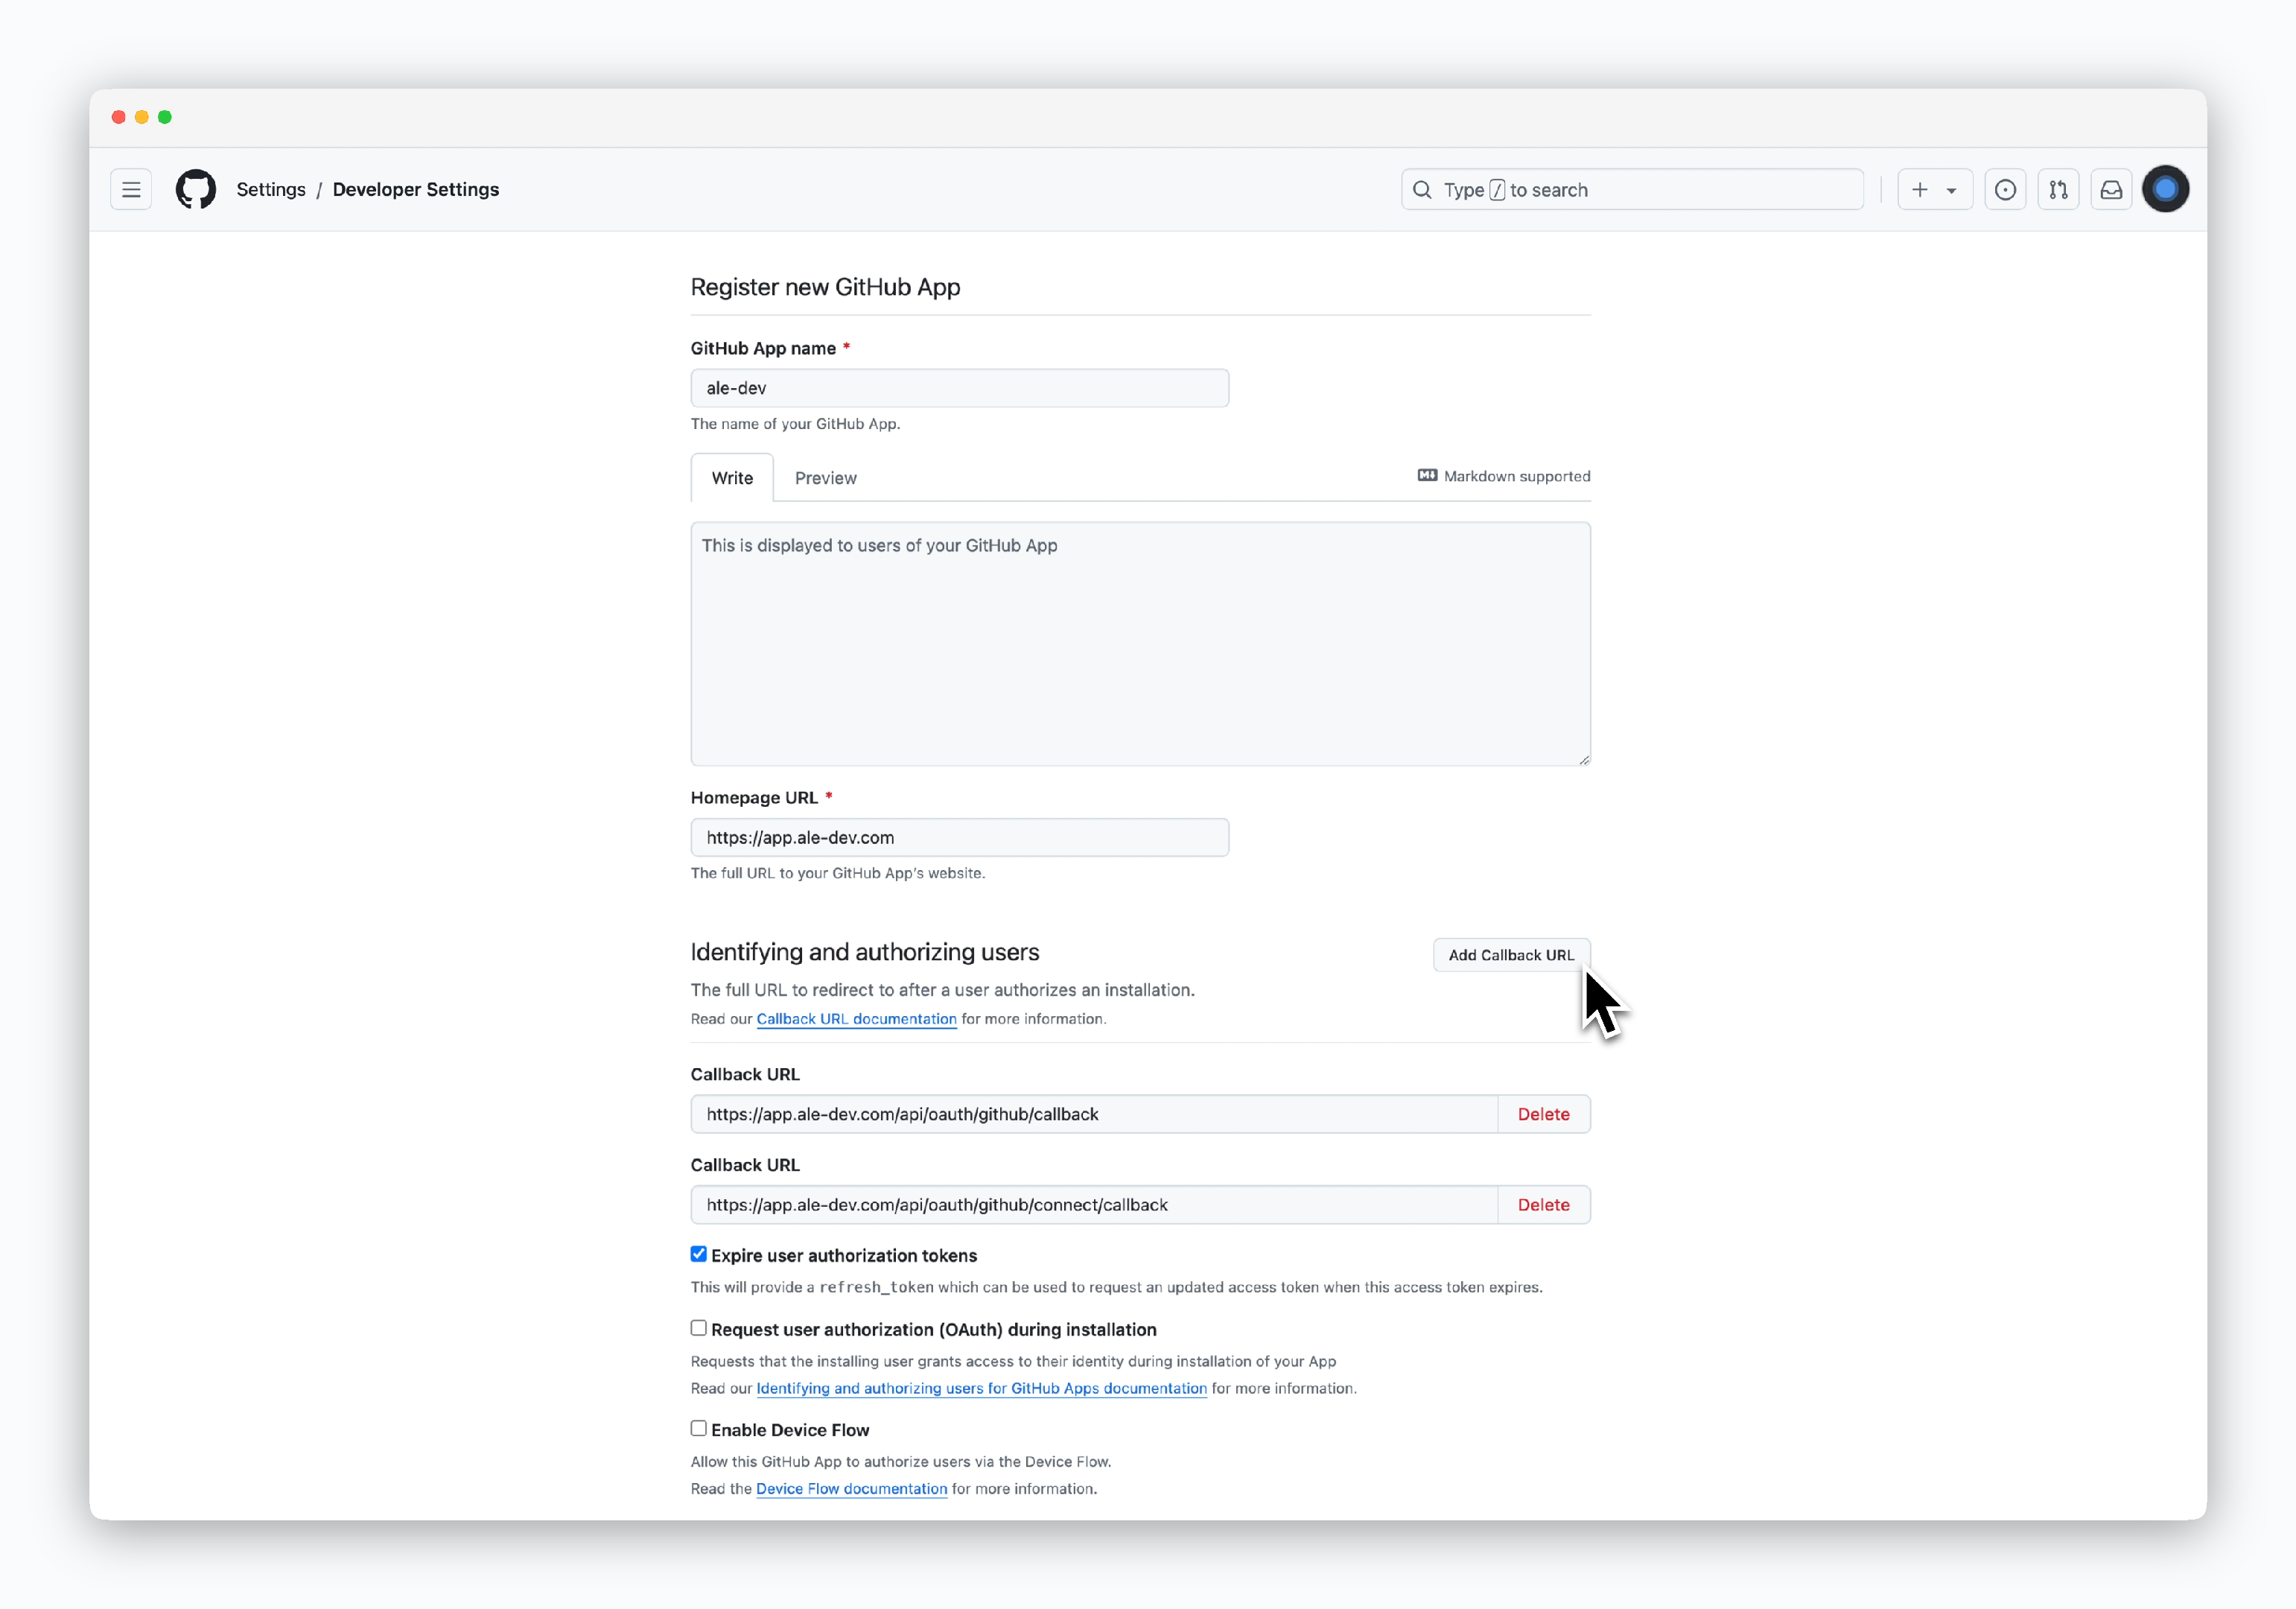 > Fill in the following details to set up your GitHub App:
* **GitHub App name**: Name for your GitHub App
* **Homepage URL**:
* URL of the website where GitHub OAuth will be used.
* Use `https://app.[domain]` (URL deployed with Ingress)
* **Callback URL (add using `Add Callback URL`)**:
* `https://app.[domain]/api/oauth/github/callback`
* `https://app.[domain]/api/oauth/github/connect/callback`
The **GitHub App name** will be used when registering GitHub OAuth in `ale`.
`https://app.[domain]/api/` is the API endpoint address for `ale`.
### Disable Webhook
> Fill in the following details to set up your GitHub App:
* **GitHub App name**: Name for your GitHub App
* **Homepage URL**:
* URL of the website where GitHub OAuth will be used.
* Use `https://app.[domain]` (URL deployed with Ingress)
* **Callback URL (add using `Add Callback URL`)**:
* `https://app.[domain]/api/oauth/github/callback`
* `https://app.[domain]/api/oauth/github/connect/callback`
The **GitHub App name** will be used when registering GitHub OAuth in `ale`.
`https://app.[domain]/api/` is the API endpoint address for `ale`.
### Disable Webhook
 > Uncheck the Active option in the Webhook section to disable it.
### Grant Permissions and Create APP
> Uncheck the Active option in the Webhook section to disable it.
### Grant Permissions and Create APP
 > In the Permissions section, grant the following permissions and click `Create GitHub App`.
* **Read and Write**
* Actions
* Administration
* Commit statuses
* Contents
* Deployments
* Issues
* Pull requests
* Workflows
* **Read-only**
* Metadata
* **Read and Write**
* Administration
* **Read-only**
* Members
* **Read-only**
* Email addresses
## Get GitHub App Information
> To add GitHub OAuth to `ale`, you'll need **4 ID/Key values**.
* **App ID**
* **Client ID**
* **Client Secret**
* **Private Key**
### App ID and Client ID
> In the Permissions section, grant the following permissions and click `Create GitHub App`.
* **Read and Write**
* Actions
* Administration
* Commit statuses
* Contents
* Deployments
* Issues
* Pull requests
* Workflows
* **Read-only**
* Metadata
* **Read and Write**
* Administration
* **Read-only**
* Members
* **Read-only**
* Email addresses
## Get GitHub App Information
> To add GitHub OAuth to `ale`, you'll need **4 ID/Key values**.
* **App ID**
* **Client ID**
* **Client Secret**
* **Private Key**
### App ID and Client ID
 > After the App is created with permissions, you can view the **App ID and Client ID**.
### Client Secret
> After the App is created with permissions, you can view the **App ID and Client ID**.
### Client Secret
 > On the same page, click `Generate a new client secret` to create and view the **Client Secret**.
### Private Key
> On the same page, click `Generate a new client secret` to create and view the **Client Secret**.
### Private Key
 > Click `Generate a private key` at the bottom of the page to download the pem file.
## GitHub App Visibility
> By default, newly created GitHub Apps are **private** and can only be used by members of the organization where the App was created. To make the GitHub App available regardless of GitHub organization, follow the steps below.
> Click `Generate a private key` at the bottom of the page to download the pem file.
## GitHub App Visibility
> By default, newly created GitHub Apps are **private** and can only be used by members of the organization where the App was created. To make the GitHub App available regardless of GitHub organization, follow the steps below.
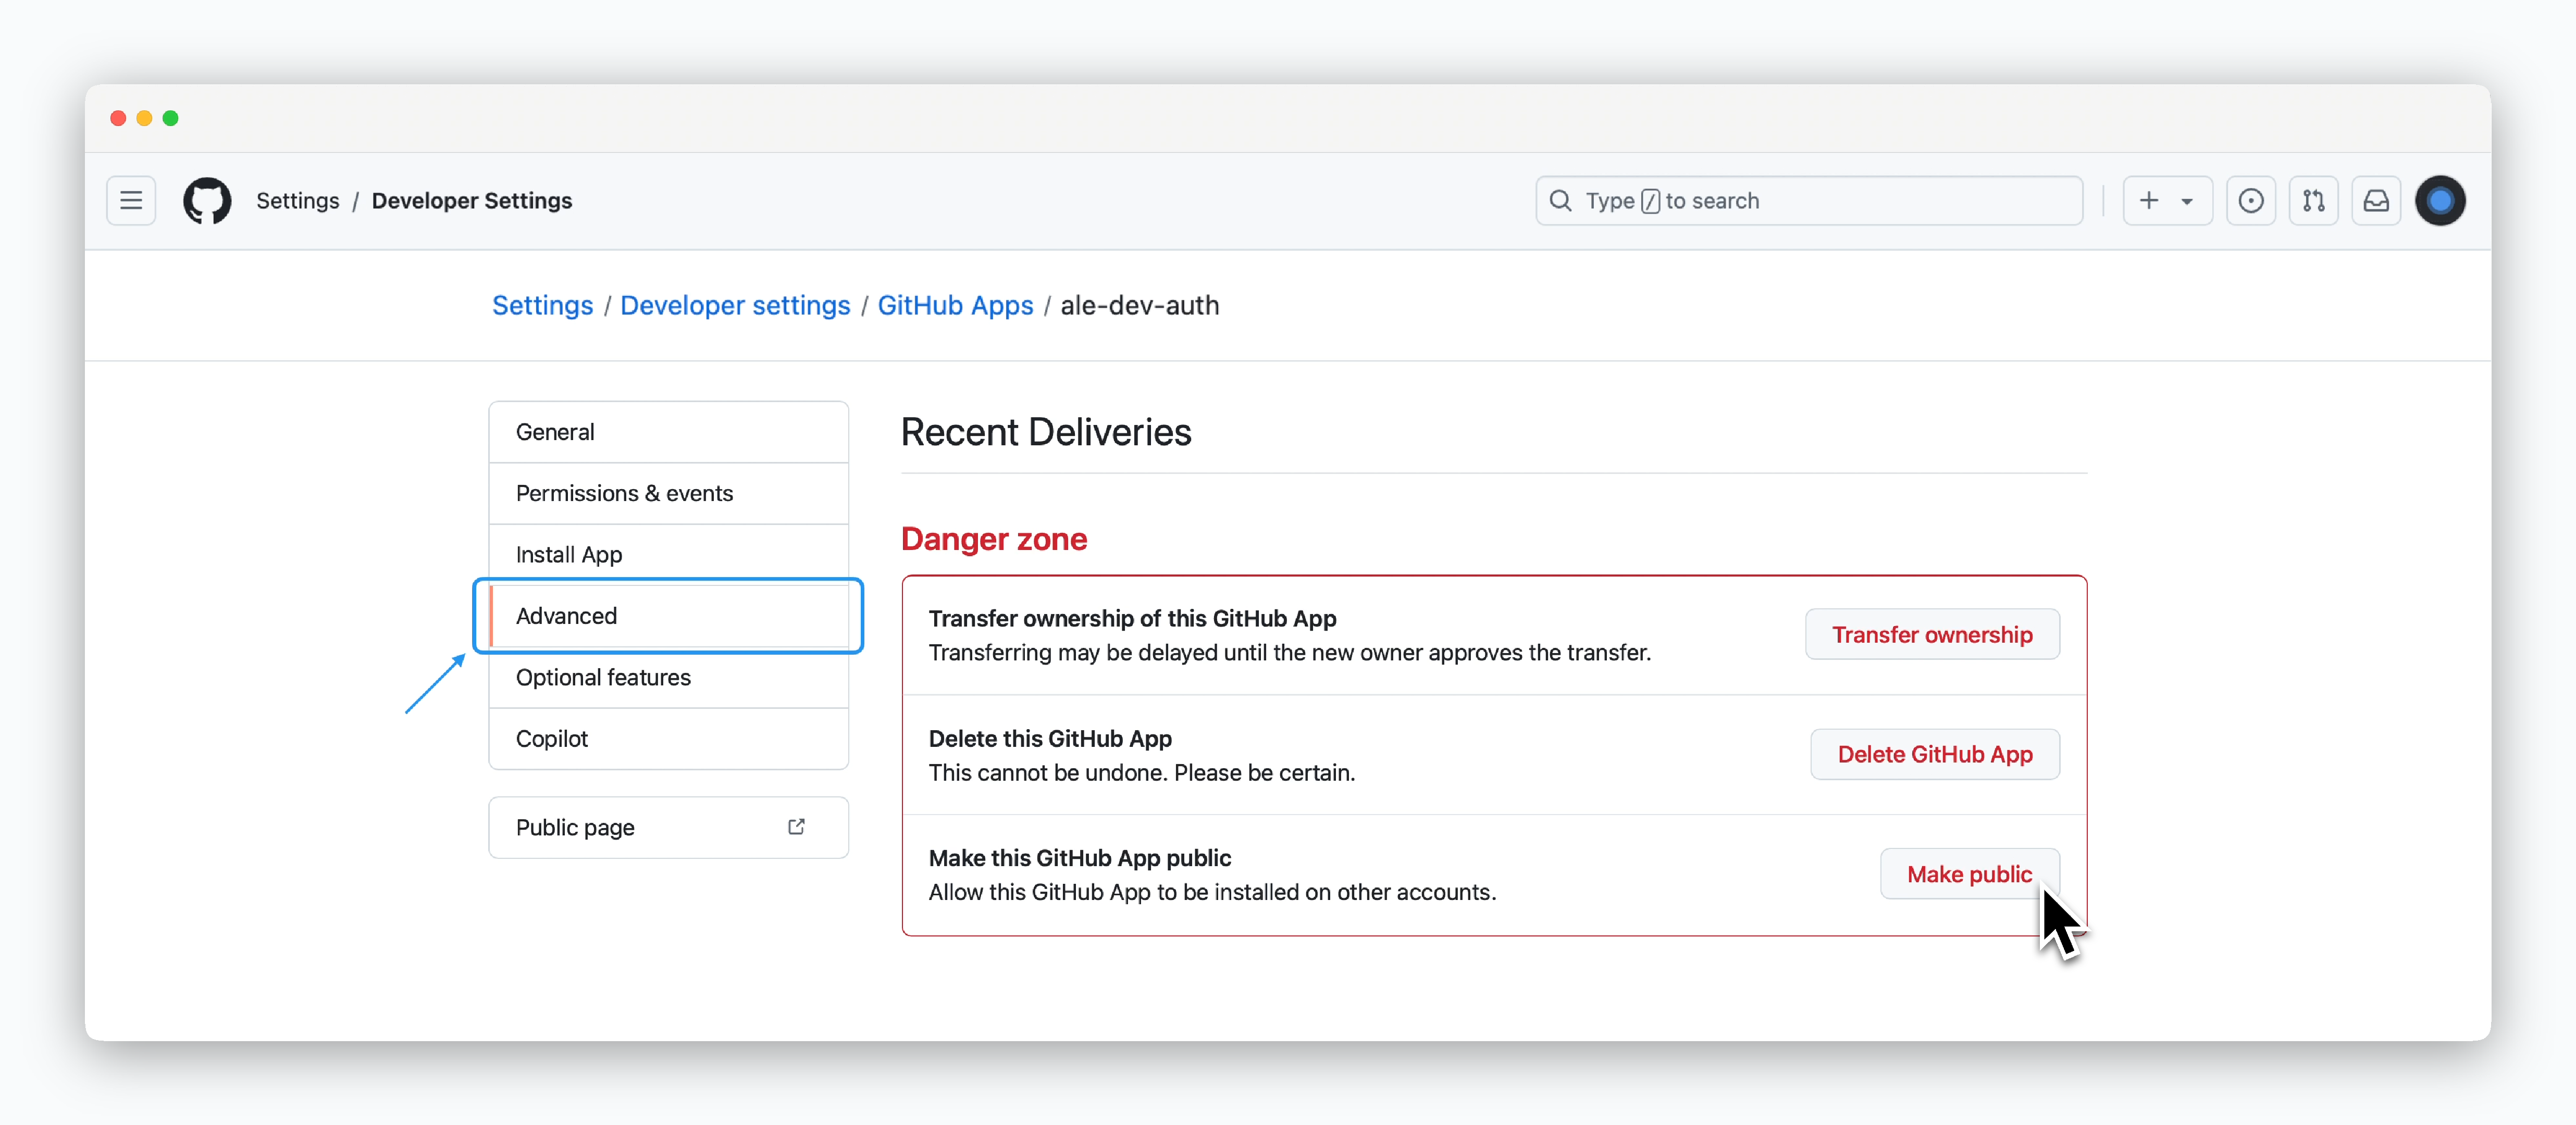 > Click `Make public` in the **Danger Zone** section under the **Advanced** settings.
## Integrate GitHub App in ale
> Click `Make public` in the **Danger Zone** section under the **Advanced** settings.
## Integrate GitHub App in ale
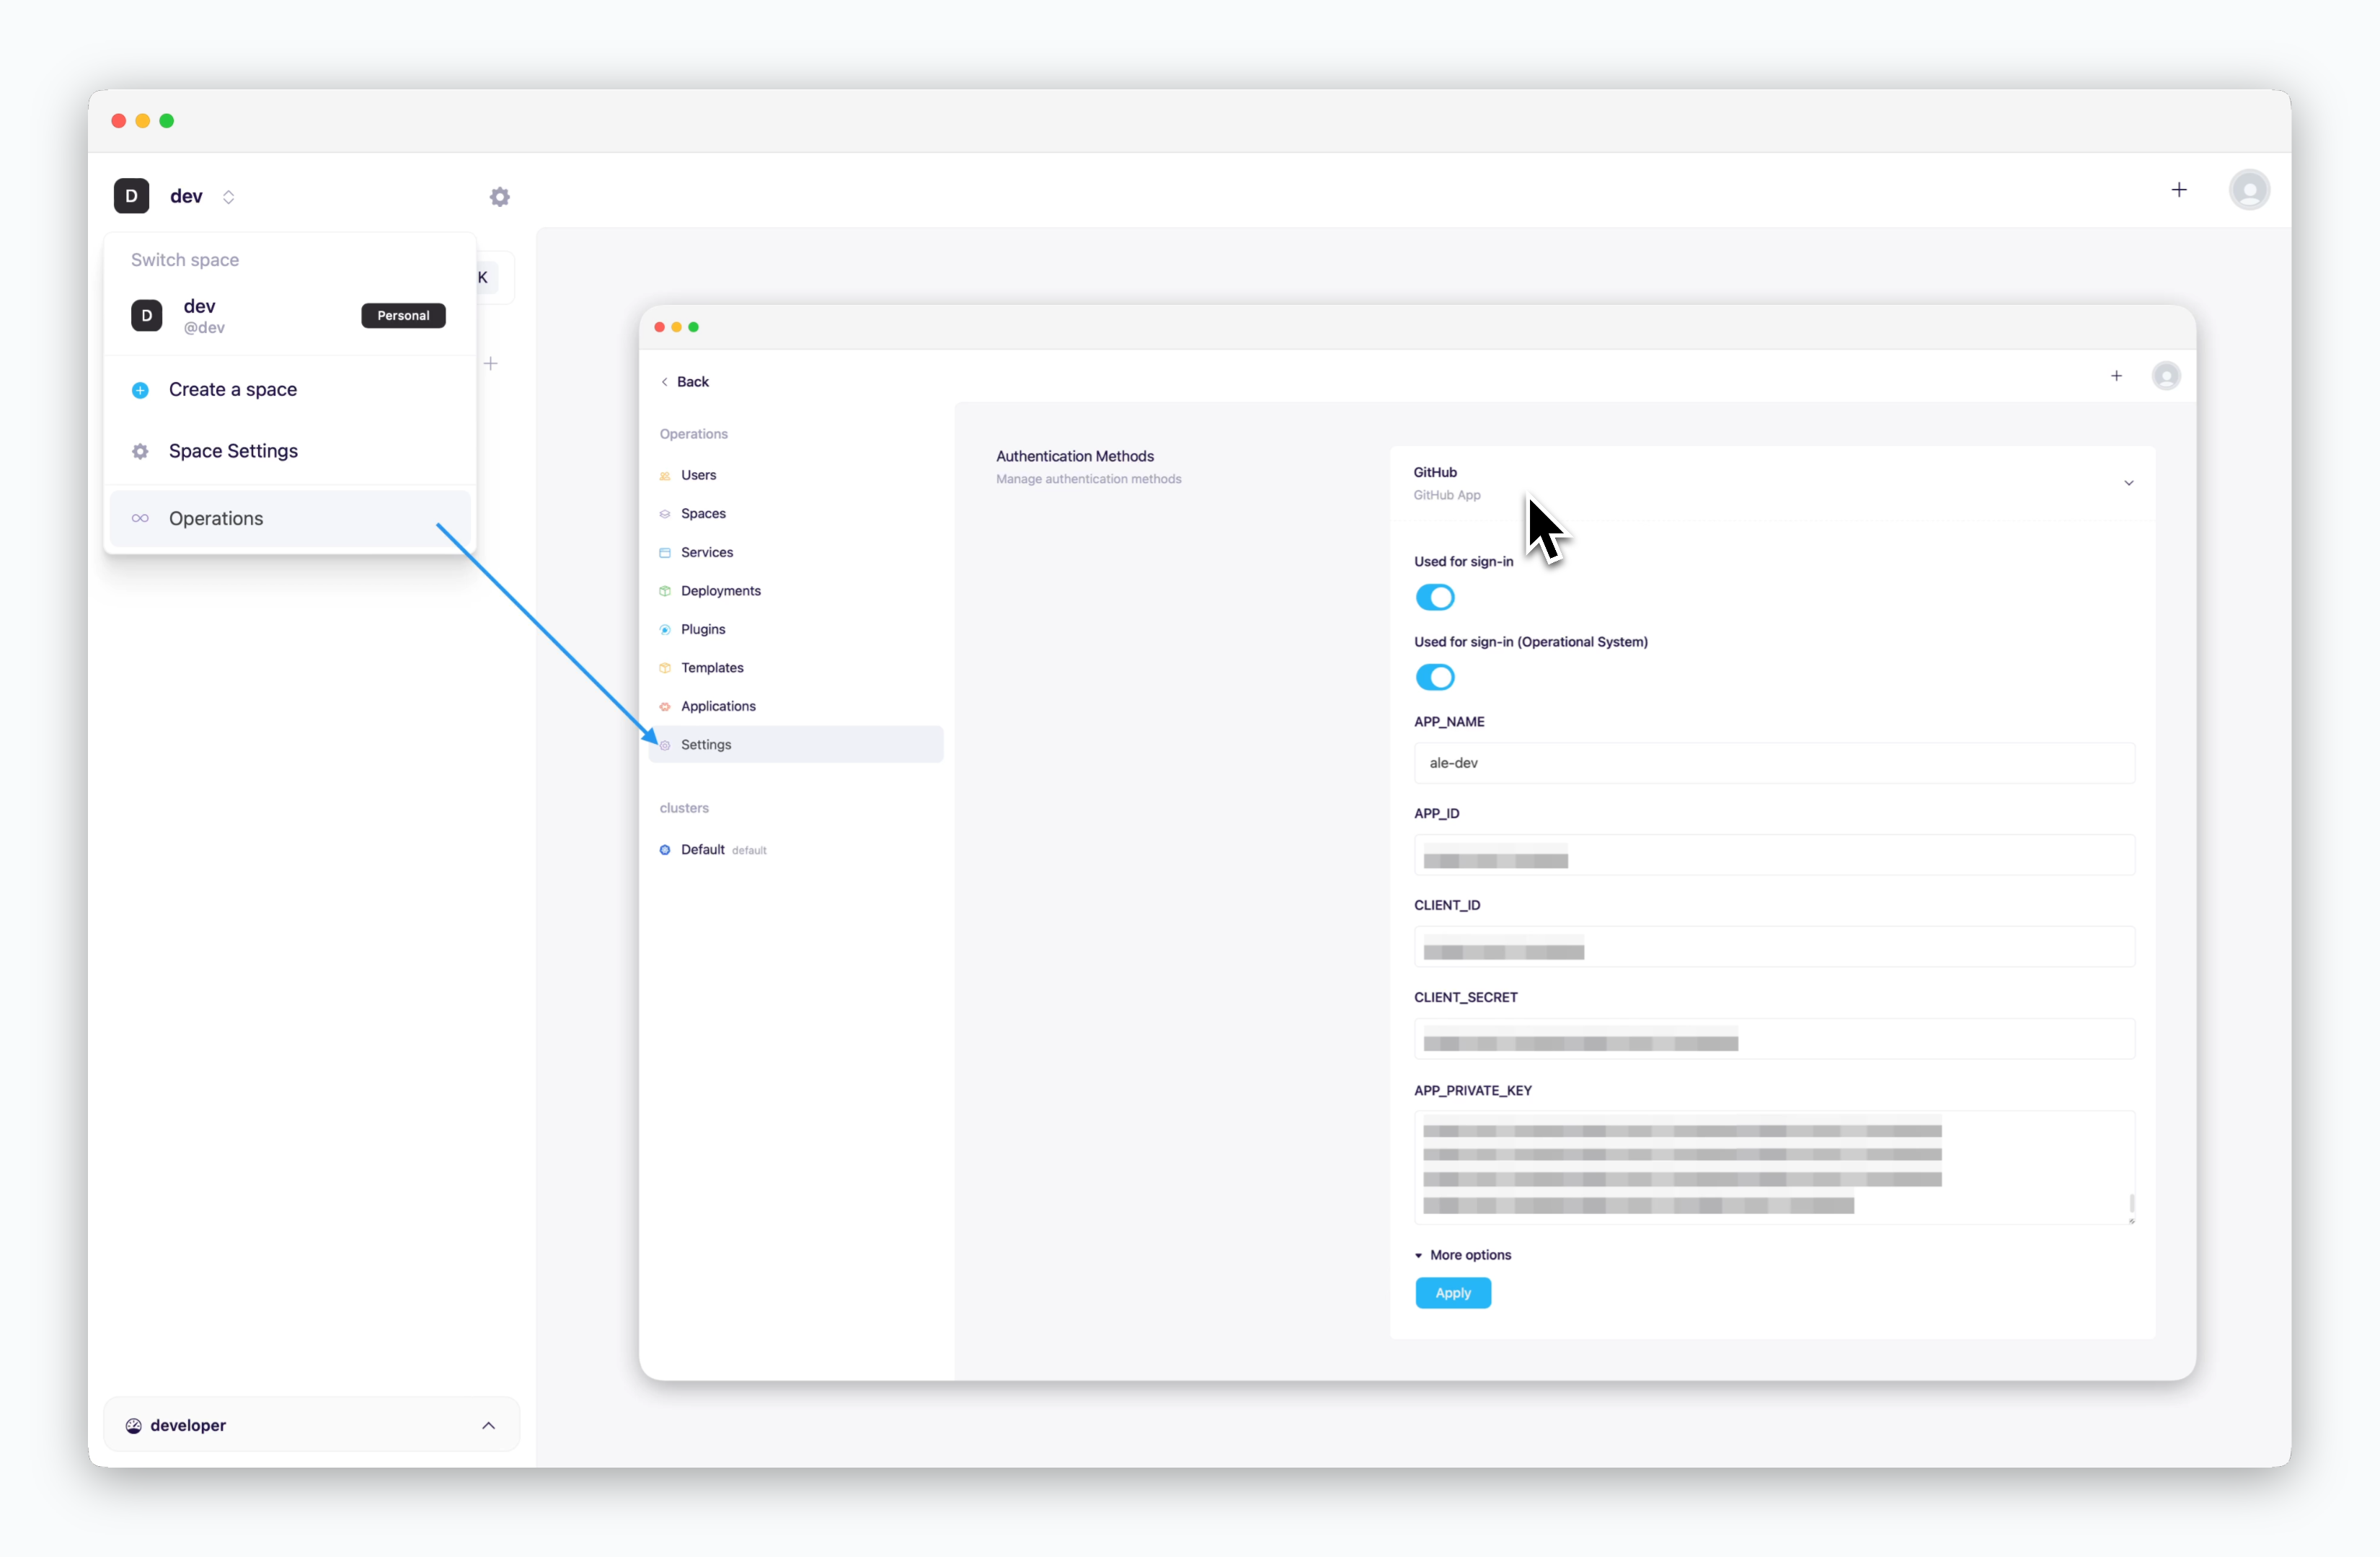 > Access the operations system, click the **Settings > Authentication > GitHub**, enter the values in previous steps into each field, and click `Apply`.
* **Enable Login**: Enable GitHub OAuth login
* **APP\_NAME**: GitHub App name
* **APP\_ID**: App ID
* **CLIENT\_ID**: Client ID
* **CLIENT\_SECRET**: Client secret
* **APP\_PRIVATE\_KEY**: Private key pem file value
After applying, check that the **Sign in with GitHub** button appears on the login page.
> Access the operations system, click the **Settings > Authentication > GitHub**, enter the values in previous steps into each field, and click `Apply`.
* **Enable Login**: Enable GitHub OAuth login
* **APP\_NAME**: GitHub App name
* **APP\_ID**: App ID
* **CLIENT\_ID**: Client ID
* **CLIENT\_SECRET**: Client secret
* **APP\_PRIVATE\_KEY**: Private key pem file value
After applying, check that the **Sign in with GitHub** button appears on the login page.
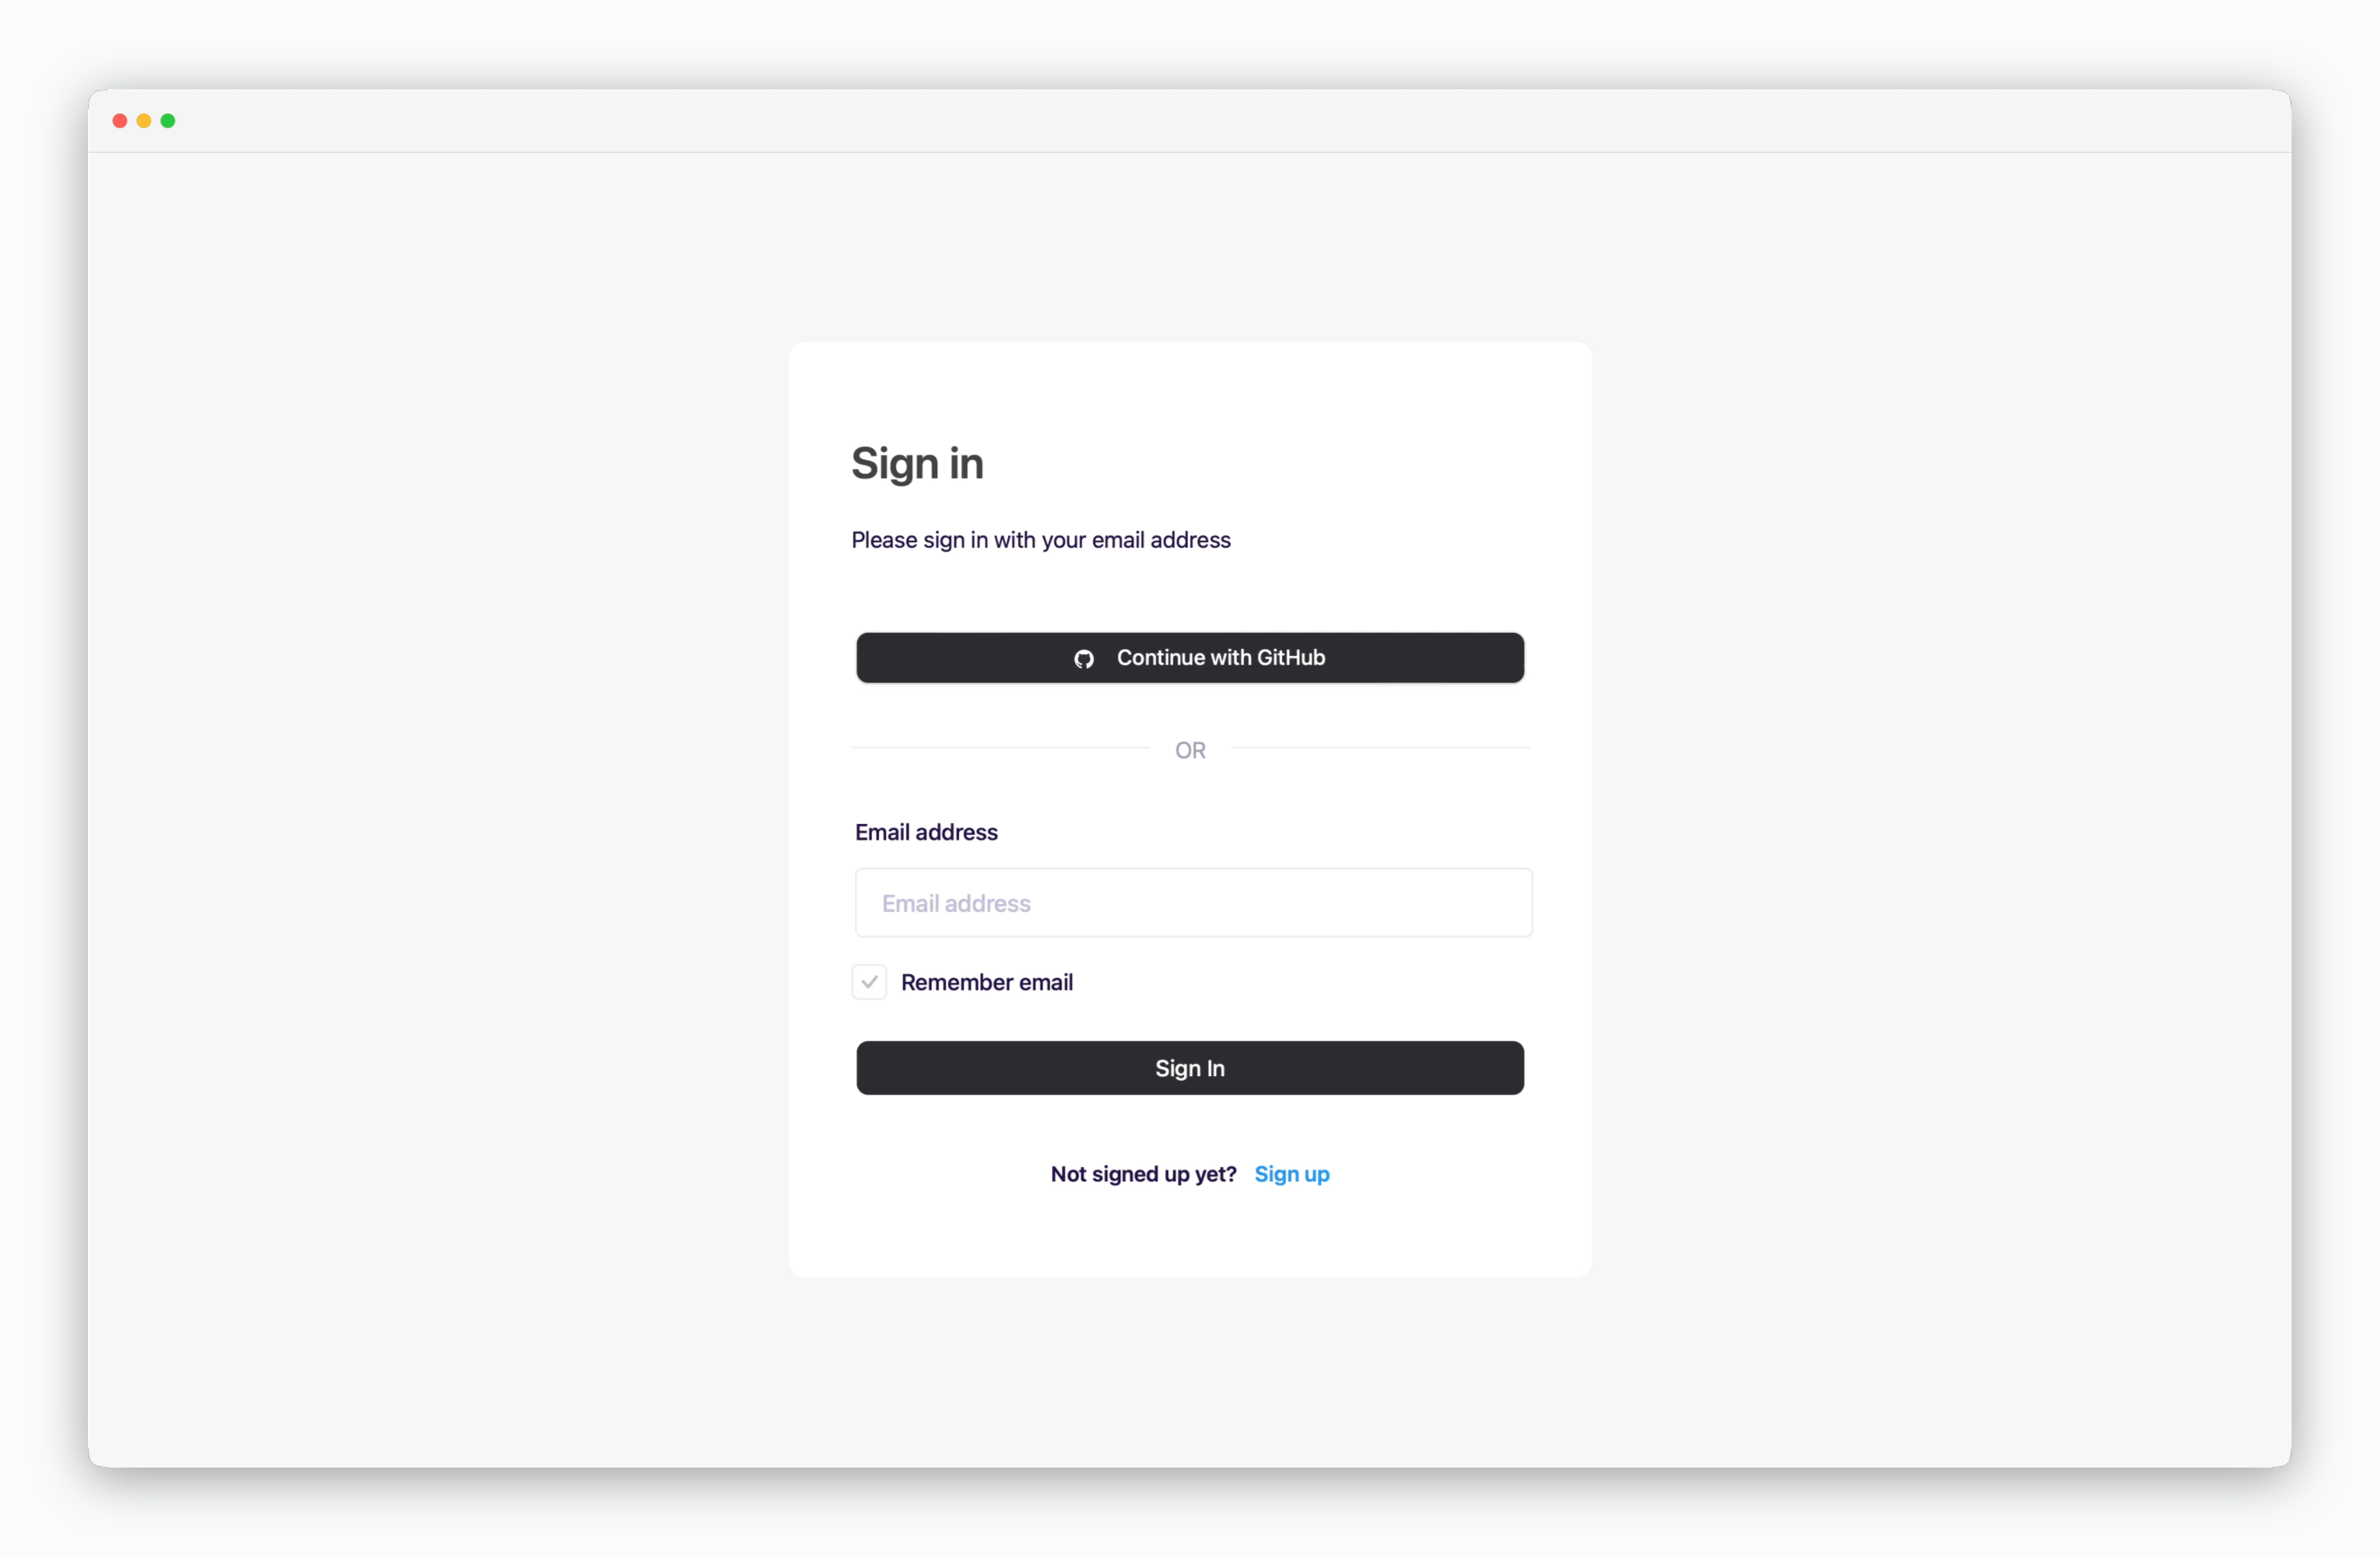 ## Sign up with GitHub Account
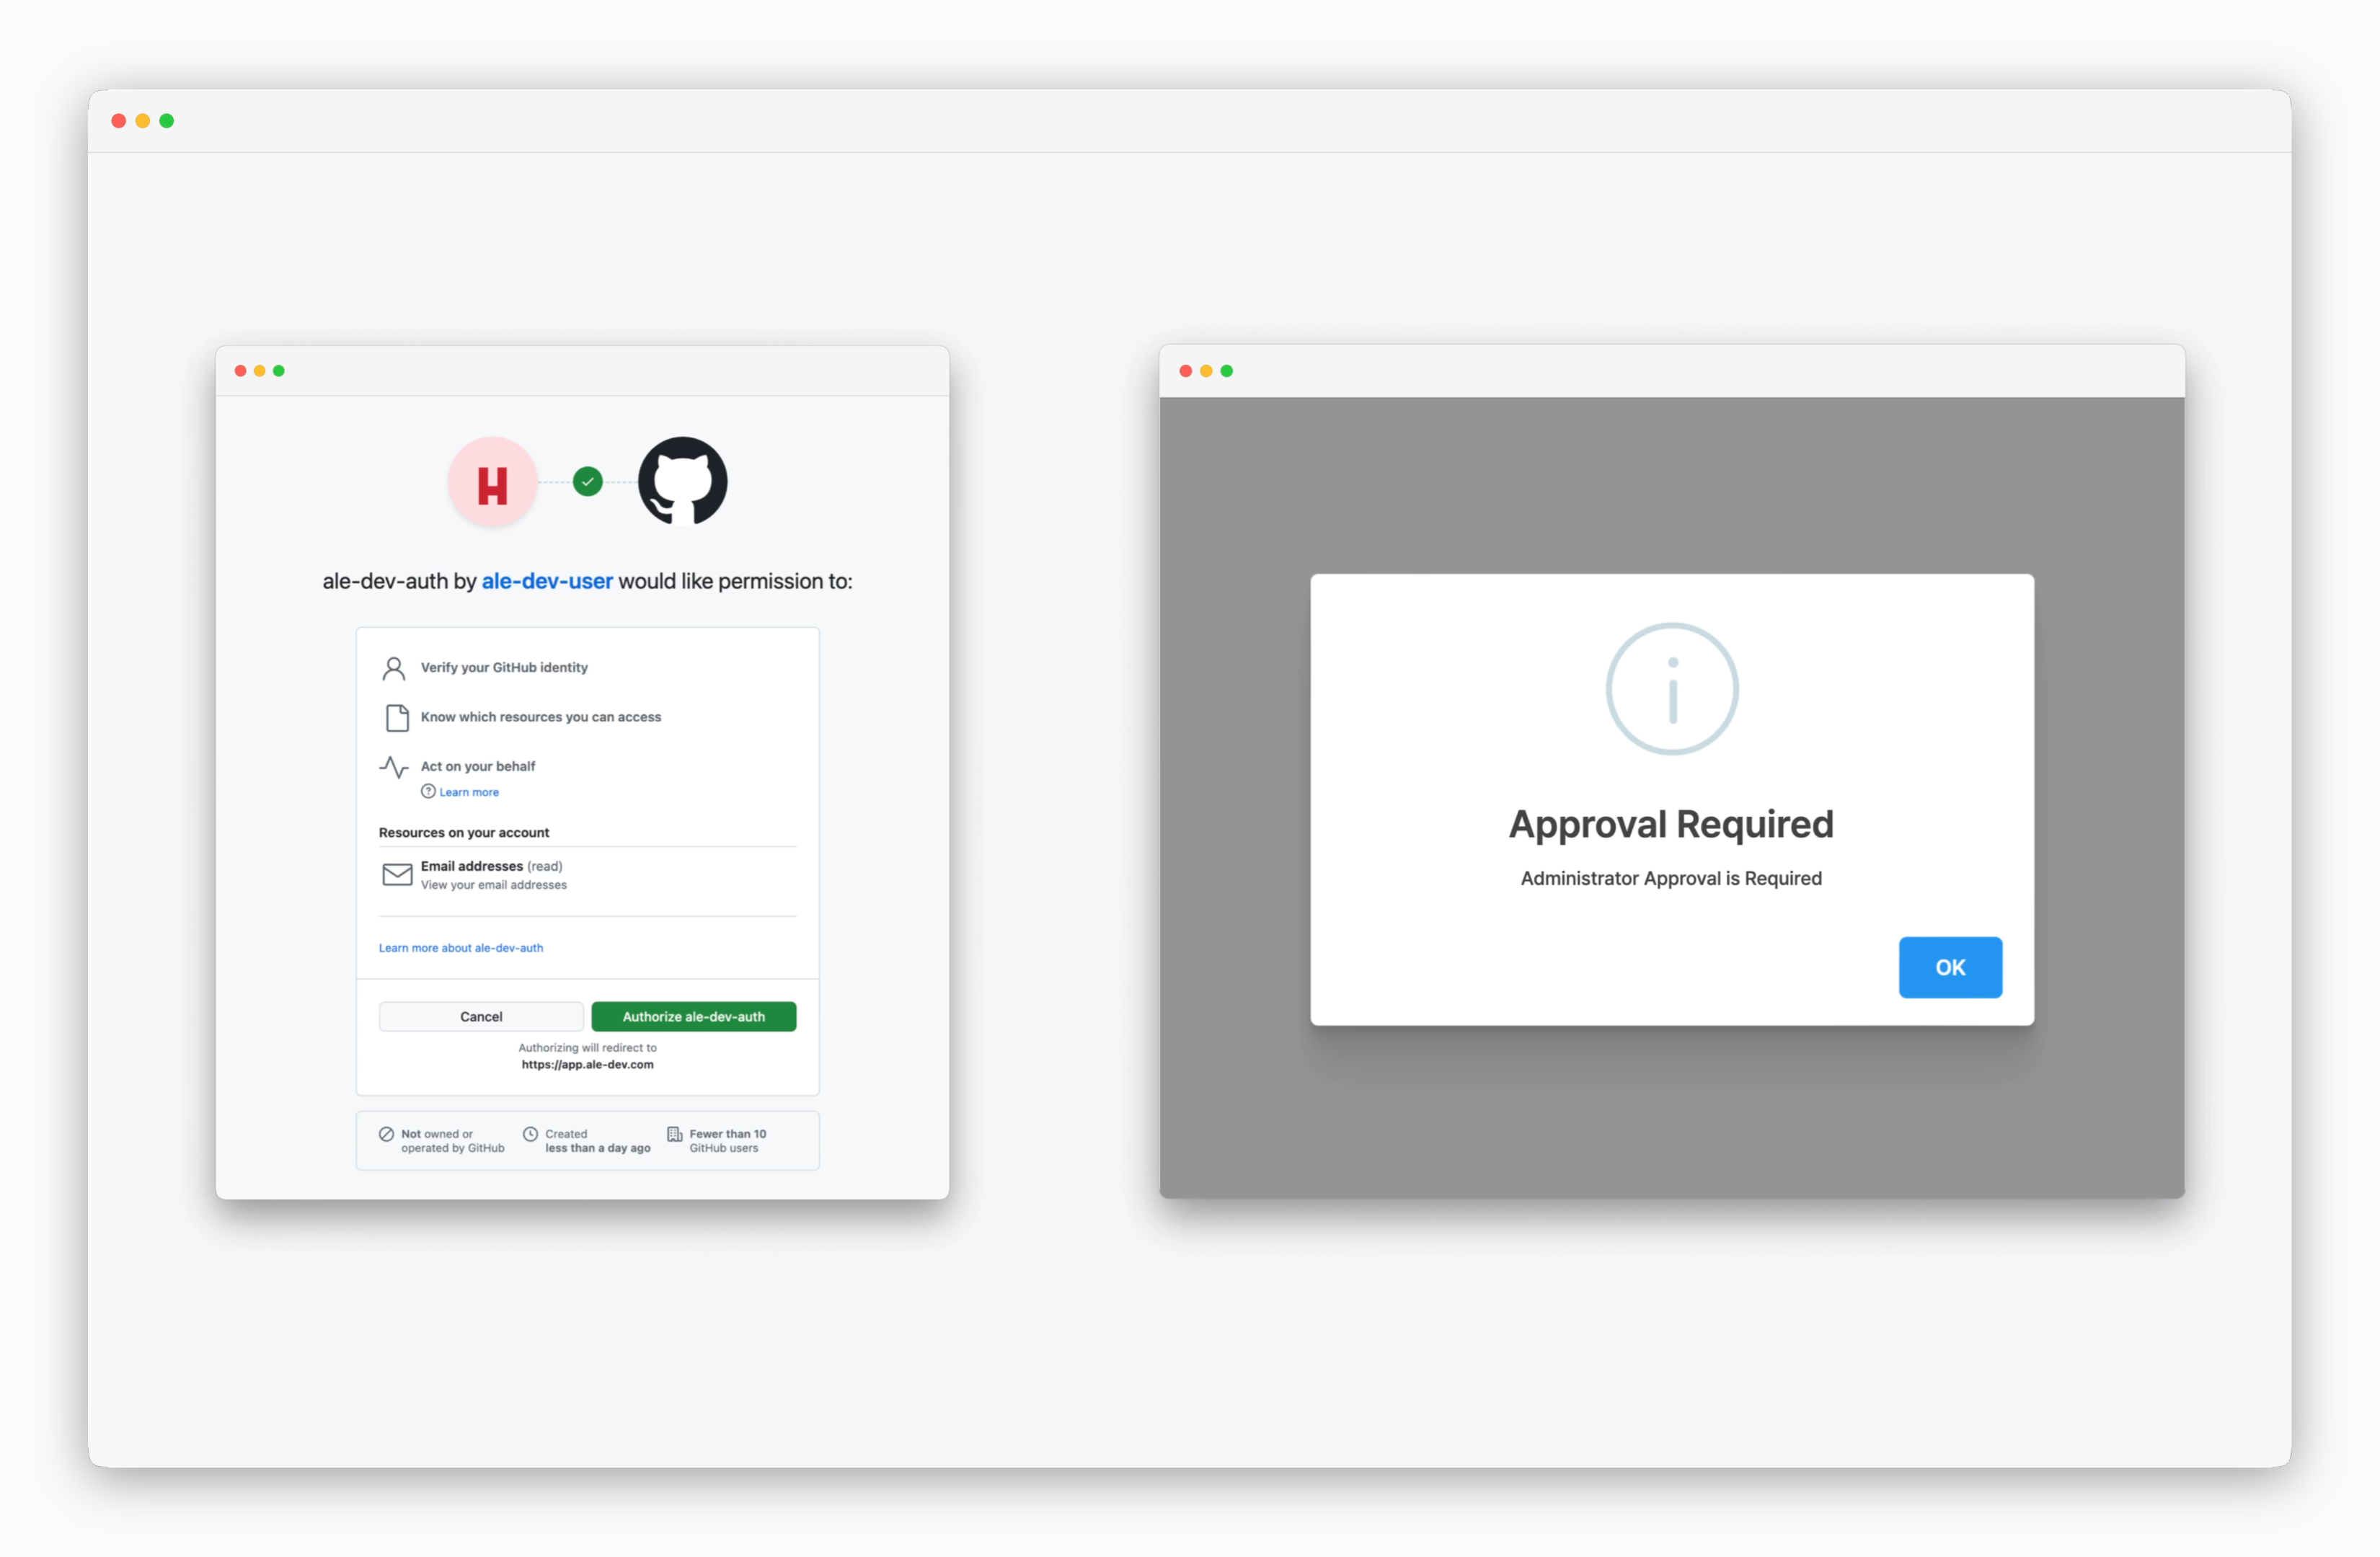 > After signing up with a GitHub account, you'll see a message 'Admin approval is required.'
To approve (activate) signed up users, see the [User Management page](/en/operations/user-management#activation).
If the GitHub account logged into your browser is the same as the account that created the GitHub App, the GitHub authorization modal won't appear.
To test GitHub OAuth, sign up with a different GitHub account in a new browser session.
If you've [set your GitHub App to private](/en/authentication/github#github-app-visibility), users attempting to log in need to belong to the same organization as the account that created the GitHub App.
> After signing up with a GitHub account, you'll see a message 'Admin approval is required.'
To approve (activate) signed up users, see the [User Management page](/en/operations/user-management#activation).
If the GitHub account logged into your browser is the same as the account that created the GitHub App, the GitHub authorization modal won't appear.
To test GitHub OAuth, sign up with a different GitHub account in a new browser session.
If you've [set your GitHub App to private](/en/authentication/github#github-app-visibility), users attempting to log in need to belong to the same organization as the account that created the GitHub App.
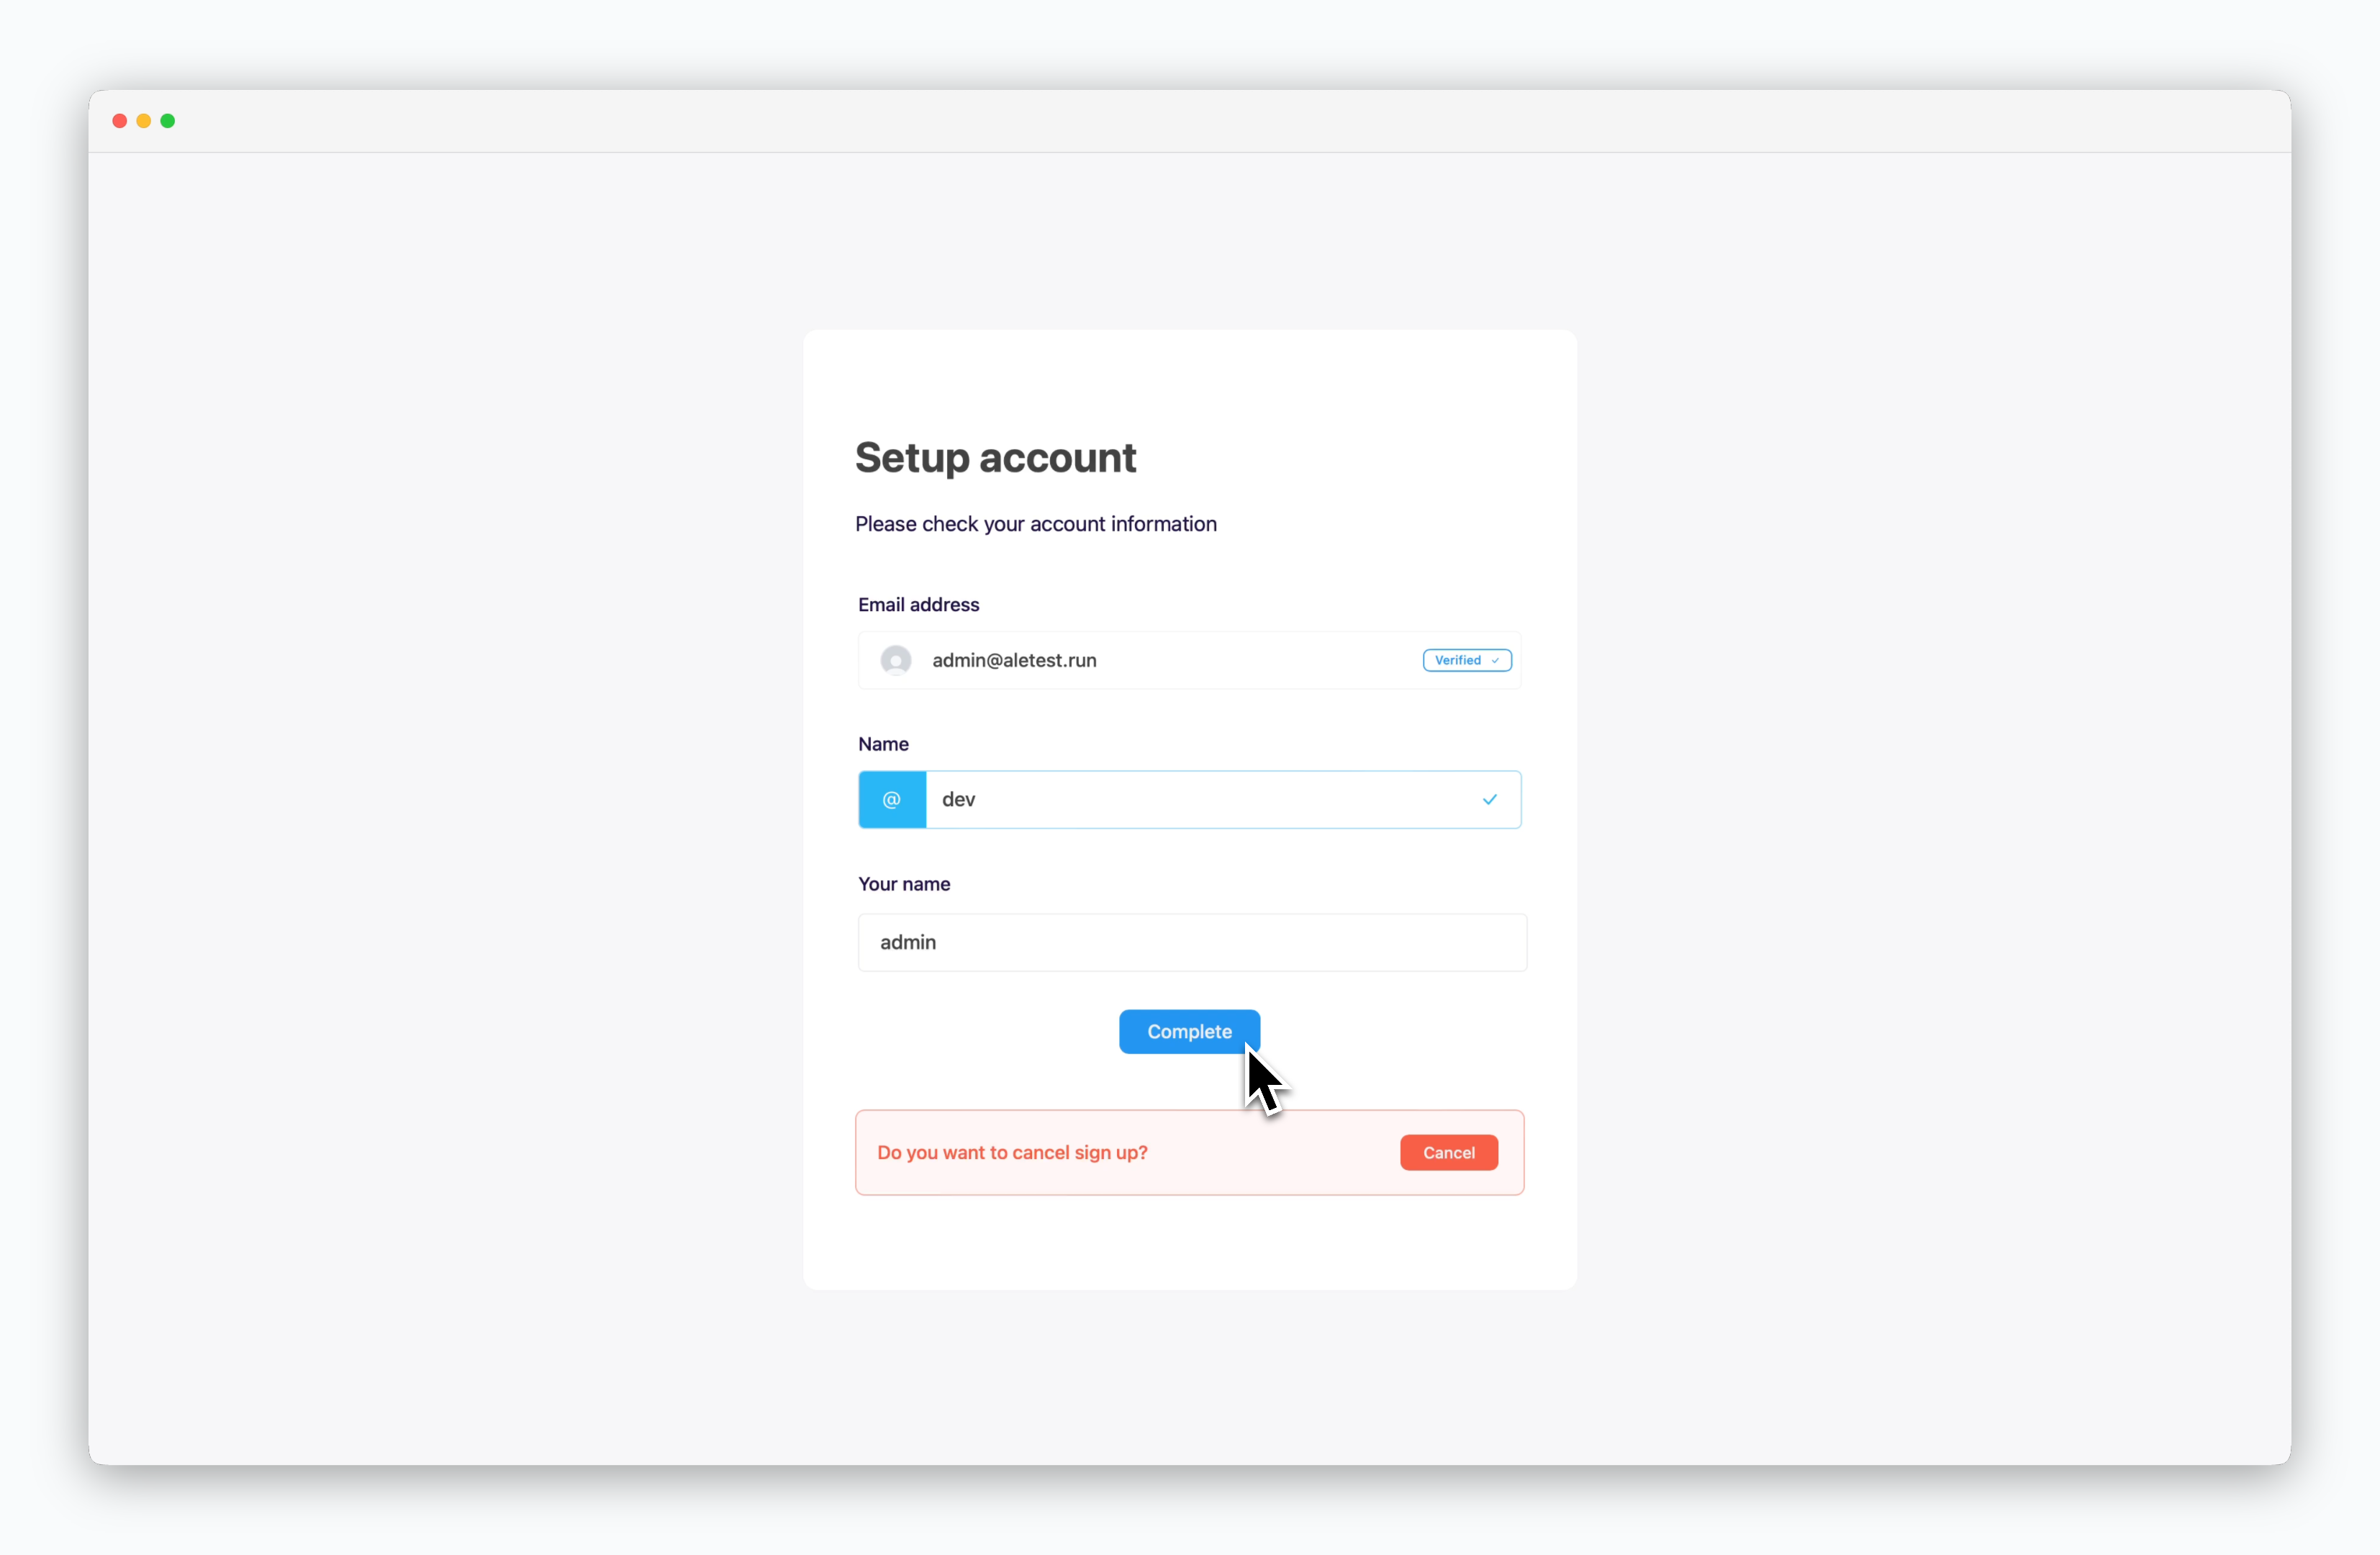 > After administrator approval, attempting GitHub login will display the **Complete Registration** page.
> Enter appropriate space and name information, then click `Complete`.
Upon accessing the dashboard, a space with your specified name will be created, and it will be allocated [default resource values predetermined in the operations system](/en/operations/settings#resource-profile-management).
For information about user registration and management, refer to the [User Management page](/en/operations/user-management).
> After administrator approval, attempting GitHub login will display the **Complete Registration** page.
> Enter appropriate space and name information, then click `Complete`.
Upon accessing the dashboard, a space with your specified name will be created, and it will be allocated [default resource values predetermined in the operations system](/en/operations/settings#resource-profile-management).
For information about user registration and management, refer to the [User Management page](/en/operations/user-management).