> ## Documentation Index
> Fetch the complete documentation index at: https://docs.ale.run/llms.txt
> Use this file to discover all available pages before exploring further.
# Database
> This guide covers database deployment in `ale`, service connectivity, and database management tool configuration using TCP connections.
`ale` offers pre-configured database options as built-in applications. For unsupported databases, you can create custom plugins through our plugin system. See our [plugin guides](/en/developers/database) for details.
Stopping or updating a database retains all data, but deleting the database will permanently erase the data.
***
## Deploying a Database
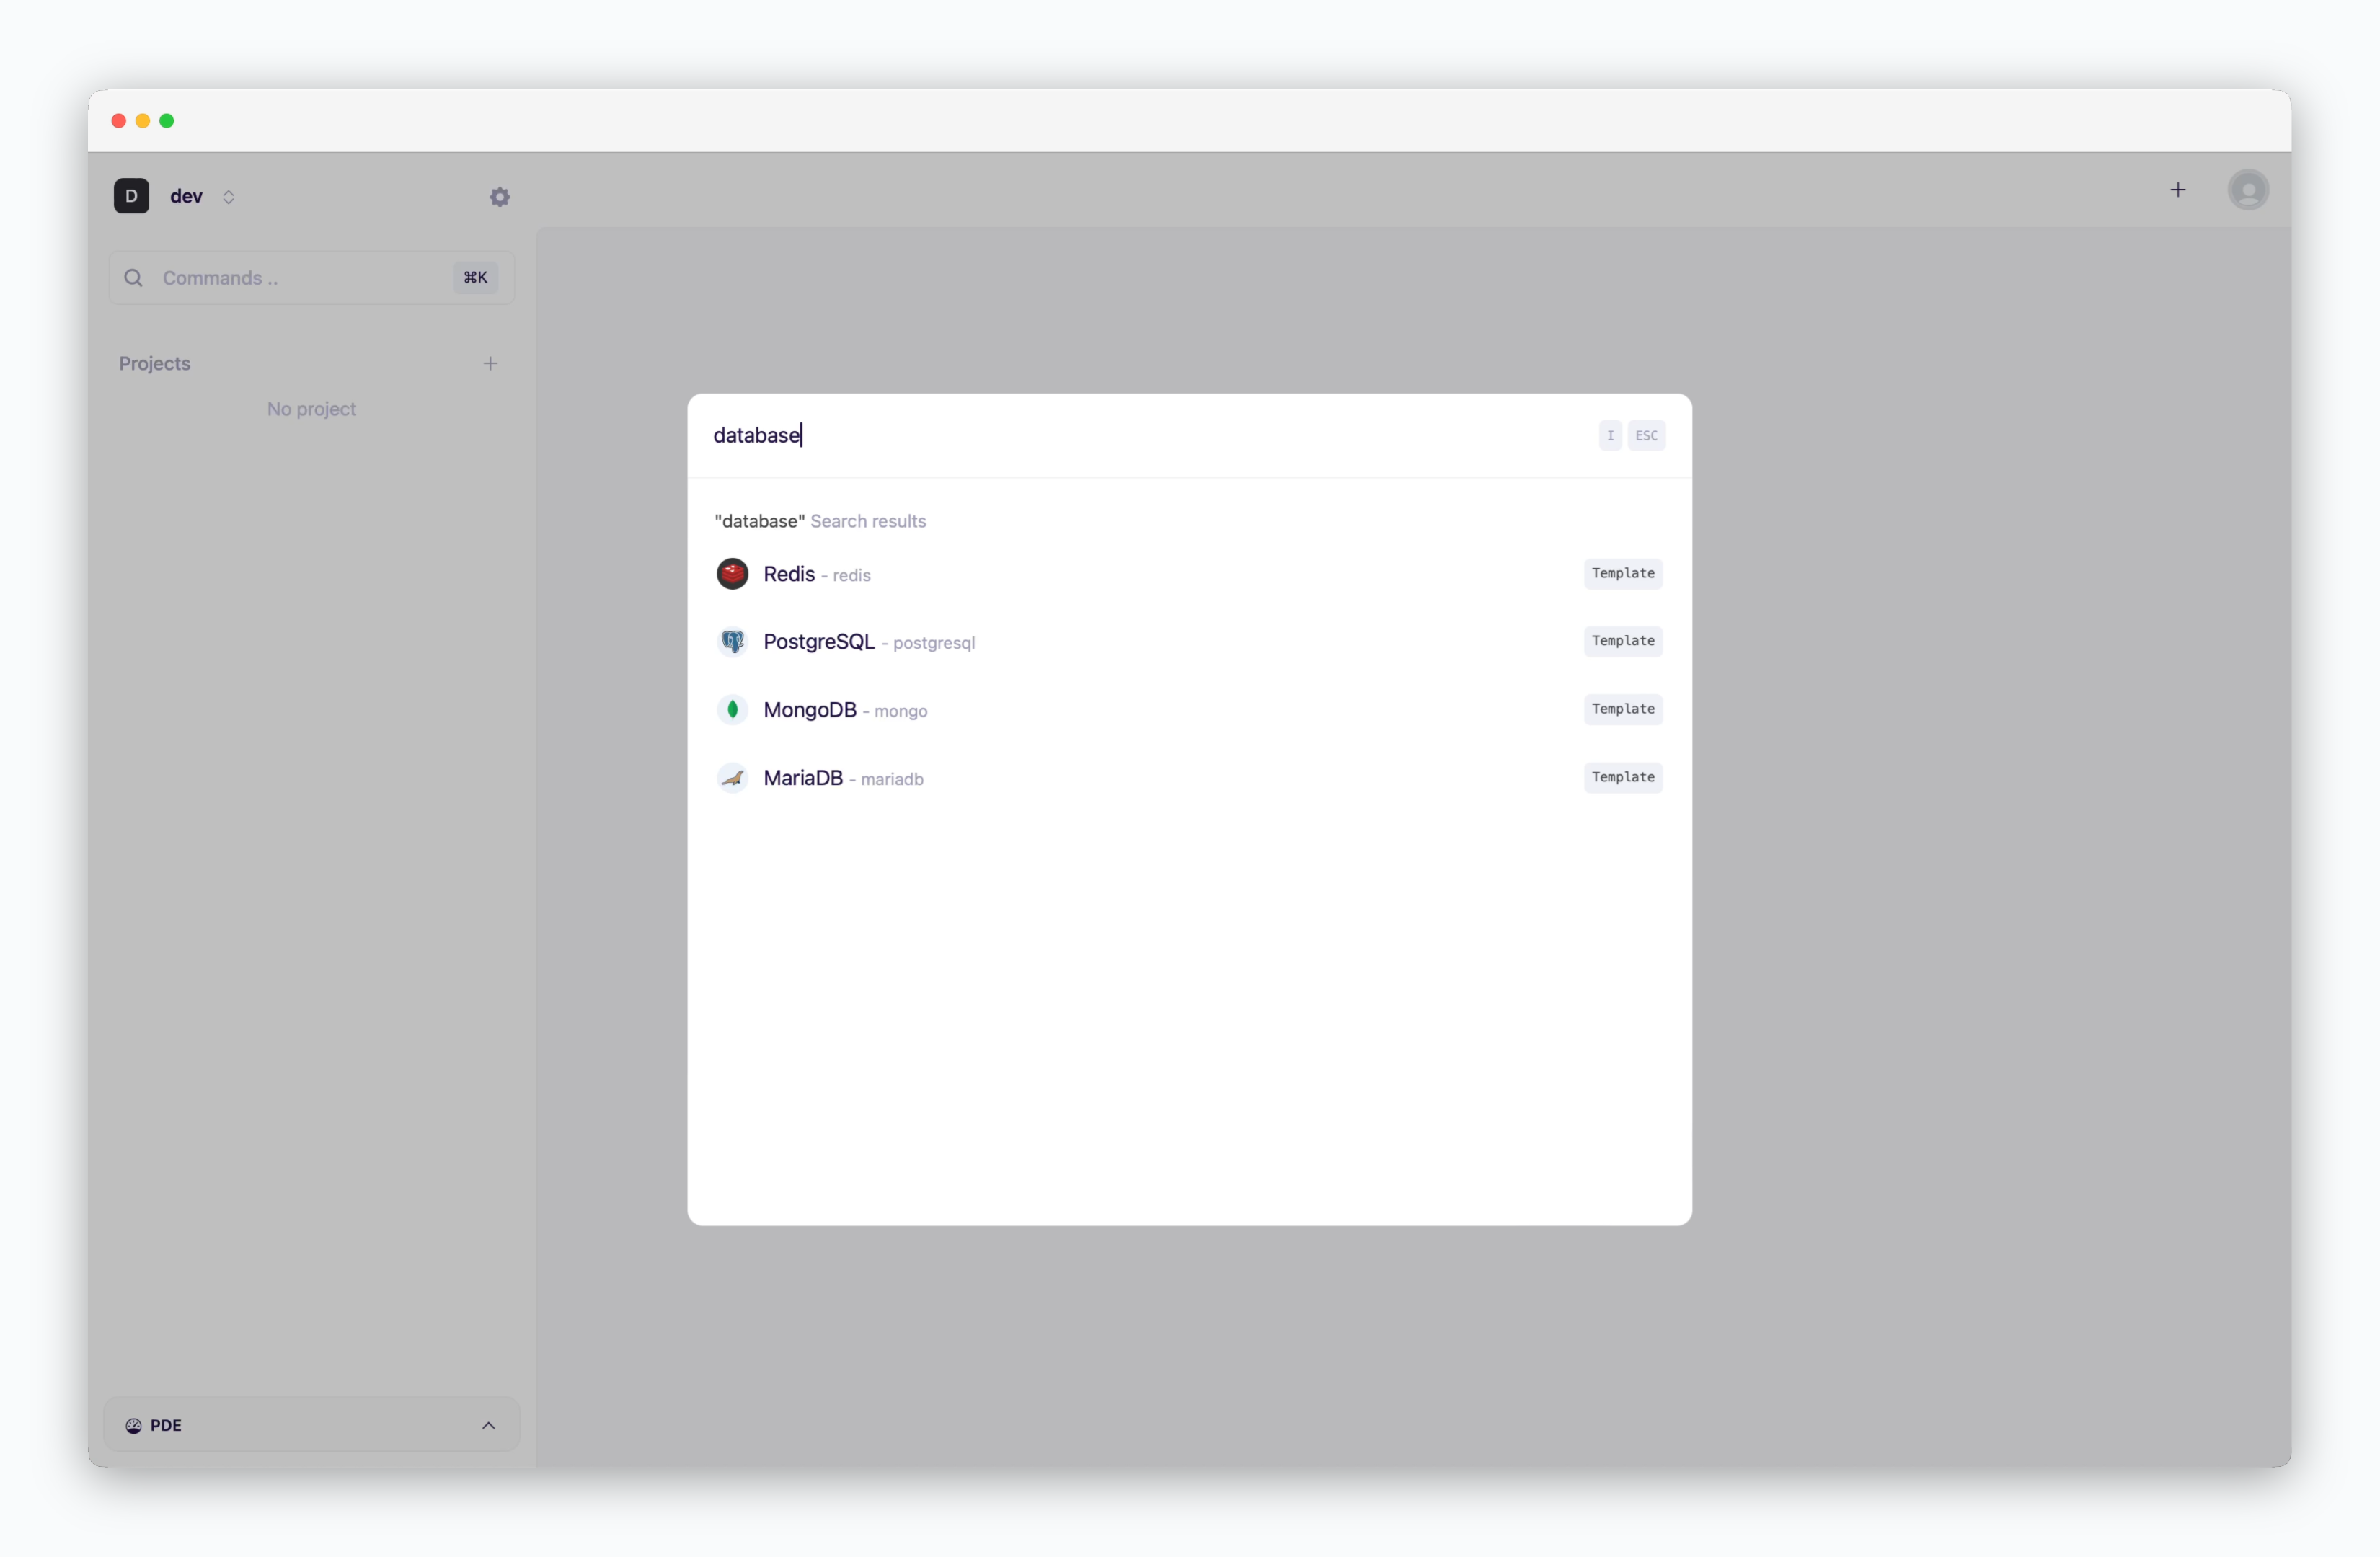 > On the dashboard, click or `⌘ + K` to open the deployment modal. Select the **database** you want to deploy and fill in the configuration fields.
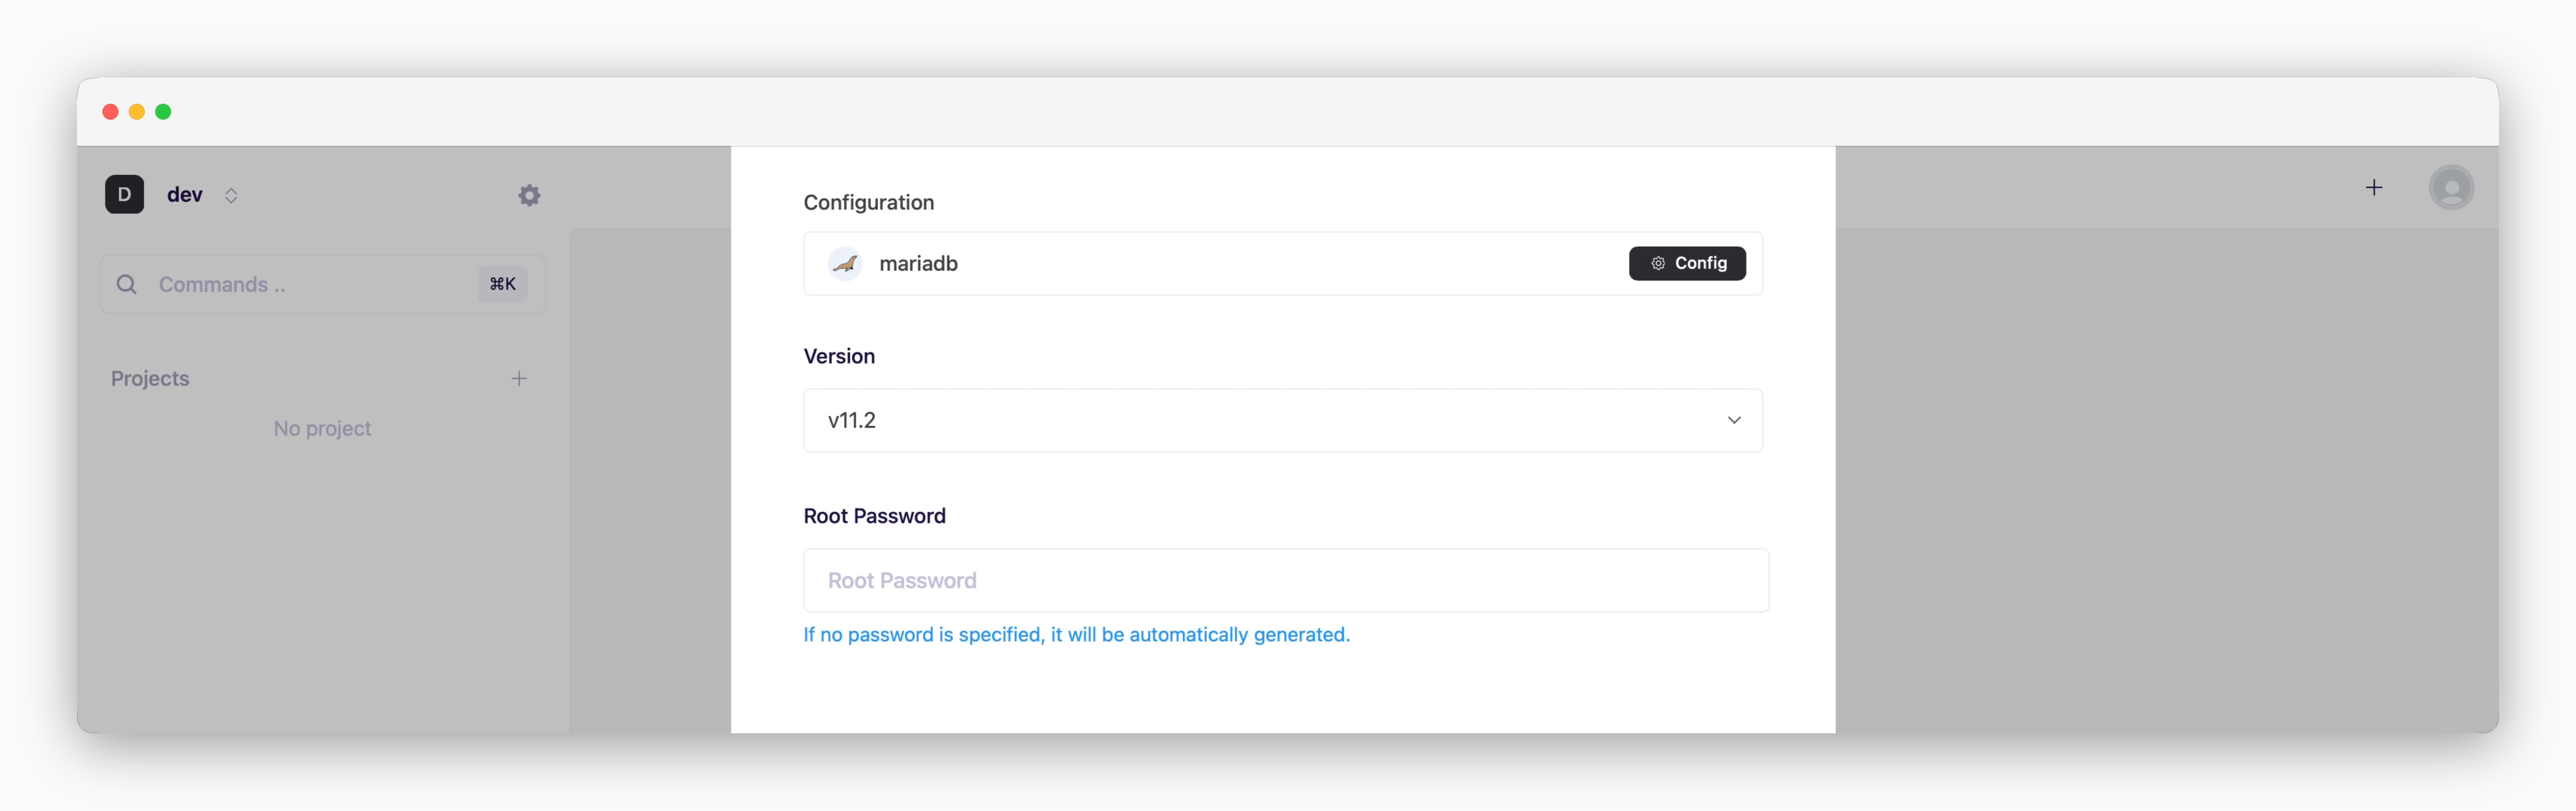 > Specify the version and root password credentials.
Basic Configuration options are **service-specific.** Set the required values based on the deployment requirements.
> Specify the version and root password credentials.
Basic Configuration options are **service-specific.** Set the required values based on the deployment requirements.
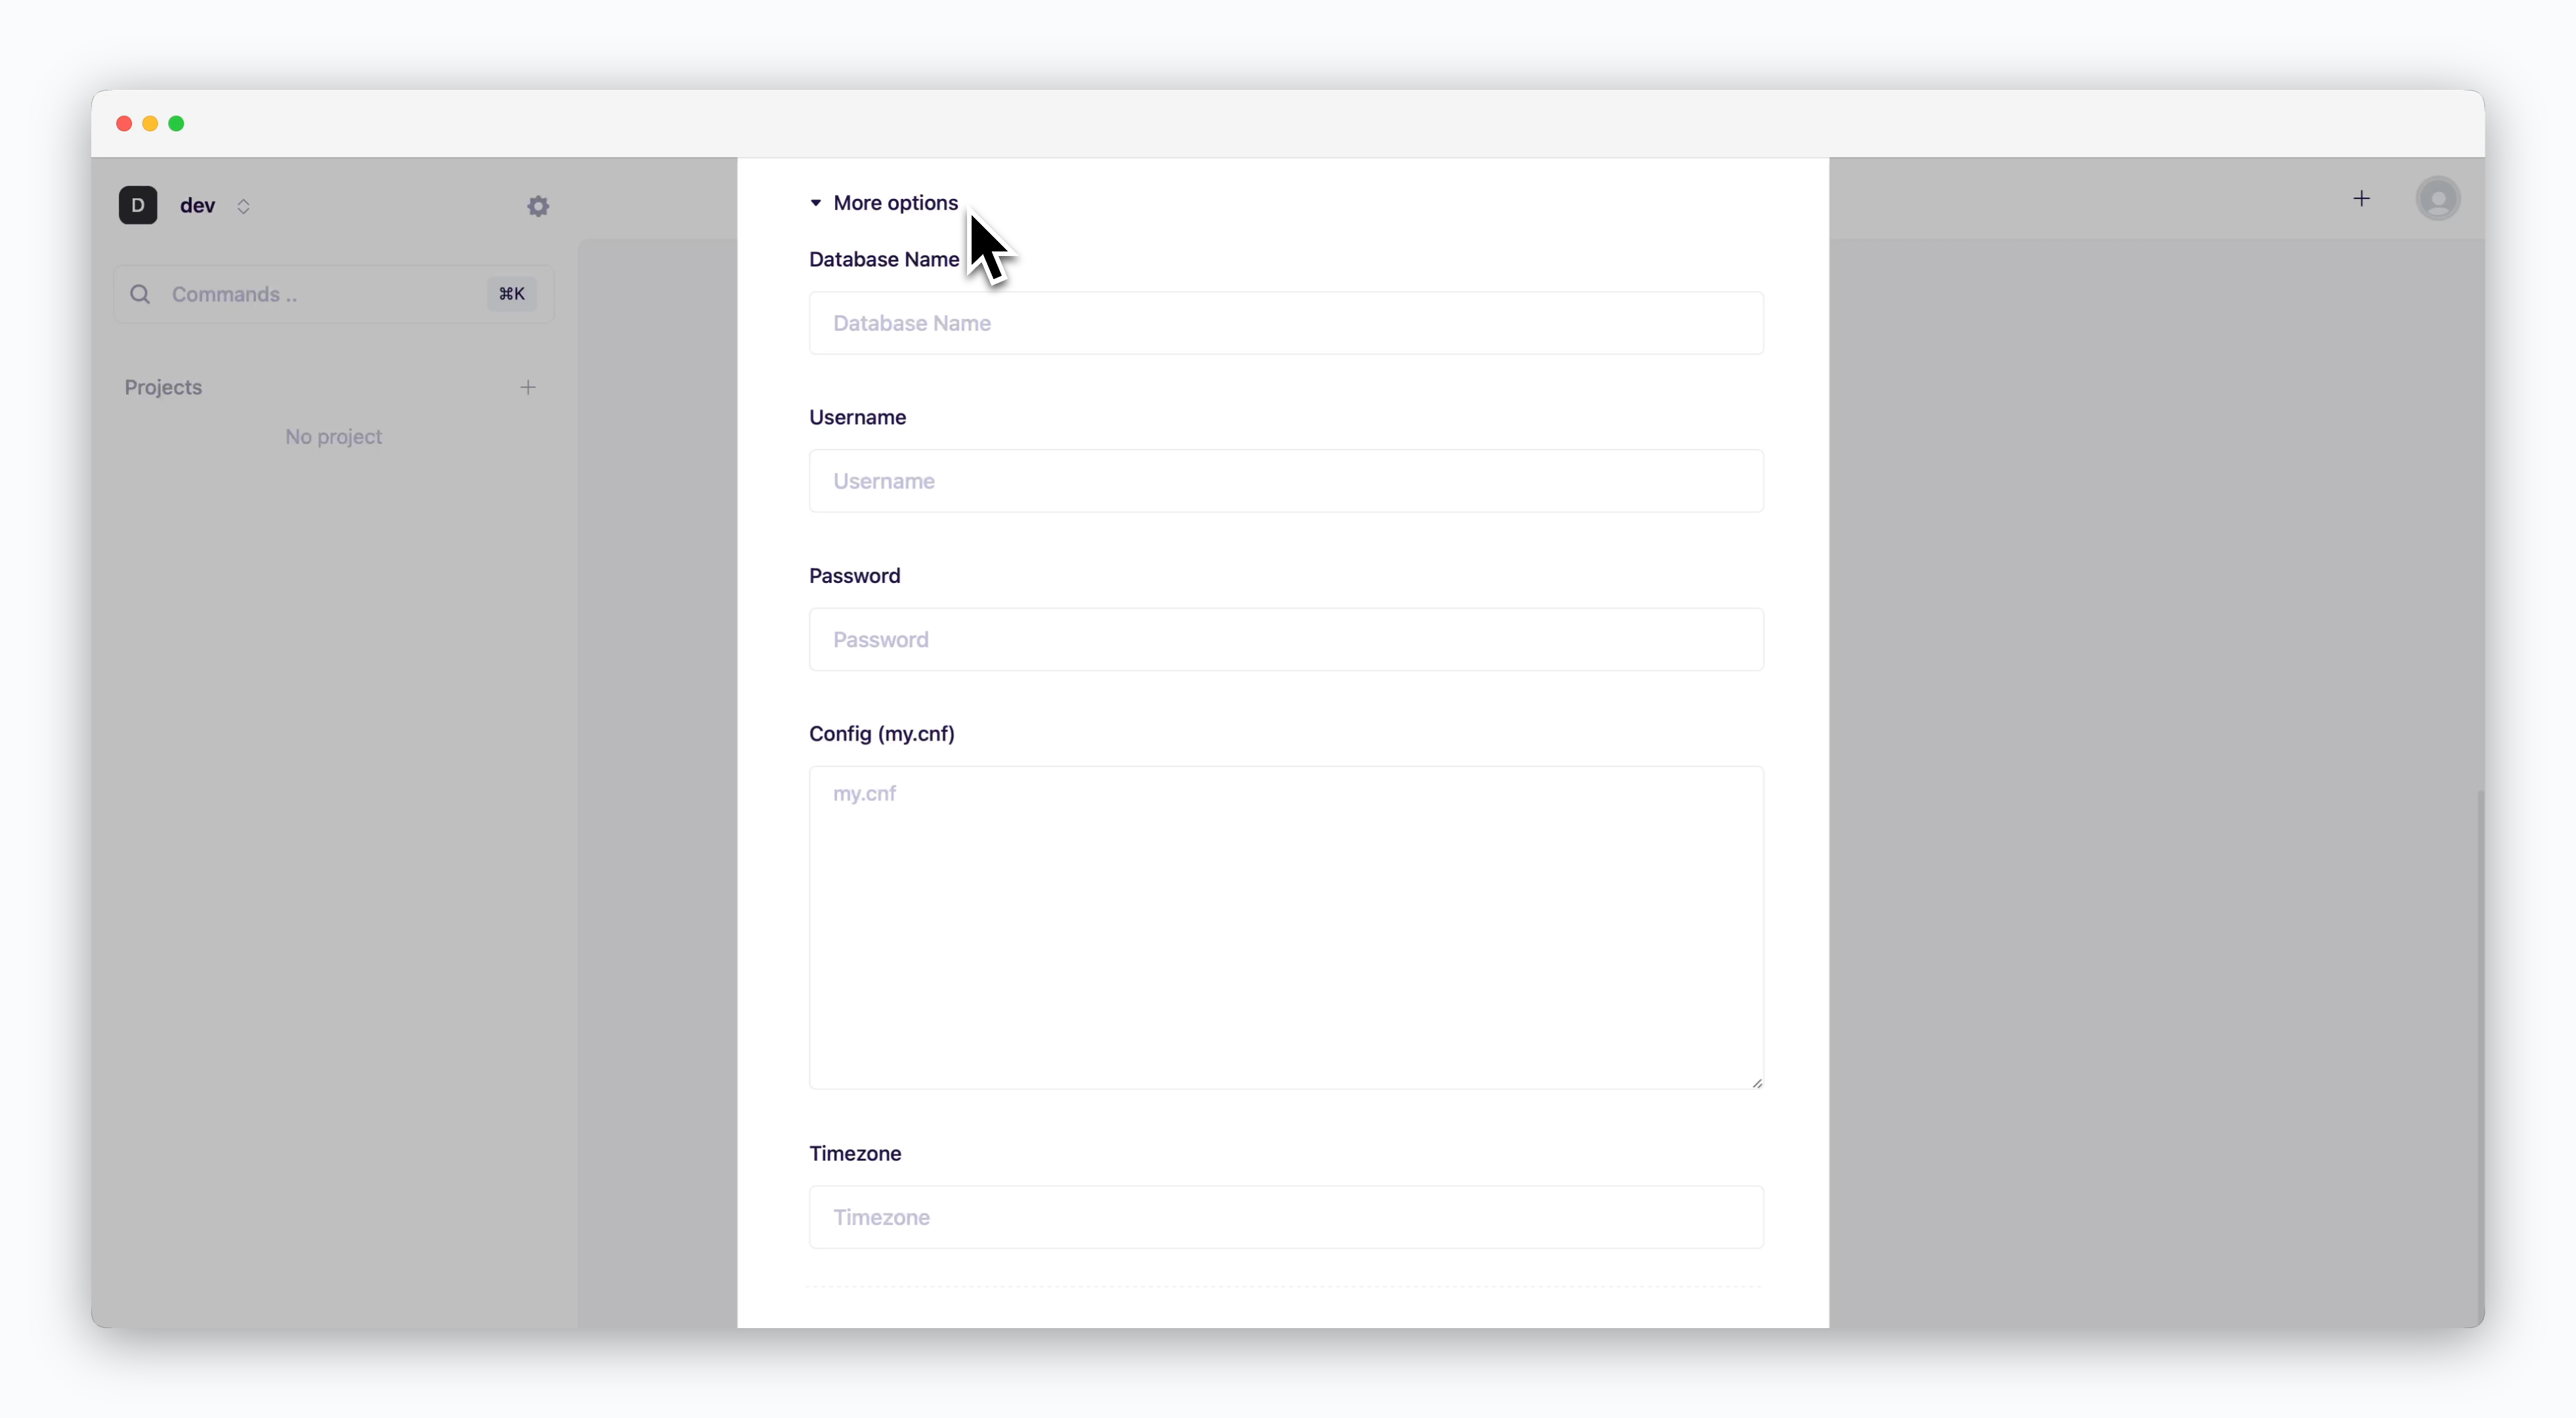 > Set database name, timezone, and service-specific parameters.
**Additional Options are service-specific.** Configure the settings based on the selected database service and deployment requirements.
> Set database name, timezone, and service-specific parameters.
**Additional Options are service-specific.** Configure the settings based on the selected database service and deployment requirements.
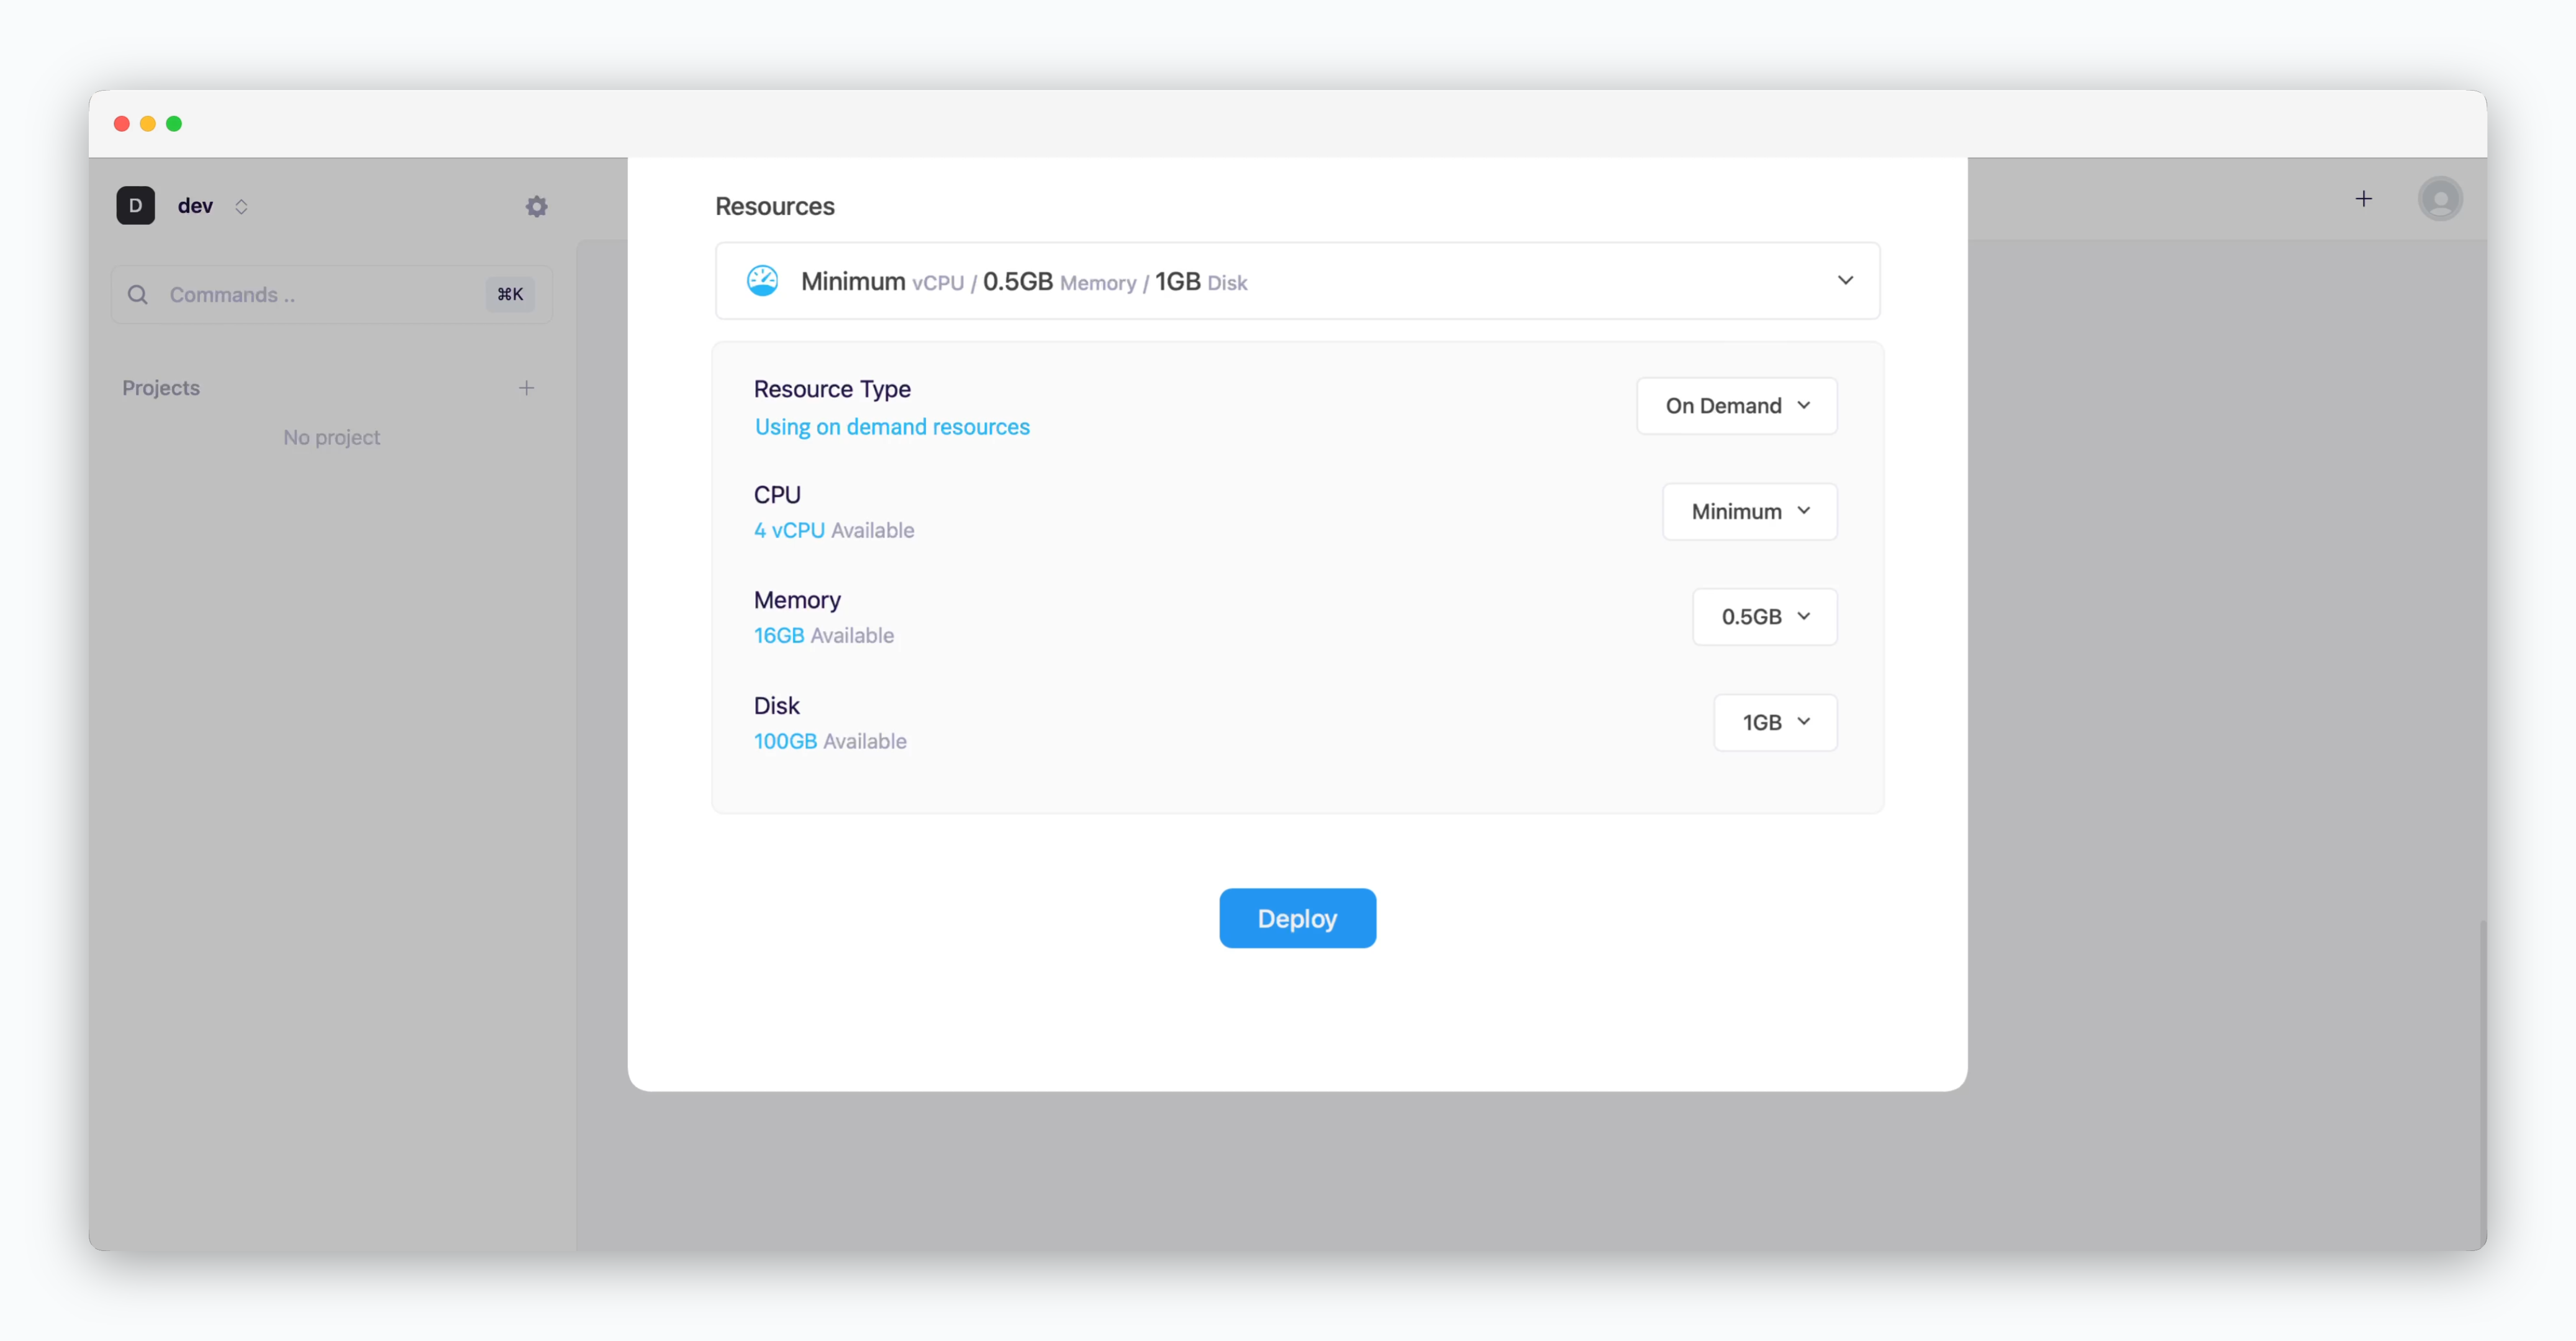 * **Resource Type**: Select between [On-demand or Spot instance types](/en/developers/resource#on-demand-spot)
* **CPU**: Maximum vCPU resource for the service. Minimum vCPU means 0.1 vCPU
* **Memory**: Maximum memory size the service can use
* **Disk**: Database disk capacity
* **Deploy**: Click `Deploy`
If deployment fails due to resource limitations, see the [Space and Resource Management page](/en/operations/spaces#allocate-resources) to add resources to the space.
The auto-generated or previously configured Root Password can be found in the [Secrets section of the Environments Settings.](/en/developers/database#root-password)
## Database Connectivity
* **Resource Type**: Select between [On-demand or Spot instance types](/en/developers/resource#on-demand-spot)
* **CPU**: Maximum vCPU resource for the service. Minimum vCPU means 0.1 vCPU
* **Memory**: Maximum memory size the service can use
* **Disk**: Database disk capacity
* **Deploy**: Click `Deploy`
If deployment fails due to resource limitations, see the [Space and Resource Management page](/en/operations/spaces#allocate-resources) to add resources to the space.
The auto-generated or previously configured Root Password can be found in the [Secrets section of the Environments Settings.](/en/developers/database#root-password)
## Database Connectivity
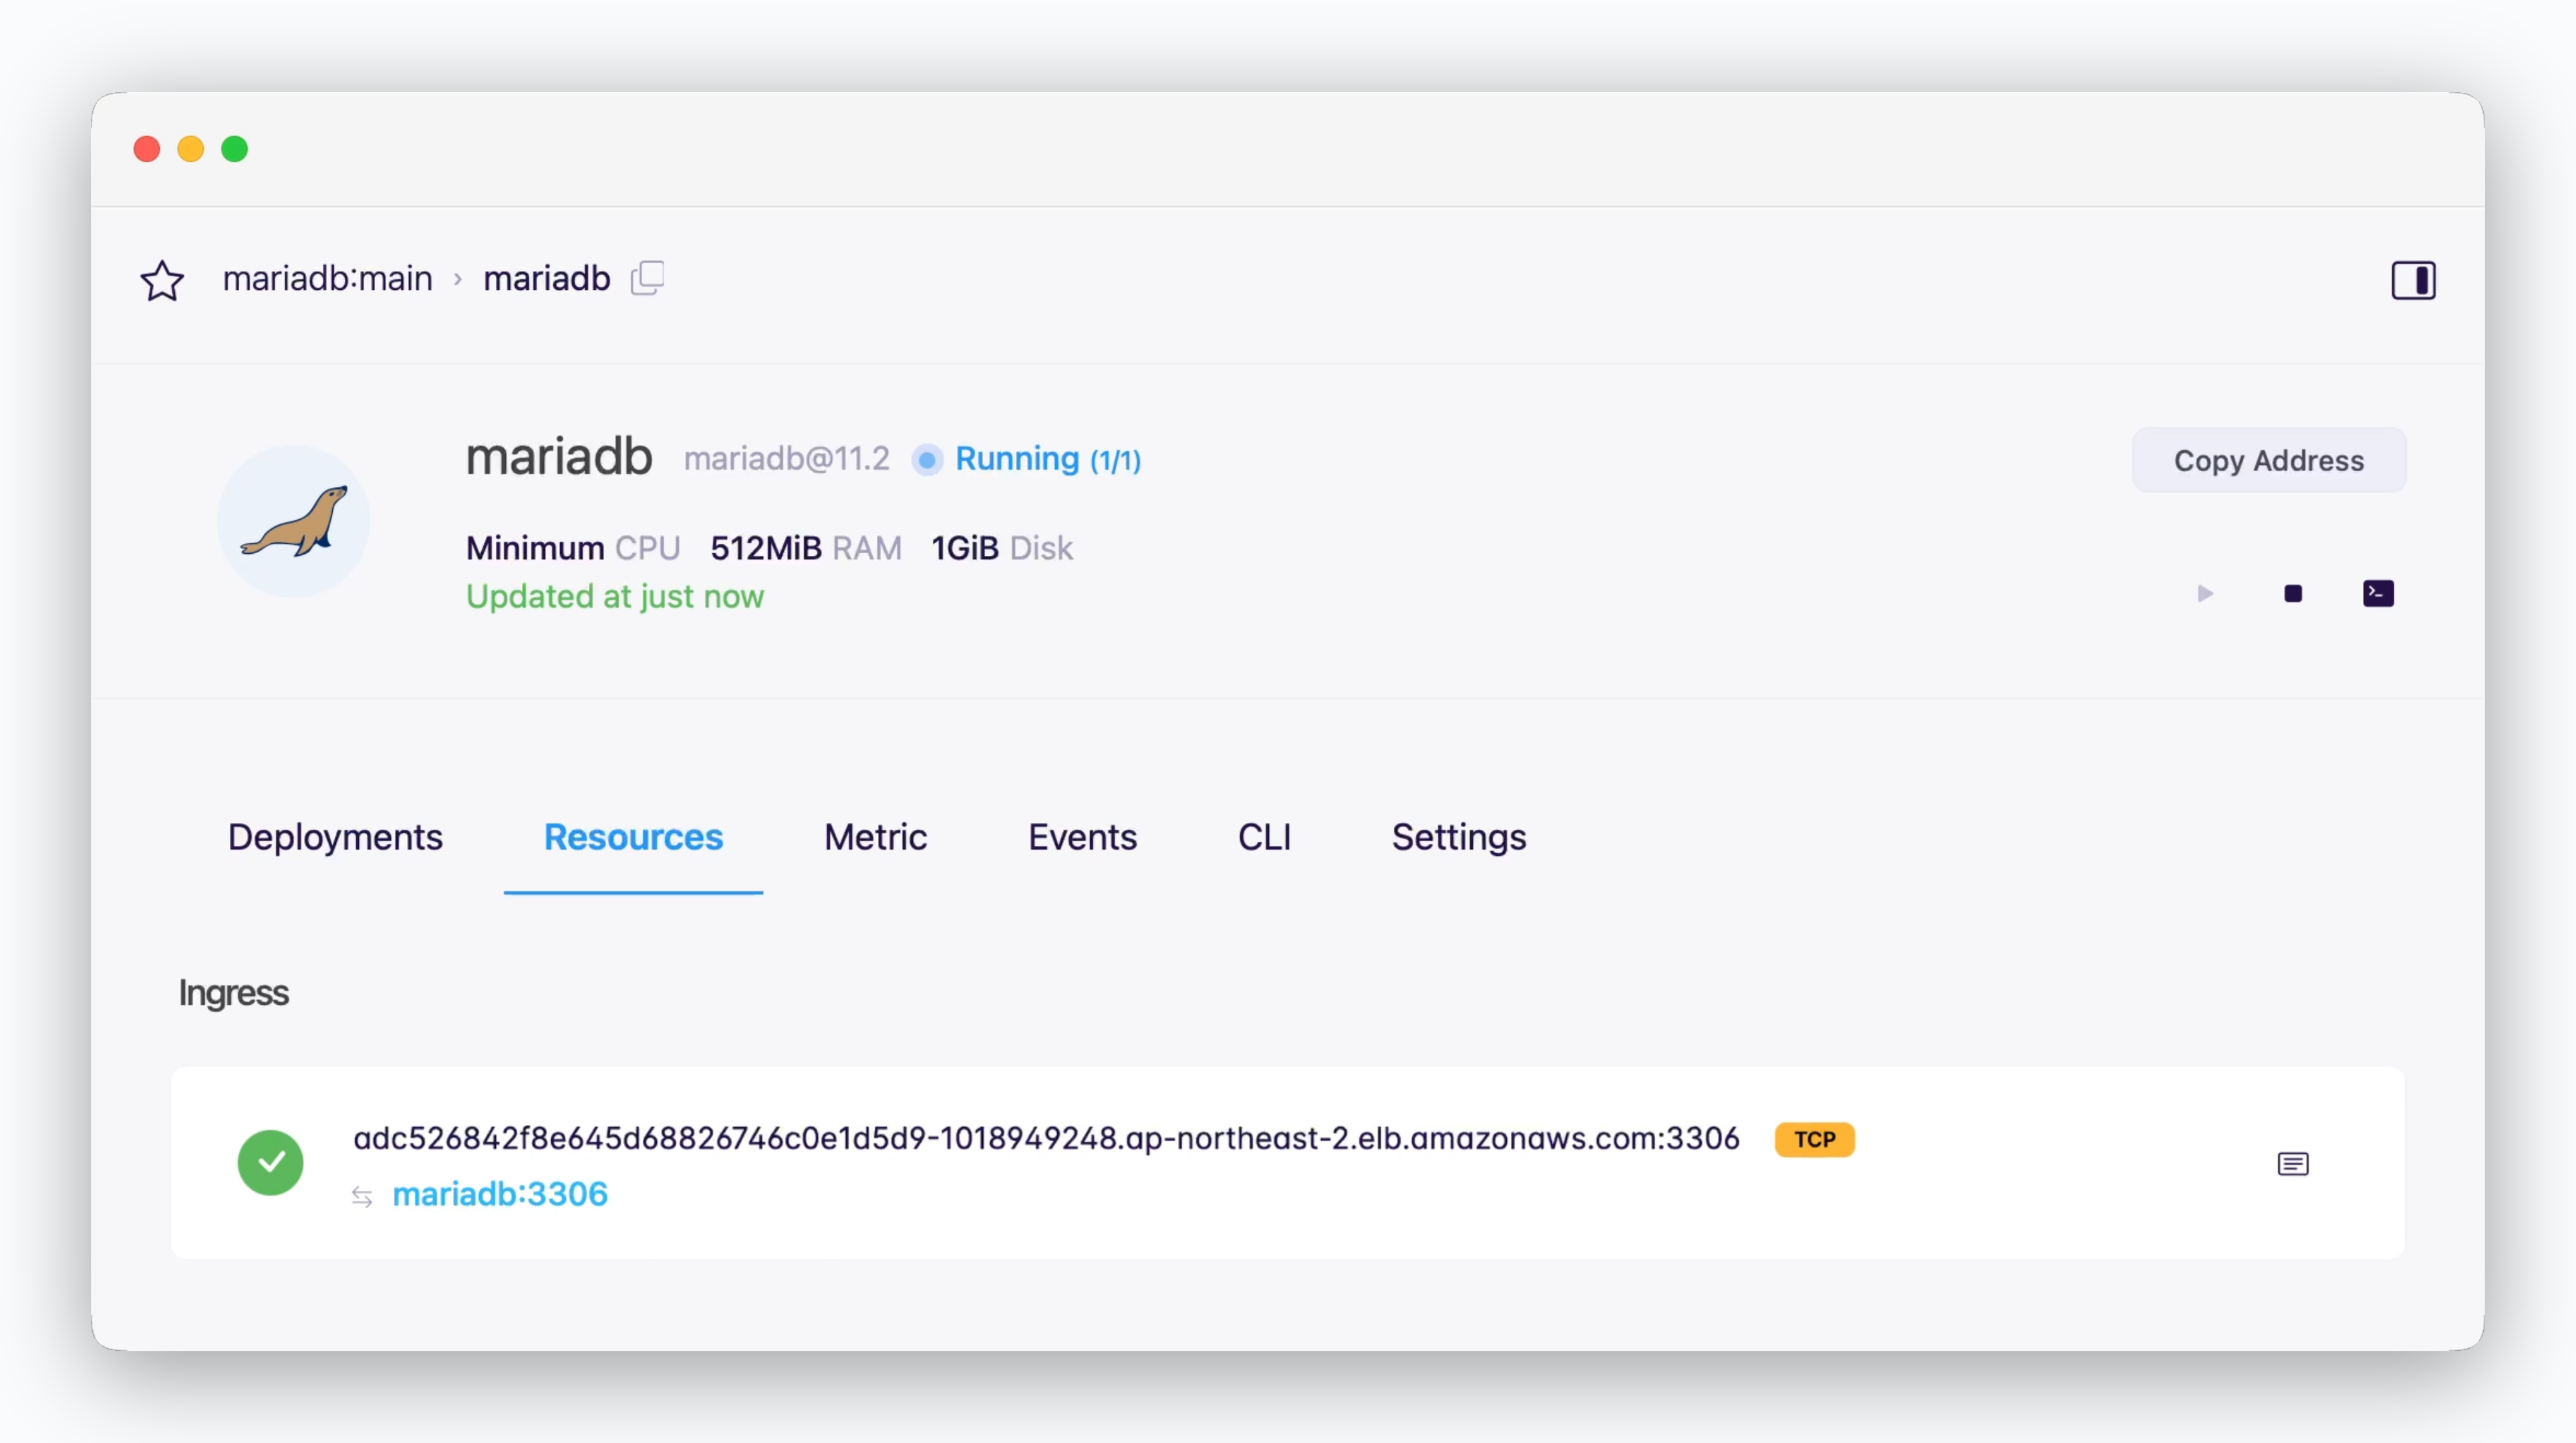
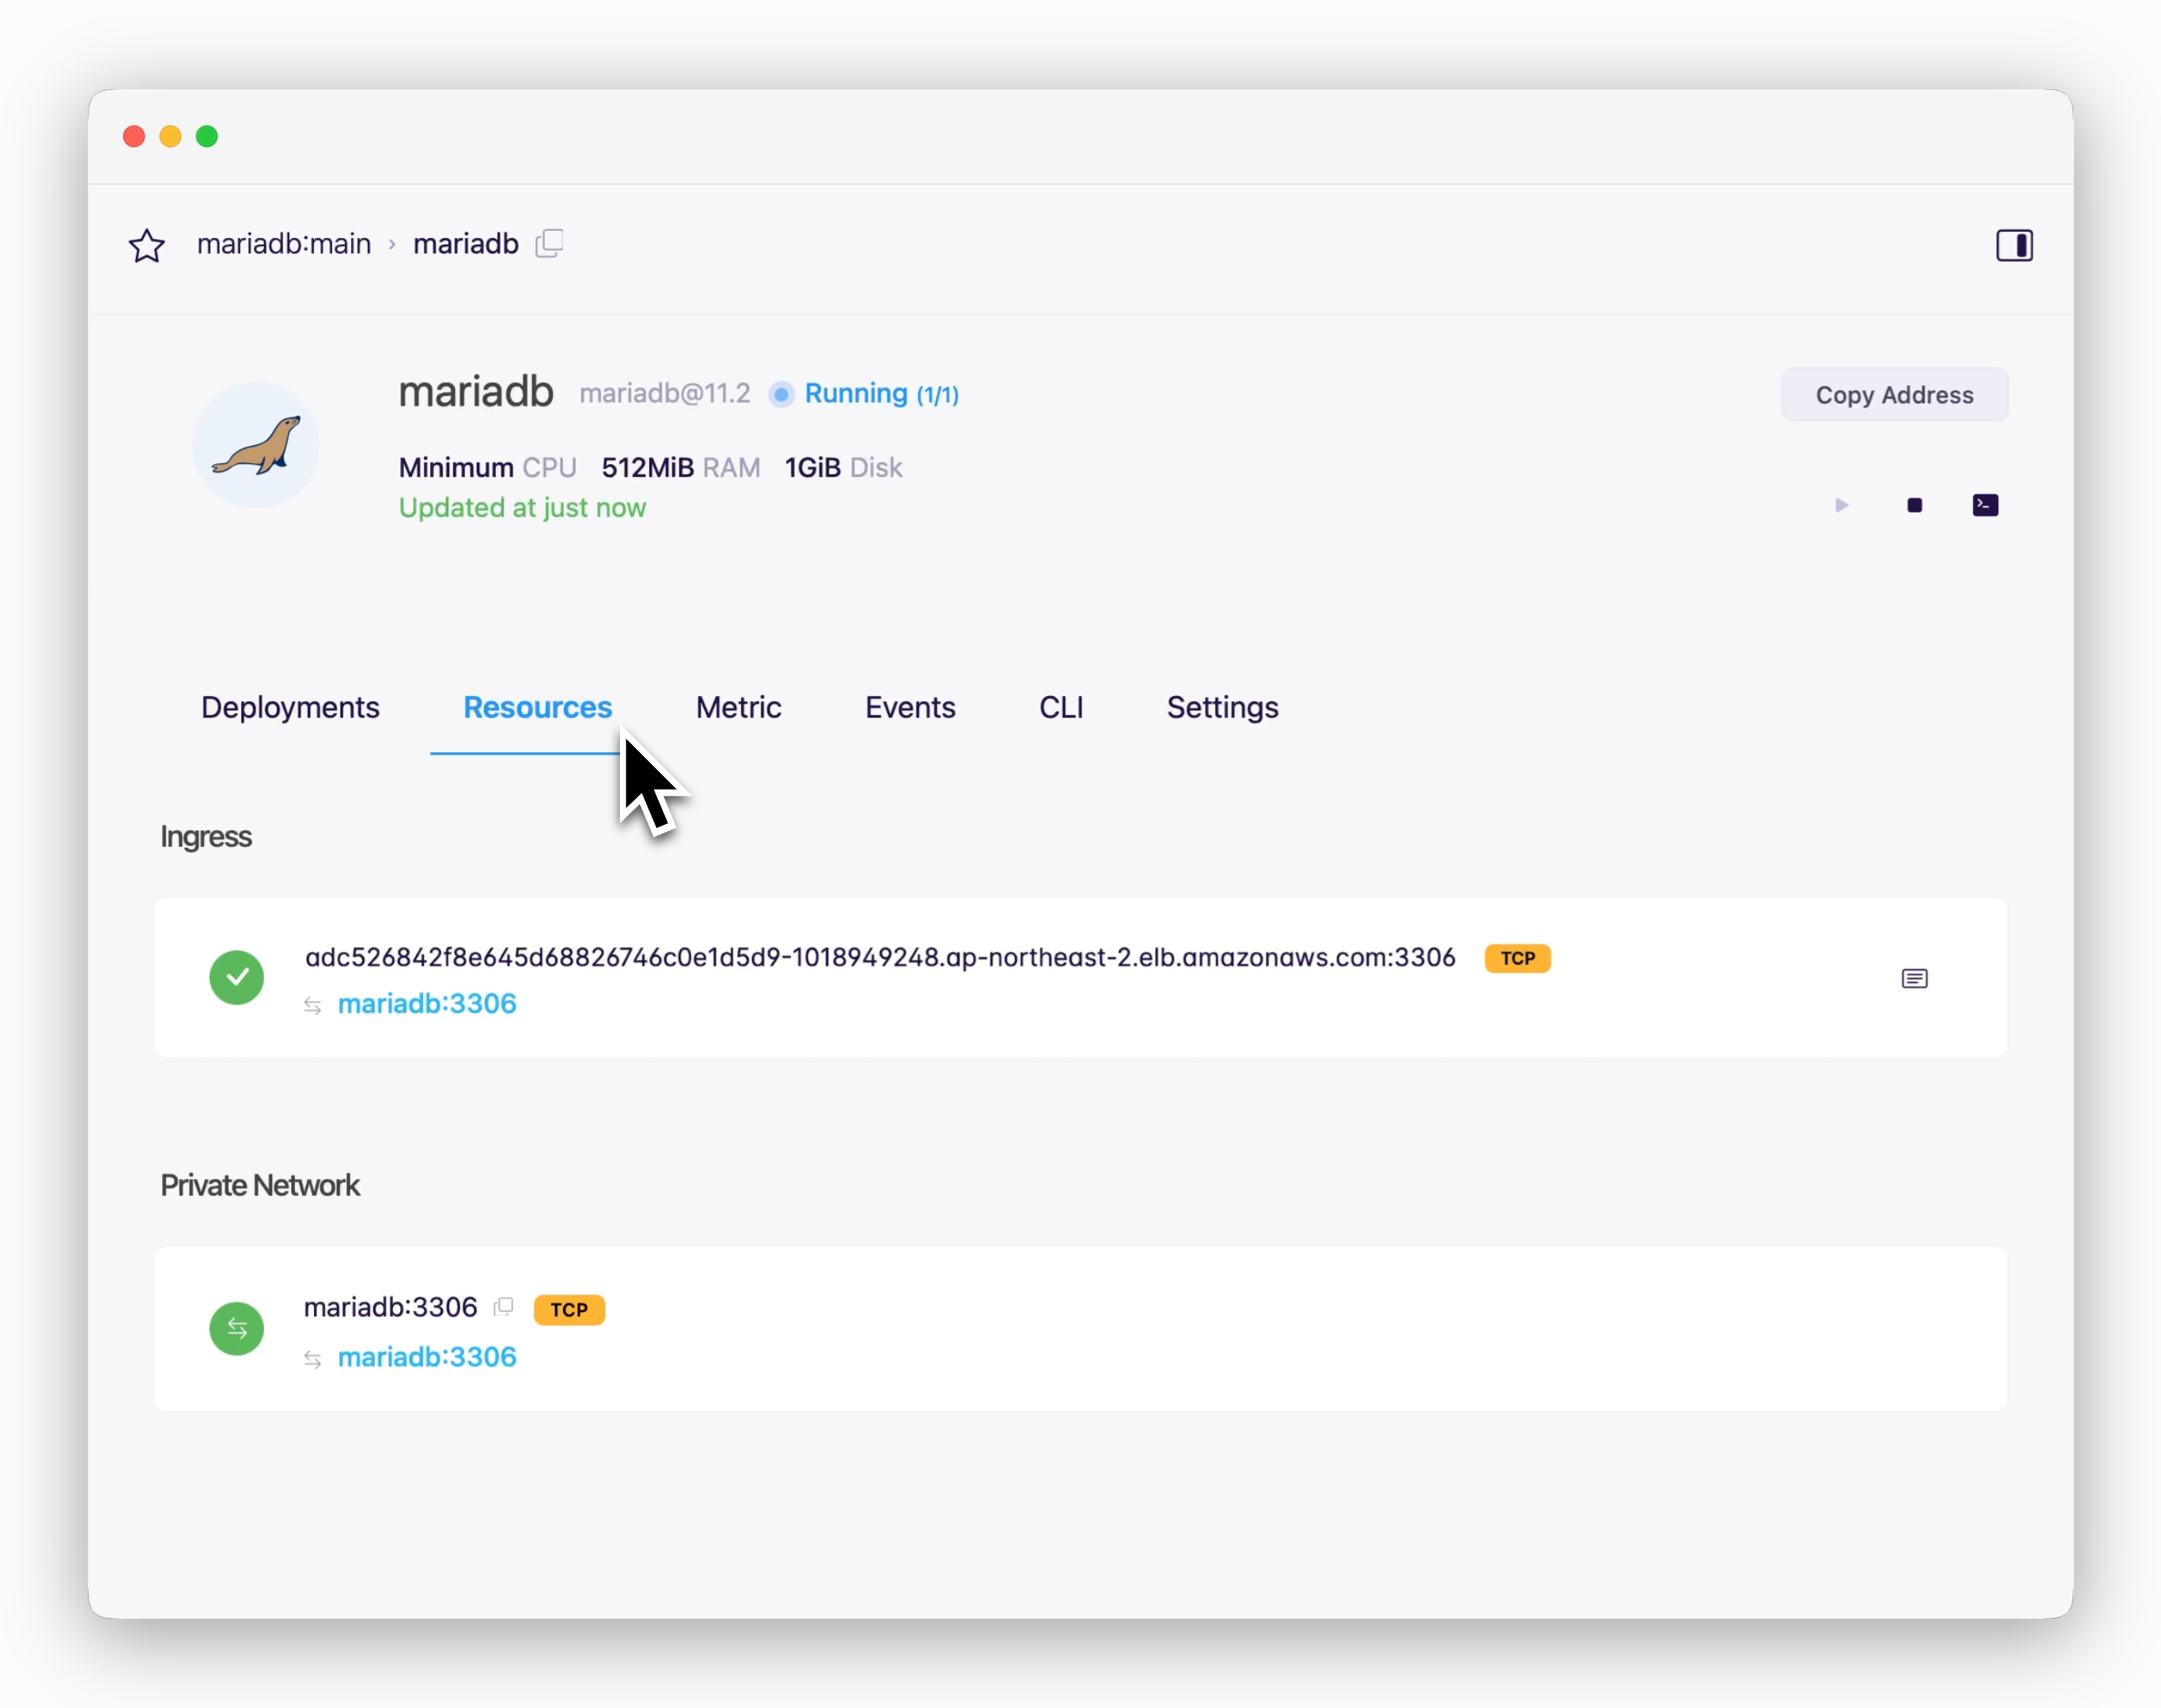 > **the connection info (hostname: port)** is in the resources tab of the service page.
### Internal Services
> **the connection info (hostname: port)** is in the resources tab of the service page.
### Internal Services
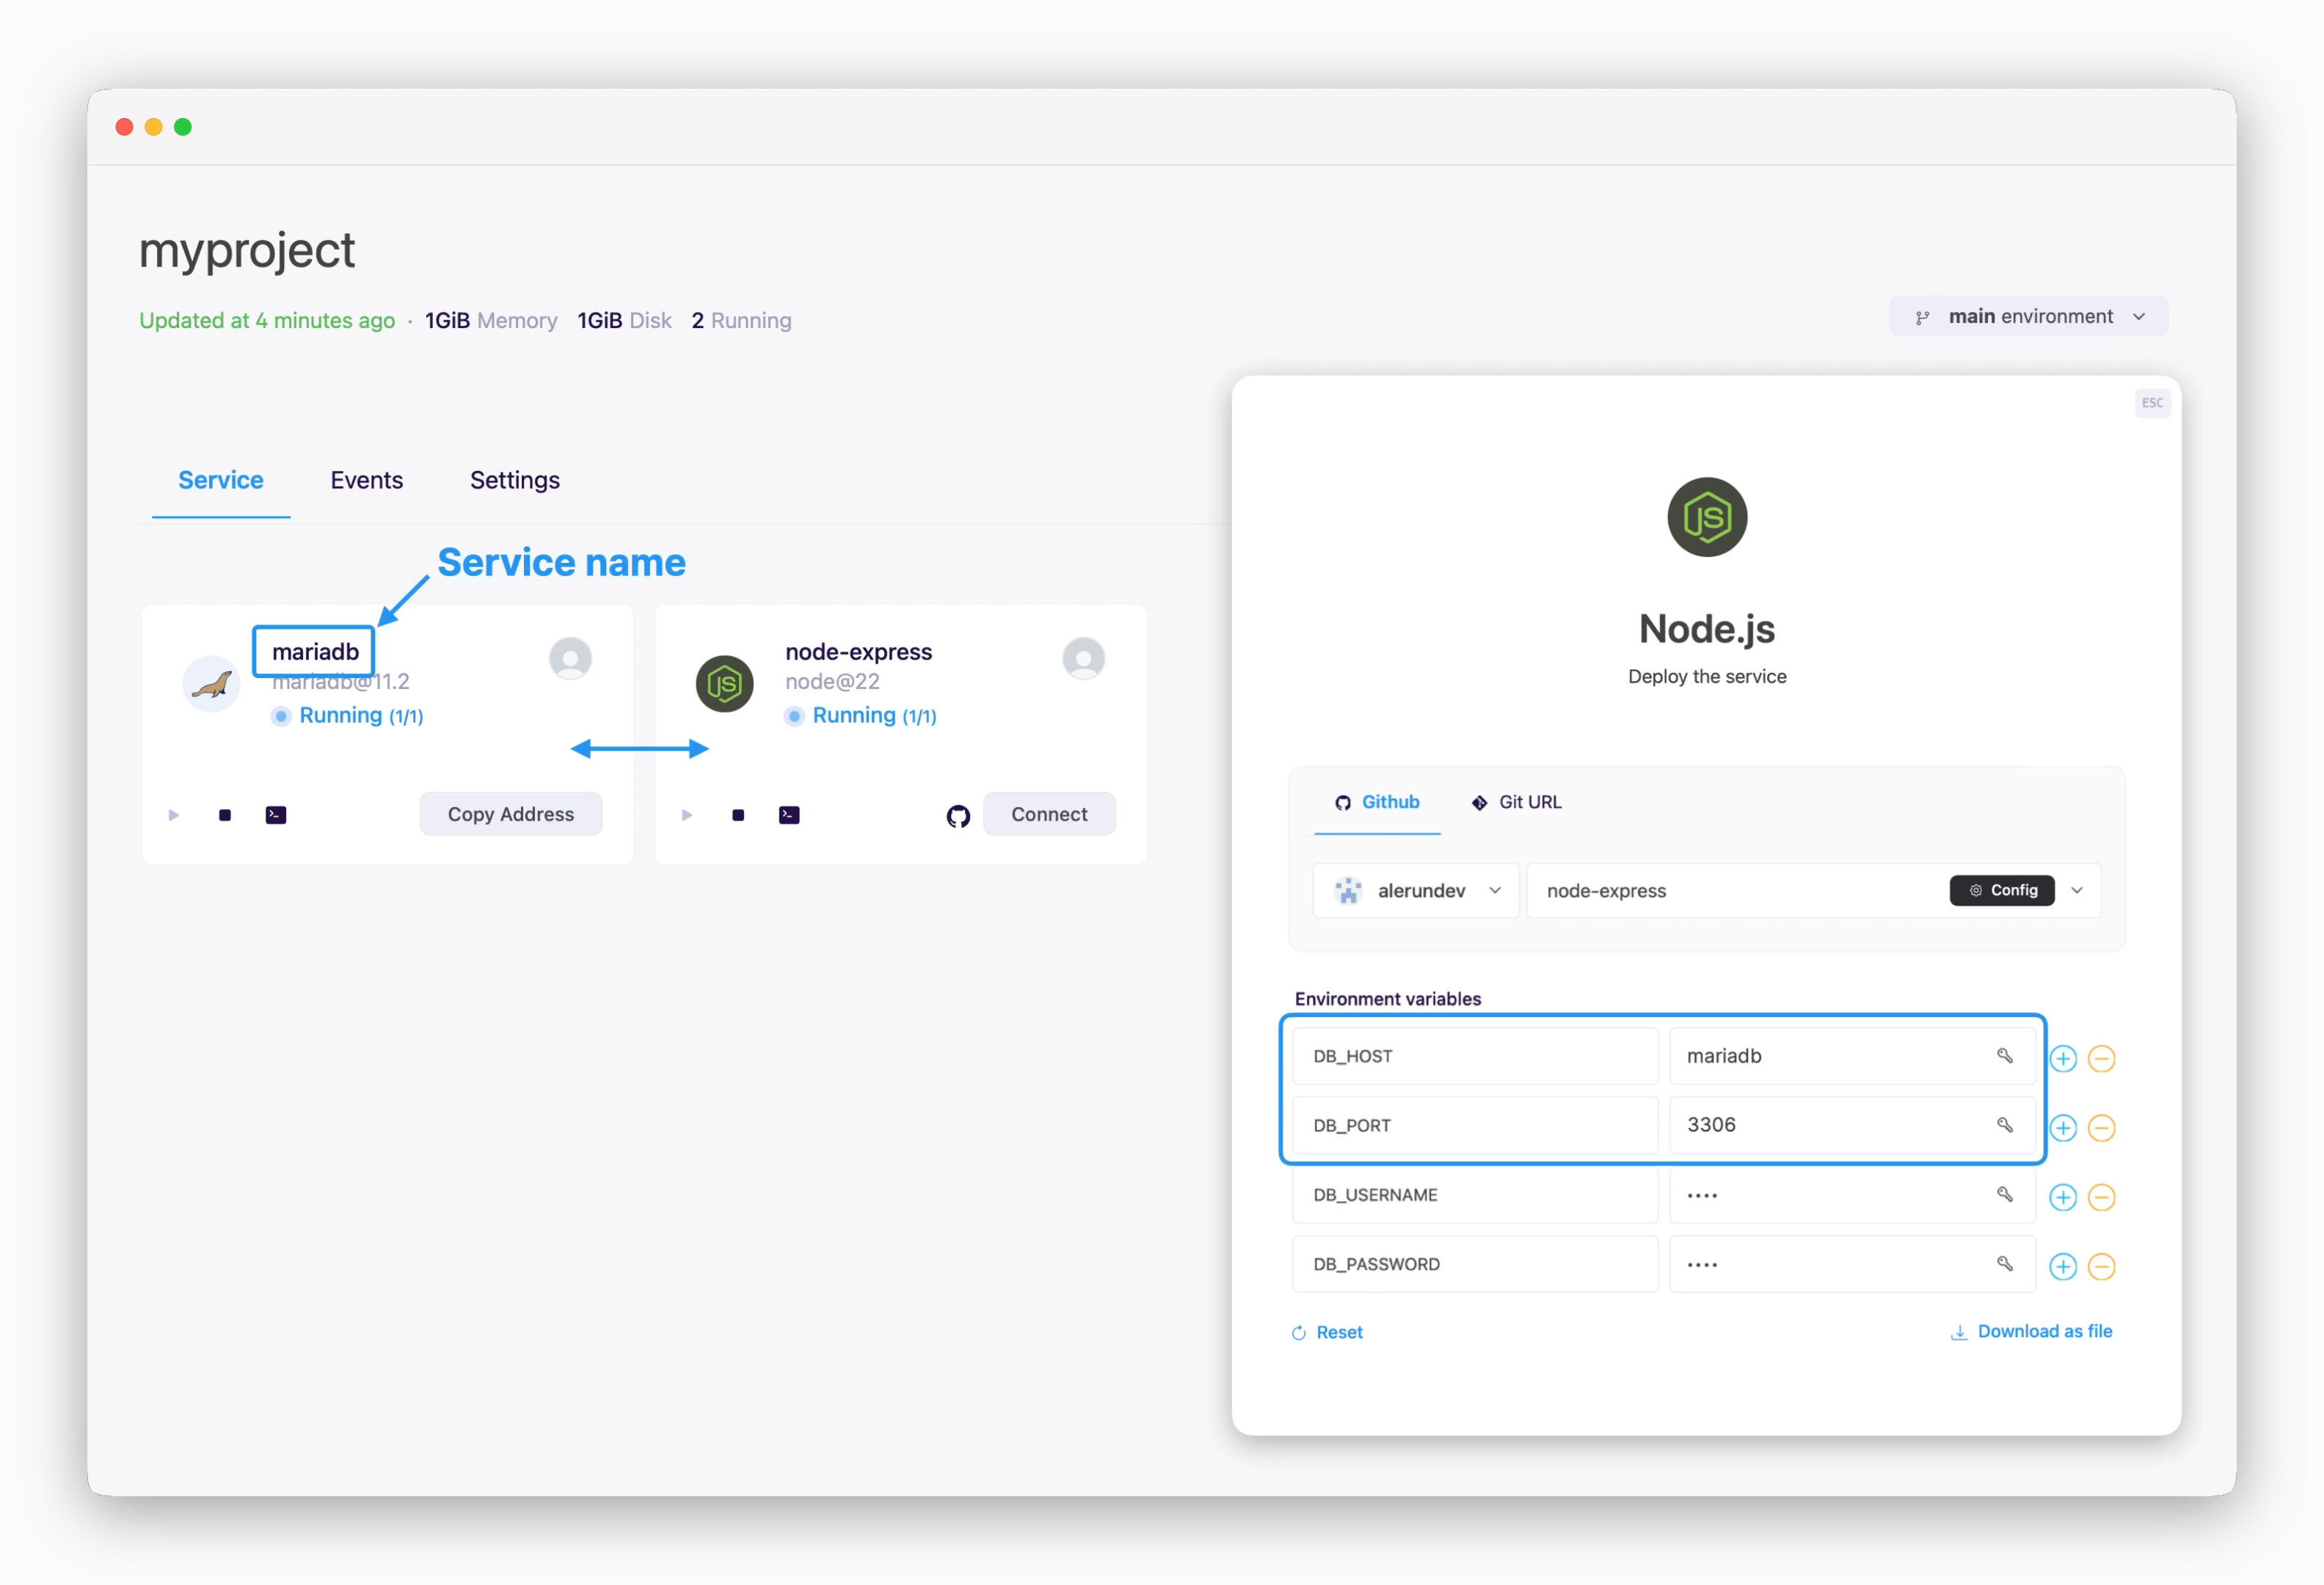 > Services displayed on the same screen can communicate using the private network address, **service name and port number.**
Services shown together belong to the same environment (namespace). Since each environment is isolated within its own network, there's no need for firewall rules, minimizing communication latency.
For more details on ale's workspace structure, see the [Environments page.](/en/developers/environment)
### External and Cross-env Services
> Services displayed on the same screen can communicate using the private network address, **service name and port number.**
Services shown together belong to the same environment (namespace). Since each environment is isolated within its own network, there's no need for firewall rules, minimizing communication latency.
For more details on ale's workspace structure, see the [Environments page.](/en/developers/environment)
### External and Cross-env Services
 > Services can connect to services in other environments or external systems using the ingress address (hostname:port).
> In this case, as shown below, you'll need to **allow external connections** in the Settings tab of the environment where the database is deployed.
> Services can connect to services in other environments or external systems using the ingress address (hostname:port).
> In this case, as shown below, you'll need to **allow external connections** in the Settings tab of the environment where the database is deployed.
 > You can allow TCP external connections in the settings tab of the environment where the database you want to connect to is located.
TCP external access is configured at the environment level and affects all services within that environment. This setting cannot be configured for individual services.
### Database Client Tools
> You can use [the ingress address](/en/developers/database#external-and-cross-env-services) to connect to your database from DB client tools via TCP.
> You can allow TCP external connections in the settings tab of the environment where the database you want to connect to is located.
TCP external access is configured at the environment level and affects all services within that environment. This setting cannot be configured for individual services.
### Database Client Tools
> You can use [the ingress address](/en/developers/database#external-and-cross-env-services) to connect to your database from DB client tools via TCP.
 > Enter the ingress address, then in the next screen, enter [the Root Password](/en/developers/database#root-password) you set during deployment.
[MySQL Workbench Download](https://dev.mysql.com/downloads/workbench/)
> Enter the ingress address, then in the next screen, enter [the Root Password](/en/developers/database#root-password) you set during deployment.
[MySQL Workbench Download](https://dev.mysql.com/downloads/workbench/)
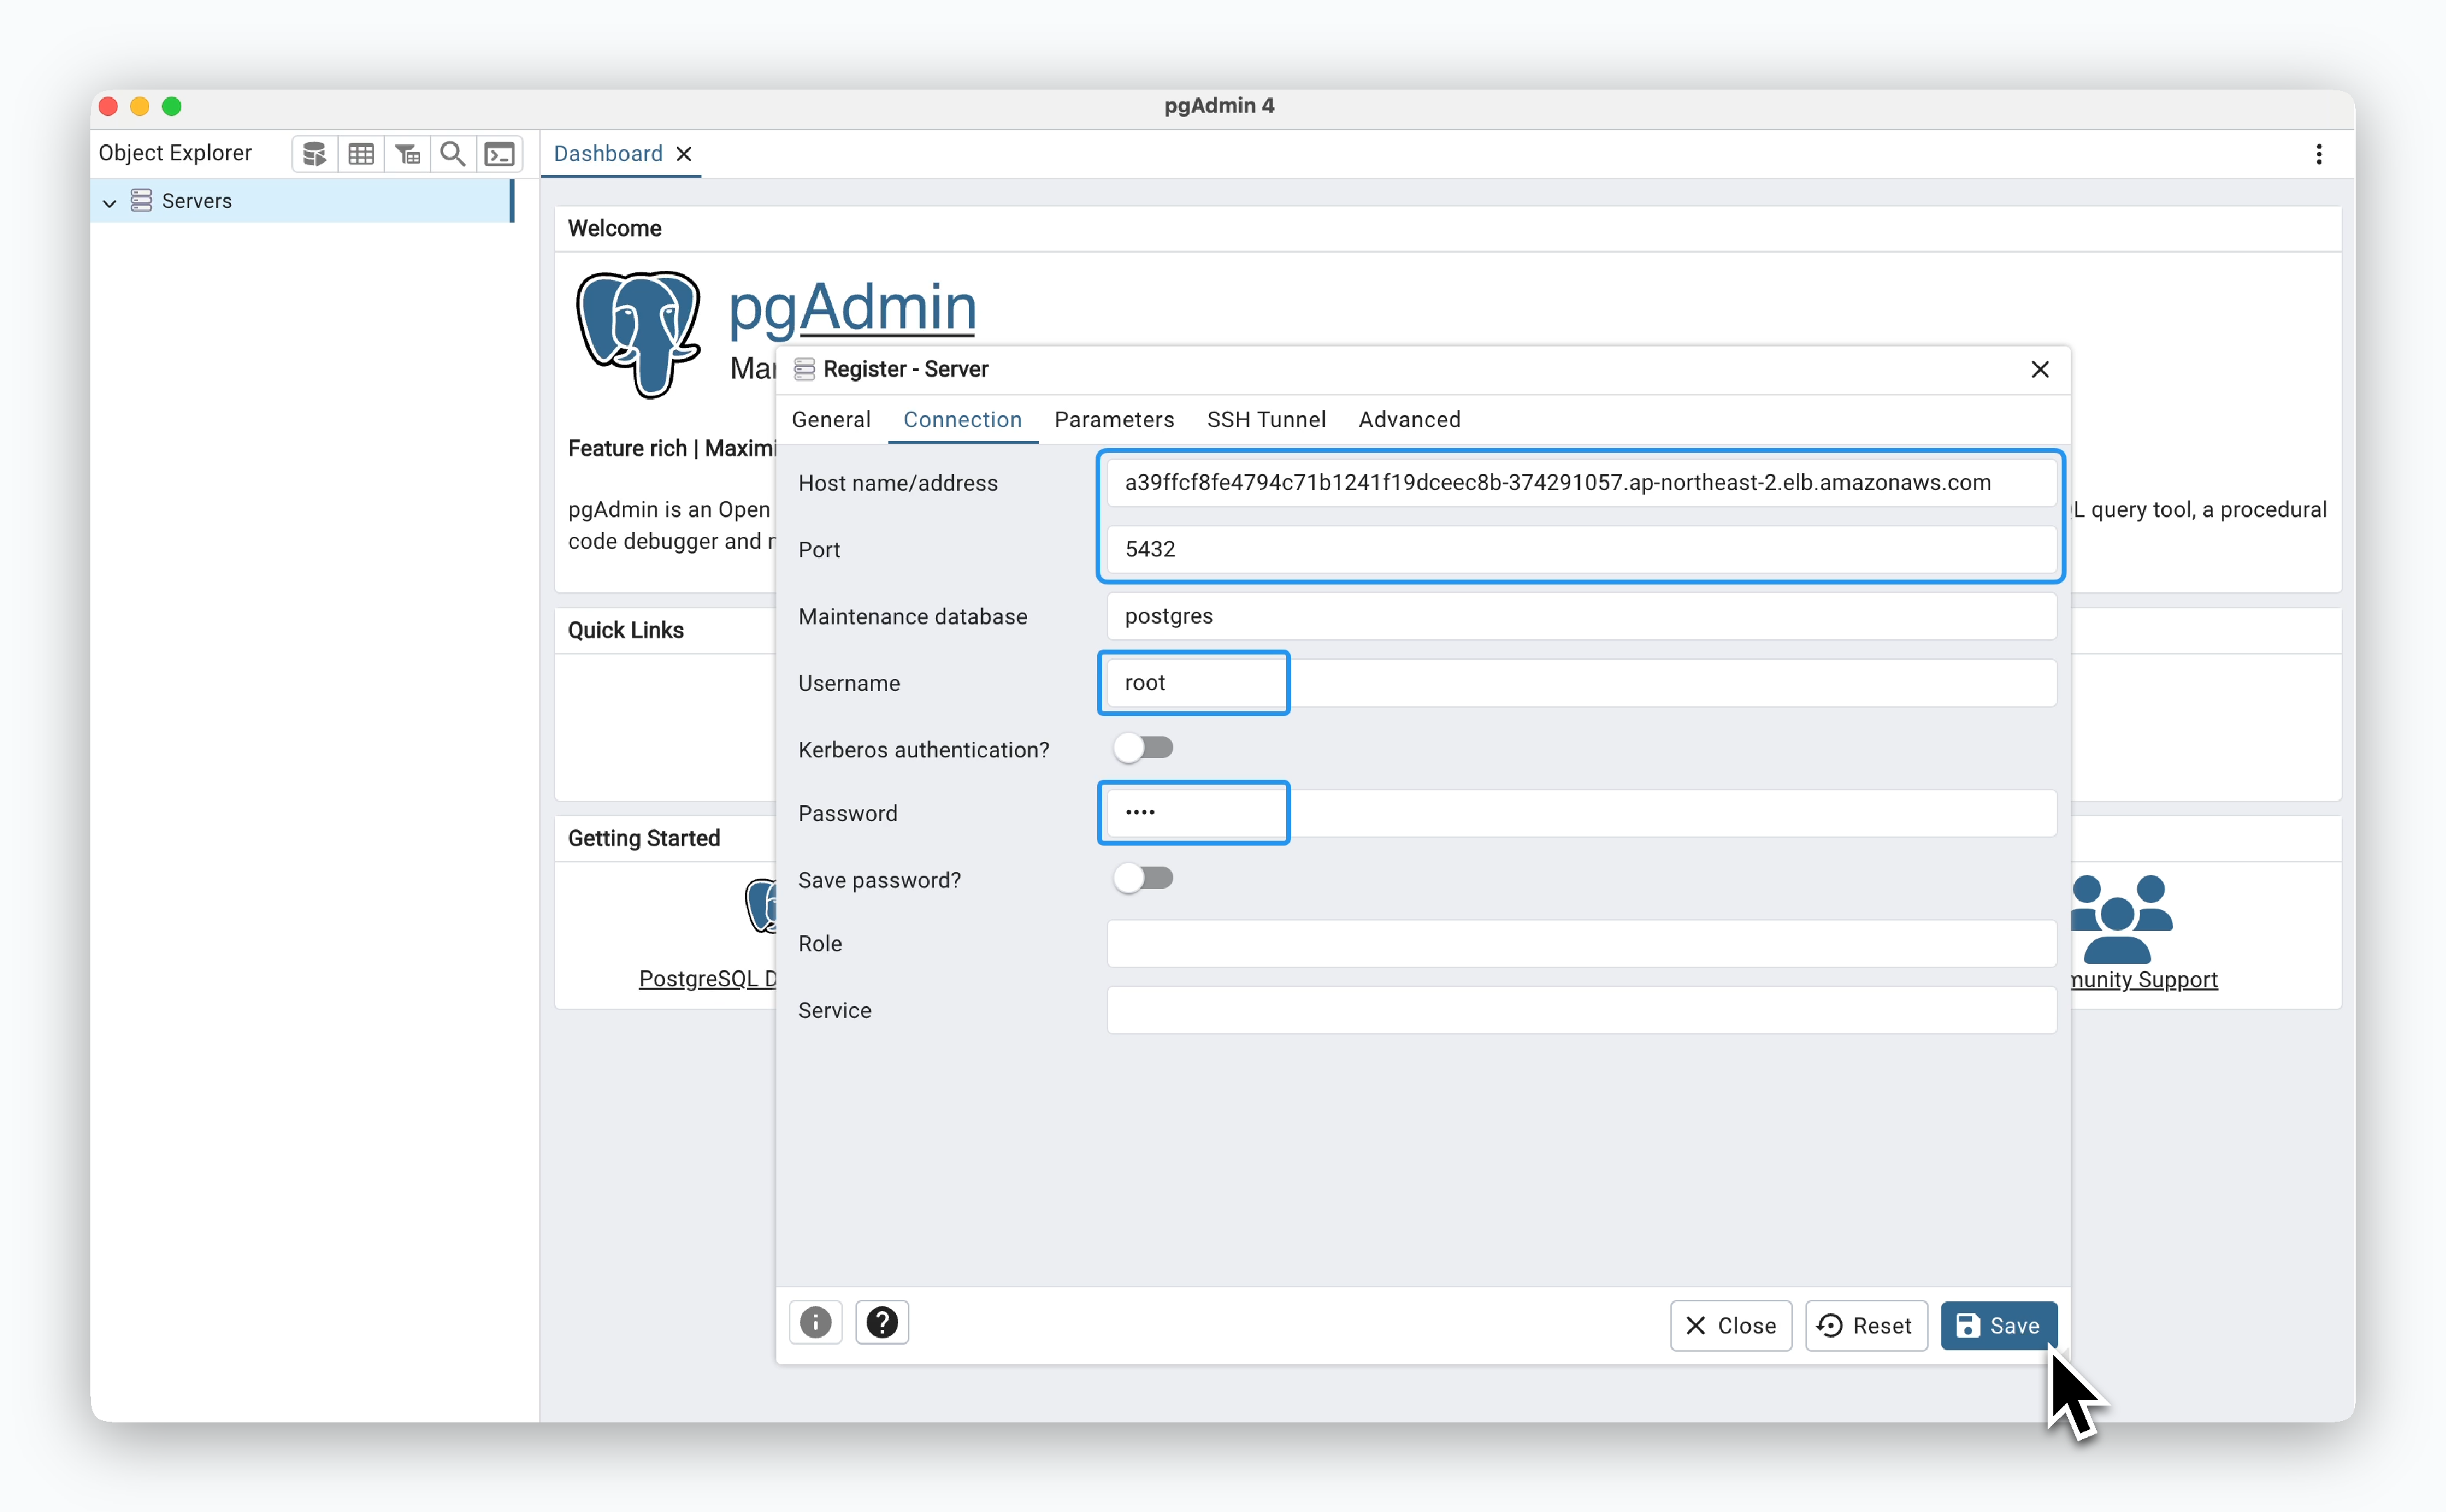 > In the Connection tab, enter the ingress address, the Username (default is **root**), and [the Root Password](/en/developers/database#root-password) you set during deployment.
[pgAdmin Download](https://www.pgadmin.org/download/)
> In the Connection tab, enter the ingress address, the Username (default is **root**), and [the Root Password](/en/developers/database#root-password) you set during deployment.
[pgAdmin Download](https://www.pgadmin.org/download/)
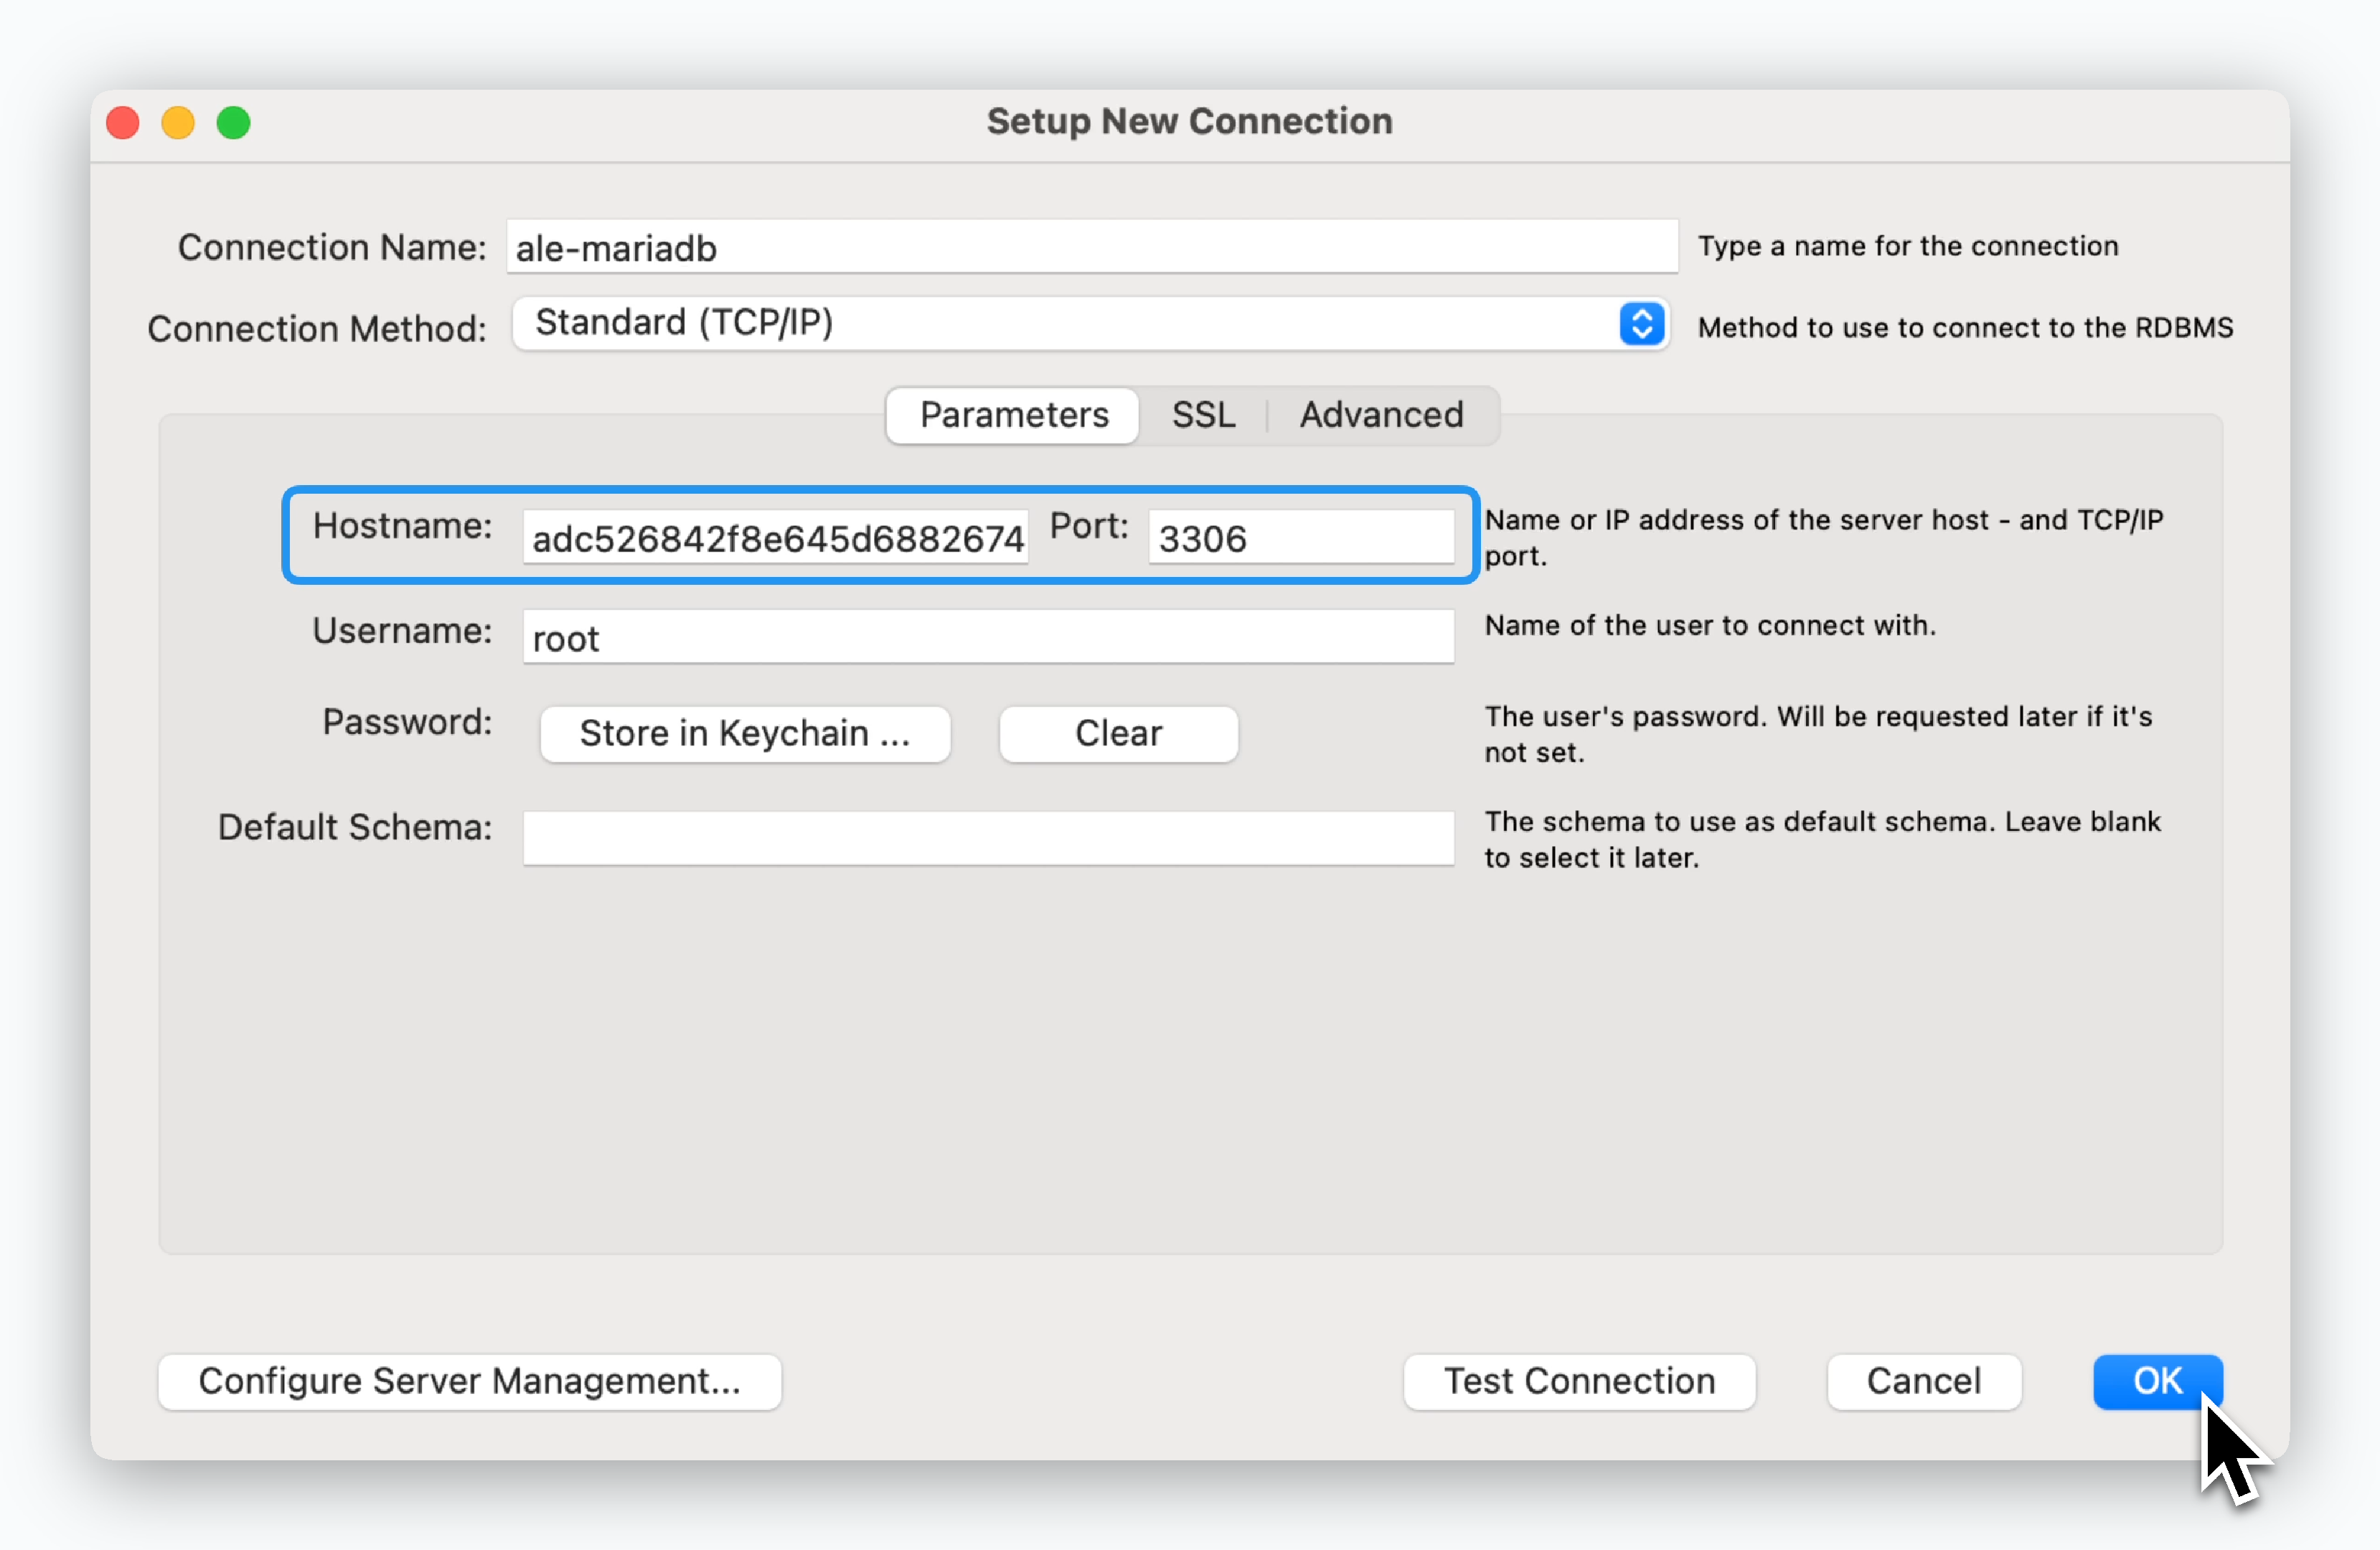
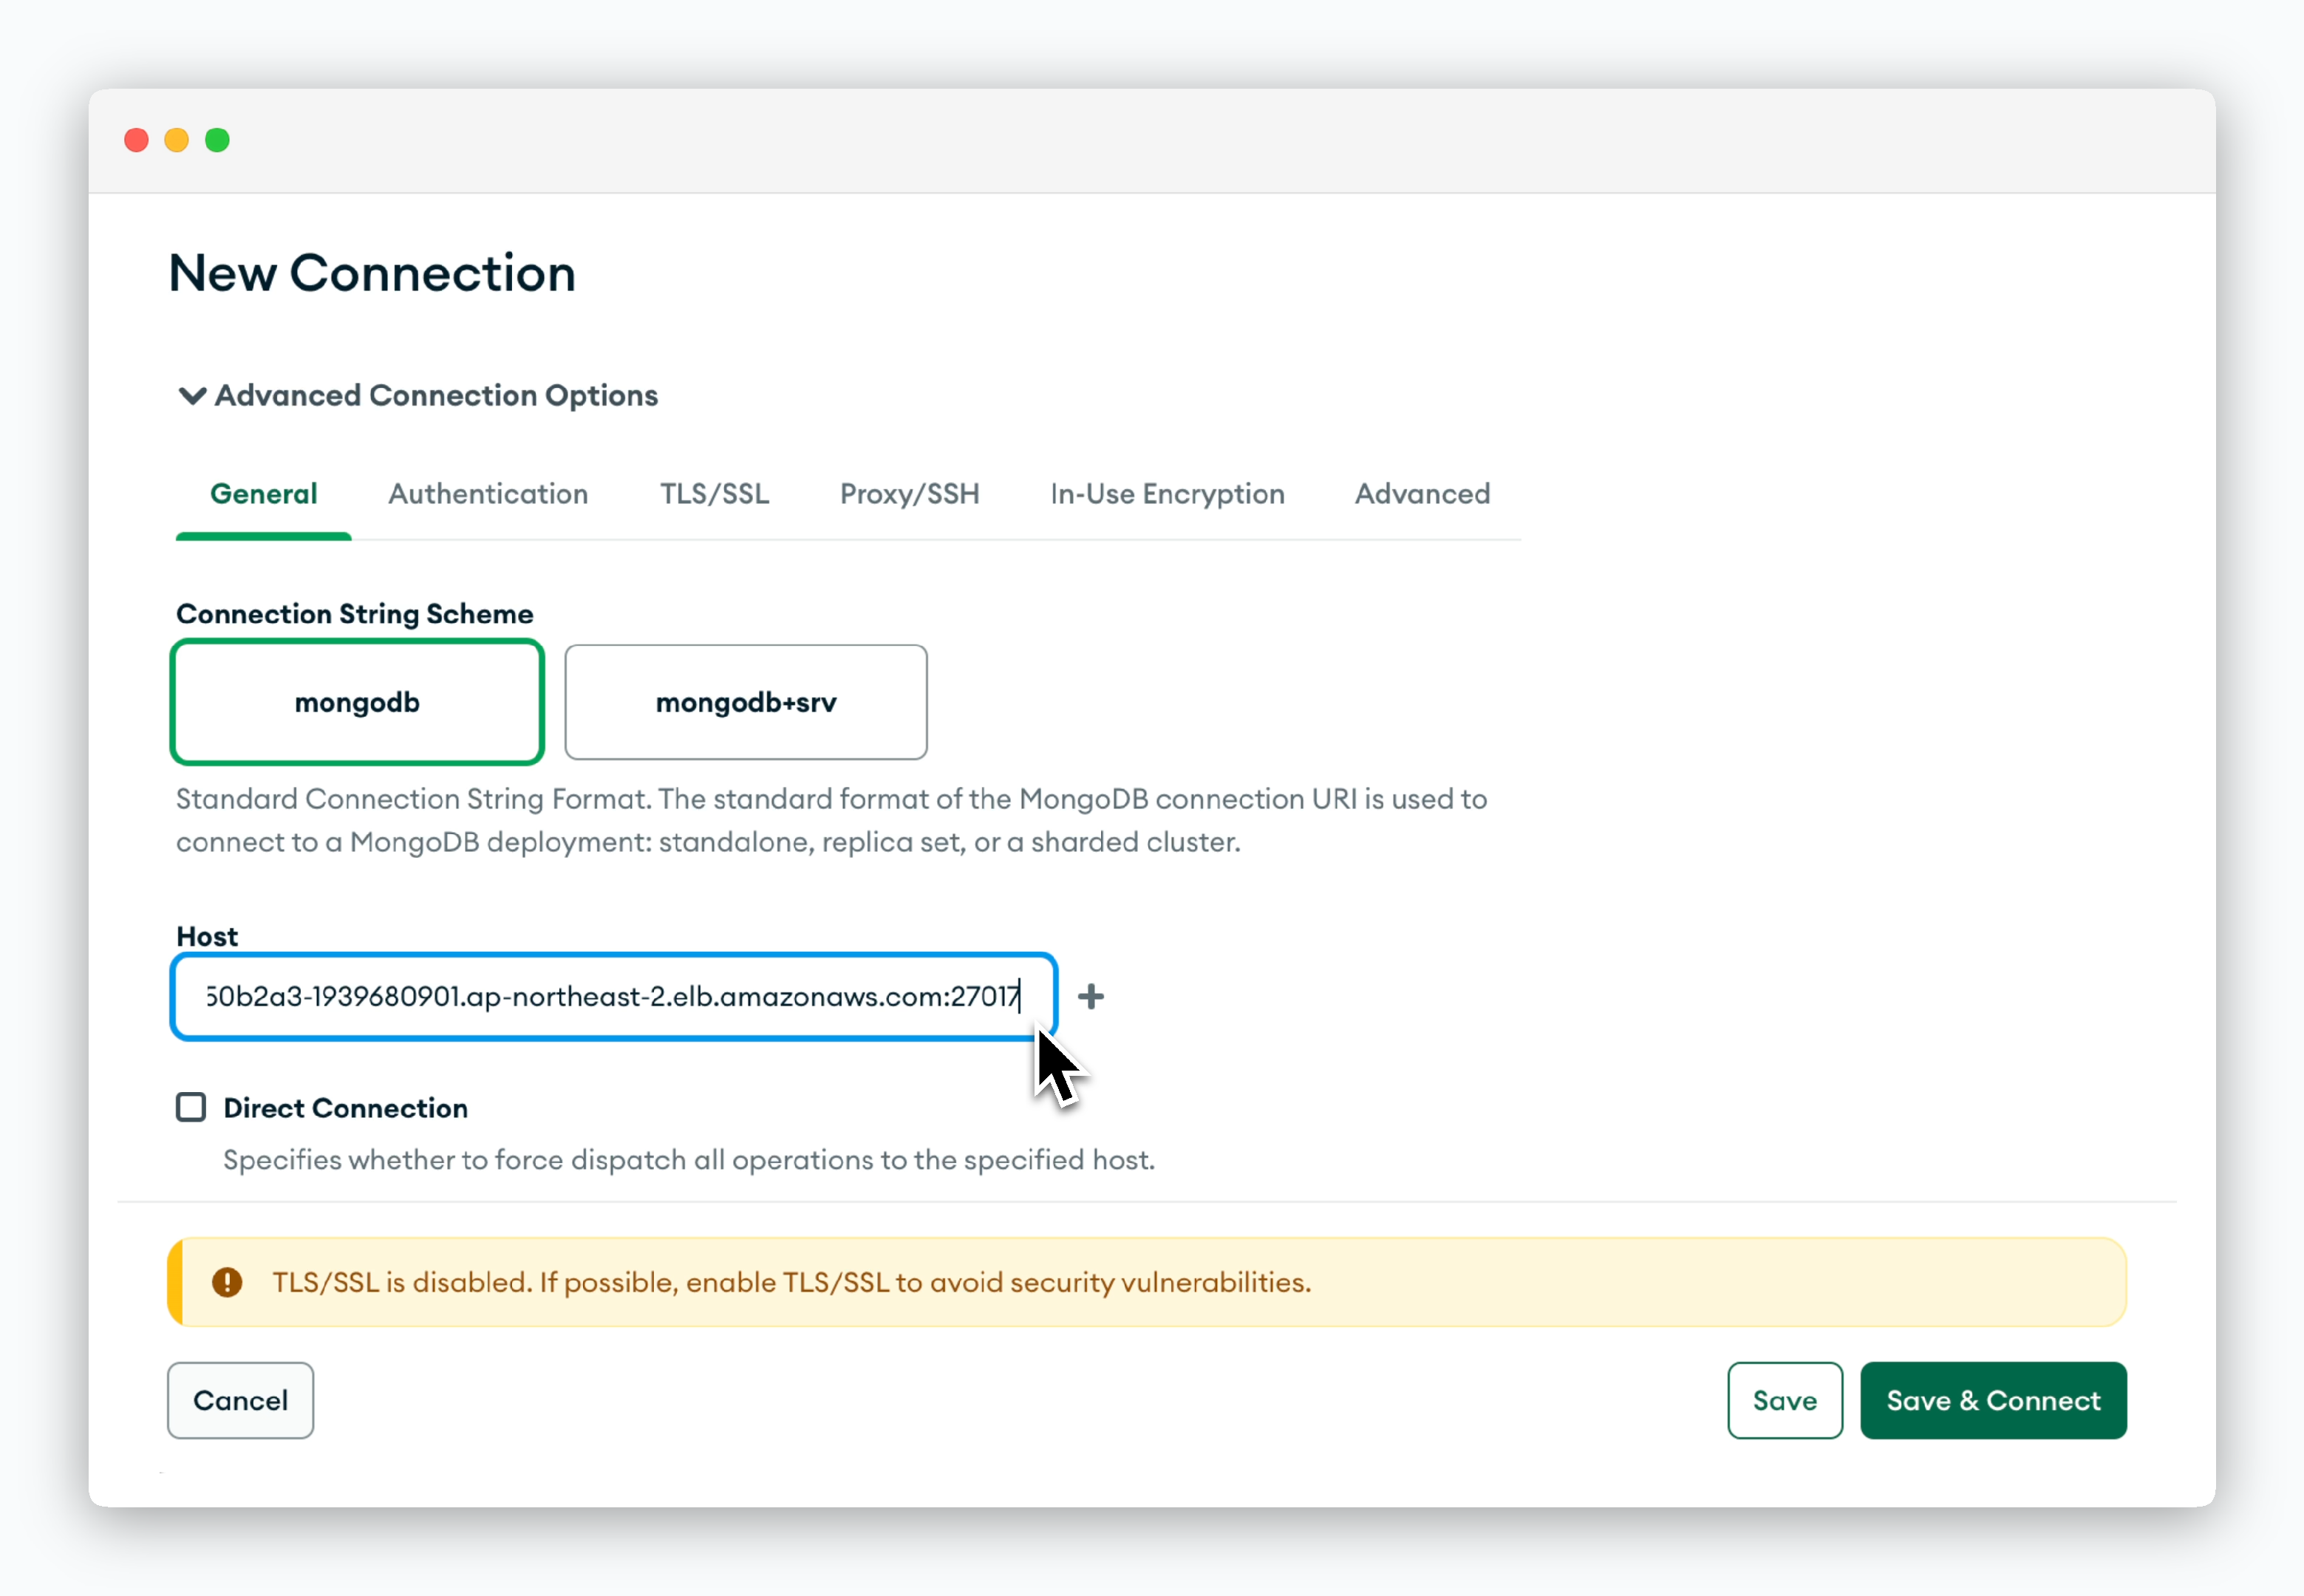 > Click `New Connection`, then in the **Advanced Connection Options** section, enter the **hostname including the port number** in the Host field.
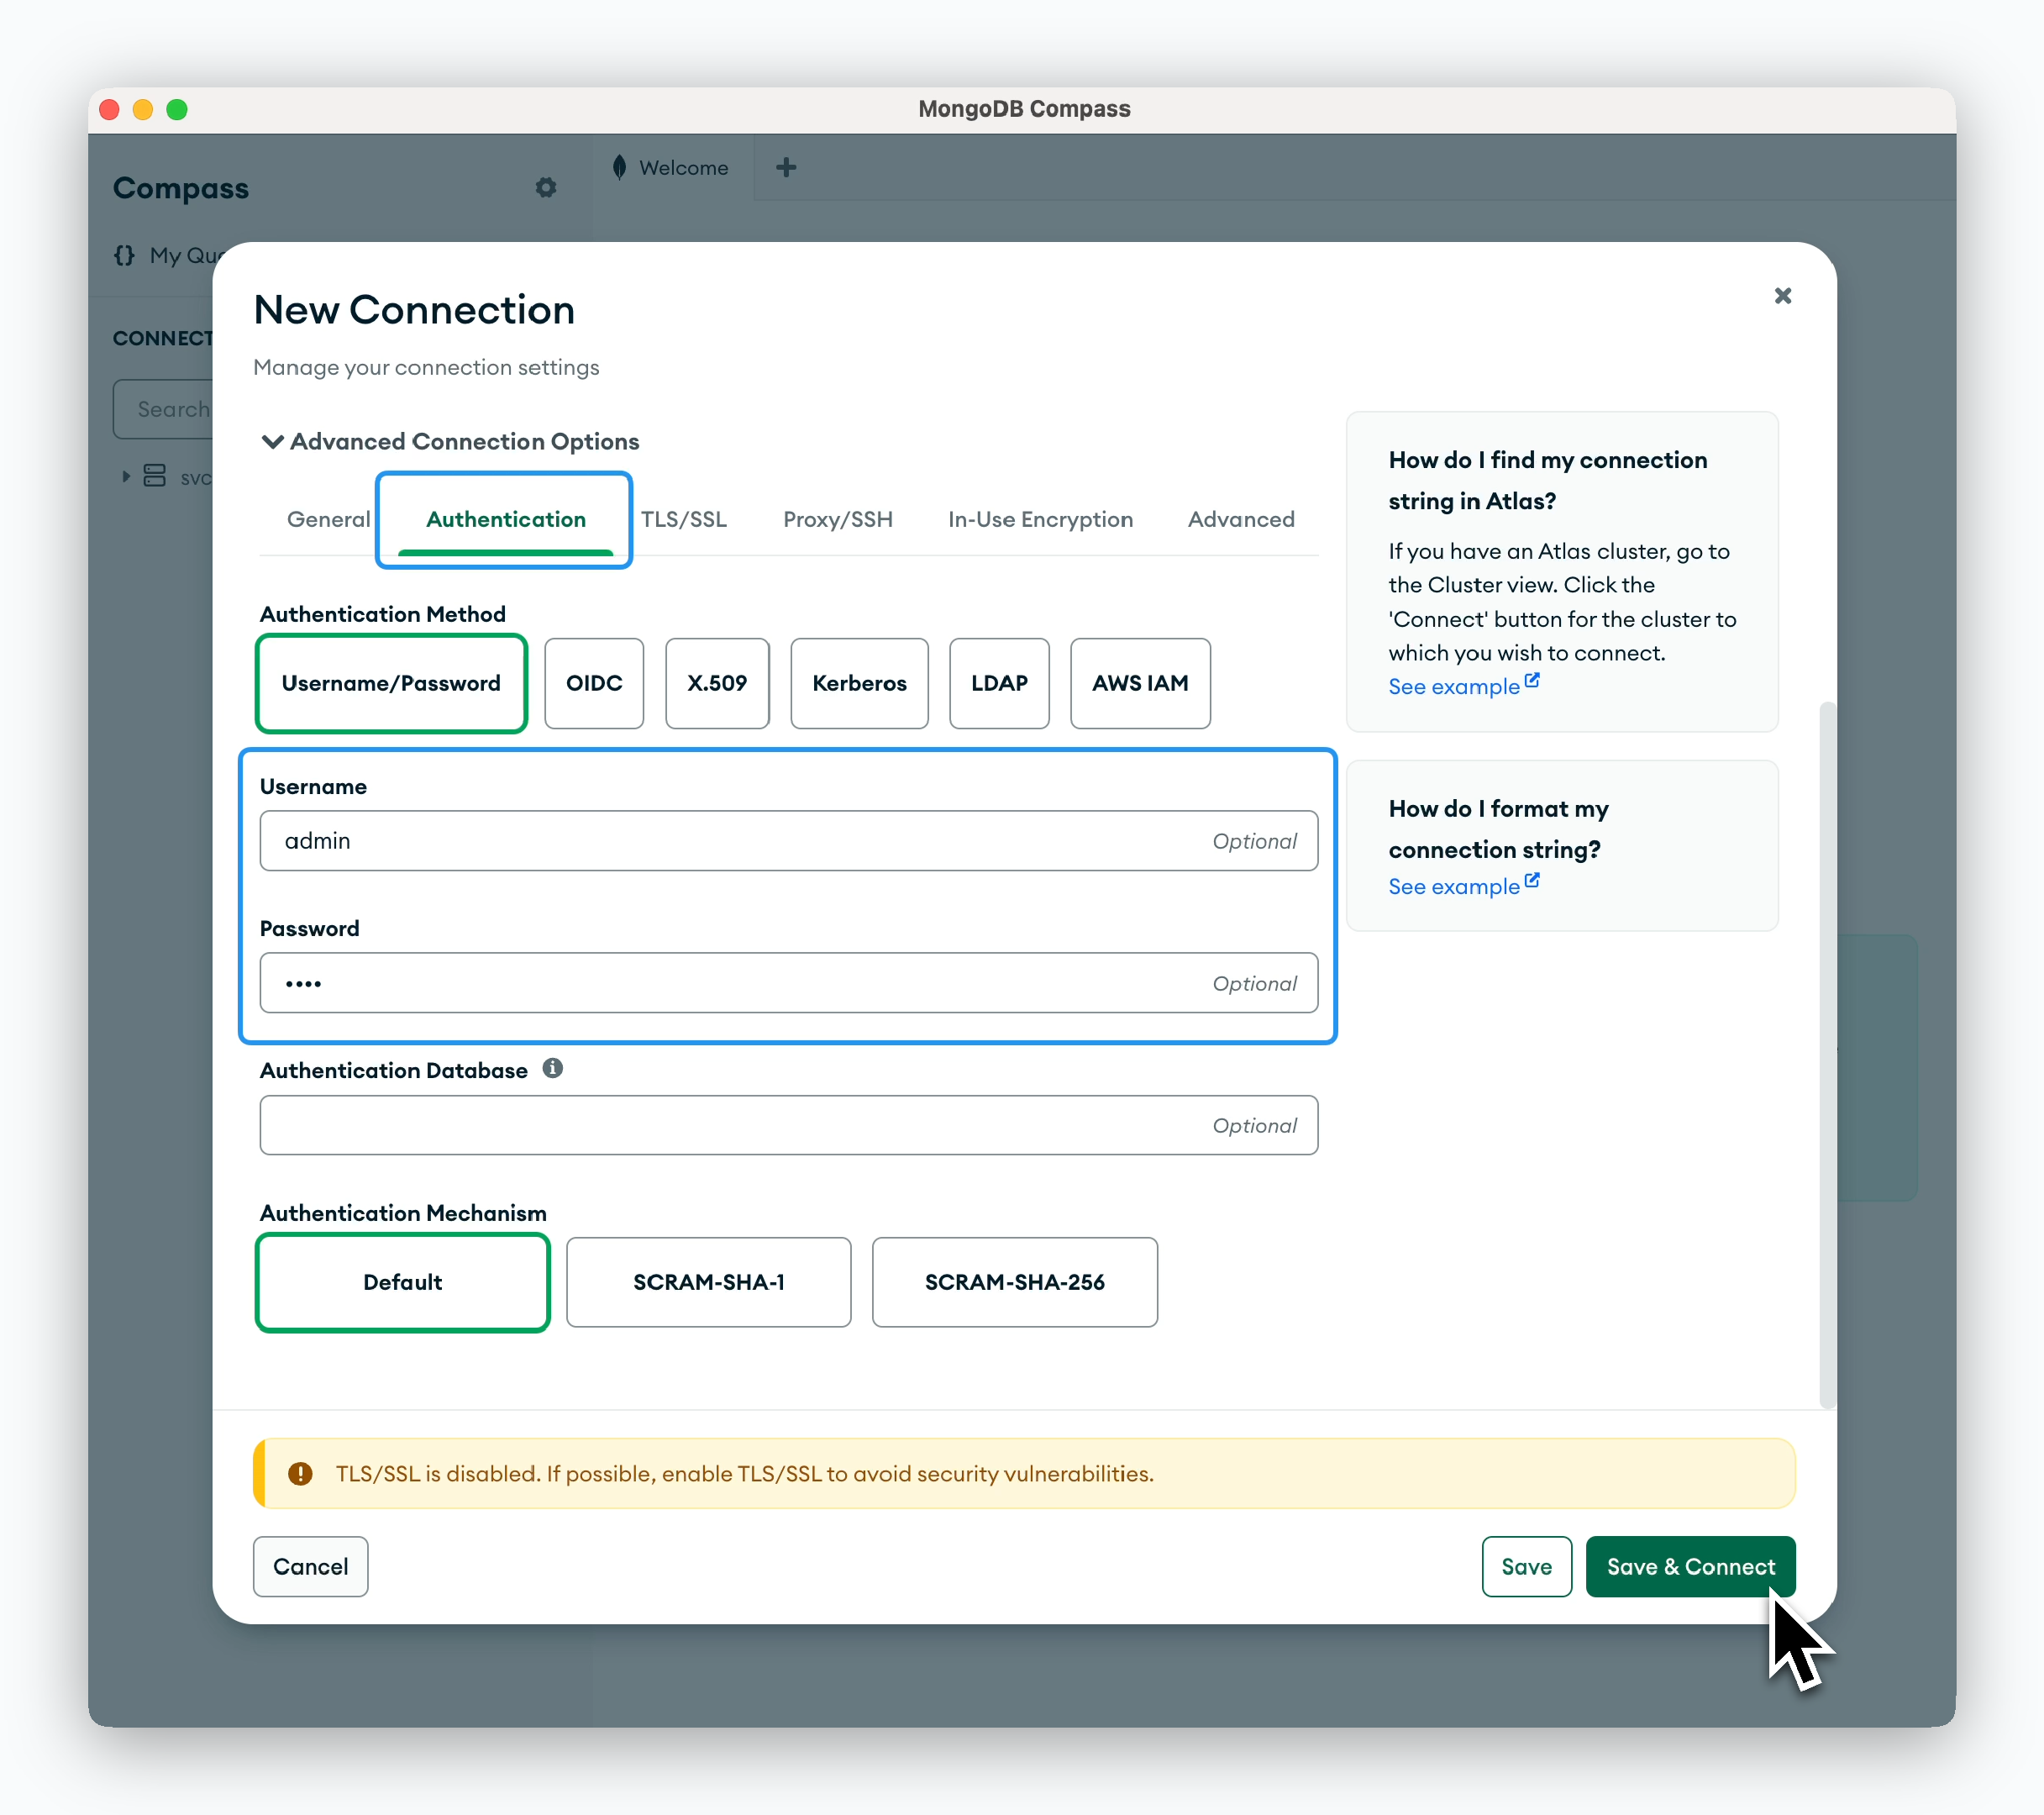 > In the Authentication tab, enter the Username (default is **admin**) and [the Root Password](/en/developers/database#root-password) you set during deployment.
[MongoDB CompassDownload](https://www.mongodb.com/try/download/compass)
> In the Authentication tab, enter the Username (default is **admin**) and [the Root Password](/en/developers/database#root-password) you set during deployment.
[MongoDB CompassDownload](https://www.mongodb.com/try/download/compass)
 > Click `Add Redis Database` and enter the ingress address.
[Redis Insight Download](https://redis.io/insight/)
[Allow TCP external connections](/en/developers/database#tcp-external-connections) to enable the DB management tool to connect to the database.
## Database Management
### Disk Space
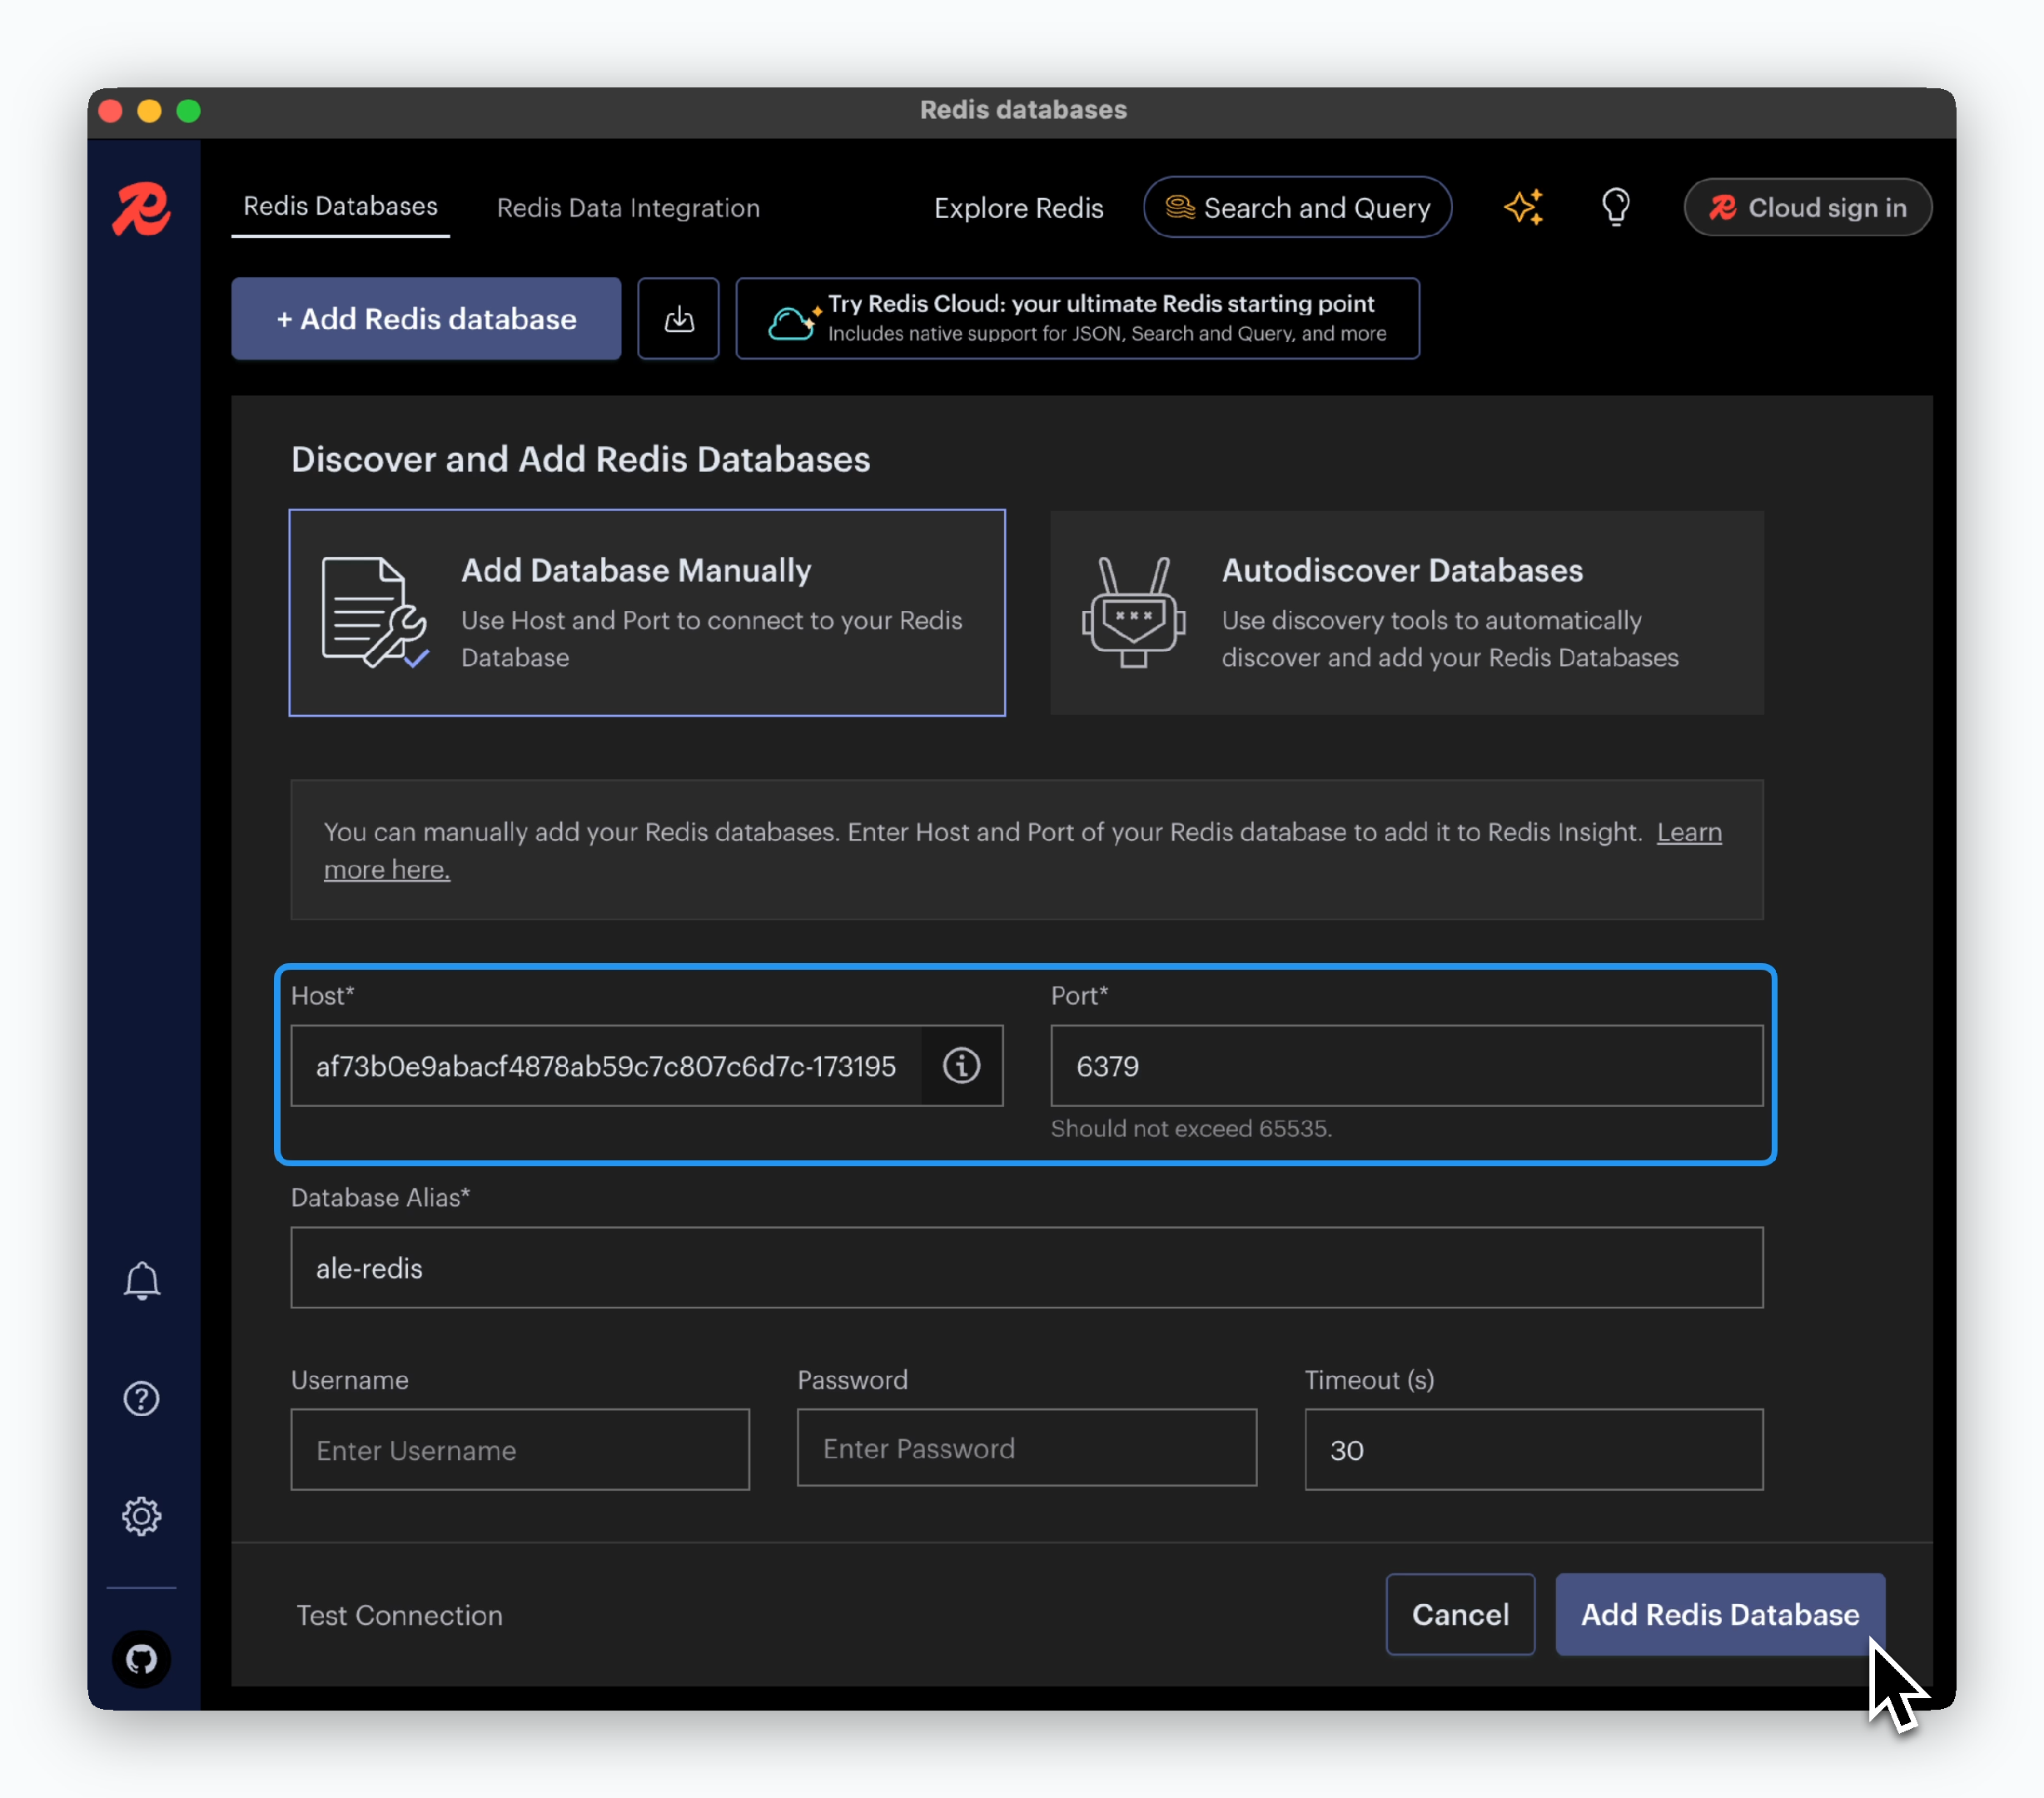
> Click `Add Redis Database` and enter the ingress address.
[Redis Insight Download](https://redis.io/insight/)
[Allow TCP external connections](/en/developers/database#tcp-external-connections) to enable the DB management tool to connect to the database.
## Database Management
### Disk Space
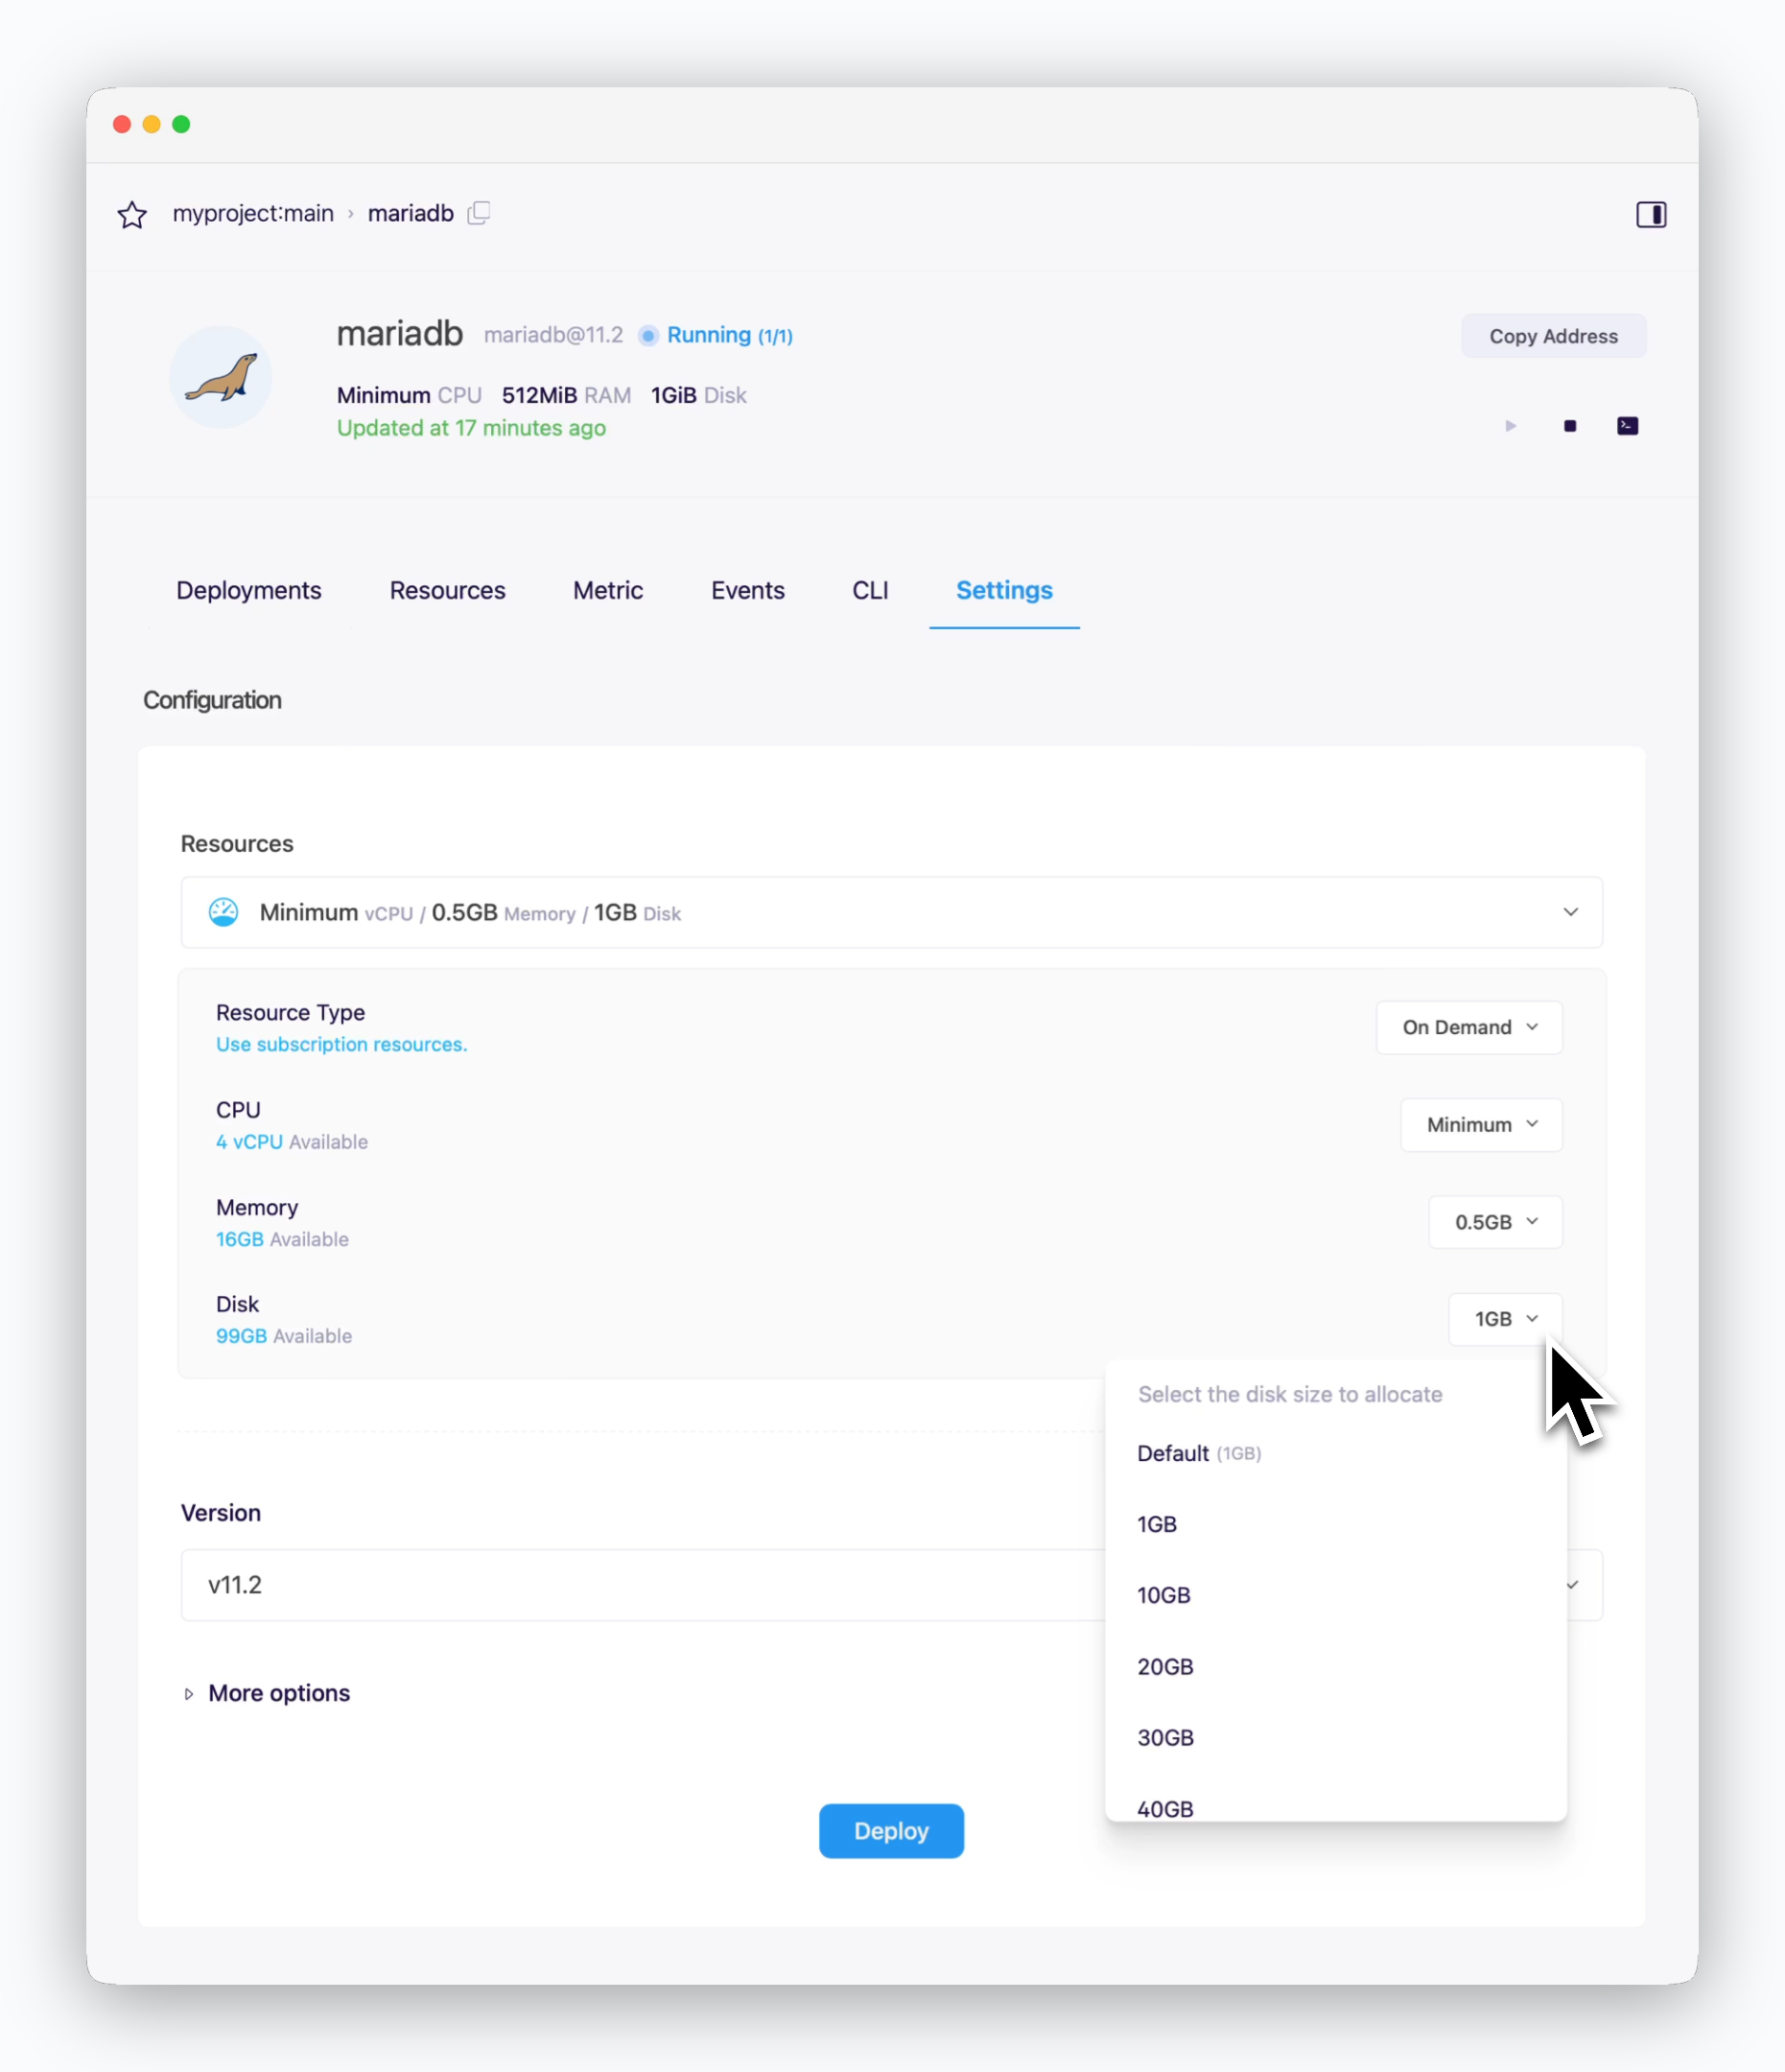 > You can modify the Disk Resource in the Settings tab of the service page. Click `Deploy` to apply the new disk capacity.
When you deploy with new resource configurations, the disk capacity will be updated while preserving all existing data.
### Root Password
> You can modify the Disk Resource in the Settings tab of the service page. Click `Deploy` to apply the new disk capacity.
When you deploy with new resource configurations, the disk capacity will be updated while preserving all existing data.
### Root Password
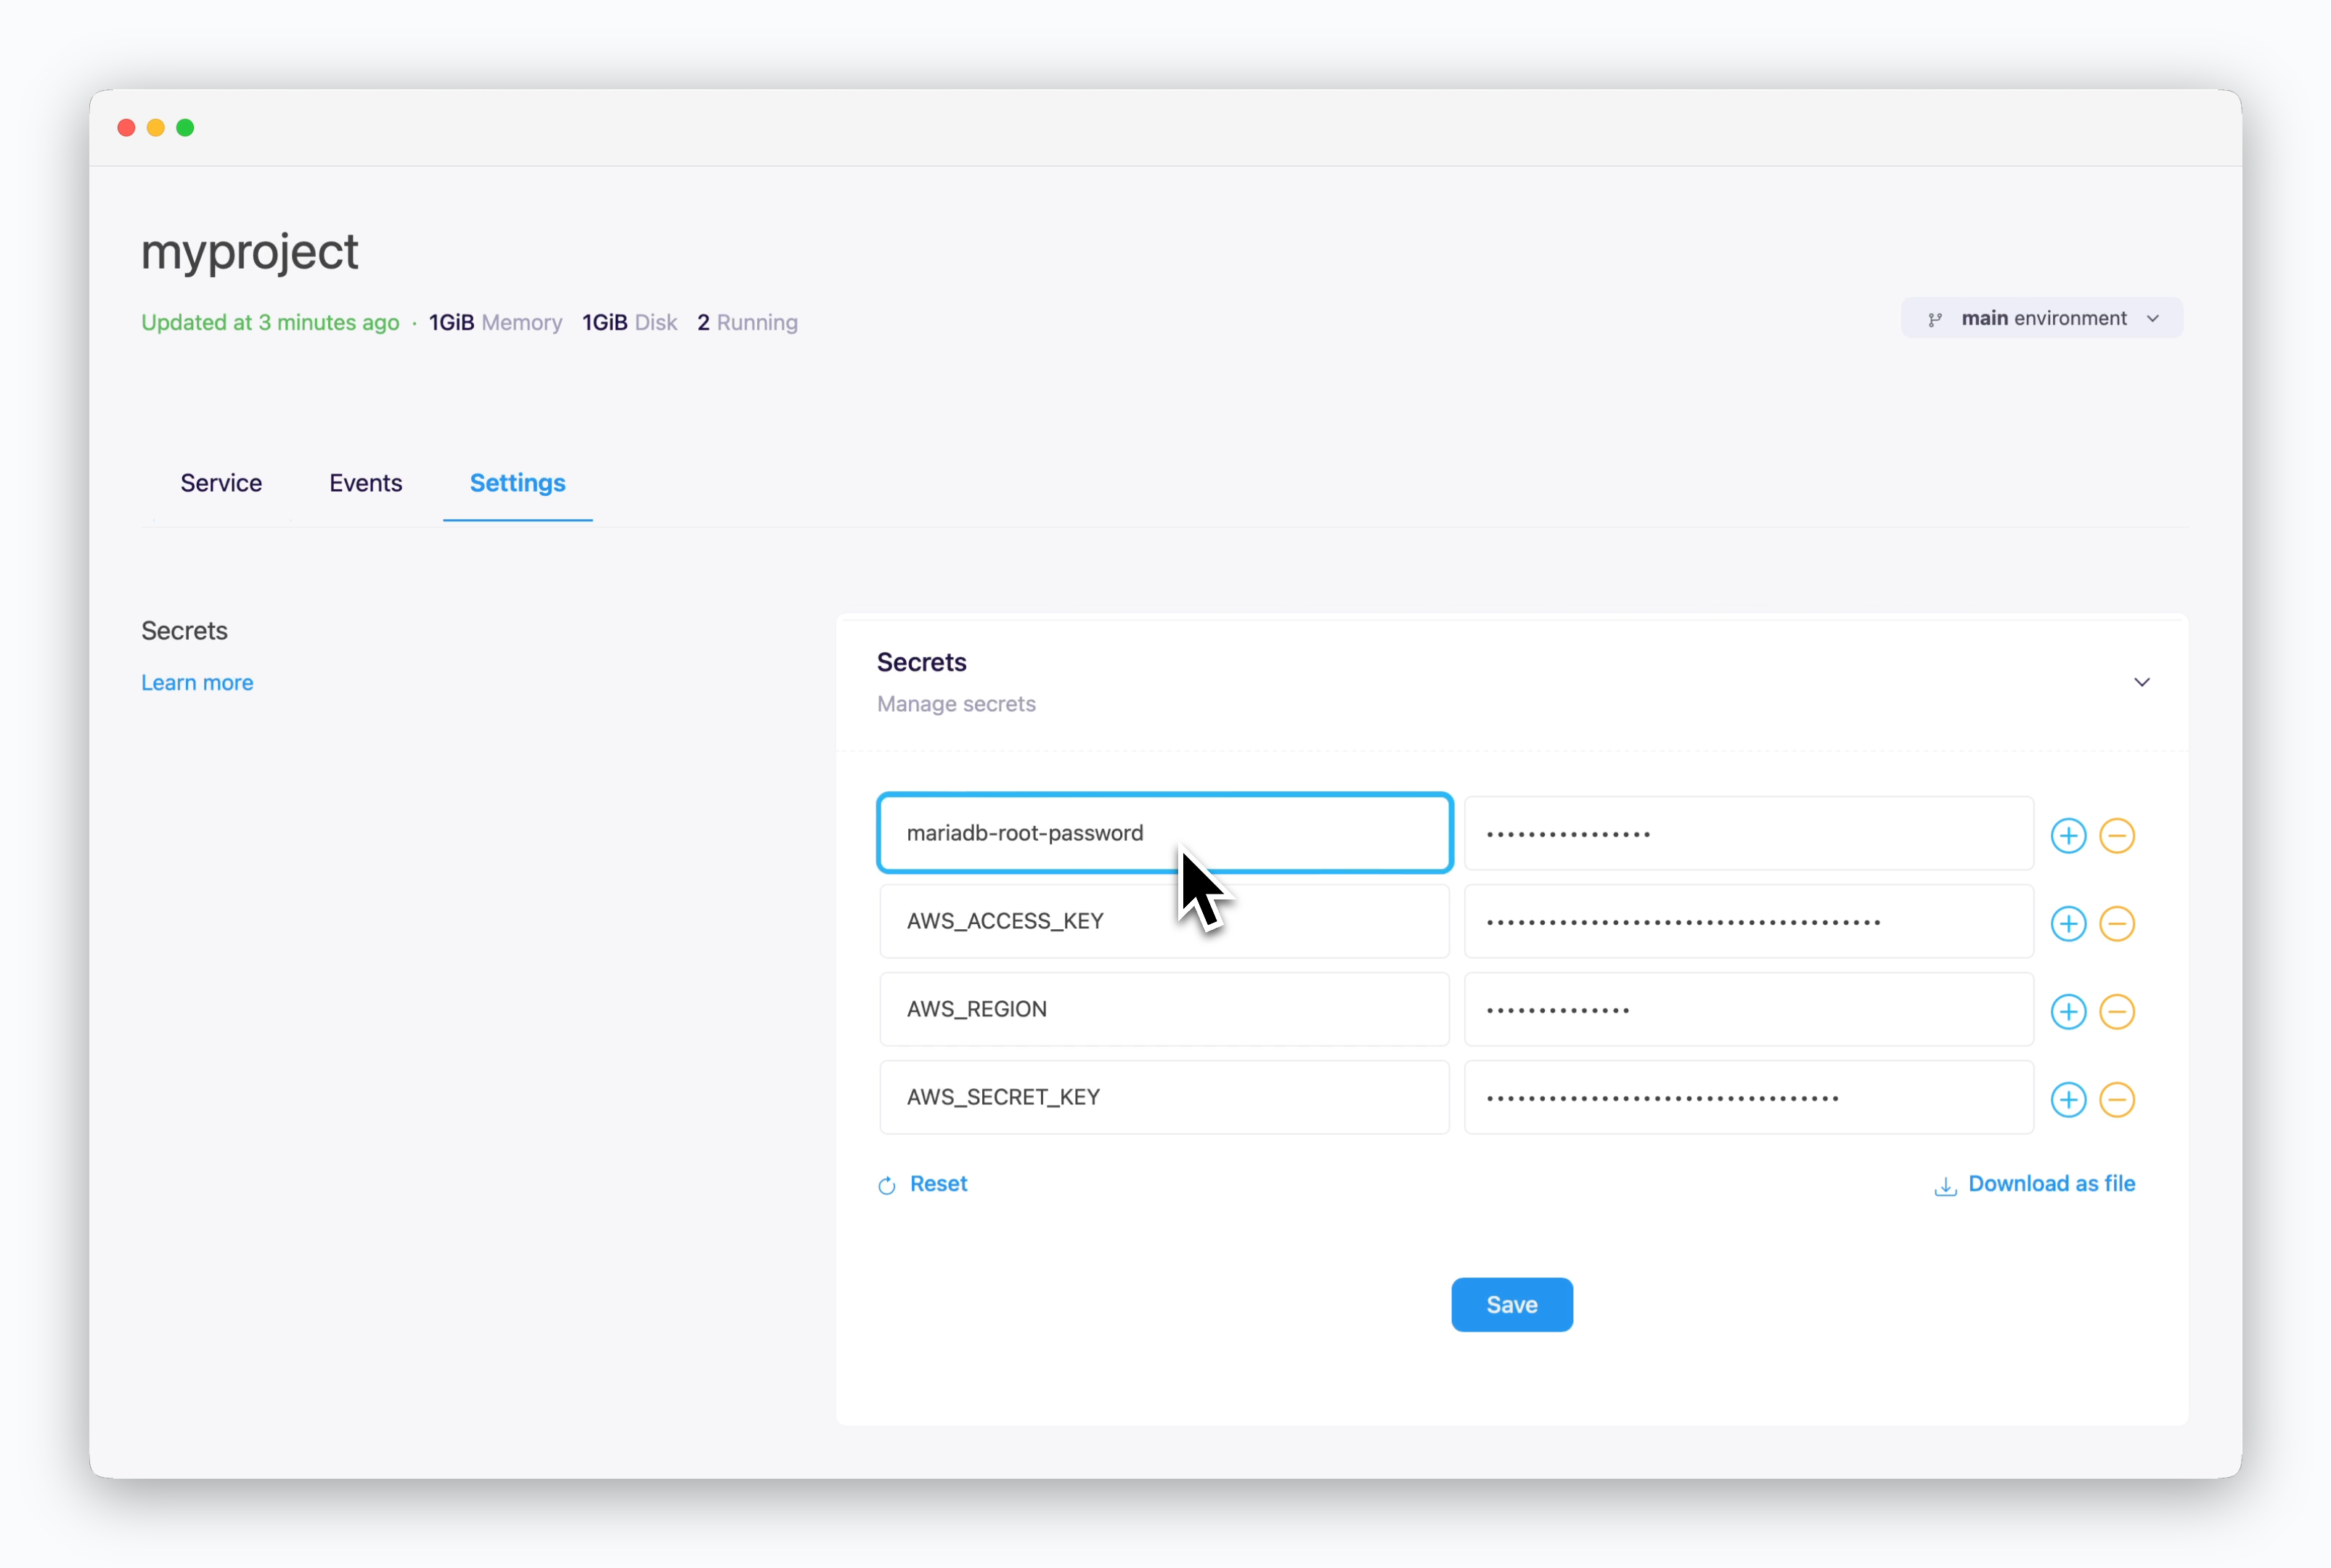 > The Root Password can be viewed and managed in **the Secrets section of environment settings.**
### Database Deletion
> The Root Password can be viewed and managed in **the Secrets section of environment settings.**
### Database Deletion
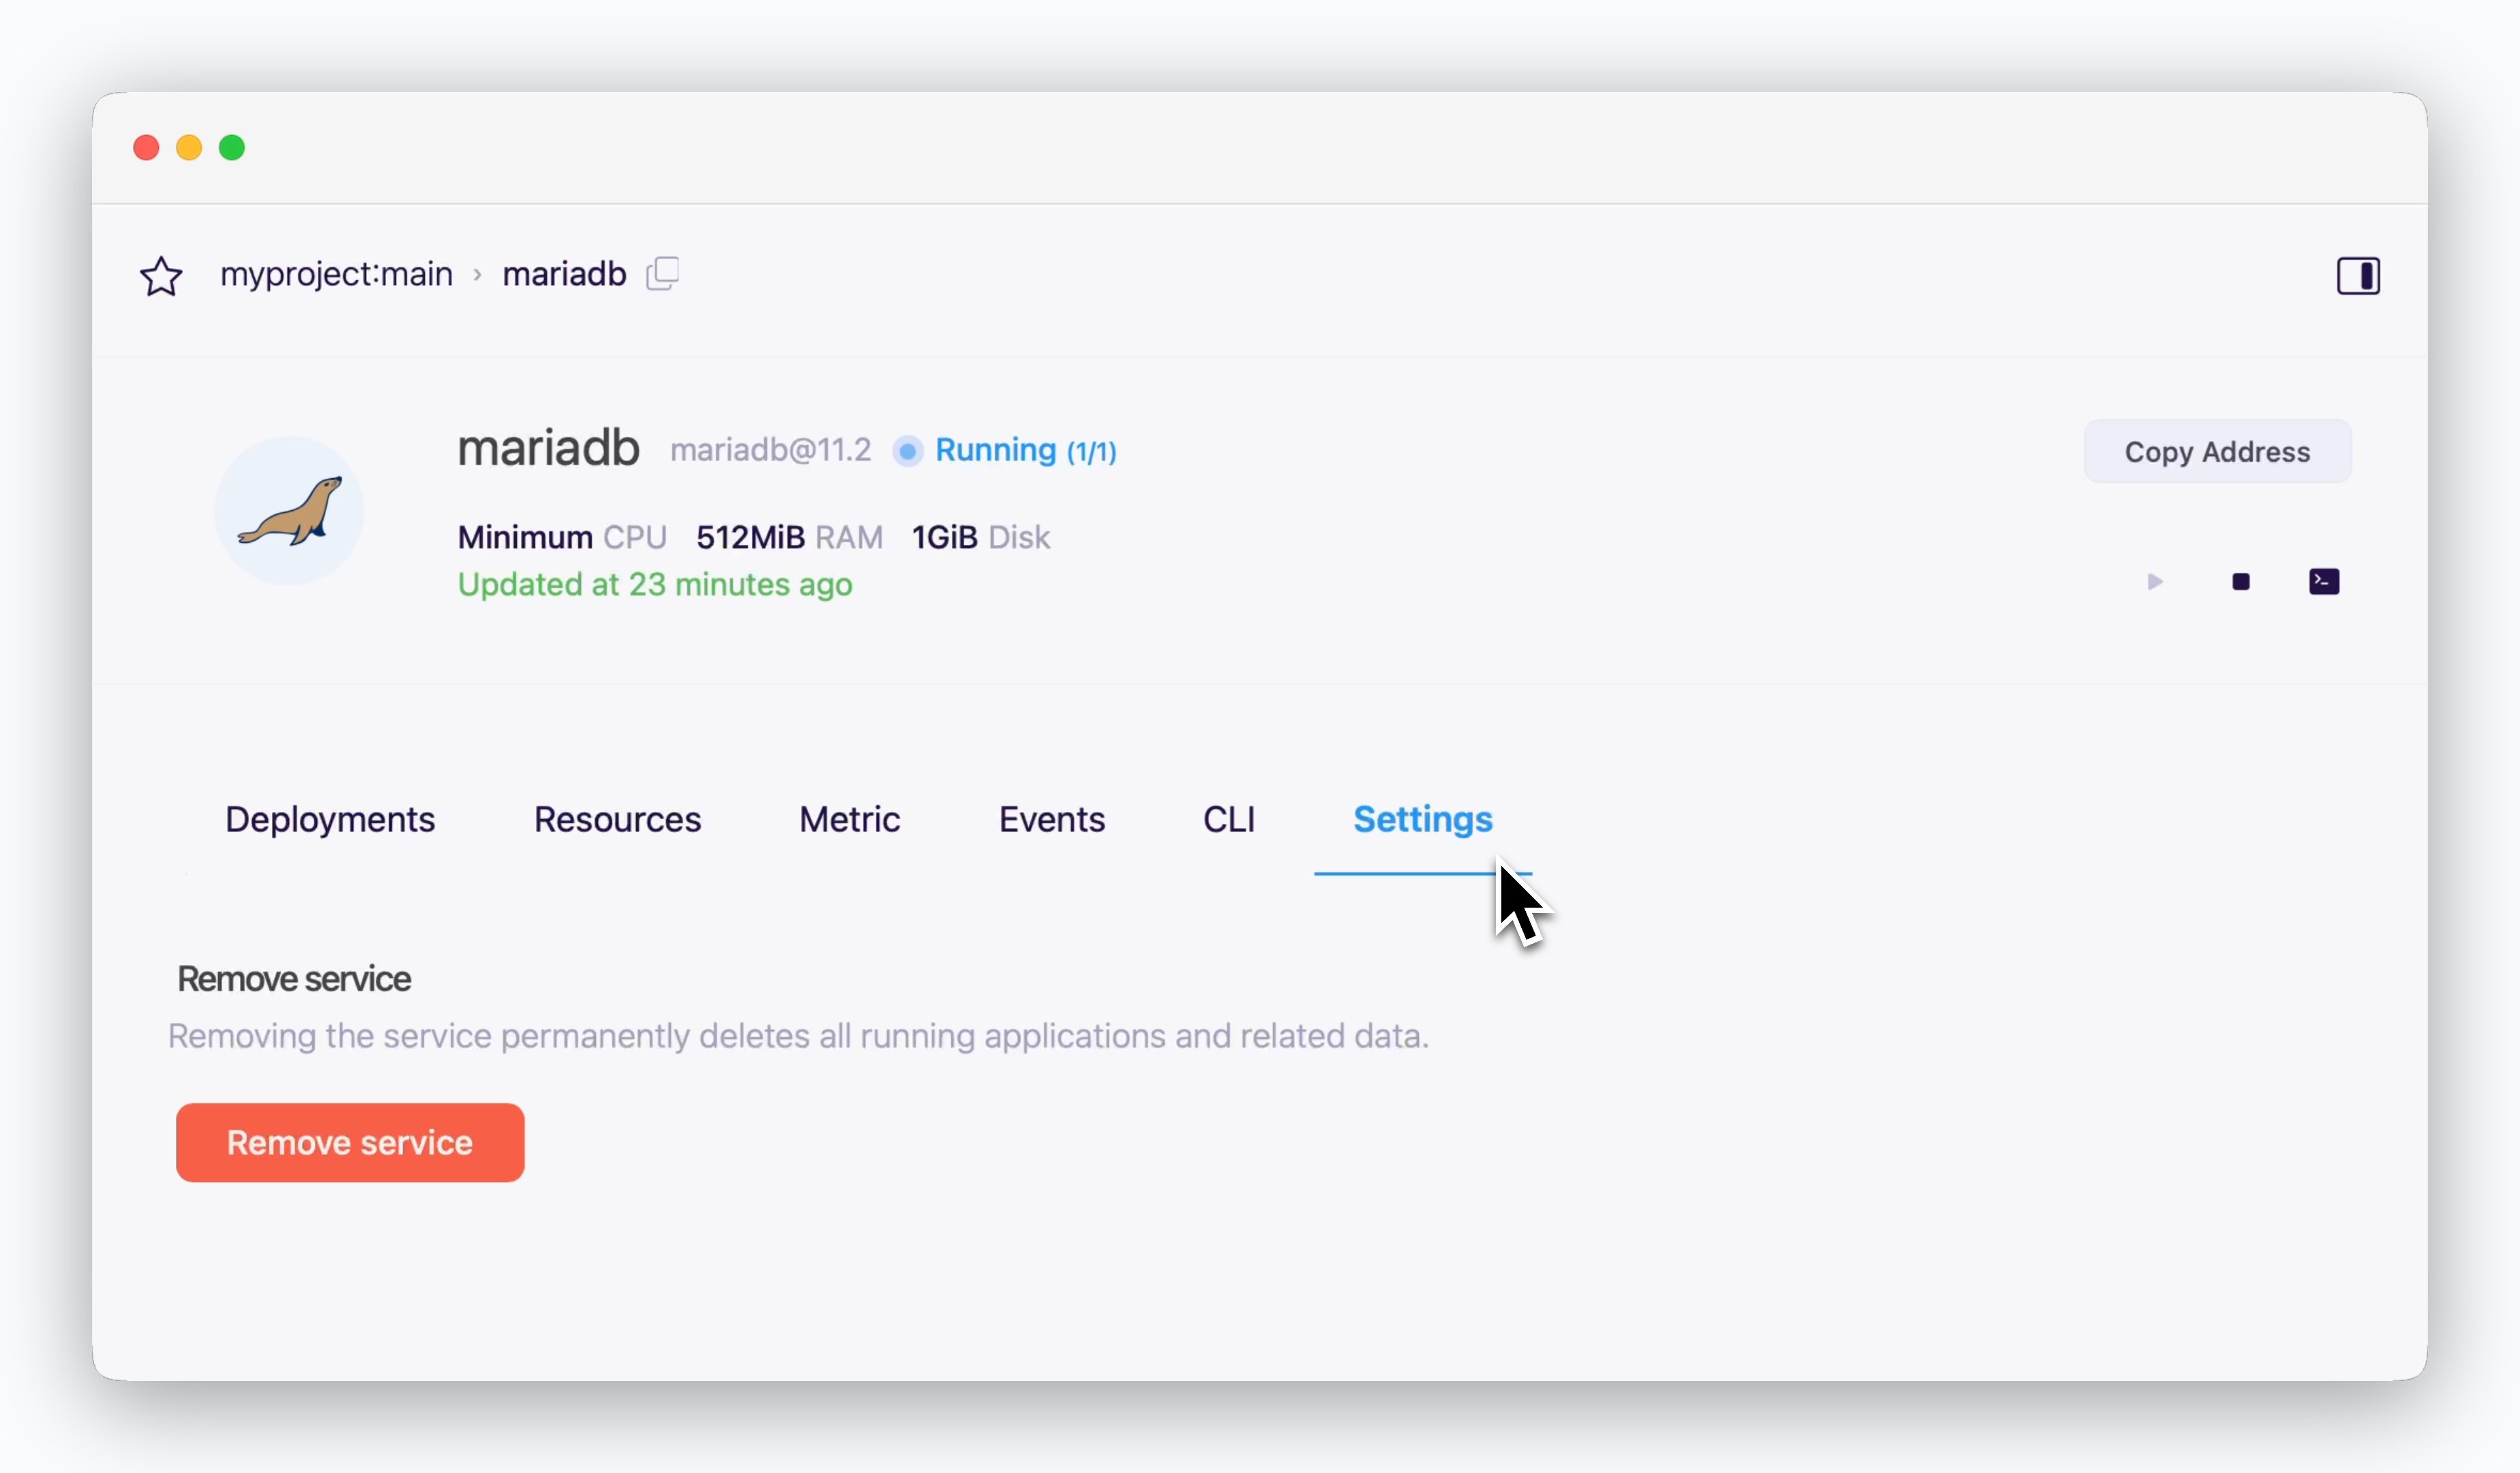 > You can delete your database service by clicking `Remove Service` in the Settings tab of the service page.
Removing a database service is irreversible and will permanently delete all data stored on its disk. Make sure you have backed up any important data before proceeding with the deletion.
> You can delete your database service by clicking `Remove Service` in the Settings tab of the service page.
Removing a database service is irreversible and will permanently delete all data stored on its disk. Make sure you have backed up any important data before proceeding with the deletion.