> ## Documentation Index
> Fetch the complete documentation index at: https://docs.ale.run/llms.txt
> Use this file to discover all available pages before exploring further.
# Quick Start
> Guide for installing ale locally and deploying an application to a local K8s cluster.
Node.js version 20 or higher is required to use `ale`.
***
## Cluster Setup
* Visit the [Docker Desktop](https://www.docker.com/products/docker-desktop/) website and download the installation file that matches your OS and architecture.
After completing the installation, verify that Docker was installed correctly by entering the following command in your terminal:
```bash theme={null}
docker version
```
**Setting up the Kubernetes Cluster**
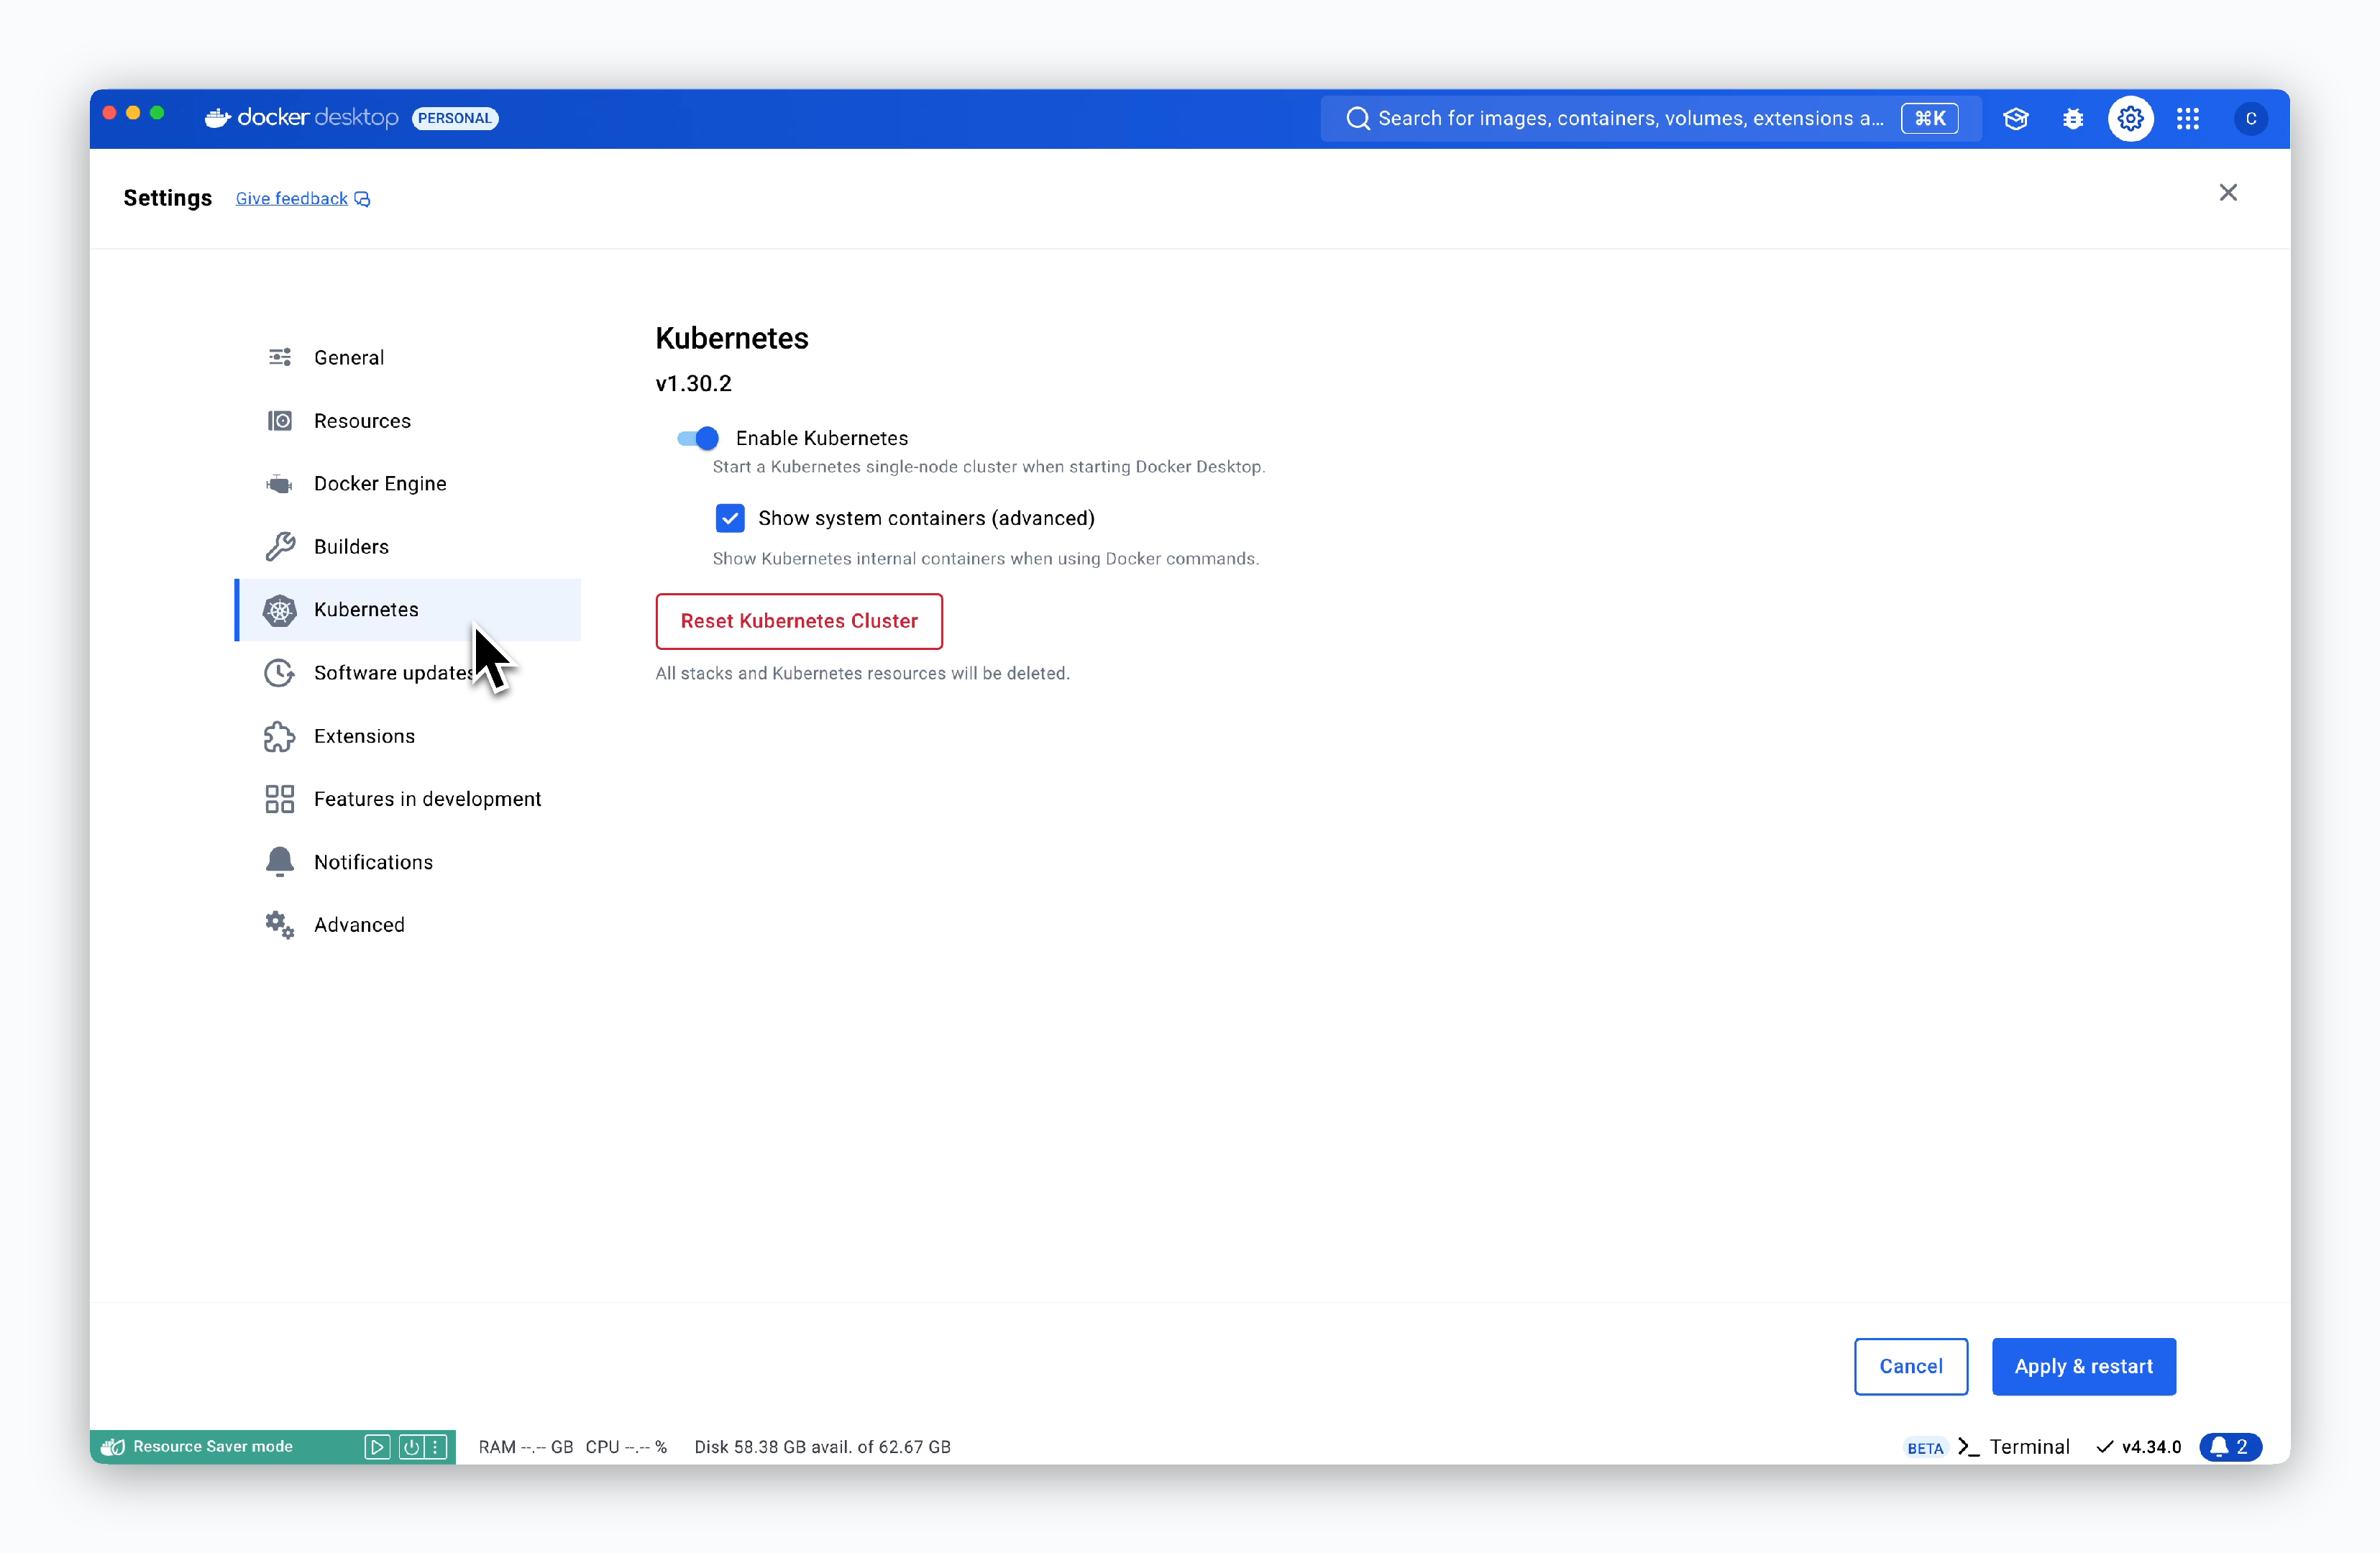
**1.** Open Docker Desktop settings, select **Kubernetes** from the left menu.
Check **Enable Kubernetes** and click `Apply & restart` at the bottom.
 **2.** Run the following command to ensure kubectl commands are applied to the Kubernetes cluster created by Docker Desktop:
```bash theme={null}
kubectl config use-context docker-desktop
```
```plain theme={null}
Switched to context "docker-desktop".
```
**3.** Run the following command in your terminal to verify that the cluster is running properly.
If the **STATUS** is not **Ready** or if the output below is not displayed, the Kubernetes cluster is not available for use, and you should check the context and Docker Desktop status.
```bash theme={null}
kubectl get node
```
```plain theme={null}
NAME STATUS ROLES AGE VERSION
docker-desktop Ready control-plane 37m v1.30.2
```
* Run the following command on macOS with [HomeBrew](https://brew.sh/) installed:
```bash theme={null}
brew install orbstack
```
**Setting up the Kubernetes Cluster**
**1.** Open OrbStack settings and select the **Kubernetes** tab.
Check both **Enable Kubernetes cluster** and **Expose services to local network devices**, then click `Apply` at the bottom.
**2.** Run the following command to ensure kubectl commands are applied to the Kubernetes cluster created by Docker Desktop:
```bash theme={null}
kubectl config use-context docker-desktop
```
```plain theme={null}
Switched to context "docker-desktop".
```
**3.** Run the following command in your terminal to verify that the cluster is running properly.
If the **STATUS** is not **Ready** or if the output below is not displayed, the Kubernetes cluster is not available for use, and you should check the context and Docker Desktop status.
```bash theme={null}
kubectl get node
```
```plain theme={null}
NAME STATUS ROLES AGE VERSION
docker-desktop Ready control-plane 37m v1.30.2
```
* Run the following command on macOS with [HomeBrew](https://brew.sh/) installed:
```bash theme={null}
brew install orbstack
```
**Setting up the Kubernetes Cluster**
**1.** Open OrbStack settings and select the **Kubernetes** tab.
Check both **Enable Kubernetes cluster** and **Expose services to local network devices**, then click `Apply` at the bottom.
 **2.** Run the following command to ensure kubectl commands are applied to the Kubernetes cluster created by OrbStack:
```bash theme={null}
kubectl config use-context orbstack
```
```plain theme={null}
Switched to context "orbstack".
```
**3.** Run the following command in your terminal to verify that the cluster is running properly.
If the **STATUS** is not **Ready** or if the output below is not displayed, the Kubernetes cluster is not available for use, and you should check the context and OrbStack status.
```bash theme={null}
kubectl get node
```
```plain theme={null}
NAME STATUS ROLES AGE VERSION
orbstack Ready control-plane,master 7m14s v1.29.3+orb1
```
kind requires go version 1.16 or higher to be installed.
Download and install the appropriate file for your operating system from [this page](https://go.dev/dl/), then run the following command to add go to your shell's PATH:
```bash zsh theme={null}
echo 'export PATH=$PATH:$HOME/go/bin' >> ~/.zshrc && source ~/.zshrc
```
```bash bash theme={null}
echo 'export PATH=$PATH:$HOME/go/bin' >> ~/.bashrc && source ~/.bashrc
```
* Run the following command in your terminal:
```bash theme={null}
go install sigs.k8s.io/kind@v0.25.0
```
**Setting up the Kubernetes Cluster**
**1.** Enter the following command in your terminal:
```bash theme={null}
cat < 19m v1.31.2
kind-worker2 Ready 19m v1.31.2
```
## Install and Run ale
```bash theme={null}
mkdir ale-run
cd ale-run
```
```bash theme={null}
npm i @ale-run/runtime@latest
```
```bash theme={null}
kubectl apply -f https://raw.githubusercontent.com/kubernetes/ingress-nginx/controller-v1.11.2/deploy/static/provider/cloud/deploy.yaml
```
```bash theme={null}
kubectl delete -A ValidatingWebhookConfiguration ingress-nginx-admission
```
```bash theme={null}
kubectl patch ingressclass nginx --type='merge' -p '{"metadata": {"annotations": {"ingressclass.kubernetes.io/is-default-class": "true"}}}'
```
```bash theme={null}
kubectl apply -f https://github.com/kubernetes-sigs/metrics-server/releases/latest/download/components.yaml
```
```bash theme={null}
npx aled dev
```
```bash theme={null}
? Select the k8s cluster to use. › Select the k8s cluster to use.
No Cluster
orbstack
❯ docker-desktop
```
When you see logs like the following, the setup is complete:
```bash theme={null}
...
[INFO] [plugin:cloudtype-apps] plugin @cloudtype/apps is installed {}
[INFO] [plugin:cloudtype-apps] plugin @cloudtype/apps is activate {}
[INFO] [pde:init] plugin "@cloudtype/apps" loaded!
[INFO] [k8s] KubernetesClusterType initialized with agent {"connection":{"context":"docker-desktop","namespace":"ale-pde"},"stat":{"db":{"url":"mongodb://127.0.0.1:64000/","dbName":"ale-pde"}}}
[INFO] [k8s] ConfigContext initialized with {"connection":{"context":"docker-desktop","namespace":"ale-pde"},"stat":{"db":{"url":"mongodb://127.0.0.1:64000/","dbName":"ale-pde"}}}
[INFO] [k8s] connect k8s to "docker-desktop"
[INFO] [k8s] [agent] cluster agent initialized
[WARN] [k8s] ConfigMap.get ale-pde agent-config
[INFO] [pde:agent] Ale Agent is initialized with config
[INFO] [pde:init] Ale Agent httpsd is listening at 127.0.0.1:9801
[INFO] [k8s] config loaded from cluster from "ale-pde/agent-config"
[INFO] [stat] stat controller init {"collector":{"prefix":"ale"},"db":{"url":"mongodb://127.0.0.1:64000/","dbName":"ale-pde"},"connection":{"context":"docker-desktop","namespace":"ale-pde"}}
[INFO] [stat] connect k8s to "docker-desktop"
[INFO] [stat] stat watcher started
```
If you encounter database conflicts during execution, delete existing ale data using the following command and restart:
```bash theme={null}
rm -r ~/.ale-dev
```
By integrating your local environment with GitHub, you can deploy source code from GitHub repositories.
**1. Create GitHub Apps**
**2.** Run the following command to ensure kubectl commands are applied to the Kubernetes cluster created by OrbStack:
```bash theme={null}
kubectl config use-context orbstack
```
```plain theme={null}
Switched to context "orbstack".
```
**3.** Run the following command in your terminal to verify that the cluster is running properly.
If the **STATUS** is not **Ready** or if the output below is not displayed, the Kubernetes cluster is not available for use, and you should check the context and OrbStack status.
```bash theme={null}
kubectl get node
```
```plain theme={null}
NAME STATUS ROLES AGE VERSION
orbstack Ready control-plane,master 7m14s v1.29.3+orb1
```
kind requires go version 1.16 or higher to be installed.
Download and install the appropriate file for your operating system from [this page](https://go.dev/dl/), then run the following command to add go to your shell's PATH:
```bash zsh theme={null}
echo 'export PATH=$PATH:$HOME/go/bin' >> ~/.zshrc && source ~/.zshrc
```
```bash bash theme={null}
echo 'export PATH=$PATH:$HOME/go/bin' >> ~/.bashrc && source ~/.bashrc
```
* Run the following command in your terminal:
```bash theme={null}
go install sigs.k8s.io/kind@v0.25.0
```
**Setting up the Kubernetes Cluster**
**1.** Enter the following command in your terminal:
```bash theme={null}
cat < 19m v1.31.2
kind-worker2 Ready 19m v1.31.2
```
## Install and Run ale
```bash theme={null}
mkdir ale-run
cd ale-run
```
```bash theme={null}
npm i @ale-run/runtime@latest
```
```bash theme={null}
kubectl apply -f https://raw.githubusercontent.com/kubernetes/ingress-nginx/controller-v1.11.2/deploy/static/provider/cloud/deploy.yaml
```
```bash theme={null}
kubectl delete -A ValidatingWebhookConfiguration ingress-nginx-admission
```
```bash theme={null}
kubectl patch ingressclass nginx --type='merge' -p '{"metadata": {"annotations": {"ingressclass.kubernetes.io/is-default-class": "true"}}}'
```
```bash theme={null}
kubectl apply -f https://github.com/kubernetes-sigs/metrics-server/releases/latest/download/components.yaml
```
```bash theme={null}
npx aled dev
```
```bash theme={null}
? Select the k8s cluster to use. › Select the k8s cluster to use.
No Cluster
orbstack
❯ docker-desktop
```
When you see logs like the following, the setup is complete:
```bash theme={null}
...
[INFO] [plugin:cloudtype-apps] plugin @cloudtype/apps is installed {}
[INFO] [plugin:cloudtype-apps] plugin @cloudtype/apps is activate {}
[INFO] [pde:init] plugin "@cloudtype/apps" loaded!
[INFO] [k8s] KubernetesClusterType initialized with agent {"connection":{"context":"docker-desktop","namespace":"ale-pde"},"stat":{"db":{"url":"mongodb://127.0.0.1:64000/","dbName":"ale-pde"}}}
[INFO] [k8s] ConfigContext initialized with {"connection":{"context":"docker-desktop","namespace":"ale-pde"},"stat":{"db":{"url":"mongodb://127.0.0.1:64000/","dbName":"ale-pde"}}}
[INFO] [k8s] connect k8s to "docker-desktop"
[INFO] [k8s] [agent] cluster agent initialized
[WARN] [k8s] ConfigMap.get ale-pde agent-config
[INFO] [pde:agent] Ale Agent is initialized with config
[INFO] [pde:init] Ale Agent httpsd is listening at 127.0.0.1:9801
[INFO] [k8s] config loaded from cluster from "ale-pde/agent-config"
[INFO] [stat] stat controller init {"collector":{"prefix":"ale"},"db":{"url":"mongodb://127.0.0.1:64000/","dbName":"ale-pde"},"connection":{"context":"docker-desktop","namespace":"ale-pde"}}
[INFO] [stat] connect k8s to "docker-desktop"
[INFO] [stat] stat watcher started
```
If you encounter database conflicts during execution, delete existing ale data using the following command and restart:
```bash theme={null}
rm -r ~/.ale-dev
```
By integrating your local environment with GitHub, you can deploy source code from GitHub repositories.
**1. Create GitHub Apps**
 > After logging into GitHub, go to **Settings > Developer Settings > GitHub Apps** and click [New GitHub App](https://github.com/settings/apps/new).
**1-1. Provide Basic Information**
> After logging into GitHub, go to **Settings > Developer Settings > GitHub Apps** and click [New GitHub App](https://github.com/settings/apps/new).
**1-1. Provide Basic Information**
 > Enter the following information to create your GitHub App:
* **GitHub App name**: Name for your GitHub App
* **Homepage URL**
* URL where GitHub OAuth will be applied
* Local access address: `http://localhost:9001`
* **Callback URL** (Add with `Add Callback URL`)
* `http://localhost:9009/oauth/github/callback`
* `http://localhost:9009/oauth/github/connect/callback`
The **GitHub App name** entered here will be used when registering GitHub OAuth with `ale`.
Since this is a local environment, use `http` instead of https, and `localhost:9009` is `ale`'s API endpoint address.
**1-2. Disable Webhook**
> Enter the following information to create your GitHub App:
* **GitHub App name**: Name for your GitHub App
* **Homepage URL**
* URL where GitHub OAuth will be applied
* Local access address: `http://localhost:9001`
* **Callback URL** (Add with `Add Callback URL`)
* `http://localhost:9009/oauth/github/callback`
* `http://localhost:9009/oauth/github/connect/callback`
The **GitHub App name** entered here will be used when registering GitHub OAuth with `ale`.
Since this is a local environment, use `http` instead of https, and `localhost:9009` is `ale`'s API endpoint address.
**1-2. Disable Webhook**
 > Uncheck Active in the Webhook section to disable it.
**1-3. Grant Permissions and Create APP**
> Uncheck Active in the Webhook section to disable it.
**1-3. Grant Permissions and Create APP**
 > Grant the following permissions in the Permission section and click `Create GitHub App` to create your APP:
* **Read and Write**
* Actions
* Administration
* Commit statuses
* Contents
* Deployments
* Issues
* Pull requests
* Workflows
* **Read-only**
* Metadata
* **Read and Write**
* Administration
* **Read-only**
* Members
* **Read-only**
* Email addresses
**2. Get GitHub App Information**
> To add GitHub OAuth to `ale`, you'll need **4 ID/Key values** in addition to the GitHub App Name:
* **App ID**
* **Client ID**
* **Client Secret**
* **Private Key**
**2-1. App ID and Client ID**
> Grant the following permissions in the Permission section and click `Create GitHub App` to create your APP:
* **Read and Write**
* Actions
* Administration
* Commit statuses
* Contents
* Deployments
* Issues
* Pull requests
* Workflows
* **Read-only**
* Metadata
* **Read and Write**
* Administration
* **Read-only**
* Members
* **Read-only**
* Email addresses
**2. Get GitHub App Information**
> To add GitHub OAuth to `ale`, you'll need **4 ID/Key values** in addition to the GitHub App Name:
* **App ID**
* **Client ID**
* **Client Secret**
* **Private Key**
**2-1. App ID and Client ID**
 > After creating the App with the granted permissions, you can view the **App ID and Client ID**.
**2-2. Client Secret**
> After creating the App with the granted permissions, you can view the **App ID and Client ID**.
**2-2. Client Secret**
 > On the same screen, click `Generate a new client secret` to create and view the **Client Secret**.
**2-3. Private Key**
> On the same screen, click `Generate a new client secret` to create and view the **Client Secret**.
**2-3. Private Key**
 > Click `Generate a private key` at the bottom of the screen to download the pem file.
**3. Integrate GitHub App in ale**
> Click `Generate a private key` at the bottom of the screen to download the pem file.
**3. Integrate GitHub App in ale**
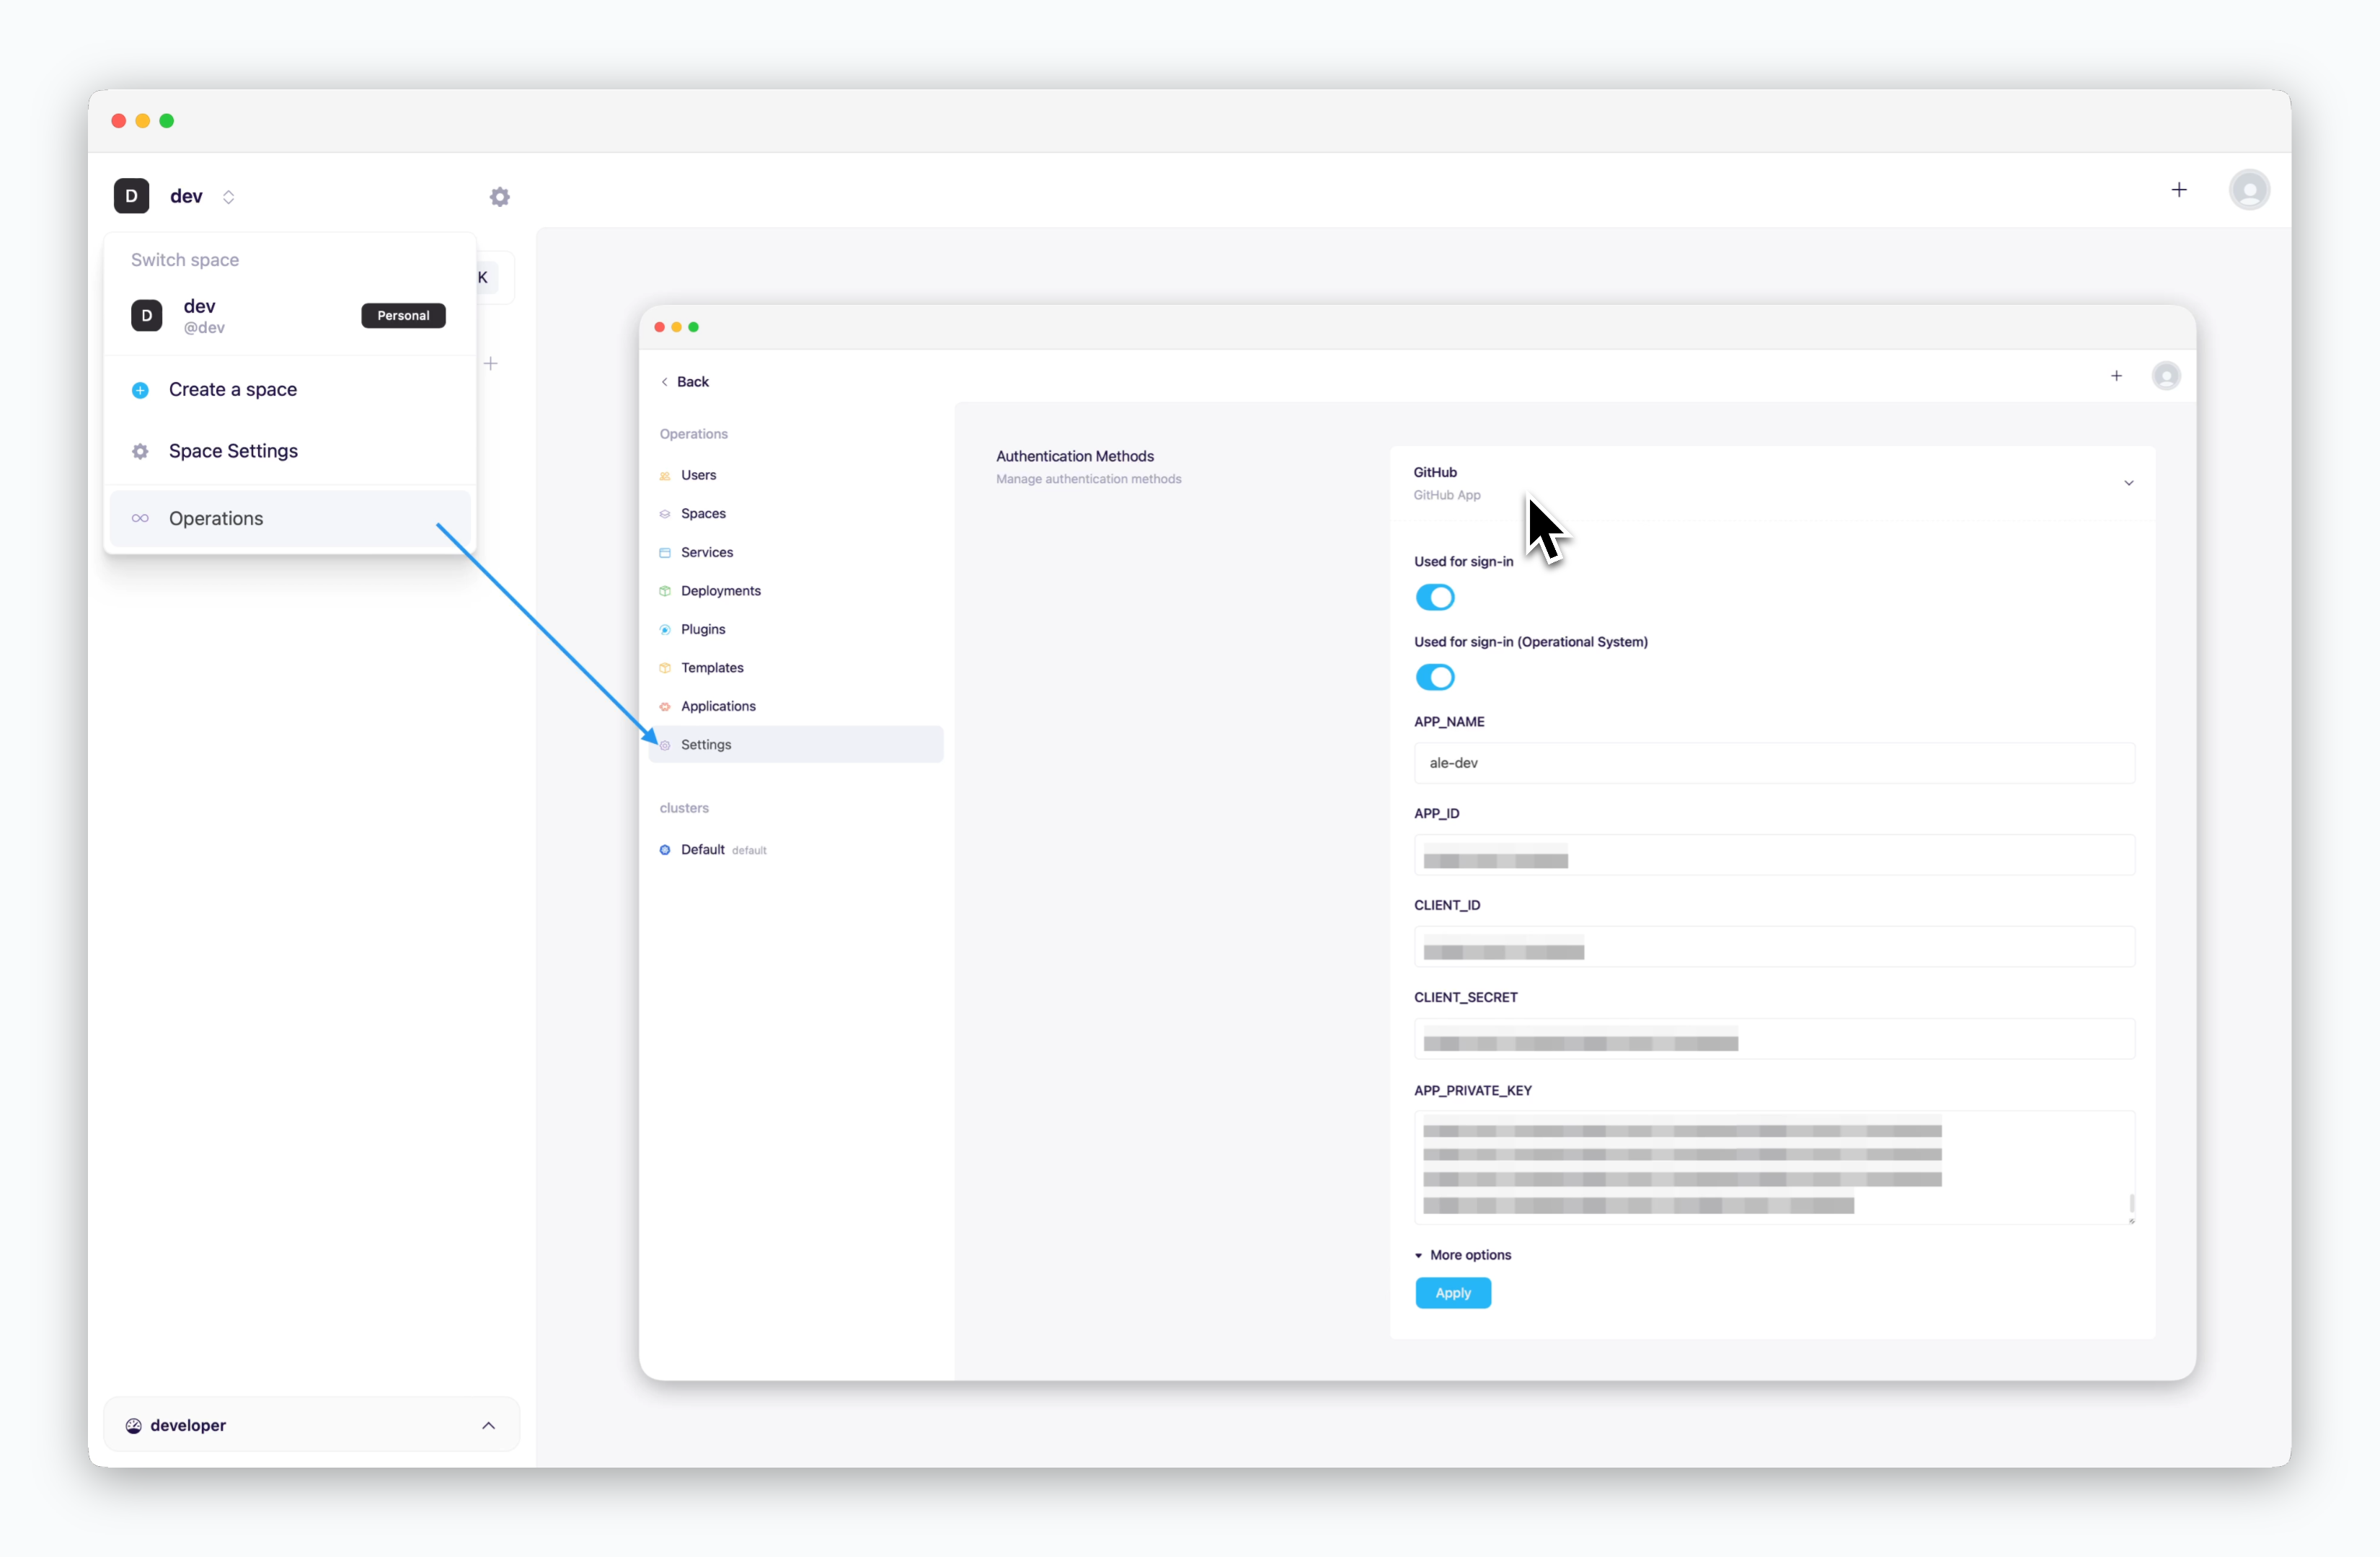 > Enter `http://localhost:9001` in your browser's address bar to access the operation system, then go to **Settings > Authentication > GitHub** dropdown. Enter the values obtained from the previous steps into each field and click `Apply`.
* **APP\_NAME**: GitHub App name
* **APP\_ID**: App ID
* **CLIENT\_ID**: Client ID
* **CLIENT\_SECRET**: Client secret
* **APP\_PRIVATE\_KEY**: Private key pem file value
## Access Dashboard
> Enter `http://localhost:9001` in your browser's address bar to access the operation system, then go to **Settings > Authentication > GitHub** dropdown. Enter the values obtained from the previous steps into each field and click `Apply`.
* **APP\_NAME**: GitHub App name
* **APP\_ID**: App ID
* **CLIENT\_ID**: Client ID
* **CLIENT\_SECRET**: Client secret
* **APP\_PRIVATE\_KEY**: Private key pem file value
## Access Dashboard
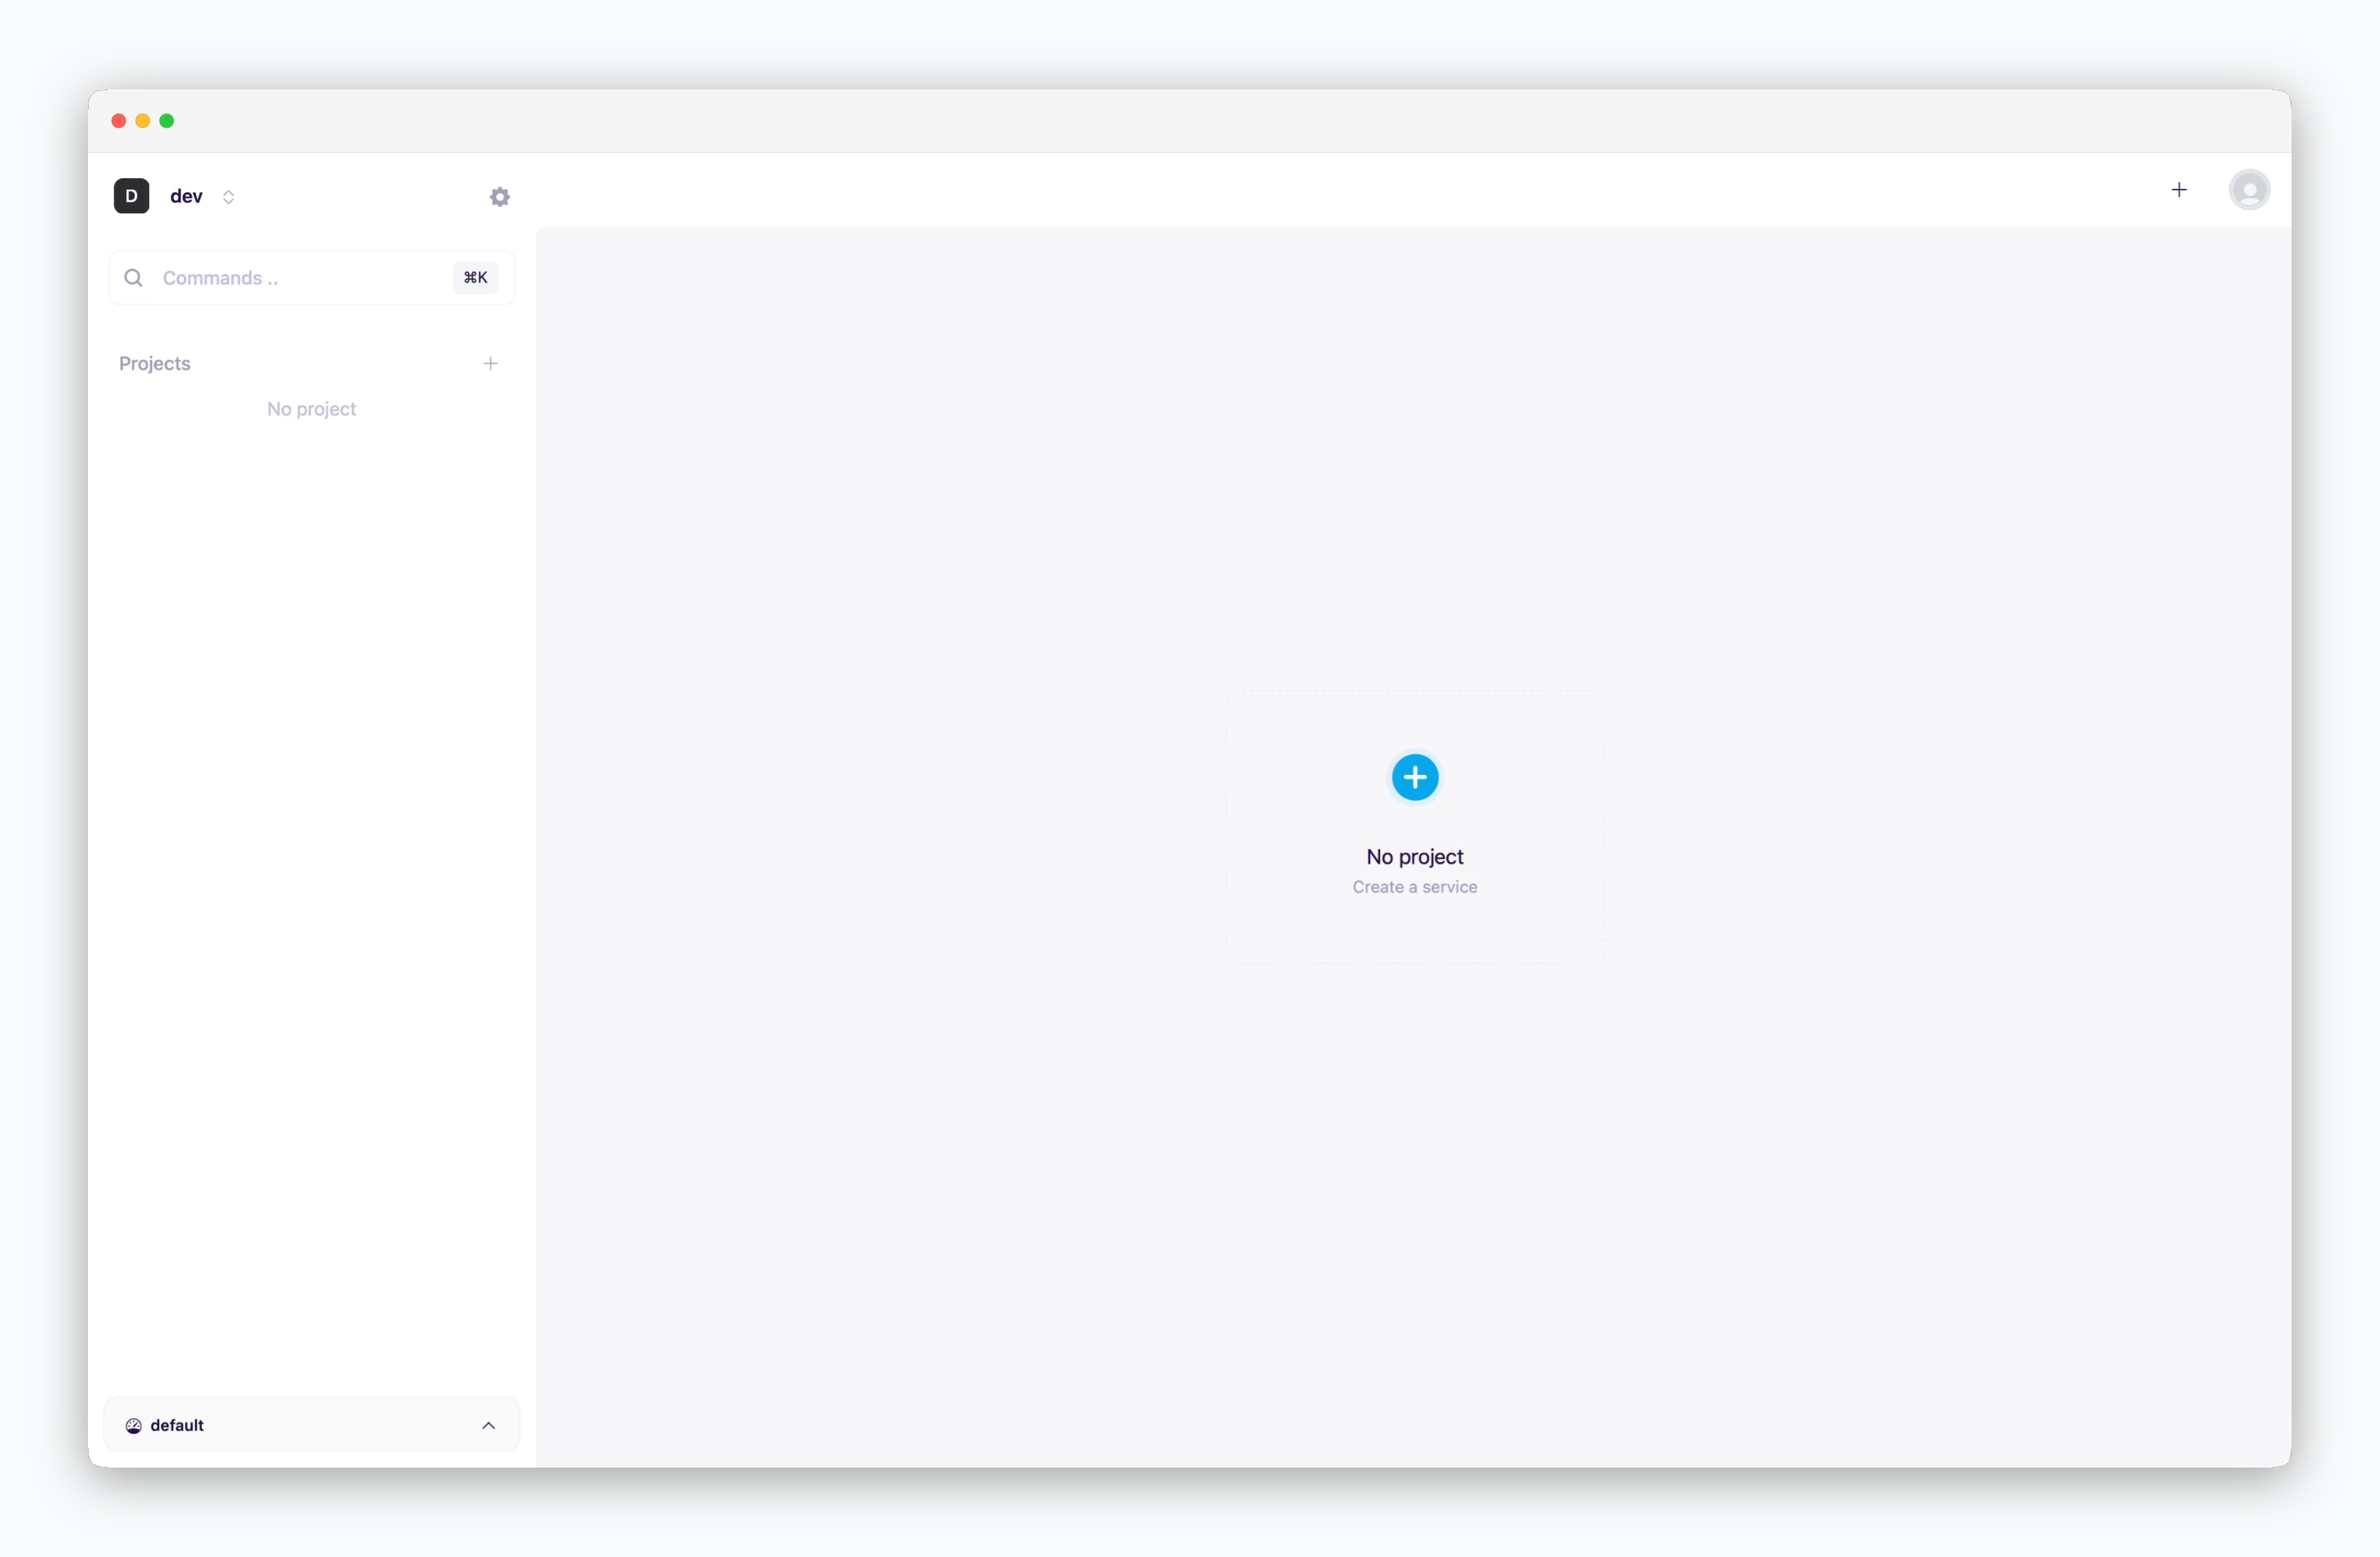 > Go to `http://localhost:9001`. On first access, you'll be connected to the default `@dev` space.
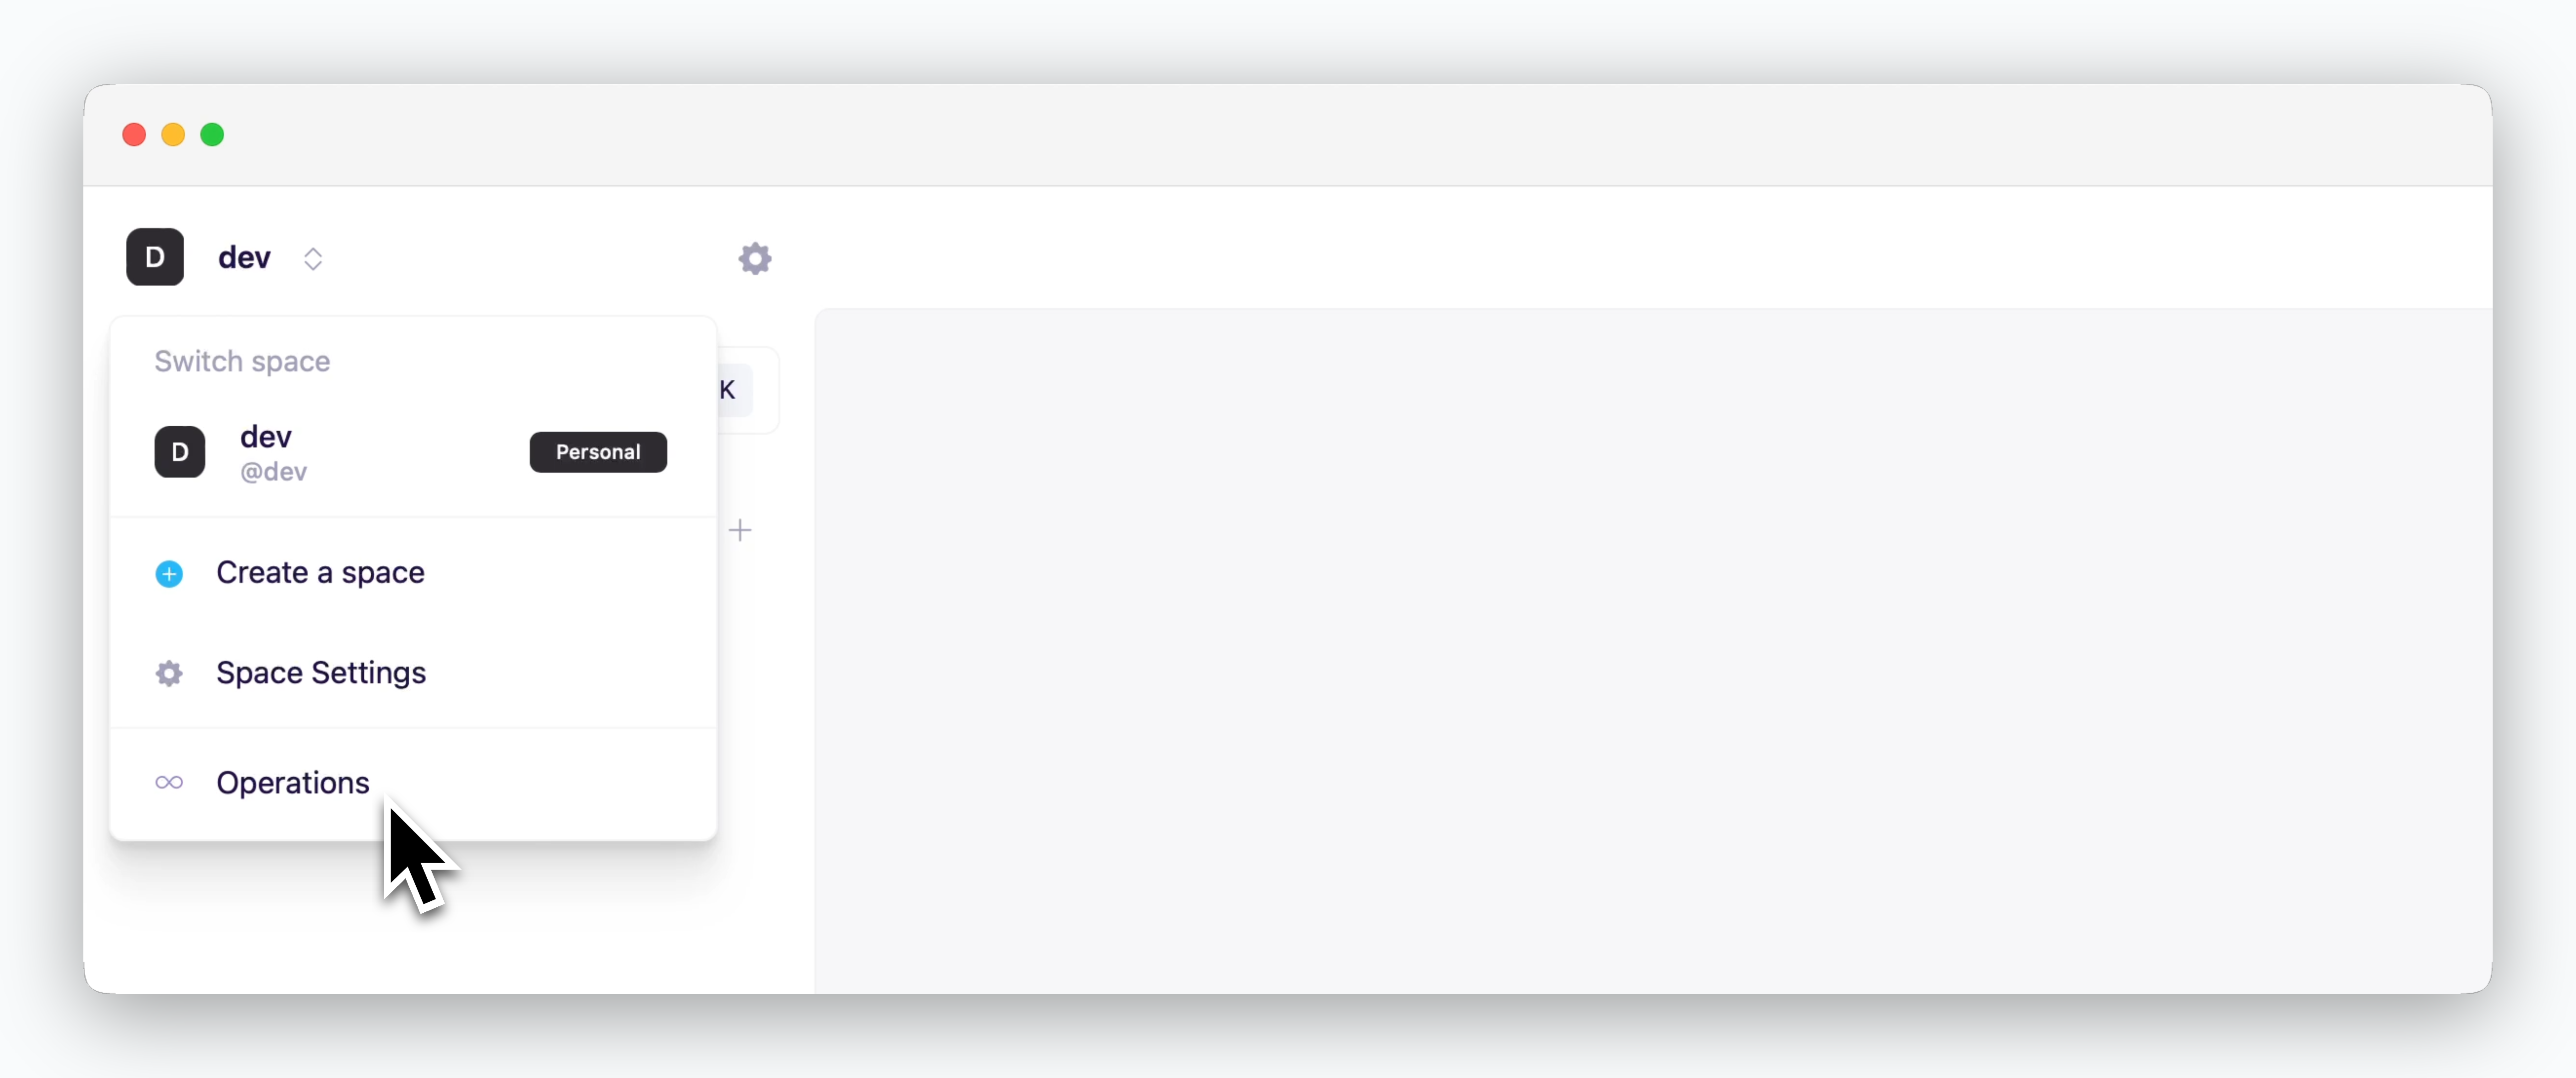 > You can access the operation system by clicking the space name in the top left of the dashboard and selecting the operation system.
## Deploy
> You can access the operation system by clicking the space name in the top left of the dashboard and selecting the operation system.
## Deploy
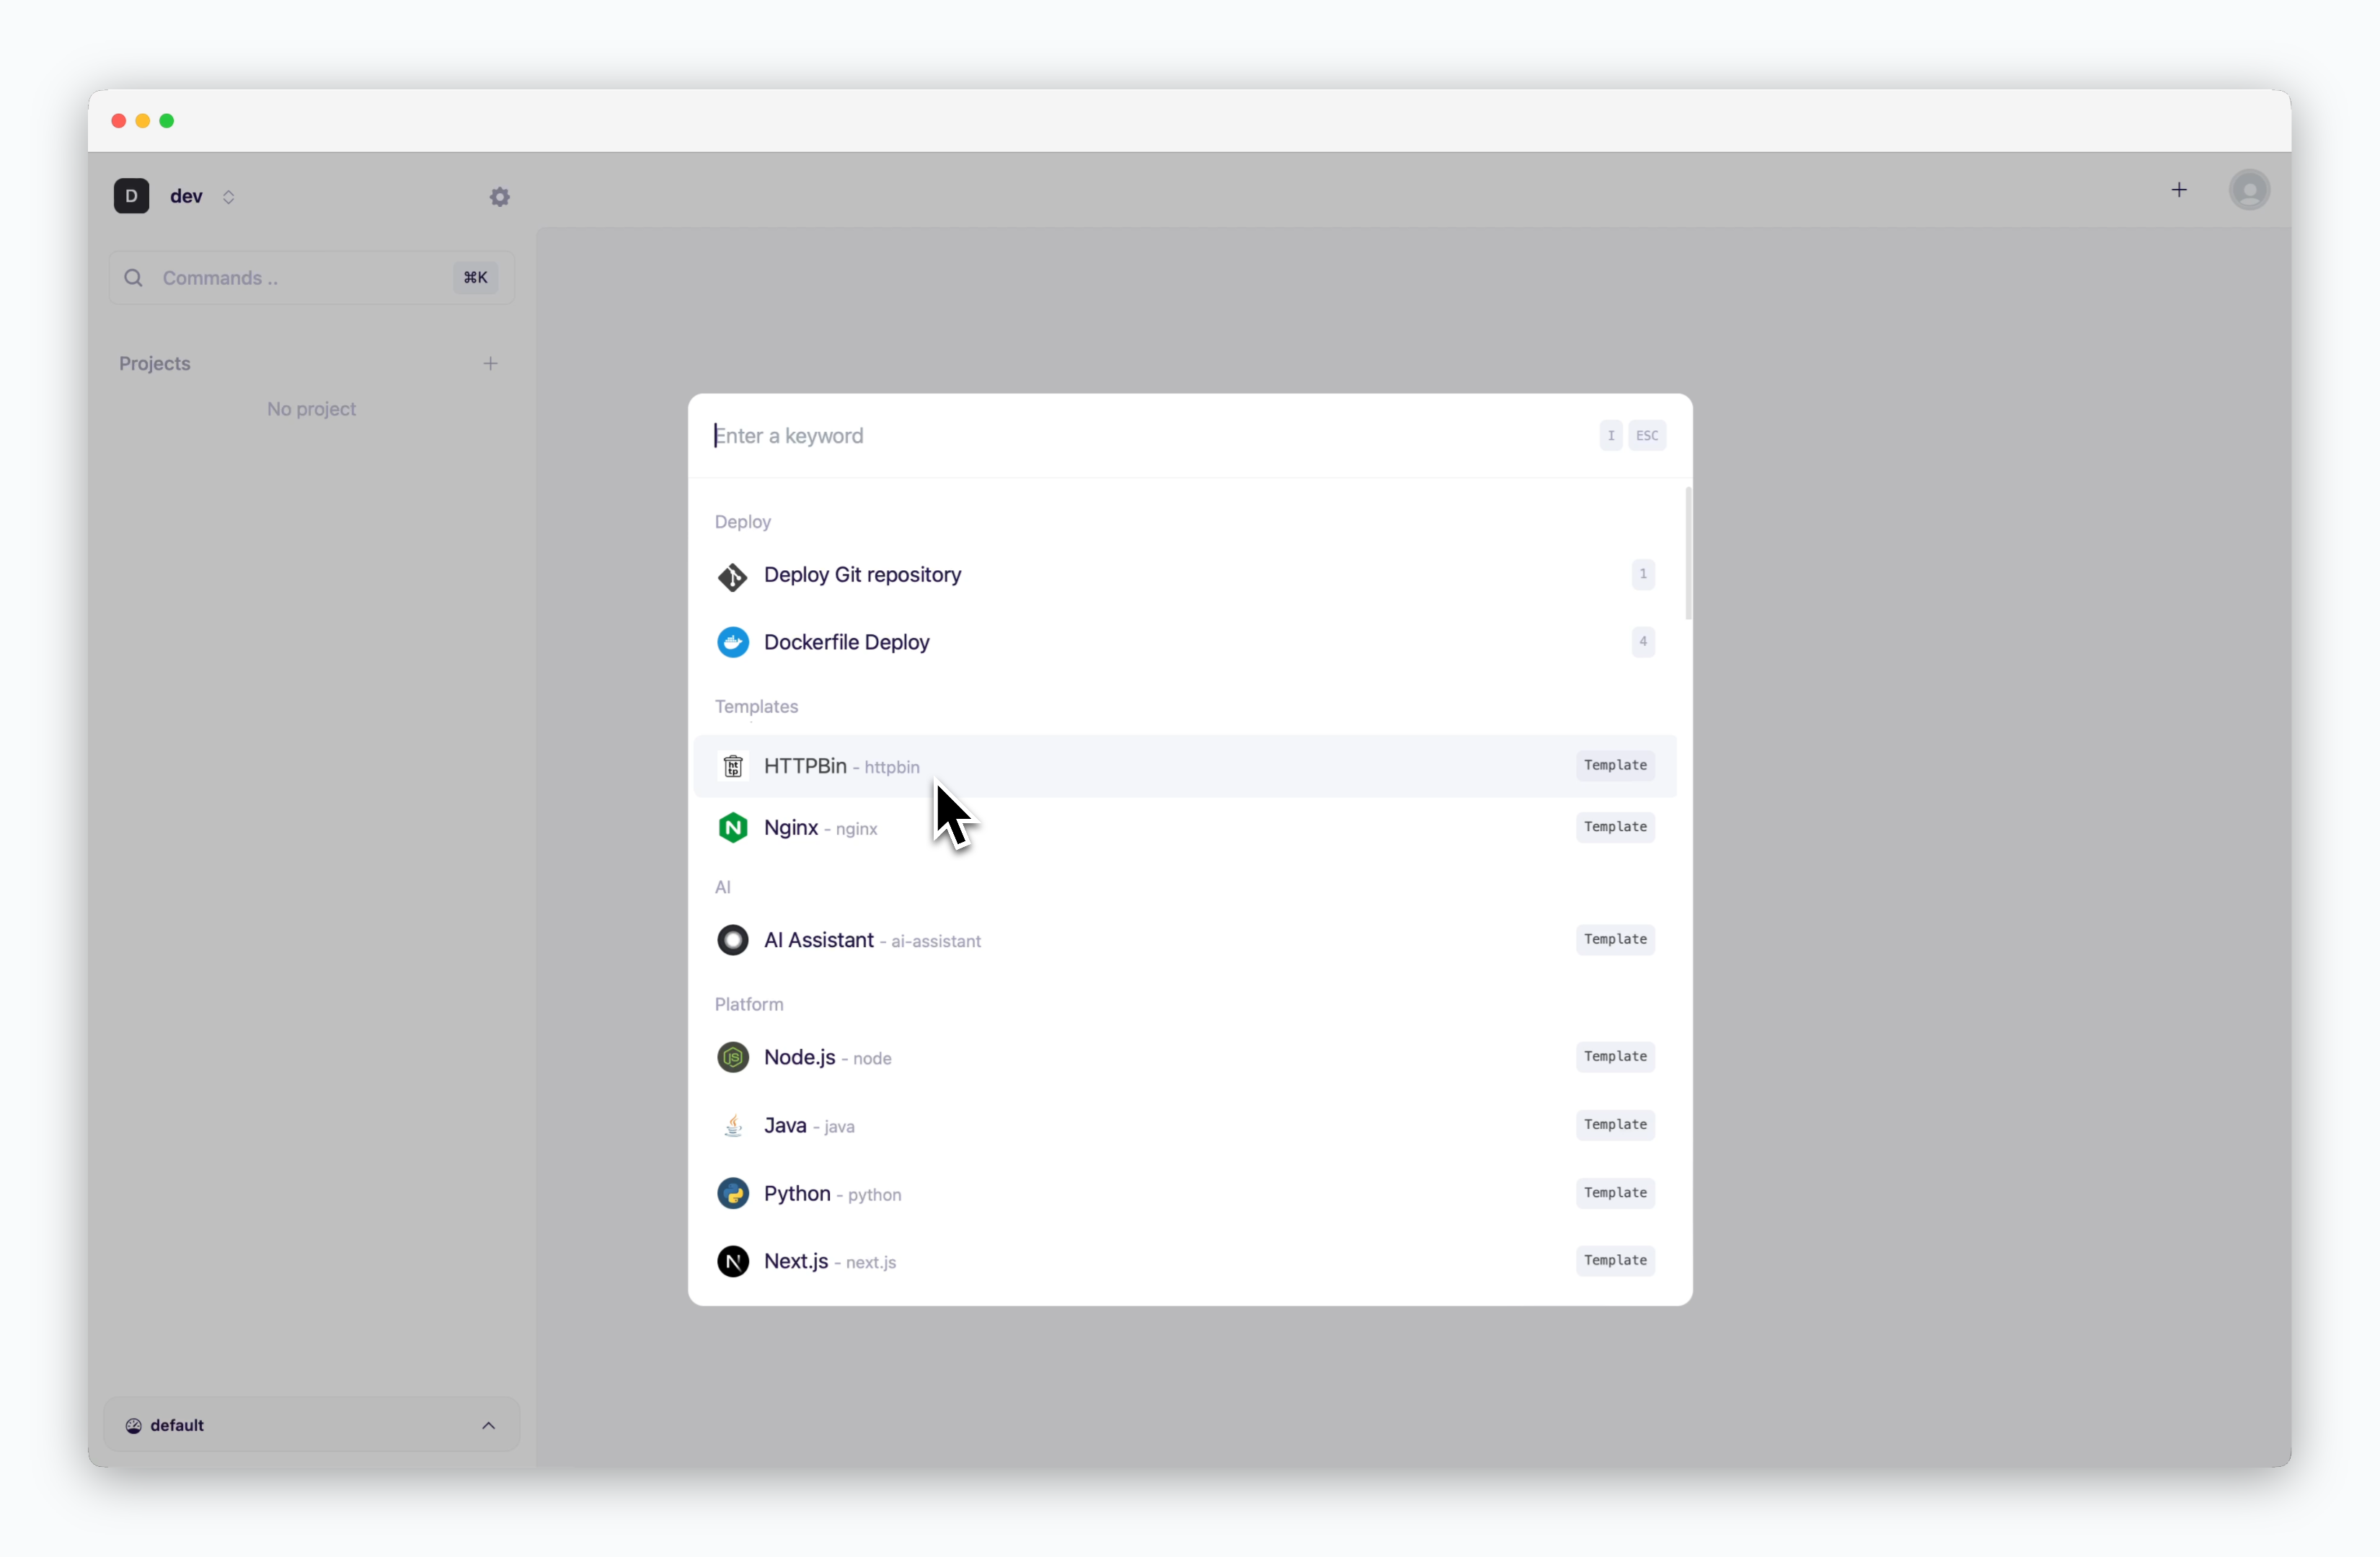 > On the dashboard, click or `⌘ + K` to open the deployment modal, then select the **HTTPBin** template.
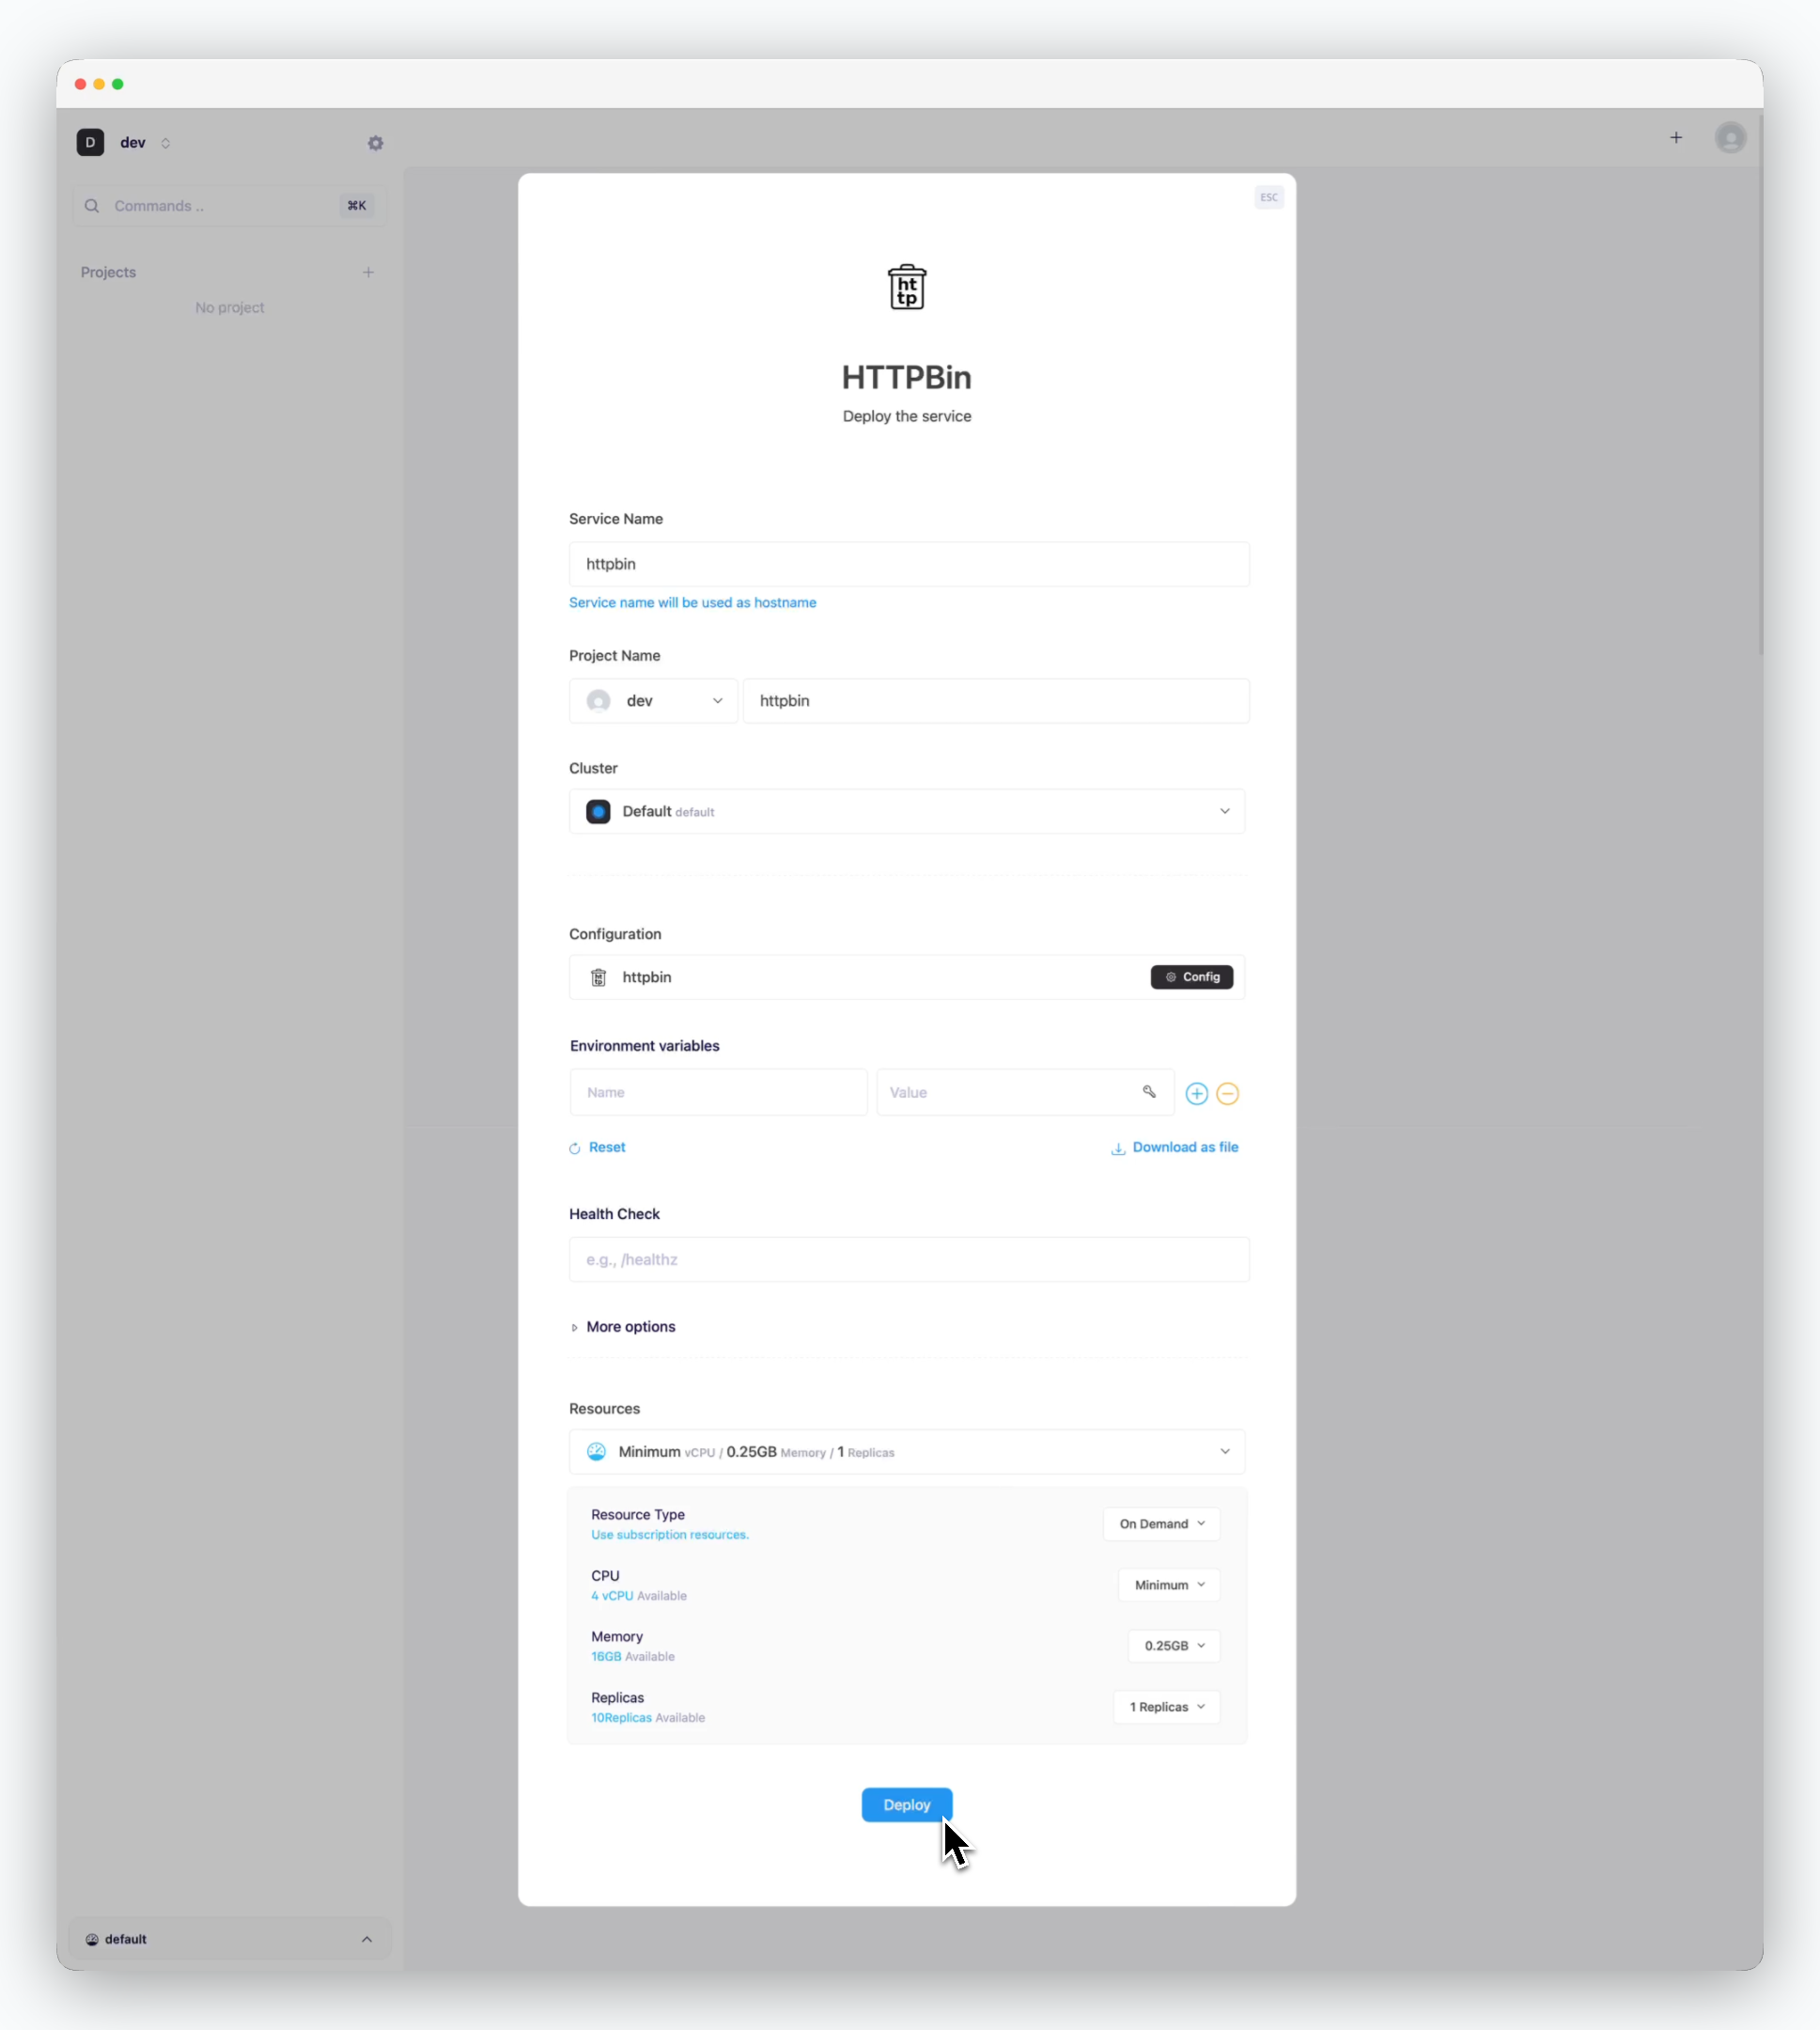 > Without changing any settings, click `Deploy` at the bottom.
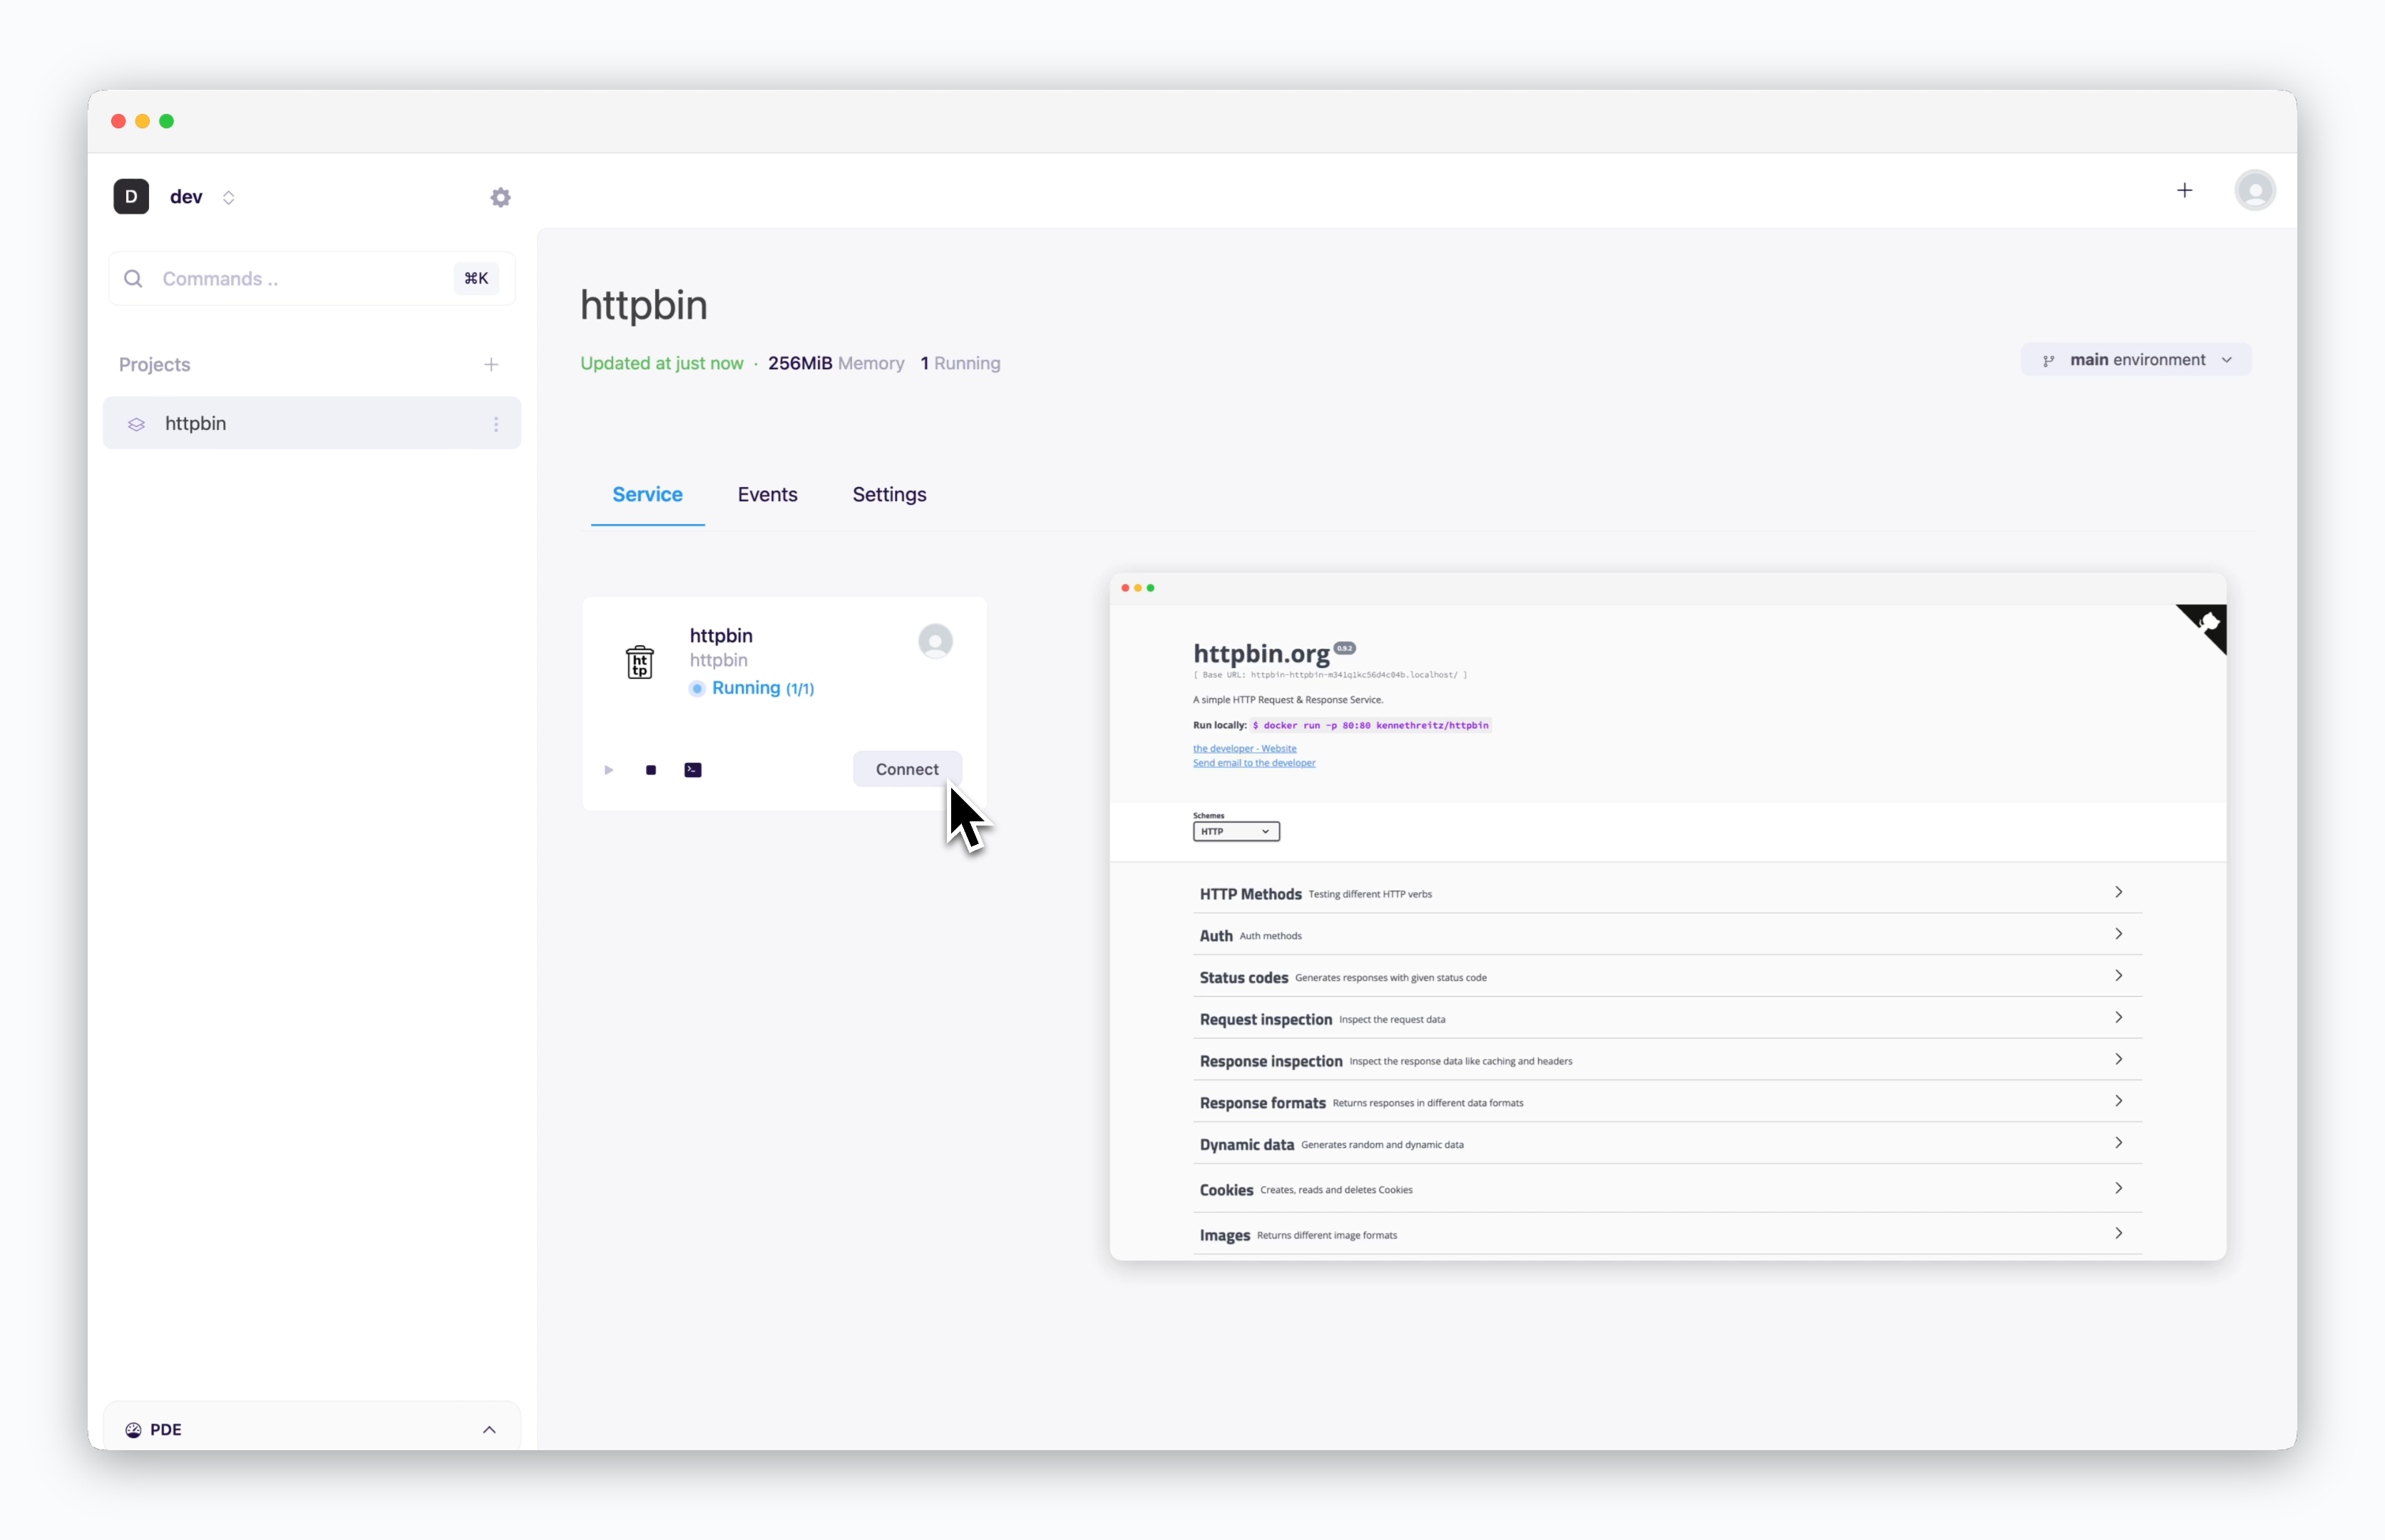 > Once deployment is complete, you can access the preview page.
You can deploy GitHub repositories by integrating your local environment with GitHub or deploy private repositories using SSH authentication. For general deployment with `ale`, refer to the [Deploying with ale page](/en/developers/deploy).
> Once deployment is complete, you can access the preview page.
You can deploy GitHub repositories by integrating your local environment with GitHub or deploy private repositories using SSH authentication. For general deployment with `ale`, refer to the [Deploying with ale page](/en/developers/deploy).