> ## Documentation Index
> Fetch the complete documentation index at: https://docs.ale.run/llms.txt
> Use this file to discover all available pages before exploring further.
# AWS EKS Cluster Setup
> A guide to creating an AWS EKS cluster using eksctl.
***
## Create eksctl YAML Specification
> Refer to the following content to create a YAML specification for the EKS cluster and save it in an appropriate location.
```yaml theme={null}
apiVersion: eksctl.io/v1alpha5
kind: ClusterConfig
metadata:
name: $CLUSTER_NAME
version: "1.30"
region: ap-northeast-2
iam:
withOIDC: true
vpc:
clusterEndpoints:
publicAccess: true
privateAccess: true
addons:
- name: vpc-cni
version: 1.18.1
attachPolicyARNs:
- arn:aws:iam::aws:policy/AmazonEKS_CNI_Policy
configurationValues: |-
enableNetworkPolicy: "true"
- name: coredns
- name: kube-proxy
managedNodeGroups:
- name: node-group-01
amiFamily: AmazonLinux2
instanceType: t3.large
minSize: 2
desiredCapacity: 2
maxSize: 4
privateNetworking: true
disableIMDSv1: true
volumeSize: 100
labels:
purpose: system
iam:
withAddonPolicies:
albIngress: true
ebs: true
efs: true
externalDNS: true
```
***
## Create EKS Cluster and Node Group
> Run the following command to create the EKS cluster.
```bash theme={null}
envsubst < [YAML file created in step 1] | eksctl create cluster -f -
# Use the manifest YAML file saved locally
```
***
## Nginx Ingress Controller
> Install the Nginx Ingress Controller using Helm.
```bash theme={null}
helm repo add ingress-nginx https://kubernetes.github.io/ingress-nginx
helm repo update
```
```bash theme={null}
helm install ingress-nginx ingress-nginx/ingress-nginx \
--version 4.11.2 \
--namespace ingress-nginx --create-namespace \
--set controller.service.type=LoadBalancer \
--set controller.service.annotations."service\.beta\.kubernetes\.io/aws-load-balancer-type"="nlb" \
--set controller.service.annotations."service\.beta\.kubernetes\.io/aws-load-balancer-scheme"="internet-facing" \
--set controller.service.annotations."service\.beta\.kubernetes\.io/aws-load-balancer-nlb-target-type"="ip" \
--set controller.allowSnippetAnnotations=true \
--set controller.admissionWebhooks.enabled=false
```
***
## Cert Manager
> Install Cert Manager using Helm.
```bash theme={null}
helm repo add jetstack https://charts.jetstack.io
helm repo update
```
```bash theme={null}
helm install \
cert-manager jetstack/cert-manager \
--namespace cert-manager \
--create-namespace \
--version v1.15.3 \
--set crds.enabled=true
```
***
## Storage
> AWS provides various storage options, and you can choose between Amazon Elastic File System (EFS) and Elastic Block Store (EBS) as the default storage for `ale` based on your use case.
**1.** Check if the cluster IAM OIDC provider exists. If not, create a new one.
```bash theme={null}
# Check if an OIDC provider is created for the cluster
aws eks describe-cluster --name $CLUSTER_NAME --query "cluster.identity.oidc.issuer" --output text | cut -d '/' -f 5
aws iam list-open-id-connect-providers | grep $OIDC_ID | cut -d "/" -f4
```
```bash theme={null}
# If an OIDC provider is not created for the cluster, use the following command to create one
aws eks describe-cluster --name $CLUSTER_NAME --query "cluster.identity.oidc.issuer" --output text | cut
eksctl utils associate-iam-oidc-provider --cluster $CLUSTER_NAME --approve
OIDC_ID=$(aws eks describe-cluster --name $CLUSTER_NAME --query "cluster.identity.oidc.issuer" --output text | cut -d '/' -f 5)
```
**2.** Create an IAM role for the EBS CSI driver.
```bash theme={null}
eksctl create iamserviceaccount \
--name ebs-csi-controller-sa \
--namespace kube-system \
--cluster ${CLUSTER_NAME} \
--role-name AmazonEKS_EBS_CSI_DriverRole \
--role-only \
--attach-policy-arn arn:aws:iam::aws:policy/service-role/AmazonEBSCSIDriverPolicy \
--approve
```
**3.** Apply the EBS CSI driver as an EKS add-on.
```bash theme={null}
export ACCOUNT_ID=$(aws sts get-caller-identity --query "Account" --output text | xargs -L 1)
```
```bash theme={null}
eksctl create addon \
--name aws-ebs-csi-driver \
--cluster ${CLUSTER_NAME} \
--service-account-role-arn arn:aws:iam::${ACCOUNT_ID}:role/AmazonEKS_EBS_CSI_DriverRole \
--force
```
**4.** Disable the default setting for gp2.
```bash theme={null}
kubectl patch storageclass gp2 \
-p '{"metadata": {"annotations":{"storageclass.kubernetes.io/is-default-class":"false"}}}'
```
**5.** Create a new Storage Class (gp3). It will be set as the default using the annotation `storageclass.kubernetes.io/is-default-class: "true"`.
```bash theme={null}
cat < 3s
```
**1.** Check if the cluster IAM OIDC provider exists. If not, create a new one.
```bash theme={null}
# Check if an OIDC provider is created for the cluster
aws eks describe-cluster --name $CLUSTER_NAME --query "cluster.identity.oidc.issuer" --output text | cut -d '/' -f 5
aws iam list-open-id-connect-providers | grep $OIDC_ID | cut -d "/" -f4
```
```bash theme={null}
# If an OIDC provider is not created for the cluster, use the following command to create one
aws eks describe-cluster --name $CLUSTER_NAME --query "cluster.identity.oidc.issuer" --output text | cut
eksctl utils associate-iam-oidc-provider --cluster $CLUSTER_NAME --approve
OIDC_ID=$(aws eks describe-cluster --name $CLUSTER_NAME --query "cluster.identity.oidc.issuer" --output text | cut -d '/' -f 5)
```
**2.** Create an IAM role for the EFS CSI driver and attach the required policy.
```bash theme={null}
eksctl create iamserviceaccount \
--name efs-csi-controller-sa \
--namespace kube-system \
--cluster ${CLUSTER_NAME} \
--role-name AmazonEKS_EFS_CSI_DriverRole \
--role-only \
--attach-policy-arn arn:aws:iam::aws:policy/service-role/AmazonEFSCSIDriverPolicy \
--approve
```
```bash theme={null}
TRUST_POLICY=$(aws iam get-role --role-name AmazonEKS_EFS_CSI_DriverRole --query 'Role.AssumeRolePolicyDocument' | \
sed -e 's/efs-csi-controller-sa/efs-csi-*/' -e 's/StringEquals/StringLike/')
```
```bash theme={null}
aws iam update-assume-role-policy --role-name AmazonEKS_EFS_CSI_DriverRole --policy-document "$TRUST_POLICY"
```
**3.** Apply the EFS CSI driver as an EKS add-on.
```bash theme={null}
export ACCOUNT_ID=$(aws sts get-caller-identity --query "Account" --output text | xargs -L 1)
```
```bash theme={null}
eksctl create addon \
--name aws-efs-csi-driver \
--cluster ${CLUSTER_NAME} \
--service-account-role-arn arn:aws:iam::${ACCOUNT_ID}:role/AmazonEKS_EFS_CSI_DriverRole \
--force
```
**4.** Retrieve information for creating an EFS file system and set it as environment variables.
```bash theme={null}
VPC_ID=$(aws eks describe-cluster \
--name $CLUSTER_NAME \
--query "cluster.resourcesVpcConfig.vpcId" \
--output text)
```
```bash theme={null}
CIDR_RANGE=$(aws ec2 describe-vpcs \
--vpc-ids $VPC_ID \
--query "Vpcs[].CidrBlock" \
--output text \
--region $AWS_REGION)
```
**5.** Create a security group and add an ingress rule to allow communication on port 2049 (NFS).
```bash theme={null}
SECURITY_GROUP_ID=$(aws ec2 create-security-group \
--group-name EfsSecurityGroup \
--description "EFS security group" \
--vpc-id $VPC_ID \
--output text)
```
```bash theme={null}
aws ec2 authorize-security-group-ingress \
--group-id $SECURITY_GROUP_ID \
--protocol tcp \
--port 2049 \
--cidr $CIDR_RANGE
```
**6.** Create an AWS EFS file system.
```bash theme={null}
aws efs create-file-system \
--region $AWS_REGION \
--performance-mode generalPurpose \
--query 'FileSystemId' \
--output text
```
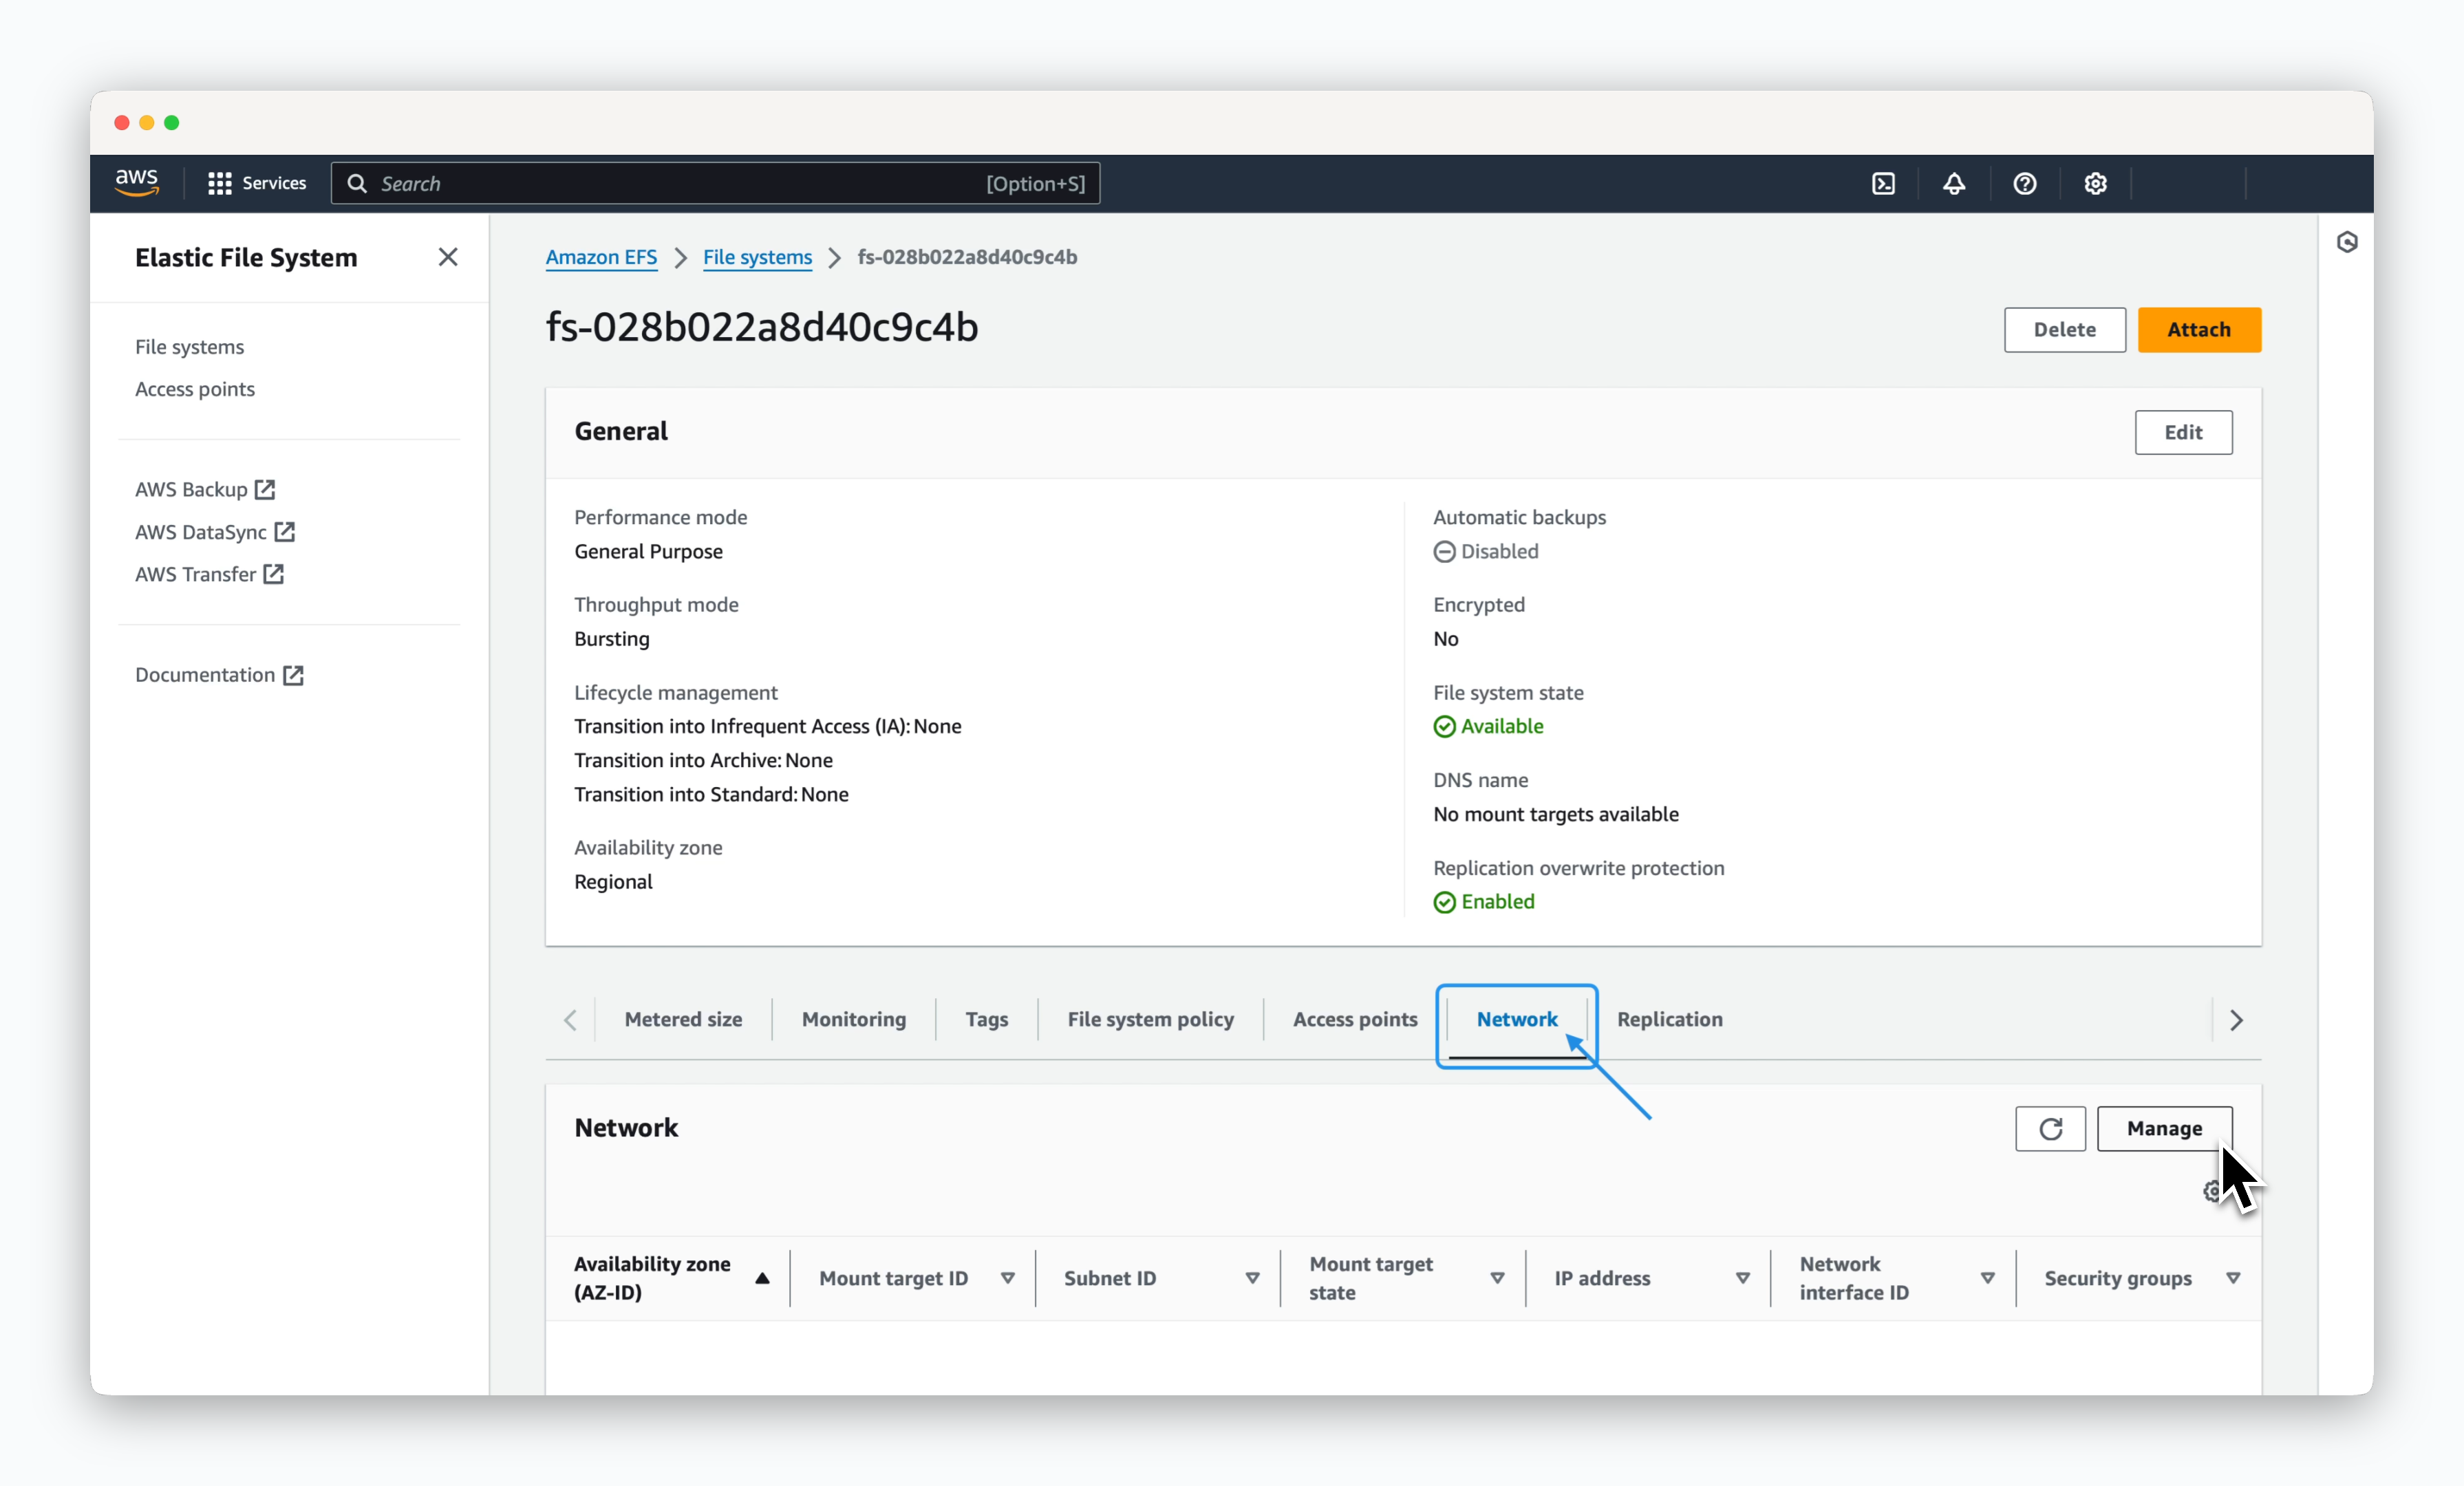
**7.** Access the created file system page in the AWS EFS management console, navigate to the Network tab, and click the Manage button.
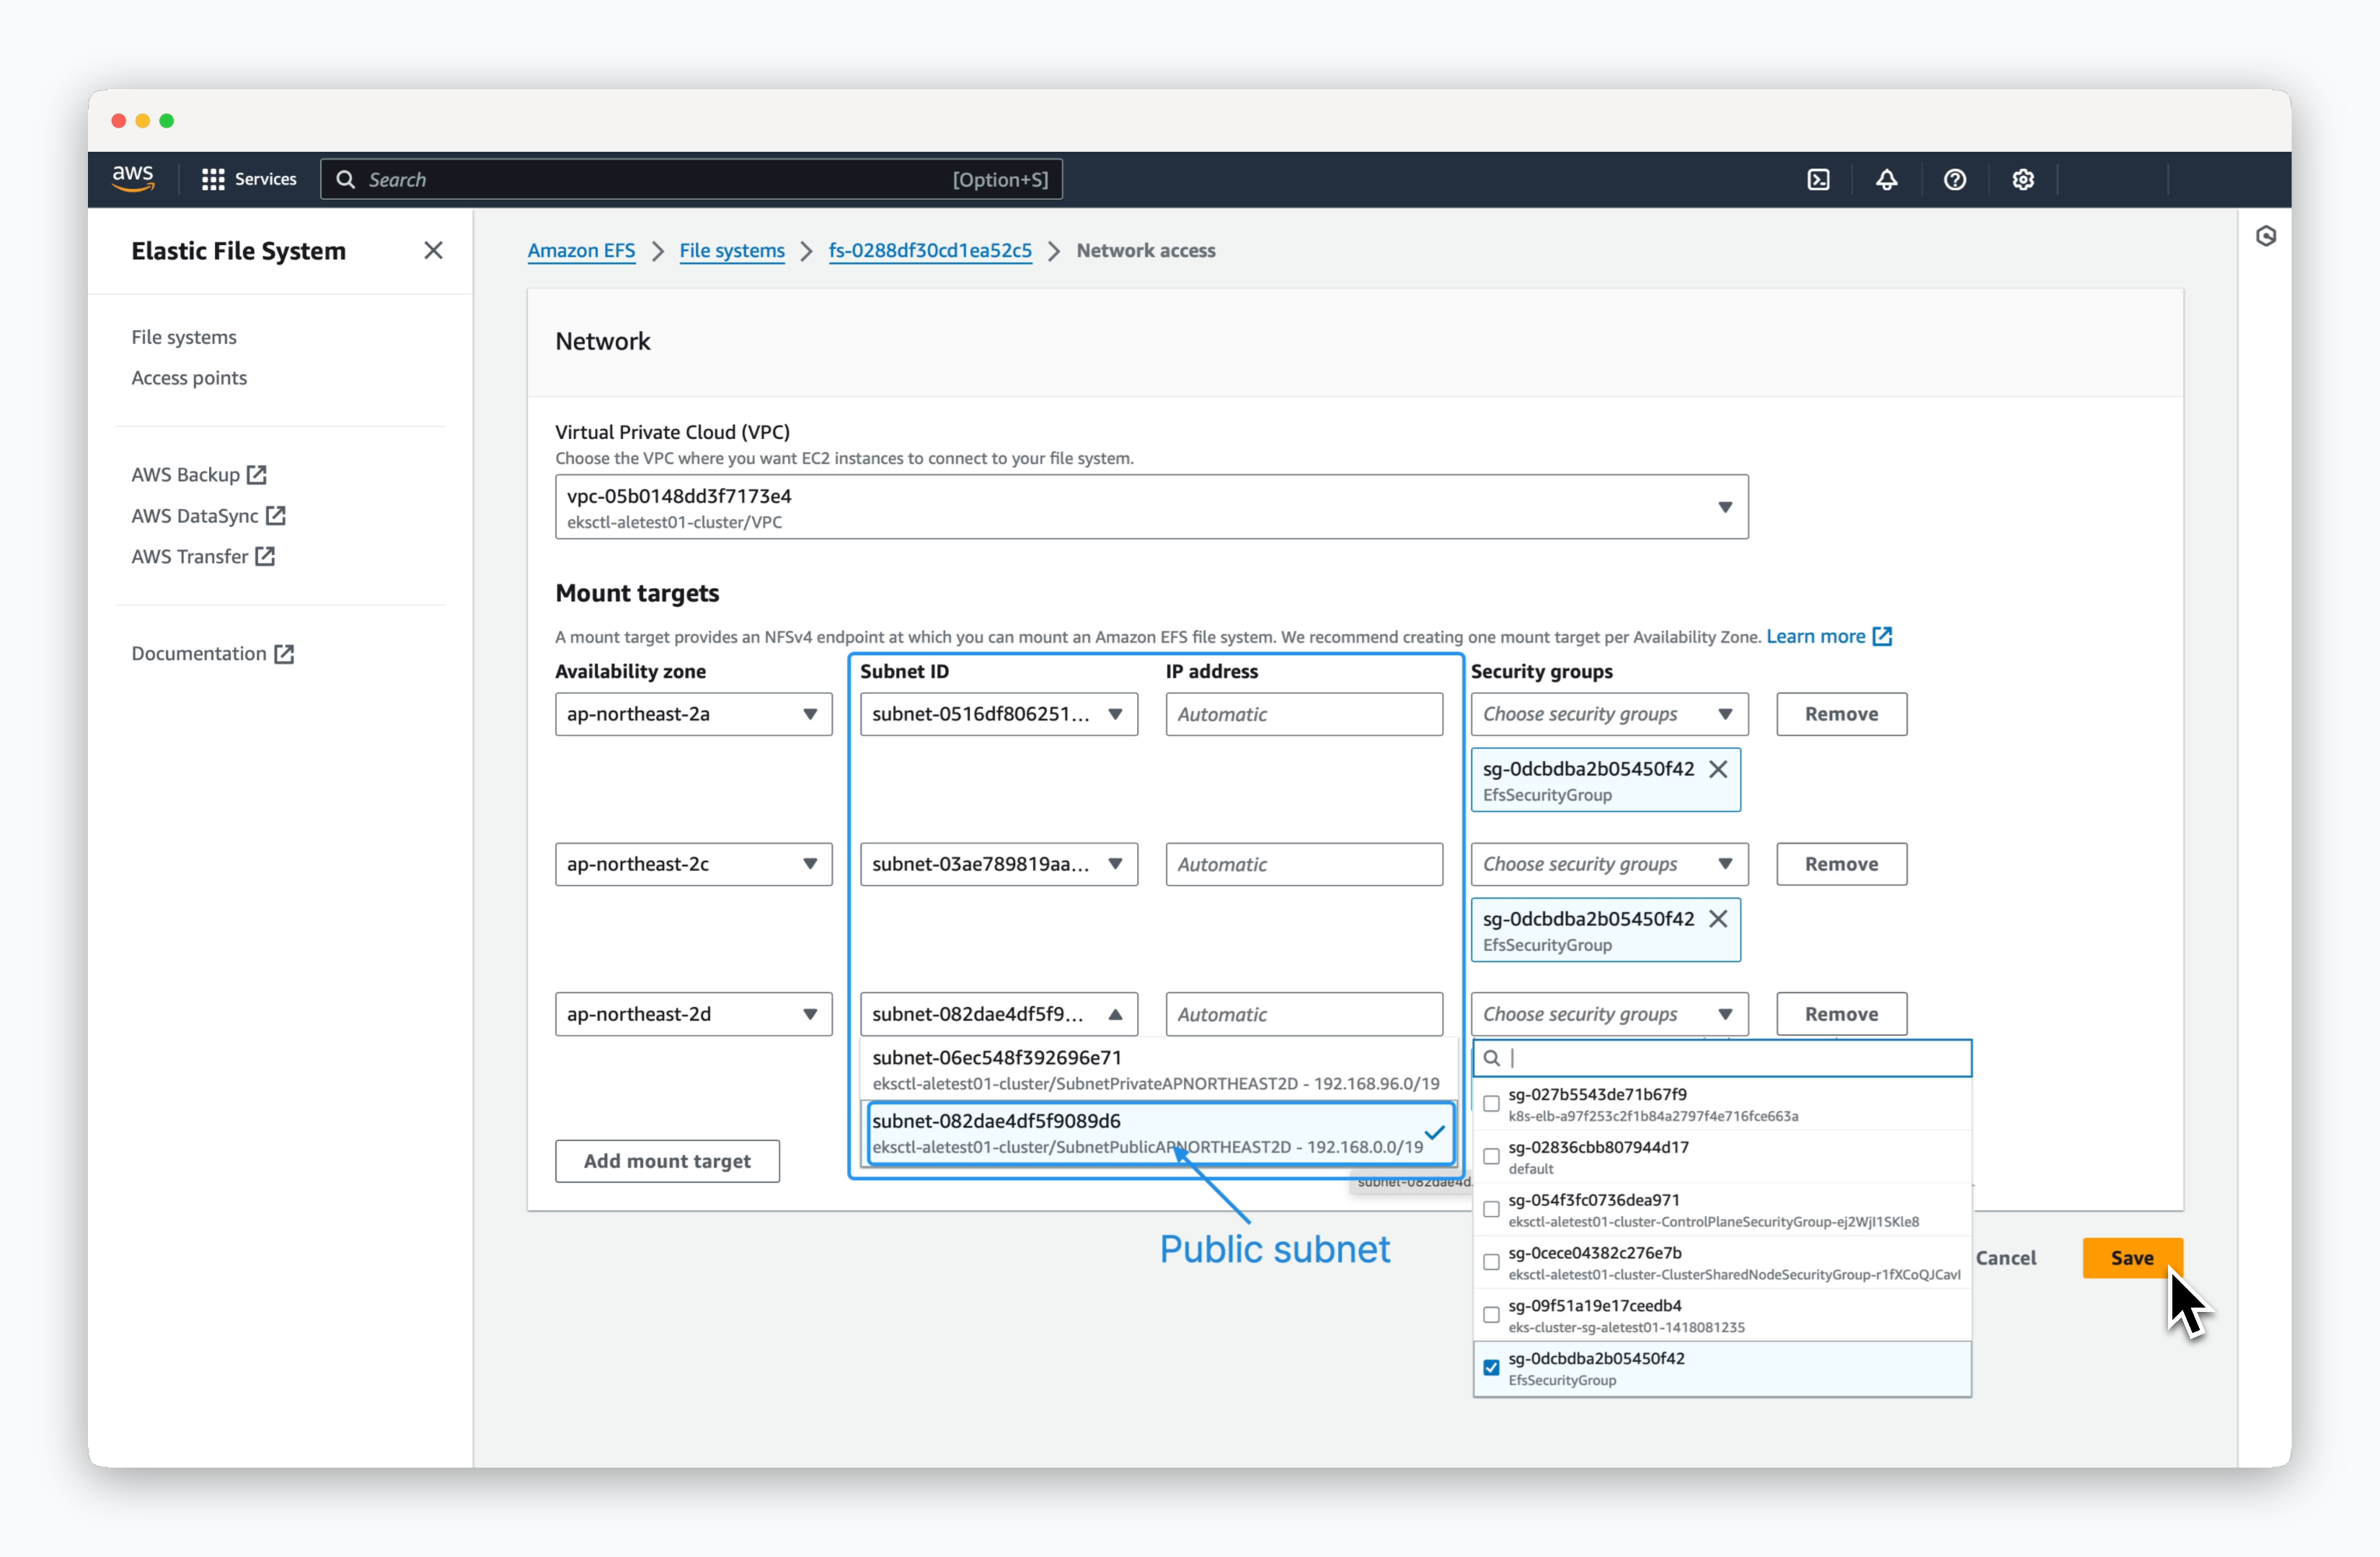
 **8.** Add mount targets based on the Availability Zones (AZ) where the Kubernetes cluster nodes are located. Select the public subnet for each node and choose the EFS security group with the inbound rule allowing port 2049. Then, save the configuration.
 **9.** Create a new Storage Class (efs-sc). It will be set as the default using the annotation `storageclass.kubernetes.io/is-default-class: "true"`.
```bash theme={null}
cat < 3s
```
## Kubernetes Metrics Server
> Install the Metrics Server to collect container resource information within the cluster.
Run the following commands to install the Kubernetes Metrics Server.
```bash theme={null}
helm repo add metrics-server https://kubernetes-sigs.github.io/metrics-server/
helm repo update
```
```bash theme={null}
helm install metrics-server metrics-server/metrics-server -n kube-system --set "args={--kubelet-insecure-tls}"
```
Verify that the Metrics Server is running correctly by executing the following command.
```bash theme={null}
kubectl get pods -n kube-system -l app.kubernetes.io/name=metrics-server
```
**9.** Create a new Storage Class (efs-sc). It will be set as the default using the annotation `storageclass.kubernetes.io/is-default-class: "true"`.
```bash theme={null}
cat < 3s
```
## Kubernetes Metrics Server
> Install the Metrics Server to collect container resource information within the cluster.
Run the following commands to install the Kubernetes Metrics Server.
```bash theme={null}
helm repo add metrics-server https://kubernetes-sigs.github.io/metrics-server/
helm repo update
```
```bash theme={null}
helm install metrics-server metrics-server/metrics-server -n kube-system --set "args={--kubelet-insecure-tls}"
```
Verify that the Metrics Server is running correctly by executing the following command.
```bash theme={null}
kubectl get pods -n kube-system -l app.kubernetes.io/name=metrics-server
```