> ## Documentation Index
> Fetch the complete documentation index at: https://docs.ale.run/llms.txt
> Use this file to discover all available pages before exploring further.
# マルチクラスター
> エールにクラスターを追加登録し、管理できます。
 > エールは主要なCSPのKubernetesクラスターだけでなく、Generic形式のクラスター接続もサポートしています。エージェントを実行する方法に応じて、以下の手順でクラスターを追加登録し管理すできます。
## Nodeとして実行
AWS EC2でエールを実行する場合は、以下の手順に従い、`ale-run`パッケージのインストール手順まで進めてください。
* [AWS EC2にエールをインストール](/ja/setup/ec2/01_ec2-prerequisite)
```bash theme={null}
mkdir ale-run
cd ale-run
```
```bash theme={null}
npm i @ale-run/runtime@latest
```
```bash theme={null}
pm2 start "npx aled agent -c [Kubernetes クラスター名]" --name "ale-agent" --watch
```
```bash theme={null}
pm2 log ale-agent
```
```bash theme={null}
...
0|ale-agent | [INFO] [runtime:init] using embedded mongodb "mongodb://127.0.0.1:27017/ale" at "/home/ubuntu/.ale/mongodb"
0|ale-agent | [INFO] [runtime:init] using cluster: default
0|ale-agent | [INFO] [k8s] KubernetesClusterDriver initialized with agent {"connection":{"context":"default","namespace":"ale"},"stat":{"db":{"url":"mongodb://127.0.0.1:27017/","dbName":"ale"}}}
0|ale-agent | [INFO] [k8s] ConfigContext initialized with {"connection":{"context":"default","namespace":"ale"},"stat":{"db":{"url":"mongodb://127.0.0.1:27017/","dbName":"ale"}}}
0|ale-agent | [INFO] [k8s] connect k8s to "default"
0|ale-agent | [INFO] [k8s] [agent] cluster agent initialized
0|ale-agent | [INFO] [runtime:agent] Ale Agent is initialized with config
0|ale-agent | [INFO] [agent-server] token loaded from secret "ale/agent-secrets"
0|ale-agent | [INFO] [runtime:init] agent httpsd is listening at 0.0.0.0:9801
0|ale-agent | [INFO] [runtime:init] agent token is cat-c5a7cea7b25709a0863ac64a80155d46.930d450e5893040b54820c83
0|ale-agent | [INFO] [k8s] config loaded from cluster from "ale/agent-config"
0|ale-agent | [INFO] [stat] stat controller init {"collector":{"prefix":"ale"},"db":{"url":"mongodb://127.0.0.1:27017/","dbName":"ale"},"connection":{"context":"default","namespace":"ale"}}
0|ale-agent | [INFO] [stat] connect k8s to "default"
0|ale-agent | [INFO] [stat] stat watcher started
```
実行中にデータベースの競合が発生した場合や設定を初期化したい場合は、以下のコマンドを入力して既存のエールデータを削除してから再実行してください。
```bash theme={null}
rm -r ~/.ale
```
> エールは主要なCSPのKubernetesクラスターだけでなく、Generic形式のクラスター接続もサポートしています。エージェントを実行する方法に応じて、以下の手順でクラスターを追加登録し管理すできます。
## Nodeとして実行
AWS EC2でエールを実行する場合は、以下の手順に従い、`ale-run`パッケージのインストール手順まで進めてください。
* [AWS EC2にエールをインストール](/ja/setup/ec2/01_ec2-prerequisite)
```bash theme={null}
mkdir ale-run
cd ale-run
```
```bash theme={null}
npm i @ale-run/runtime@latest
```
```bash theme={null}
pm2 start "npx aled agent -c [Kubernetes クラスター名]" --name "ale-agent" --watch
```
```bash theme={null}
pm2 log ale-agent
```
```bash theme={null}
...
0|ale-agent | [INFO] [runtime:init] using embedded mongodb "mongodb://127.0.0.1:27017/ale" at "/home/ubuntu/.ale/mongodb"
0|ale-agent | [INFO] [runtime:init] using cluster: default
0|ale-agent | [INFO] [k8s] KubernetesClusterDriver initialized with agent {"connection":{"context":"default","namespace":"ale"},"stat":{"db":{"url":"mongodb://127.0.0.1:27017/","dbName":"ale"}}}
0|ale-agent | [INFO] [k8s] ConfigContext initialized with {"connection":{"context":"default","namespace":"ale"},"stat":{"db":{"url":"mongodb://127.0.0.1:27017/","dbName":"ale"}}}
0|ale-agent | [INFO] [k8s] connect k8s to "default"
0|ale-agent | [INFO] [k8s] [agent] cluster agent initialized
0|ale-agent | [INFO] [runtime:agent] Ale Agent is initialized with config
0|ale-agent | [INFO] [agent-server] token loaded from secret "ale/agent-secrets"
0|ale-agent | [INFO] [runtime:init] agent httpsd is listening at 0.0.0.0:9801
0|ale-agent | [INFO] [runtime:init] agent token is cat-c5a7cea7b25709a0863ac64a80155d46.930d450e5893040b54820c83
0|ale-agent | [INFO] [k8s] config loaded from cluster from "ale/agent-config"
0|ale-agent | [INFO] [stat] stat controller init {"collector":{"prefix":"ale"},"db":{"url":"mongodb://127.0.0.1:27017/","dbName":"ale"},"connection":{"context":"default","namespace":"ale"}}
0|ale-agent | [INFO] [stat] connect k8s to "default"
0|ale-agent | [INFO] [stat] stat watcher started
```
実行中にデータベースの競合が発生した場合や設定を初期化したい場合は、以下のコマンドを入力して既存のエールデータを削除してから再実行してください。
```bash theme={null}
rm -r ~/.ale
```
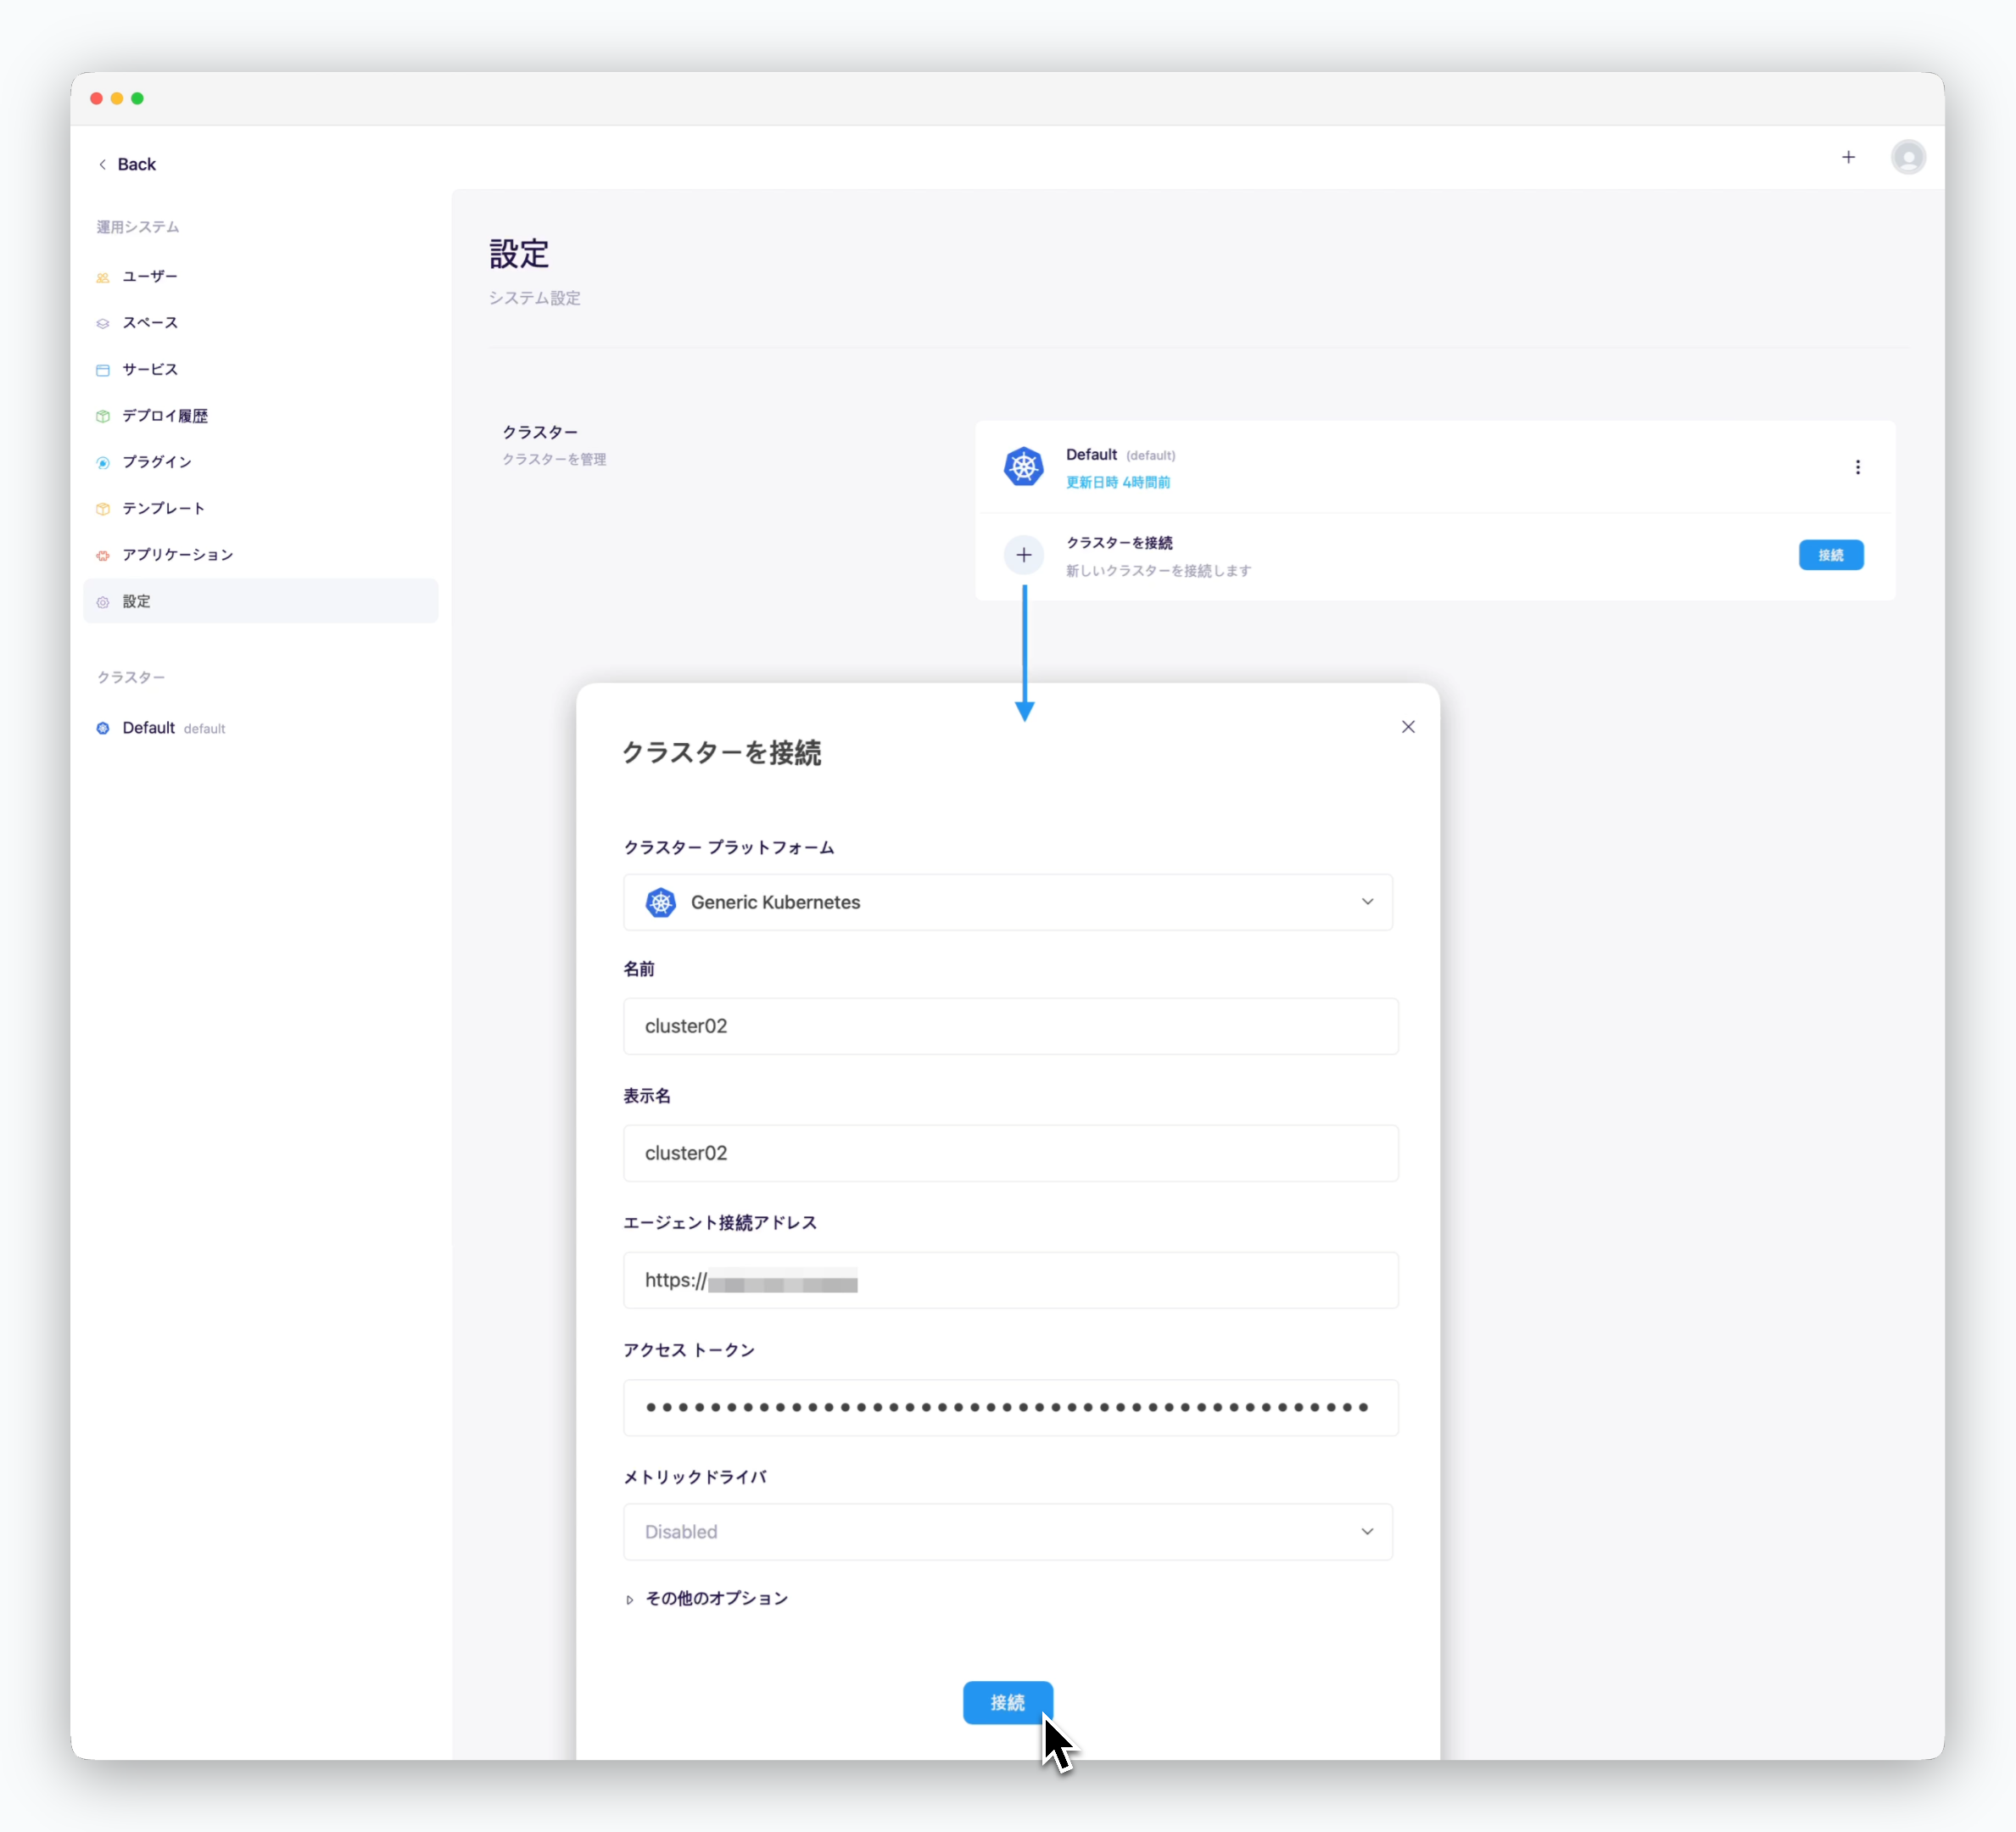 * **クラスタープラットフォーム** : Generic Kubernetes
* **名前、表示名** : ダッシュボードに表示される名前
* **エージェント接続アドレス**
* **アクセストークン** : 前の手順で取得したトークン値
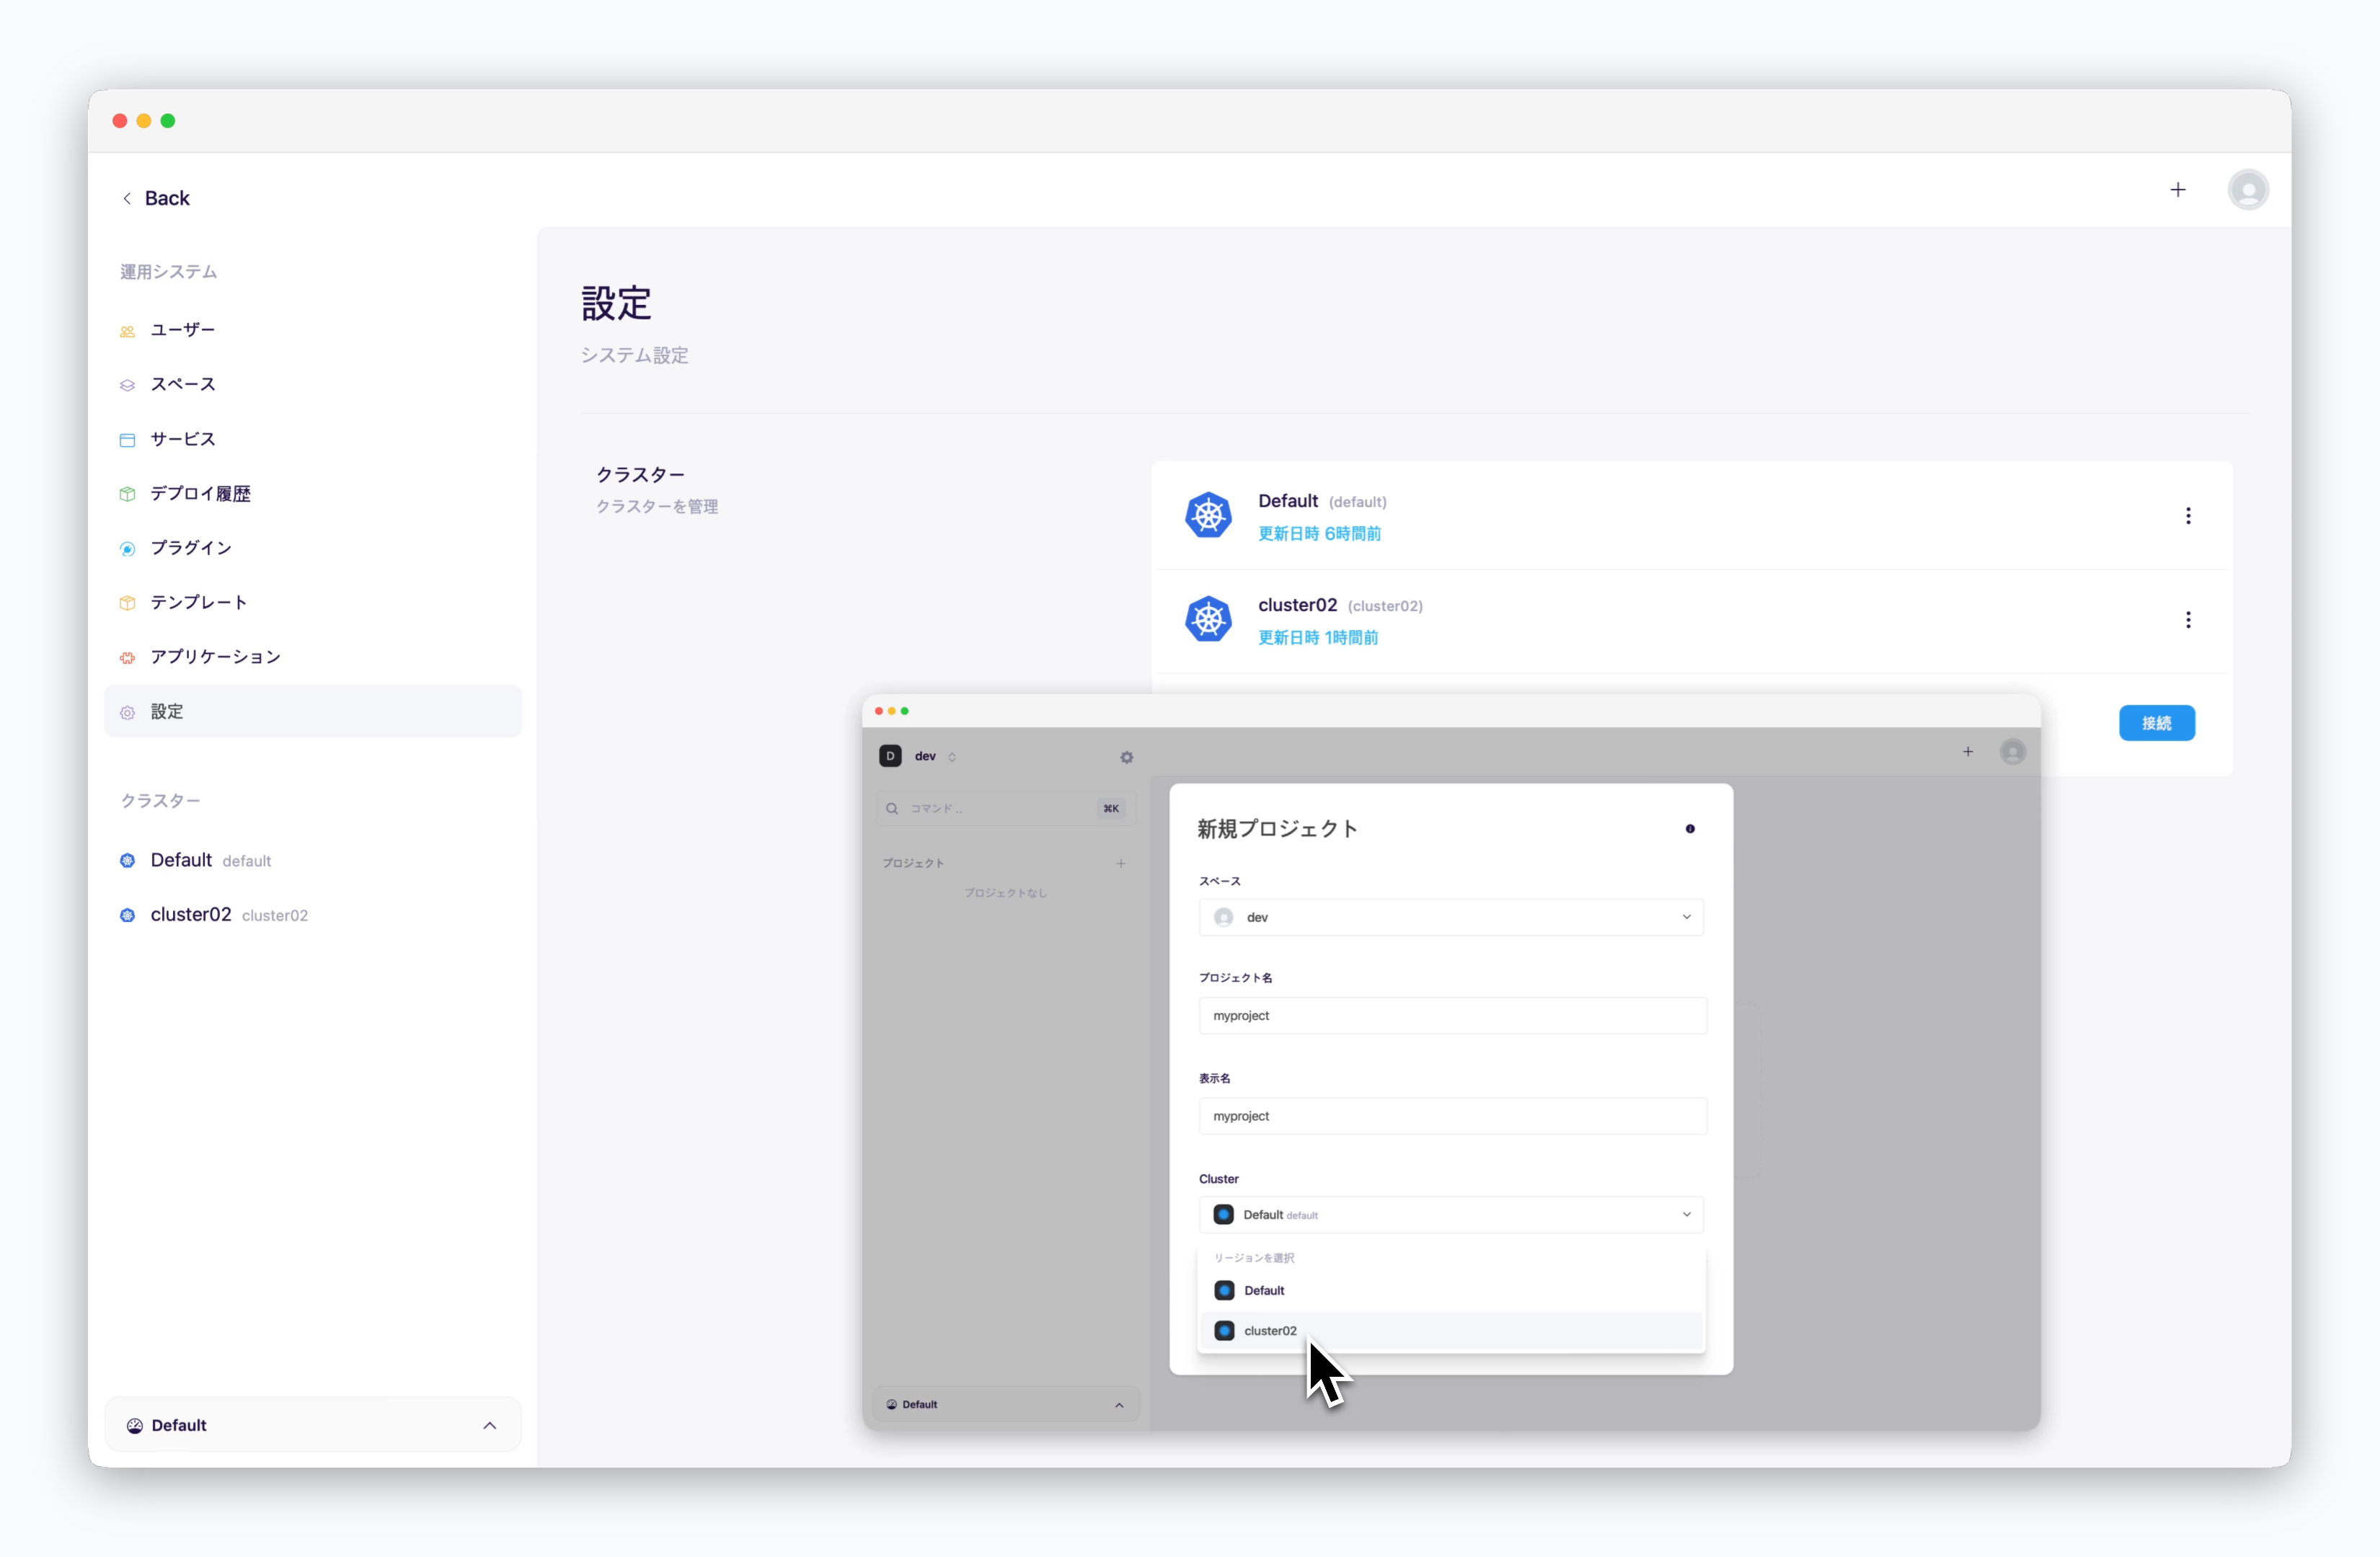
接続されたクラスターは、ダッシュボードでサービスをデプロイするためのプロジェクトまたは環境を作成する際に、デプロイ先のクラスターとして選択できます。
* **クラスタープラットフォーム** : Generic Kubernetes
* **名前、表示名** : ダッシュボードに表示される名前
* **エージェント接続アドレス**
* **アクセストークン** : 前の手順で取得したトークン値
接続されたクラスターは、ダッシュボードでサービスをデプロイするためのプロジェクトまたは環境を作成する際に、デプロイ先のクラスターとして選択できます。
 ## Kubernetes Podでの実行
Kubernetesクラスターにエールをインストールする場合は、以下のページを参考に進めてください。
* [AWS EKS](/ja/setup/eks-eksctl/01_aws-prerequisite)
* [GCP GKE](/ja/setup/gke/01_gke-prerequisite)
```bash AWS EKS - hostname theme={null}
kubectl get svc \
-n ale \
ale-agent-lb \
-o jsonpath='{.status.loadBalancer.ingress[0].hostname}' \
| xargs -I{} echo "https://{}"
```
```bash GKE, AKE - ip theme={null}
kubectl get svc \
-n ale \
ale-agent-lb \
-o jsonpath='{.status.loadBalancer.ingress[0].ip}' \
| xargs -I{} echo "https://{}"
```
```bash theme={null}
kubectl get secrets agent-secrets -n ale -o jsonpath='{.data.AGENT_TOKEN}' | base64 --decode
```
* **クラスタープラットフォーム** : 接続するクラスターのプロバイダーを選択
* **名前、表示名** : ダッシュボードに表示される名前
* **エージェント接続アドレス**
* **アクセストークン** : 前の手順で取得したトークン値
接続されたクラスターは、ダッシュボードでサービスをデプロイするためのプロジェクトまたは環境を作成する際に、デプロイ先のクラスターとして選択できます。
## Kubernetes Podでの実行
Kubernetesクラスターにエールをインストールする場合は、以下のページを参考に進めてください。
* [AWS EKS](/ja/setup/eks-eksctl/01_aws-prerequisite)
* [GCP GKE](/ja/setup/gke/01_gke-prerequisite)
```bash AWS EKS - hostname theme={null}
kubectl get svc \
-n ale \
ale-agent-lb \
-o jsonpath='{.status.loadBalancer.ingress[0].hostname}' \
| xargs -I{} echo "https://{}"
```
```bash GKE, AKE - ip theme={null}
kubectl get svc \
-n ale \
ale-agent-lb \
-o jsonpath='{.status.loadBalancer.ingress[0].ip}' \
| xargs -I{} echo "https://{}"
```
```bash theme={null}
kubectl get secrets agent-secrets -n ale -o jsonpath='{.data.AGENT_TOKEN}' | base64 --decode
```
* **クラスタープラットフォーム** : 接続するクラスターのプロバイダーを選択
* **名前、表示名** : ダッシュボードに表示される名前
* **エージェント接続アドレス**
* **アクセストークン** : 前の手順で取得したトークン値
接続されたクラスターは、ダッシュボードでサービスをデプロイするためのプロジェクトまたは環境を作成する際に、デプロイ先のクラスターとして選択できます。