> ## Documentation Index
> Fetch the complete documentation index at: https://docs.ale.run/llms.txt
> Use this file to discover all available pages before exploring further.
# Google
> Google OAuthを`ale`に追加するガイドです。
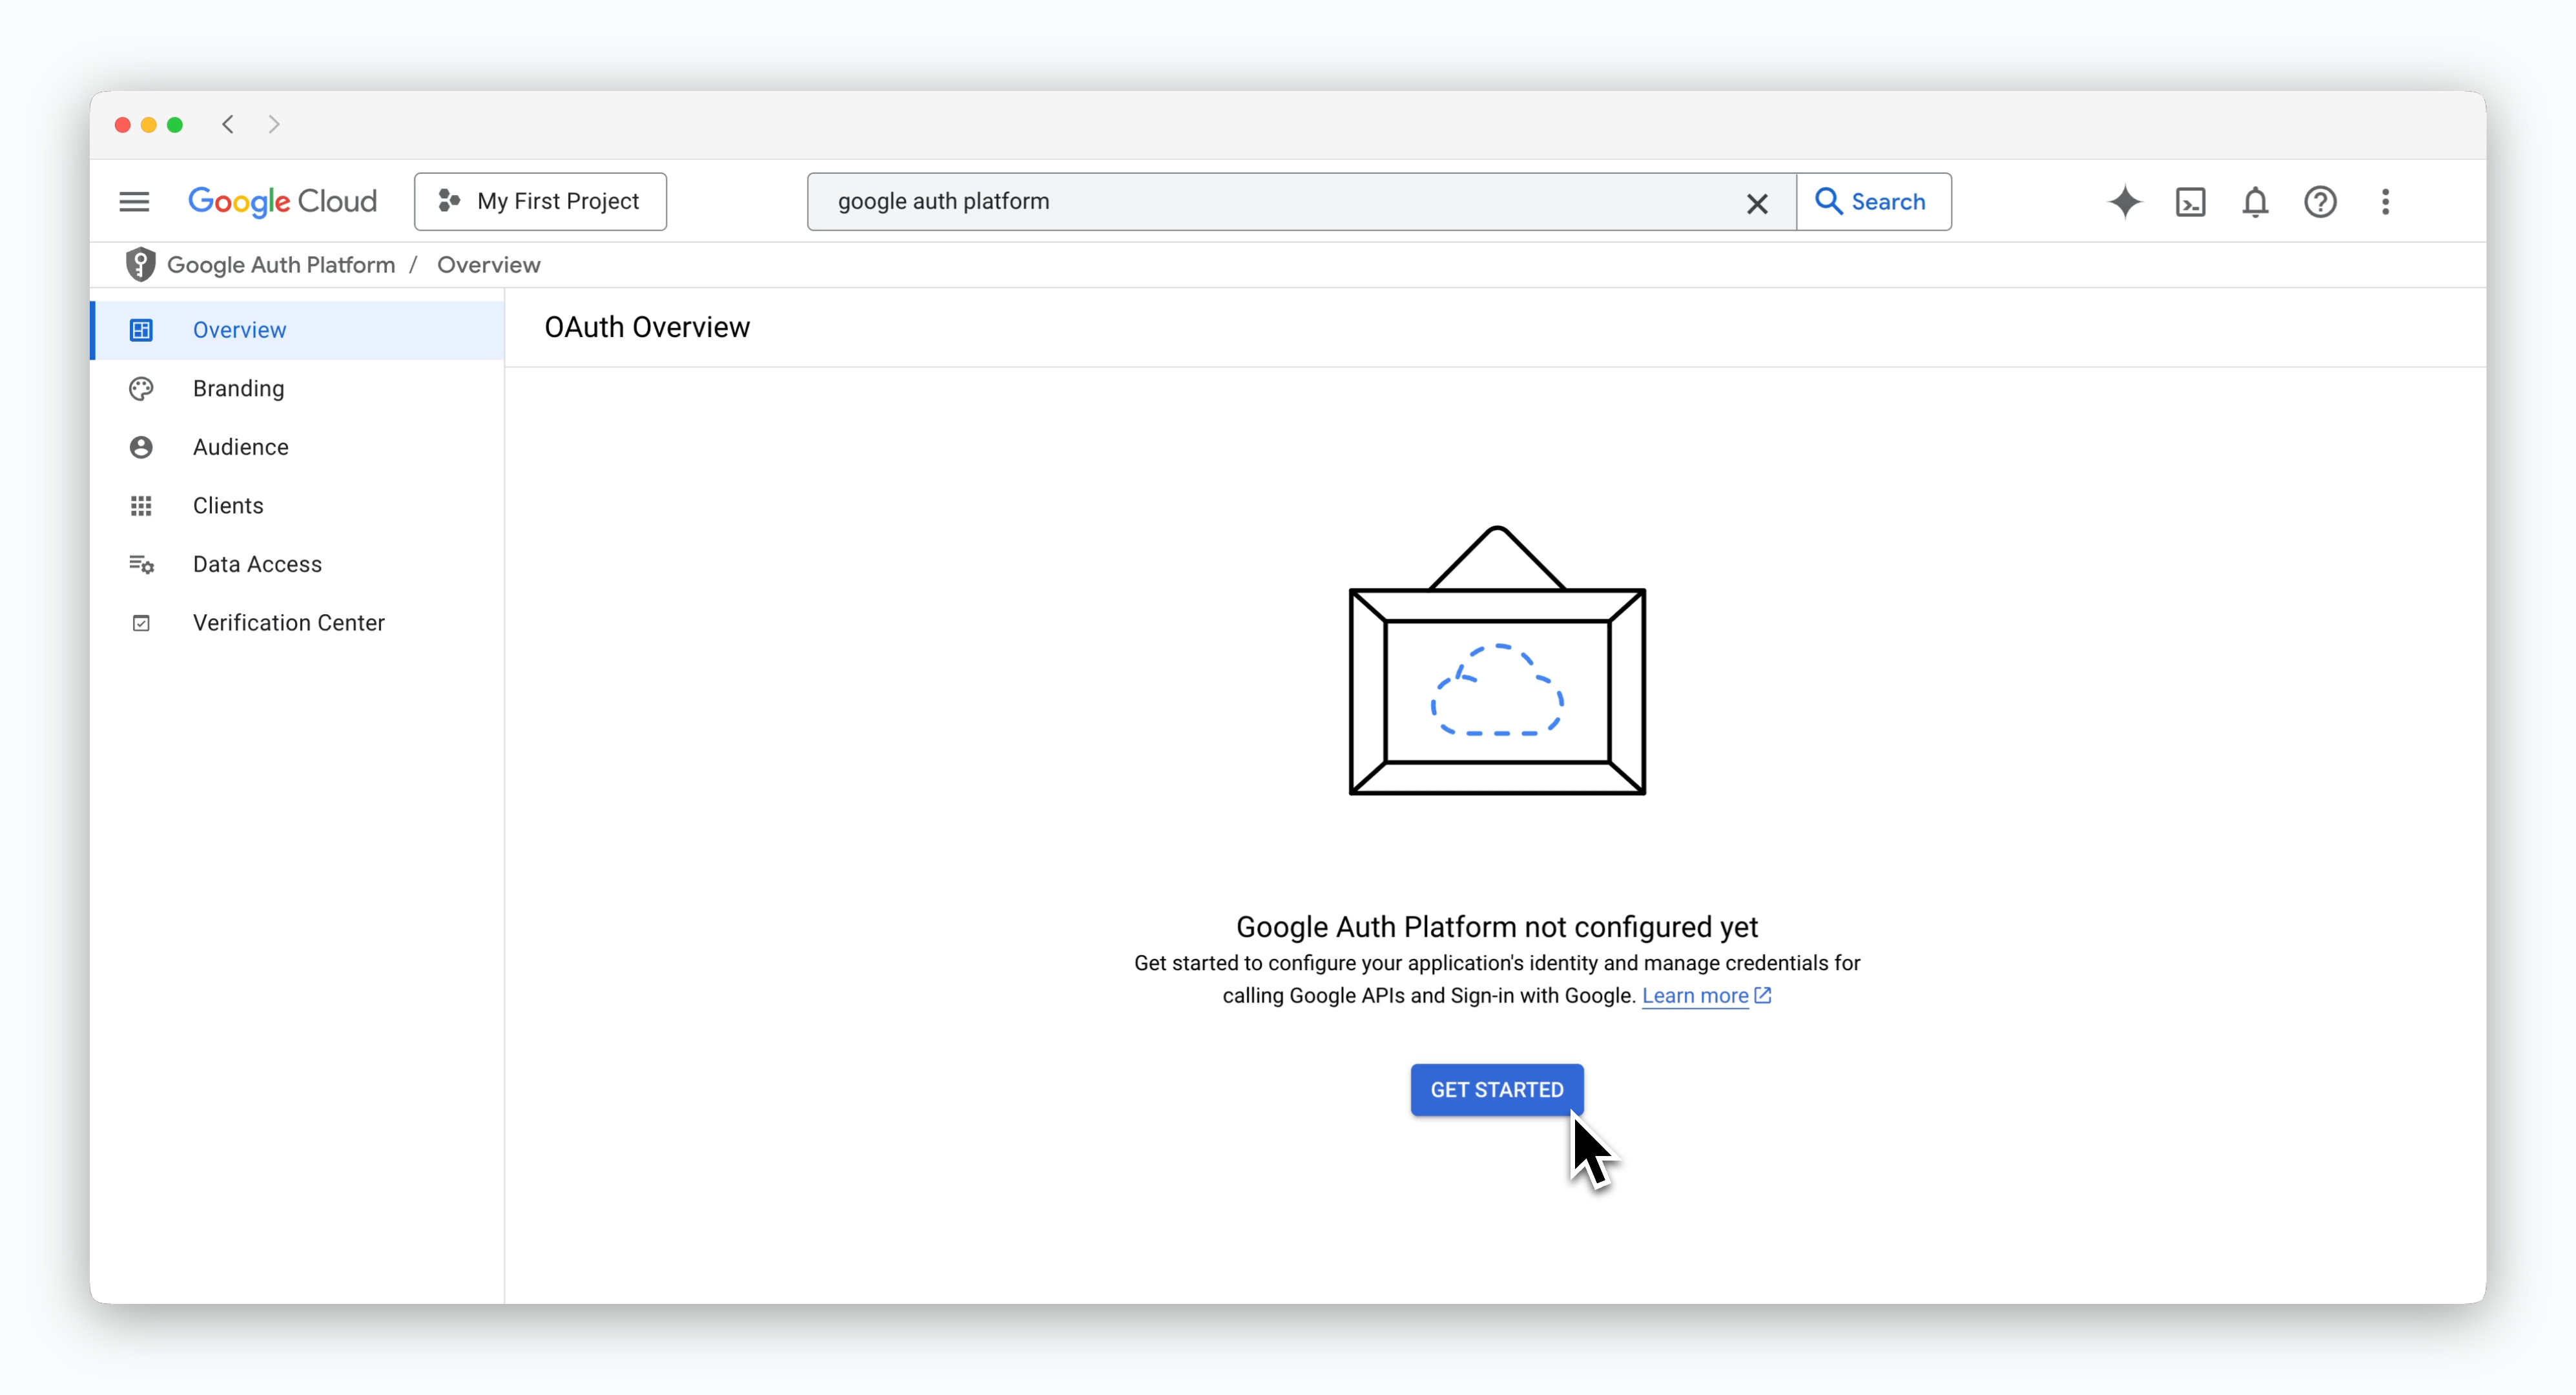 > GCP コンソールの Google Auth Platform ページで `GET STARTED` をクリックして開始します。
***
## Overview
> GCP コンソールの Google Auth Platform ページで `GET STARTED` をクリックして開始します。
***
## Overview
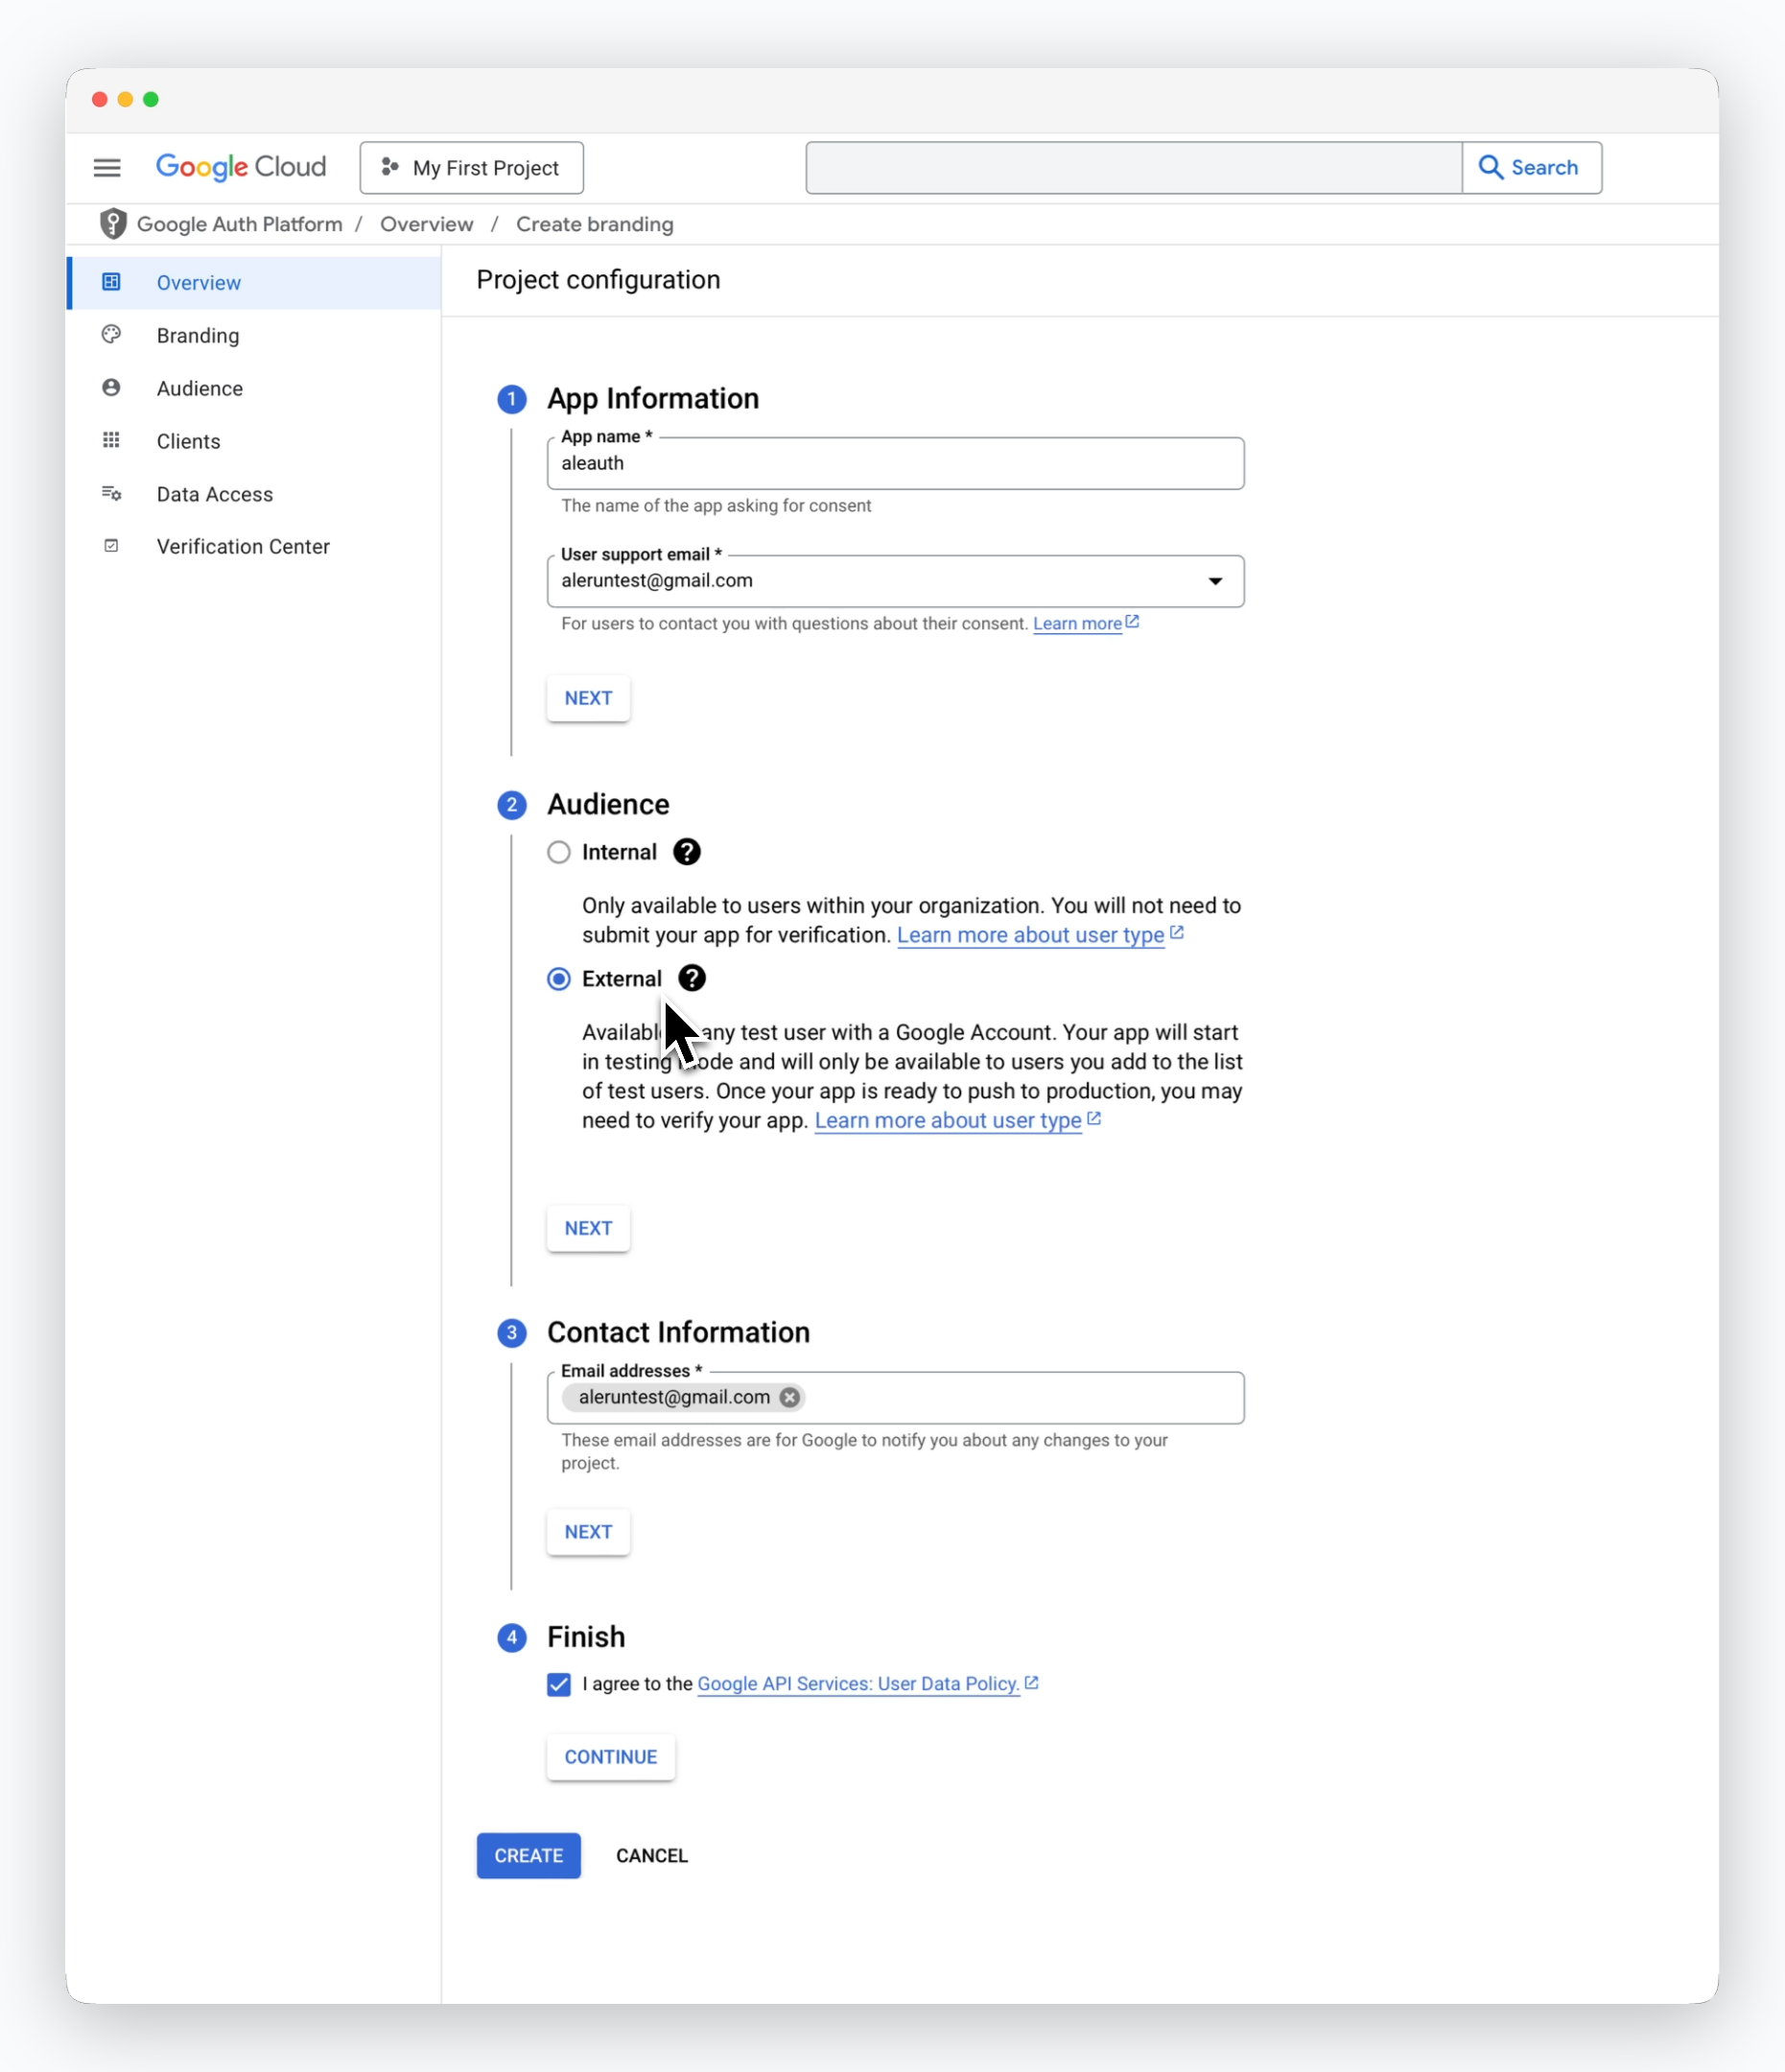 > Overviewページで、以下の値を入力し、`CREATE` をクリックします。
* **App Information:** アプリ名とGoogle OAuth同意に関する問い合わせ先メールアドレス。
* **Audience:** External。
* **Contact Information:** Google Cloud プロジェクト内の変更通知を受信するメールアドレス。
* **Finish:** Googleのポリシーに同意するチェックボックスを選択。
## Branding
> Overviewページで、以下の値を入力し、`CREATE` をクリックします。
* **App Information:** アプリ名とGoogle OAuth同意に関する問い合わせ先メールアドレス。
* **Audience:** External。
* **Contact Information:** Google Cloud プロジェクト内の変更通知を受信するメールアドレス。
* **Finish:** Googleのポリシーに同意するチェックボックスを選択。
## Branding
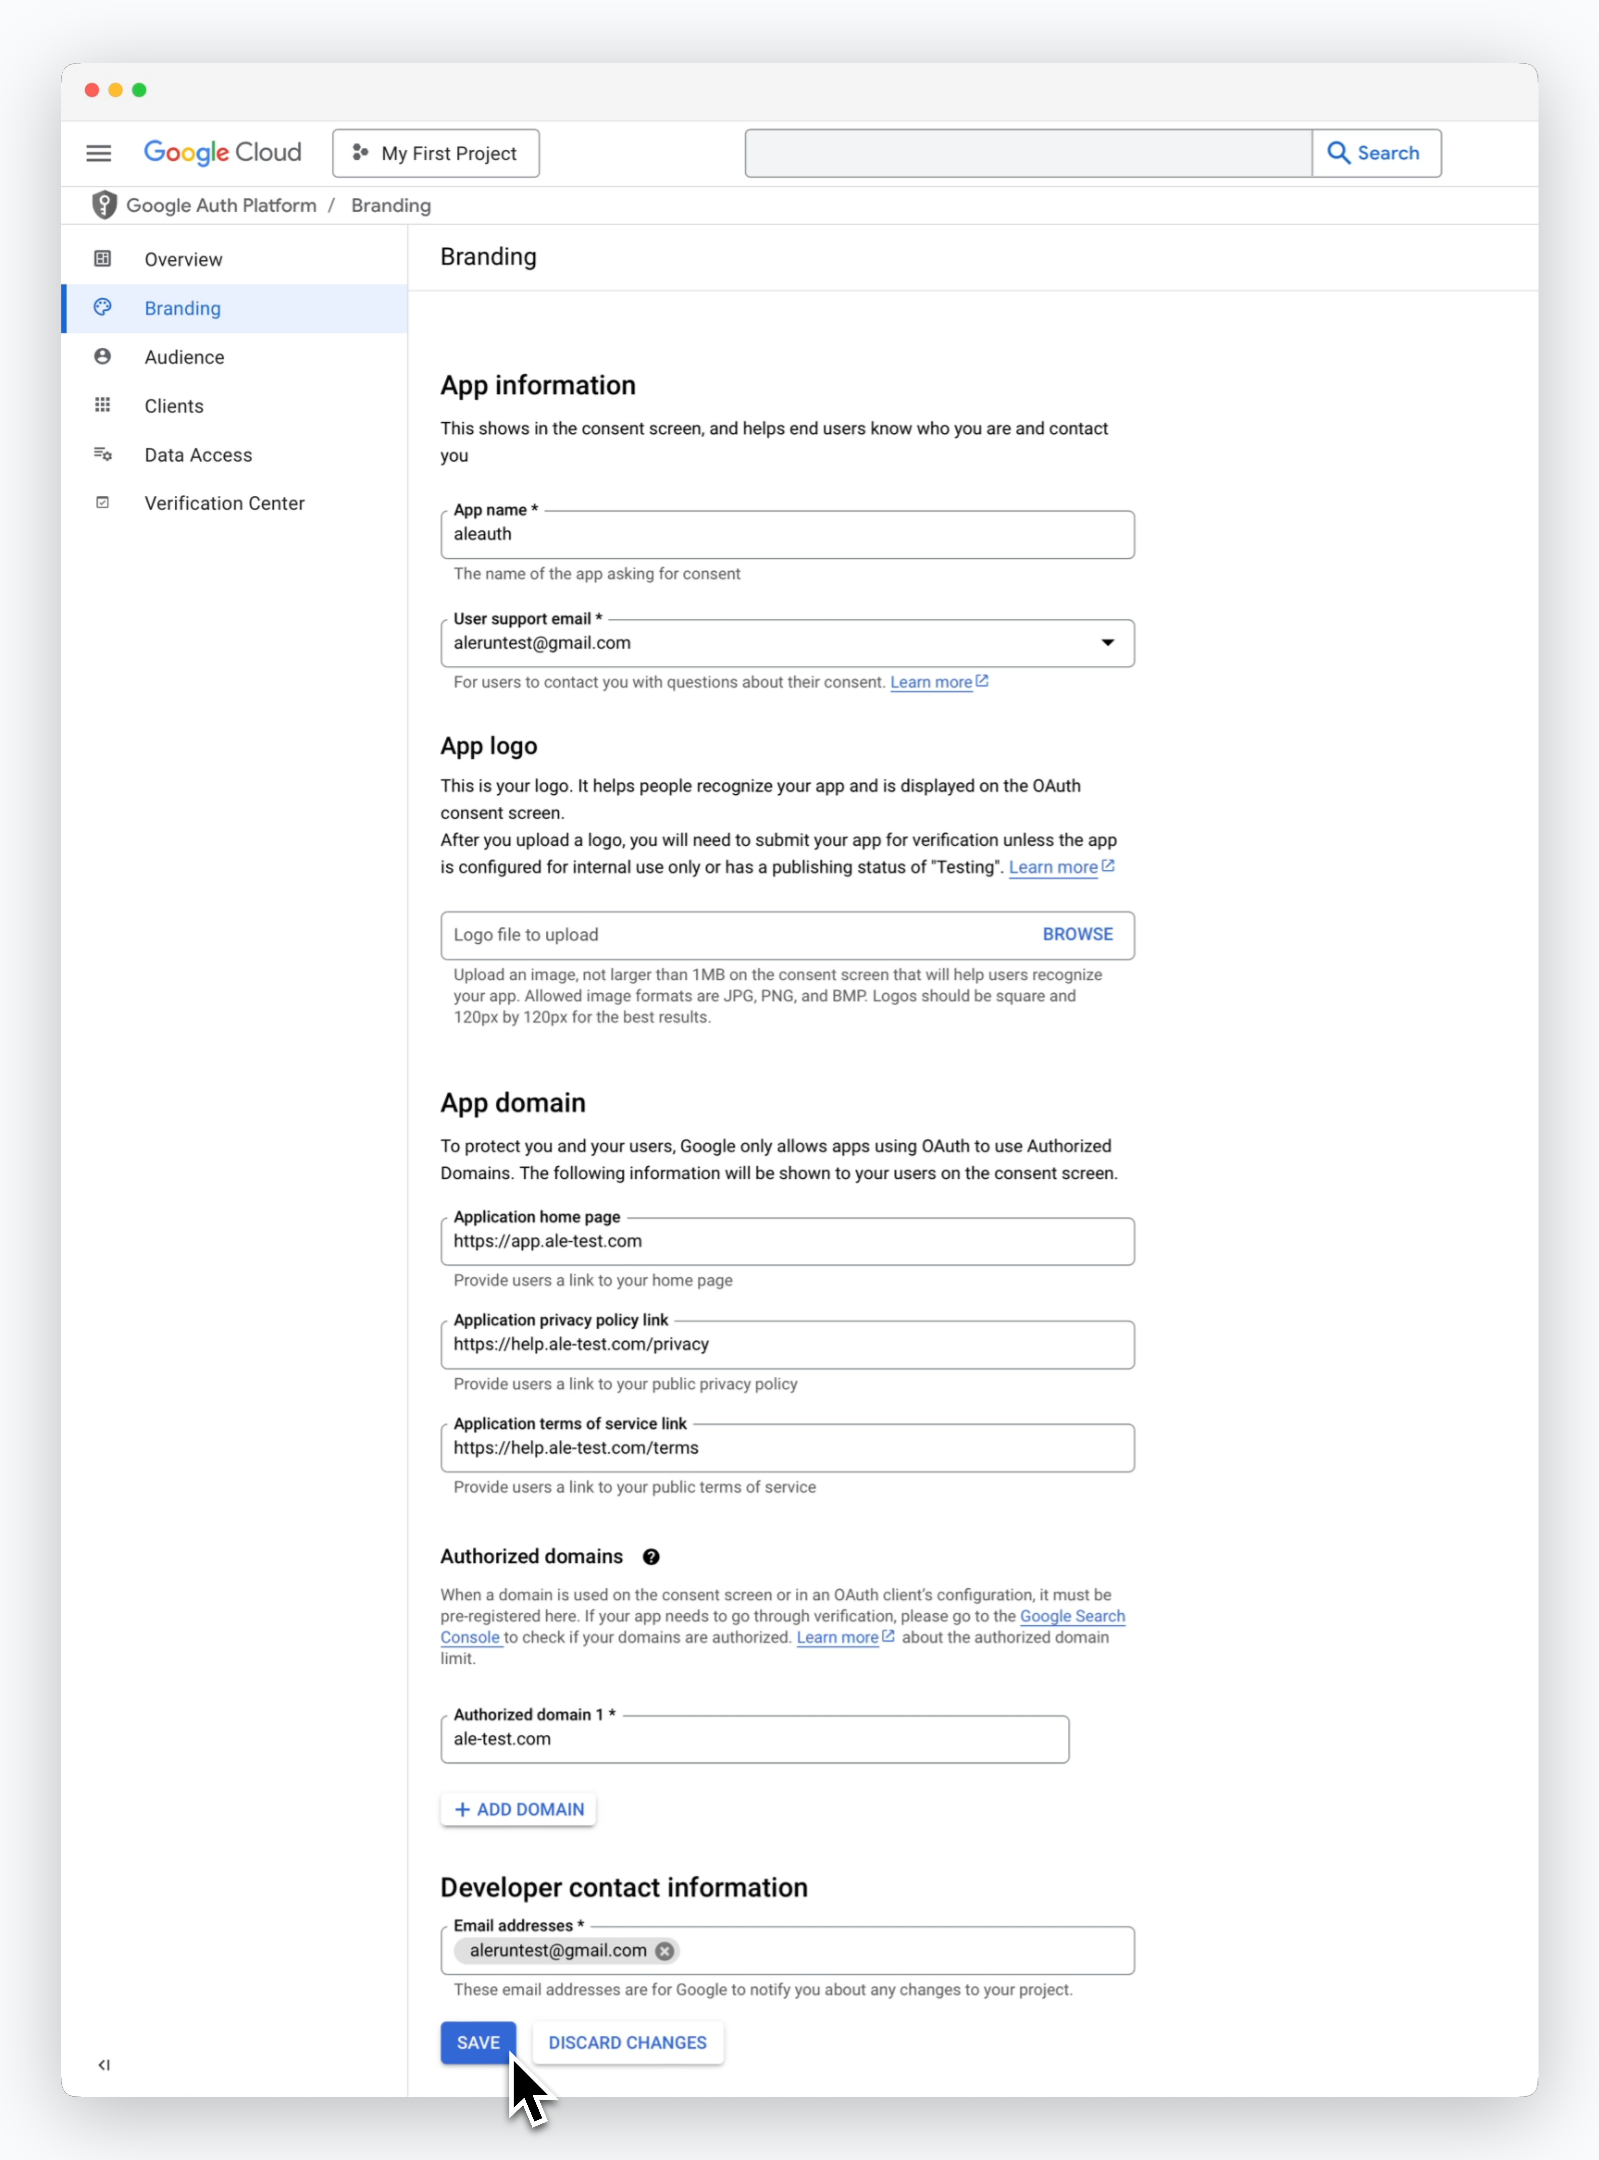 > Brandingページで、アプリのドメインに関する情報を以下のように入力します。
* **Application home page:** デプロイした `ale` のURL: `https://app.[ドメイン]`。
* **Application privacy policy link:** OAuthを使用するサービスのプライバシーポリシーURL。
* **Application terms of service link:** Google OAuthを使用するサービスの利用規約リンク。
* **Authorized domains:**
* アプリのホームページ、プライバシーポリシー、利用規約のドメインを入力。
* 異なるドメインを使用する場合は、`ADD DOMAIN` をクリックしてすべてのドメインを入力。
ロゴを登録しなくてもGoogle OAuthを使用できますが、ロゴを登録する場合は認証プロセスが必要です。
## Audience
> Brandingページで、アプリのドメインに関する情報を以下のように入力します。
* **Application home page:** デプロイした `ale` のURL: `https://app.[ドメイン]`。
* **Application privacy policy link:** OAuthを使用するサービスのプライバシーポリシーURL。
* **Application terms of service link:** Google OAuthを使用するサービスの利用規約リンク。
* **Authorized domains:**
* アプリのホームページ、プライバシーポリシー、利用規約のドメインを入力。
* 異なるドメインを使用する場合は、`ADD DOMAIN` をクリックしてすべてのドメインを入力。
ロゴを登録しなくてもGoogle OAuthを使用できますが、ロゴを登録する場合は認証プロセスが必要です。
## Audience
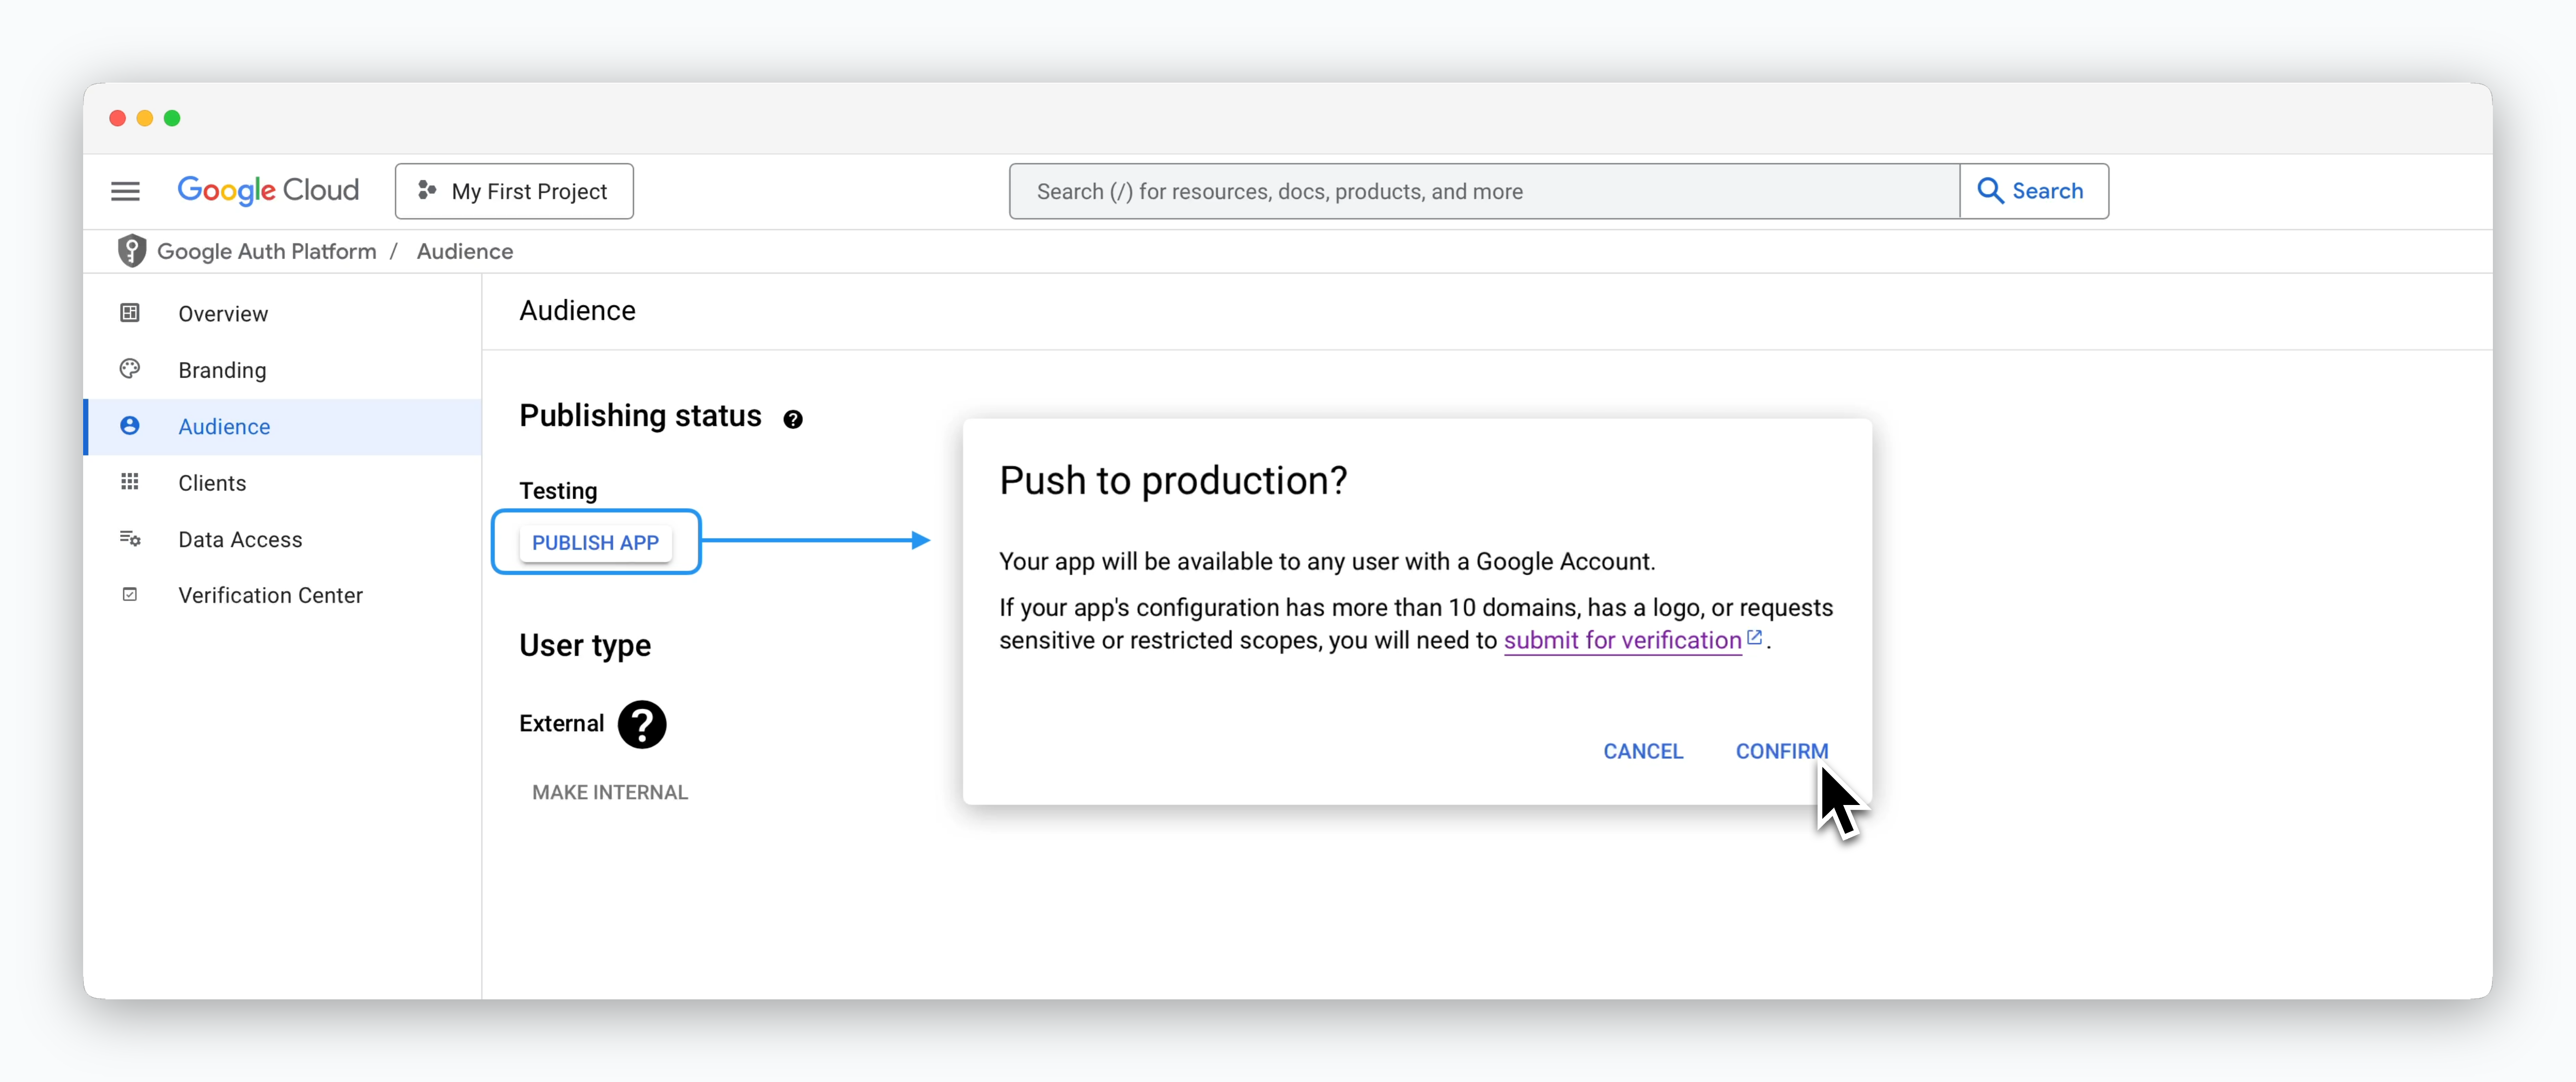 > Audienceページで、`PUBLISH APP` をクリックしてアプリを利用可能にします。
## Client
> Audienceページで、`PUBLISH APP` をクリックしてアプリを利用可能にします。
## Client
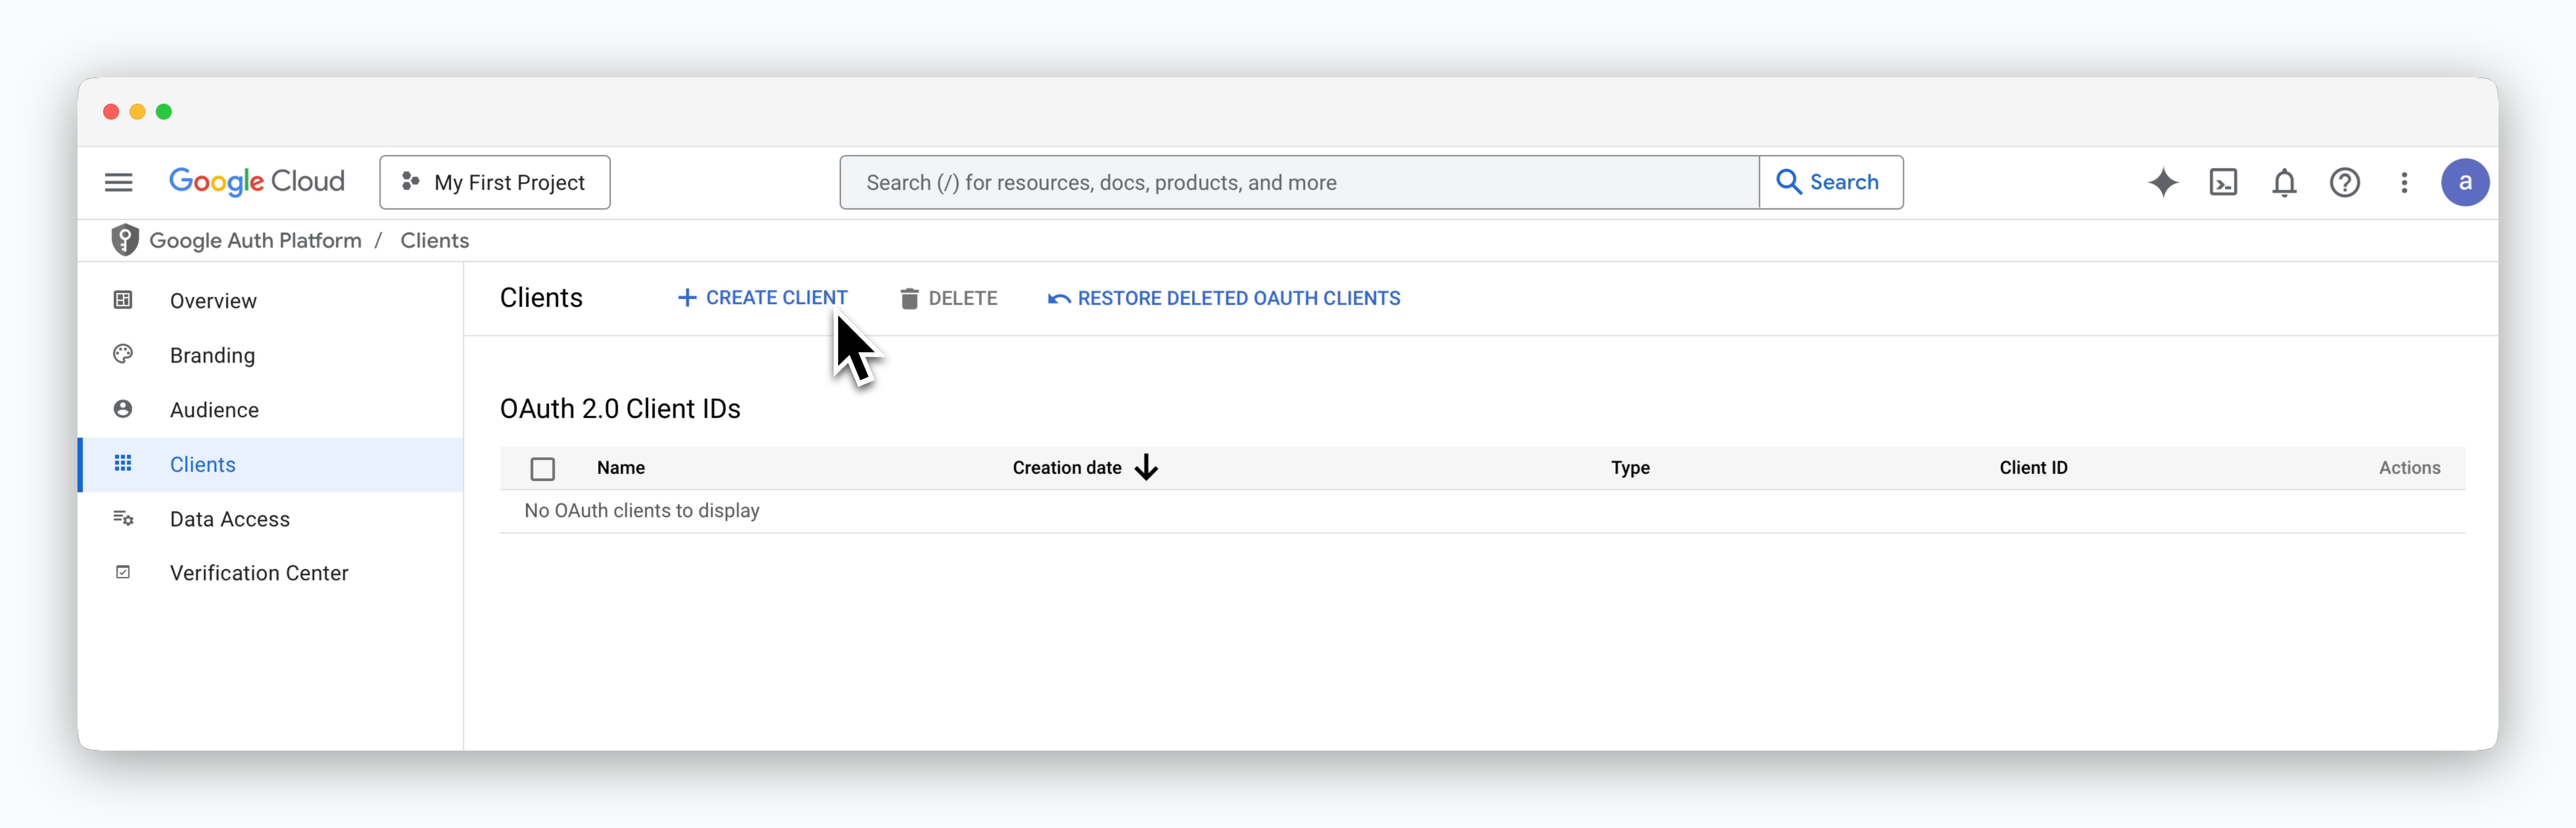 > Clientページで、`CREATE CLIENT` をクリックし、以下の設定でOAuthクライアントIDを作成します。
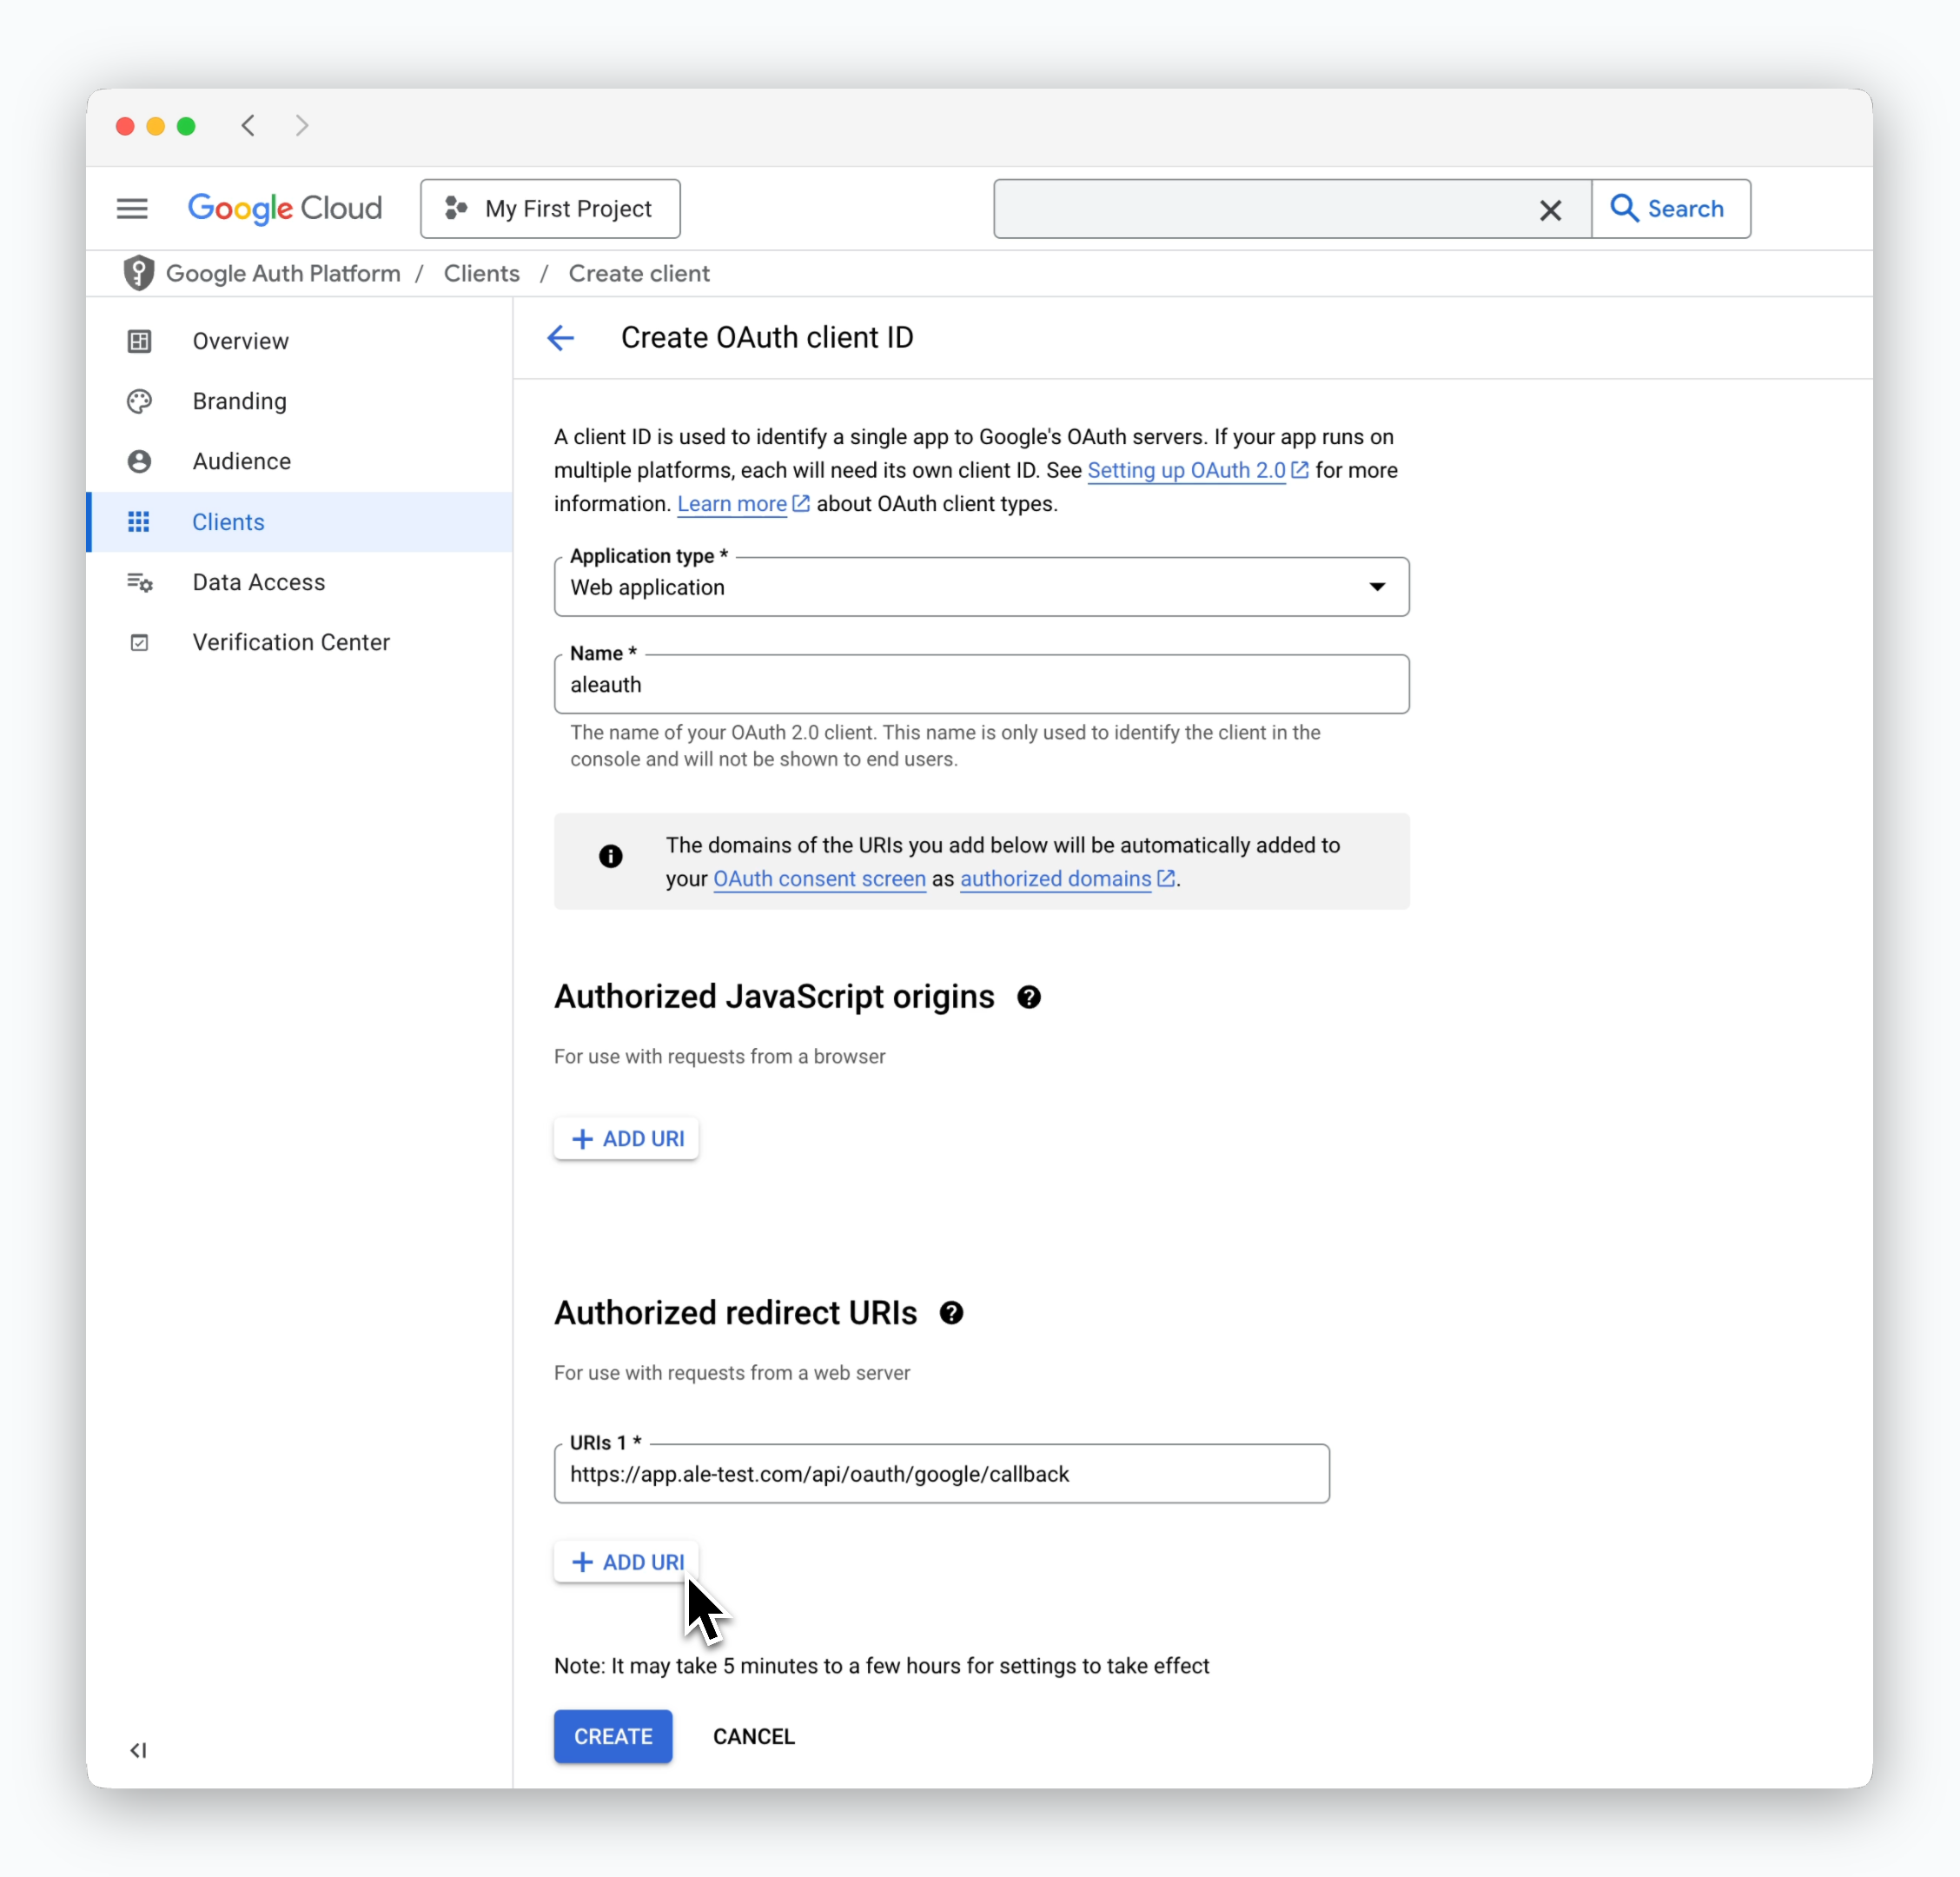 * **Application type:** Web application。
* **Authorized redirect URIs:** `https://app.[ドメイン]/api/oauth/google/callback`。
## Data Access
* **Application type:** Web application。
* **Authorized redirect URIs:** `https://app.[ドメイン]/api/oauth/google/callback`。
## Data Access
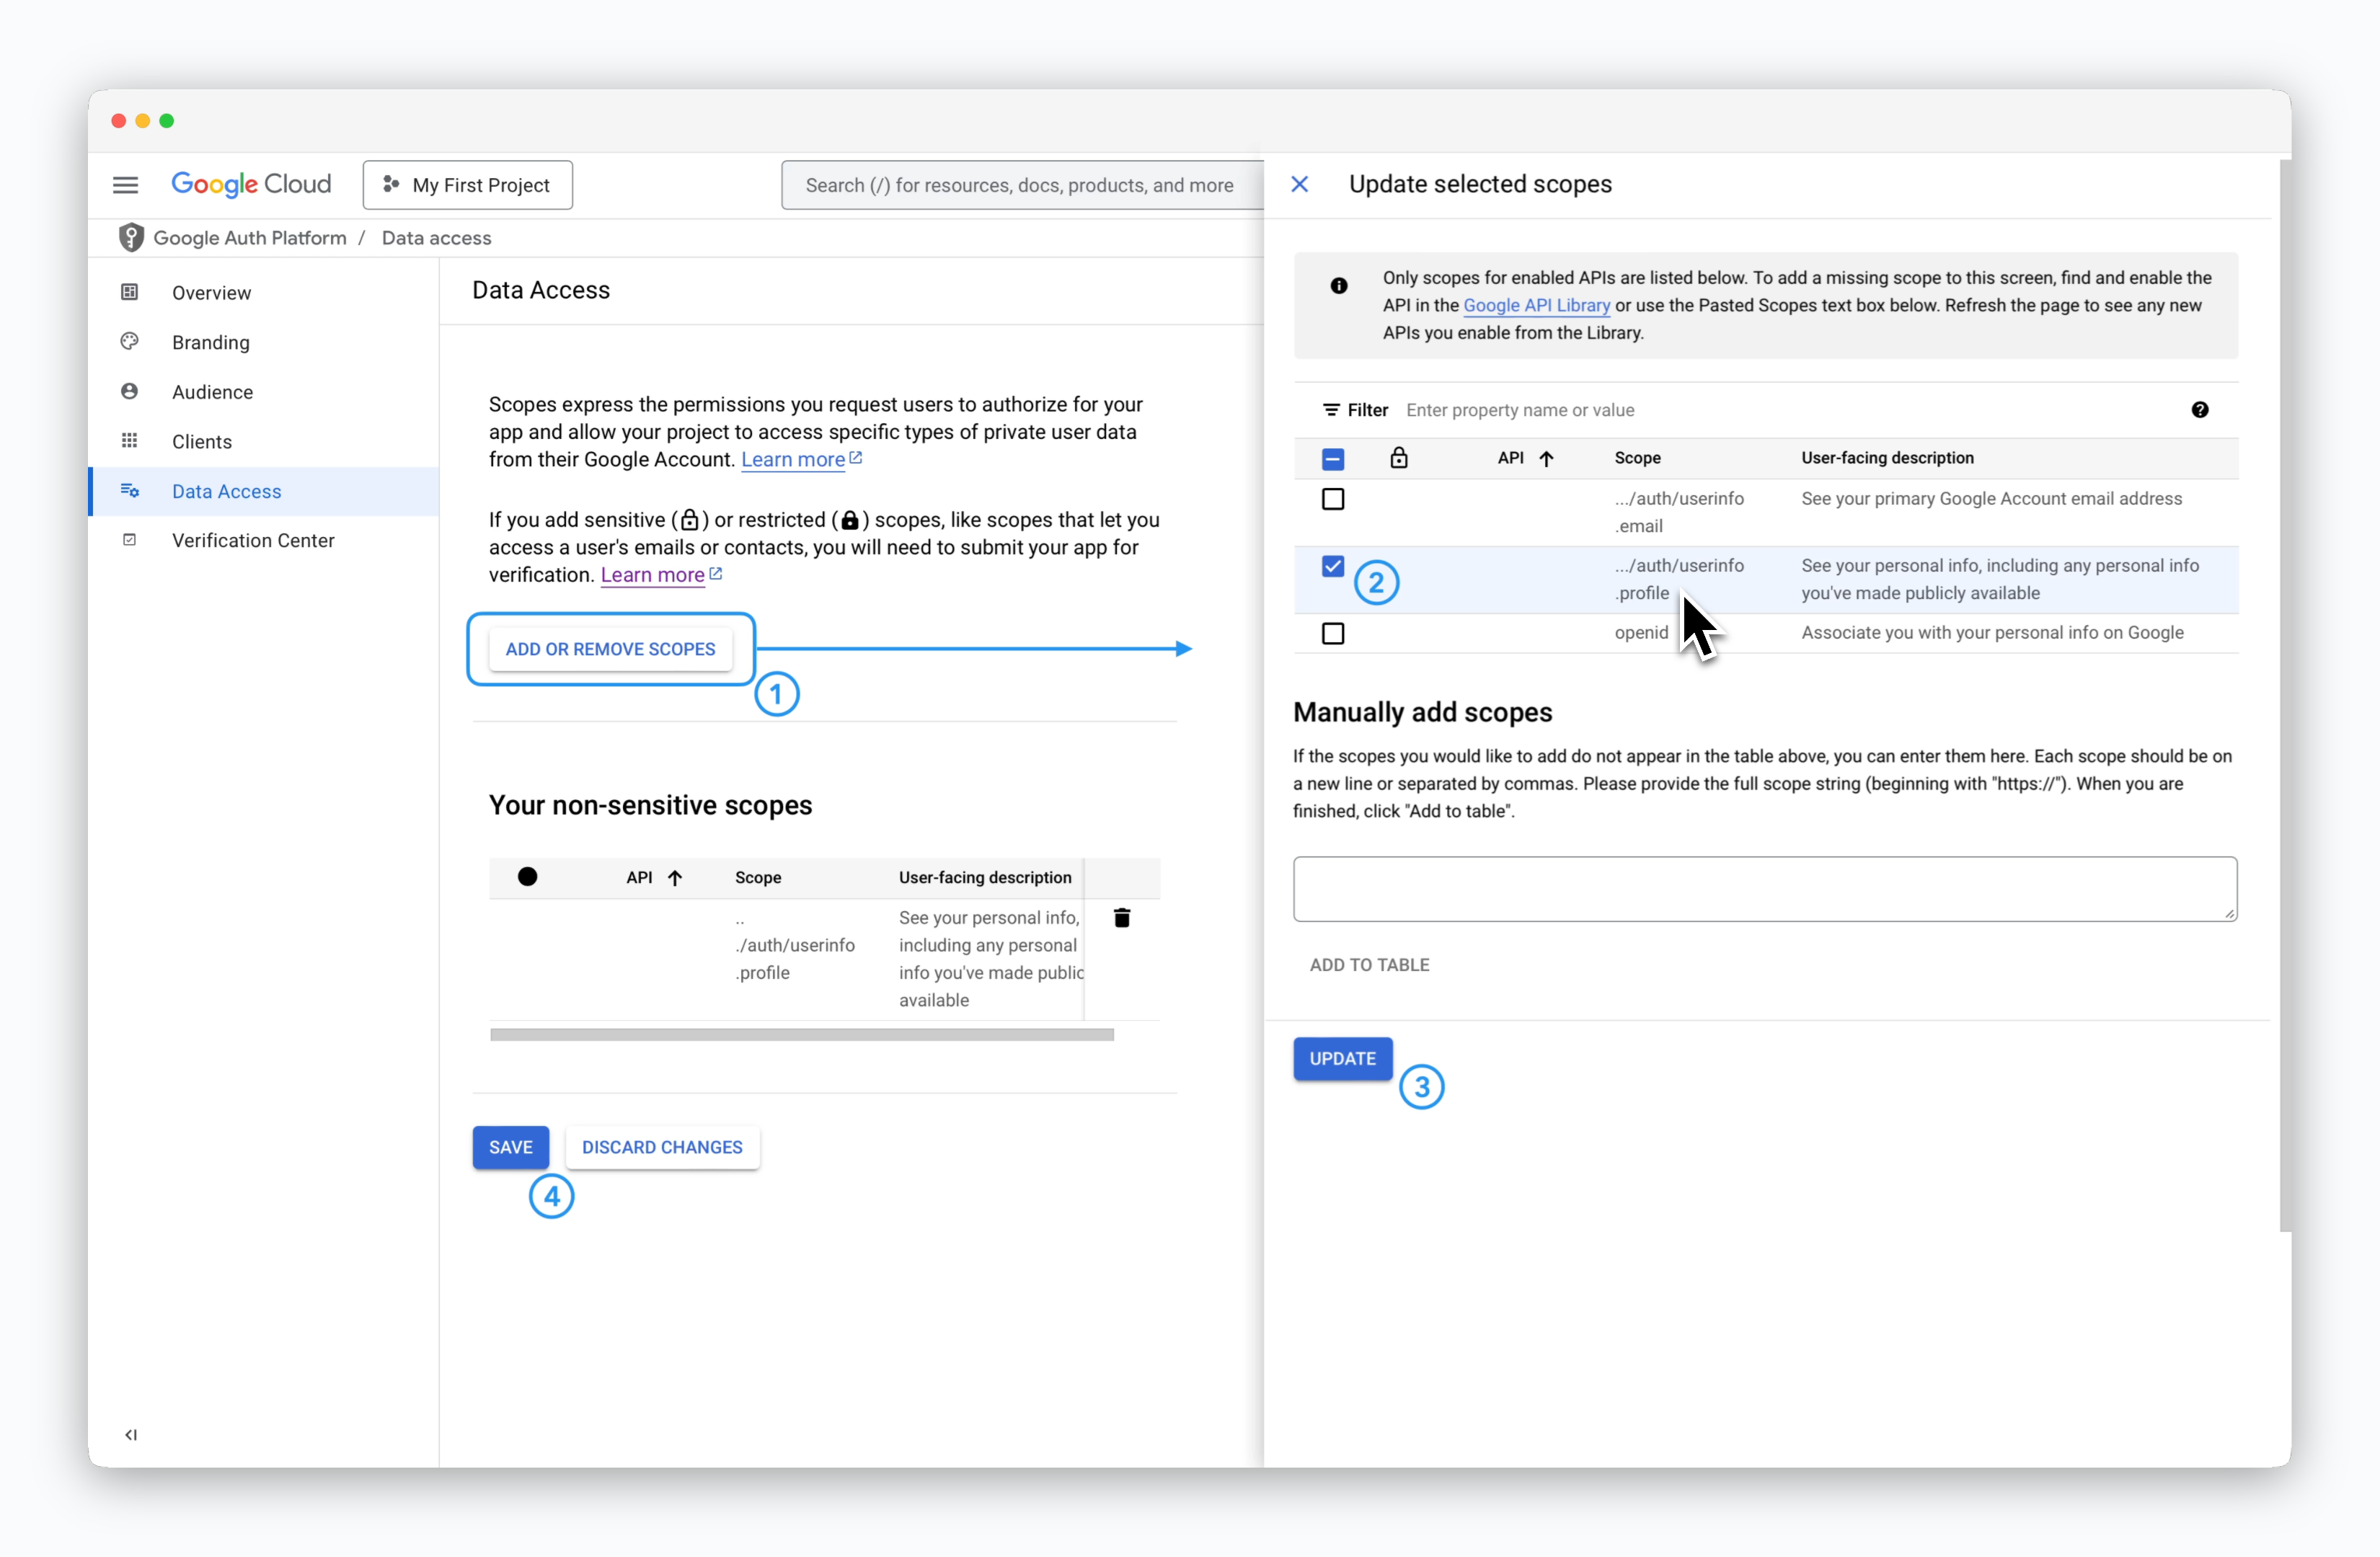 > Data Accessページで、上記のスクリーンショットの順序に従ってスコープを追加します。
追加するスコープは `.../auth/userinfo.profile` です。
## Client ID、Secretの確認
> Data Accessページで、上記のスクリーンショットの順序に従ってスコープを追加します。
追加するスコープは `.../auth/userinfo.profile` です。
## Client ID、Secretの確認
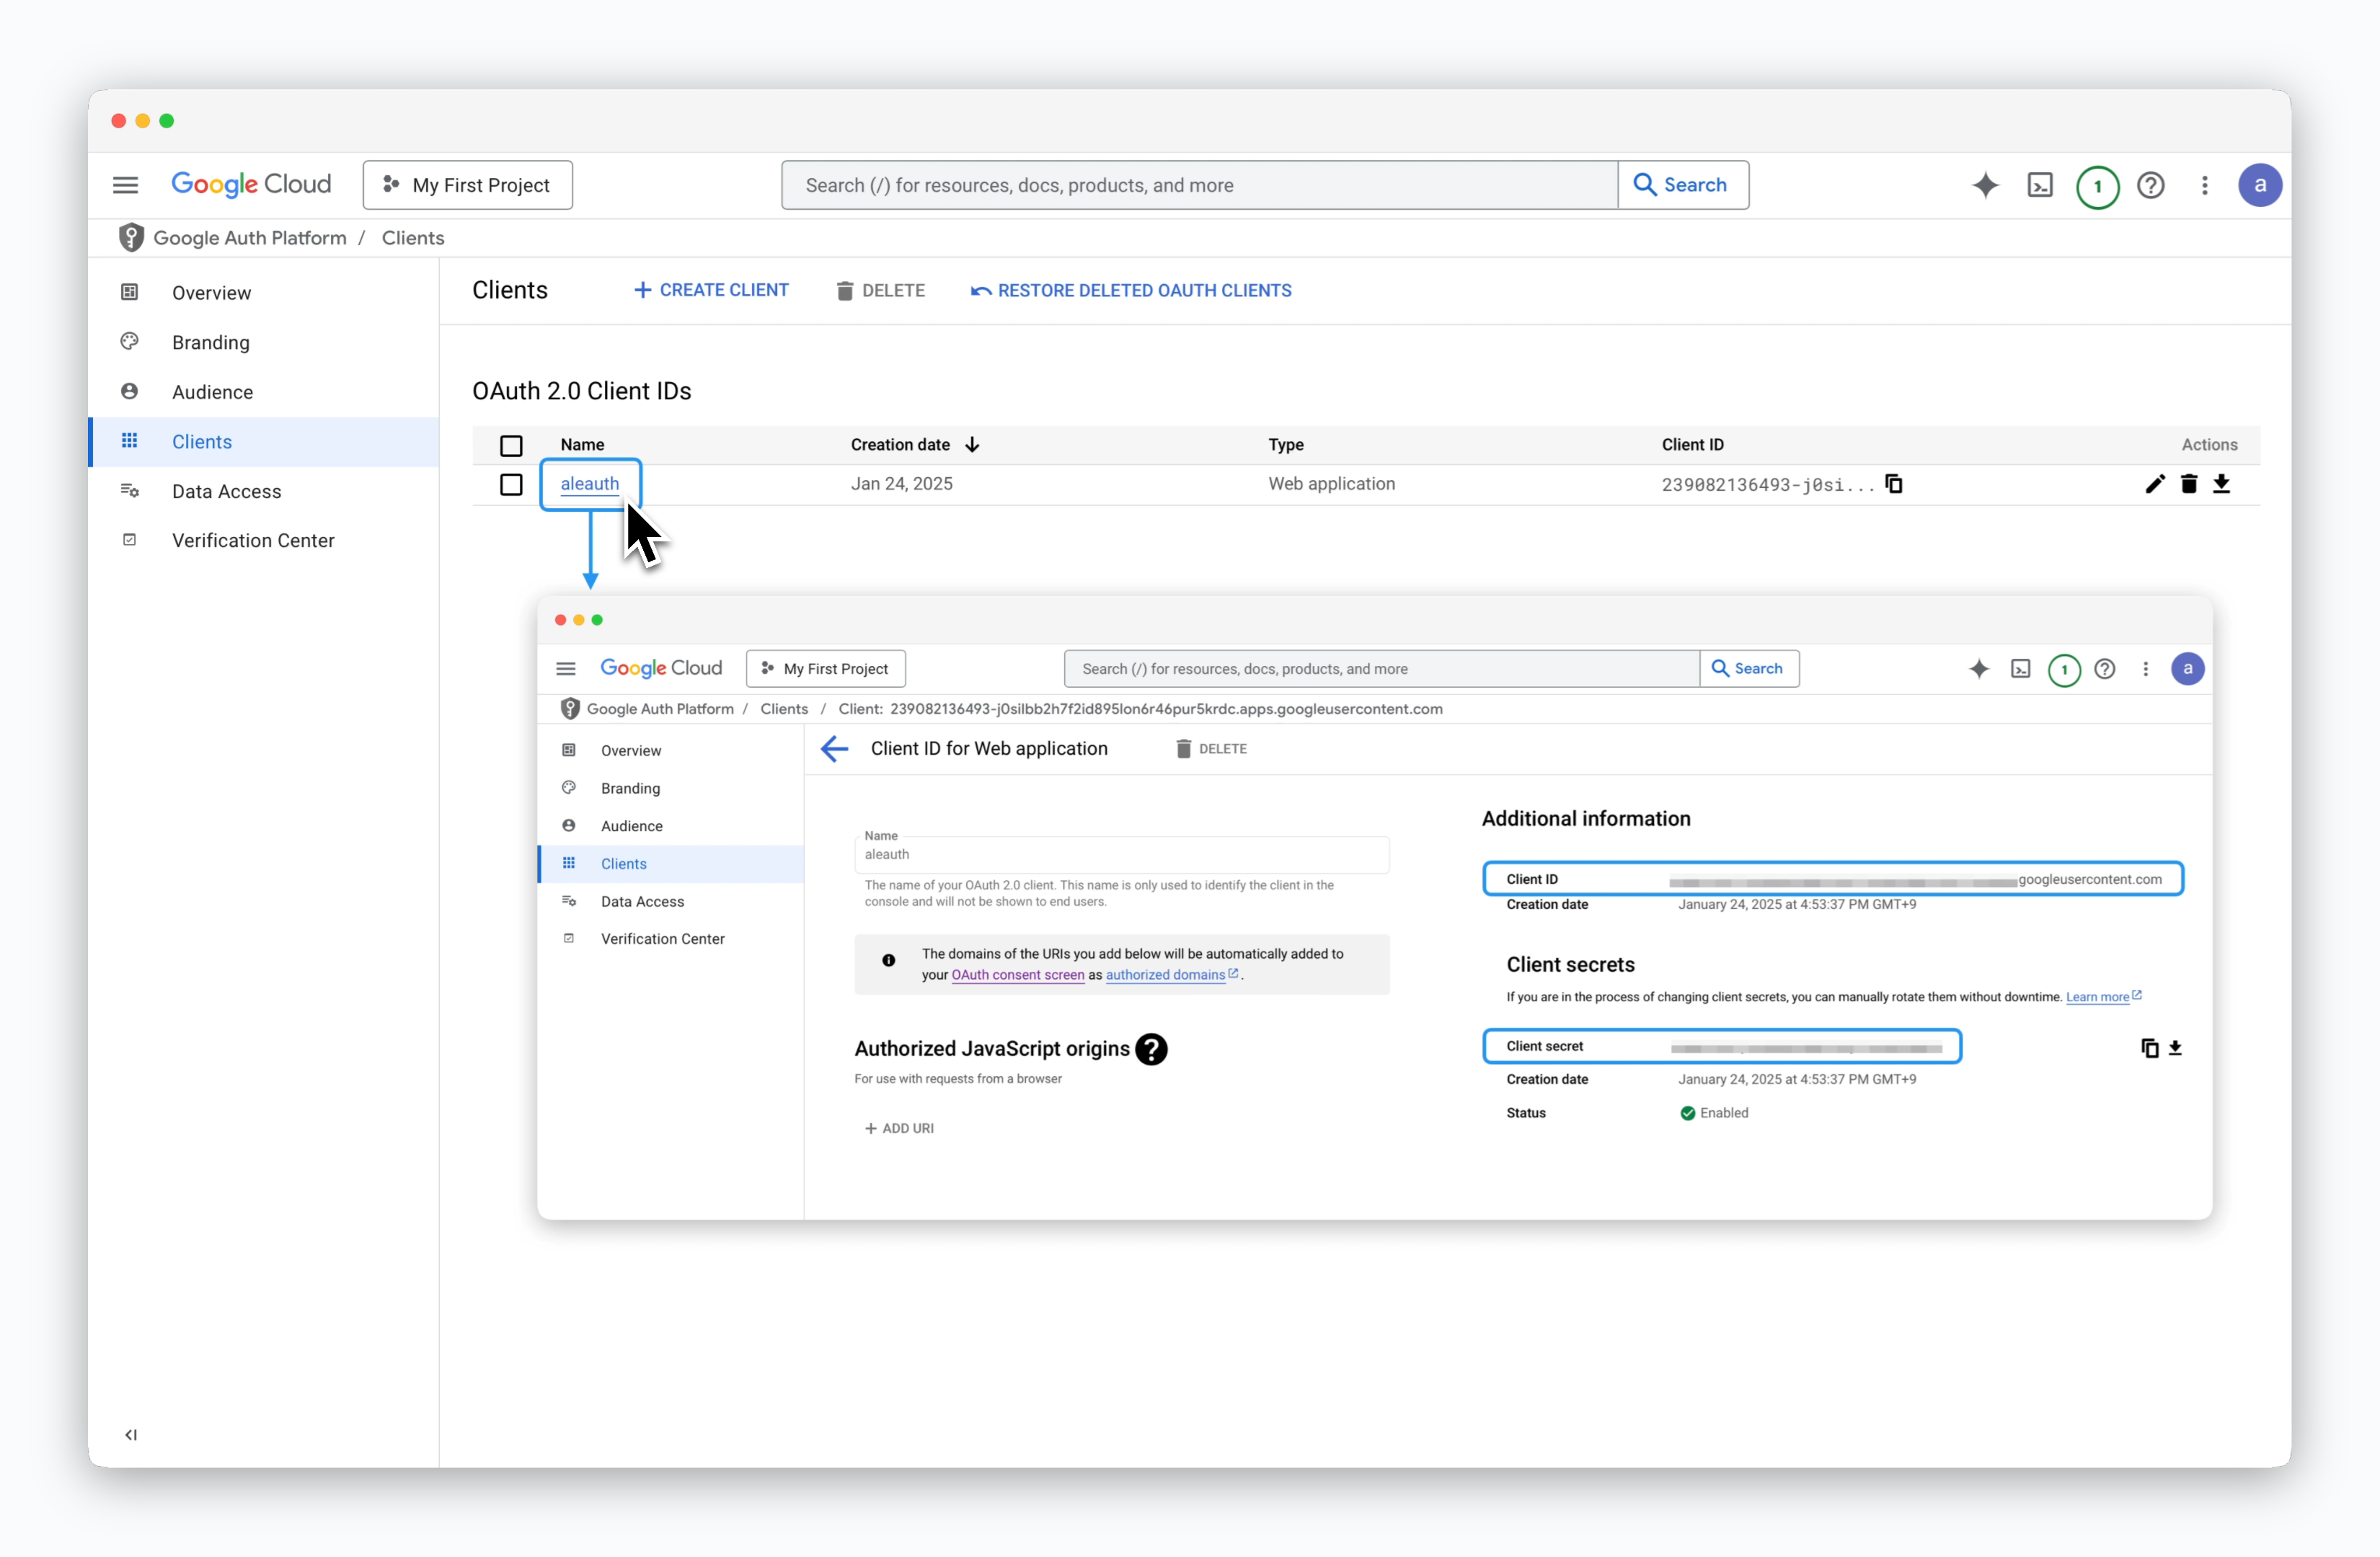 > 左サイドバーのClientページで、作成したクライアント名をクリックし、**Client ID**と**Client Secret**を取得します。
***
## 運用システムへの登録
> 左サイドバーのClientページで、作成したクライアント名をクリックし、**Client ID**と**Client Secret**を取得します。
***
## 運用システムへの登録
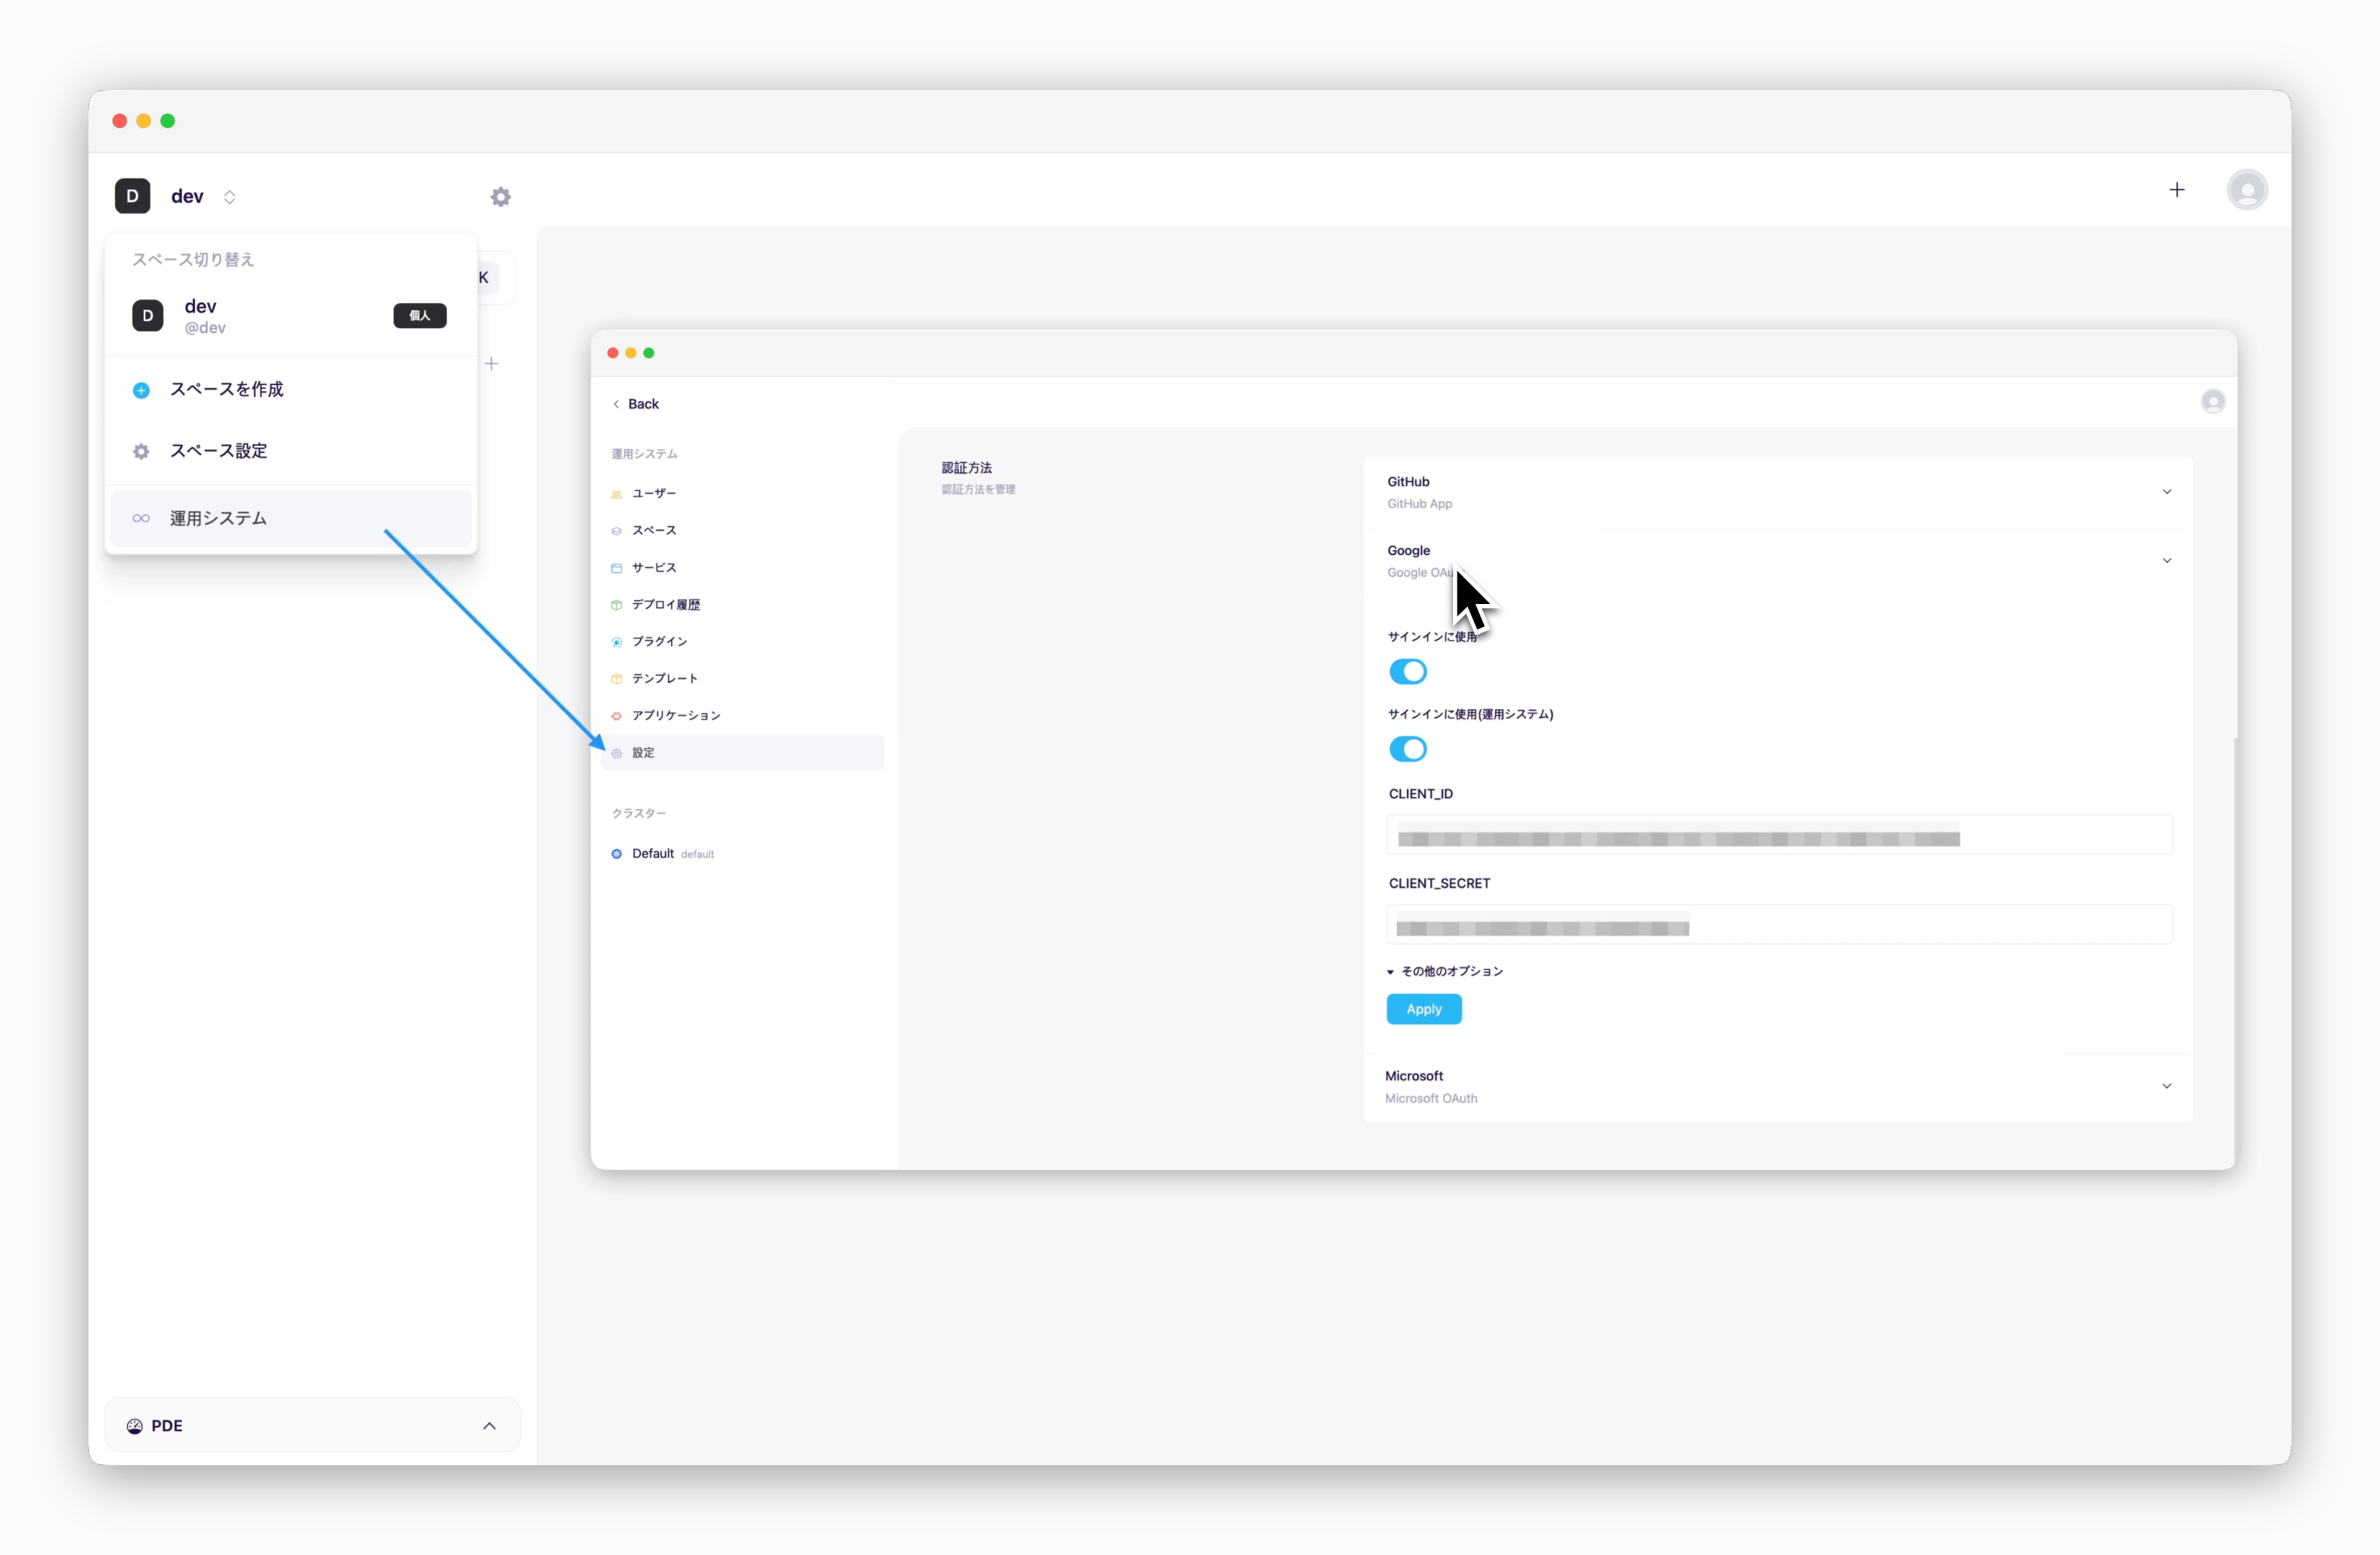 > オペレーションシステムにアクセスし、**Settings > Authentication Methods > Google dropdown**をクリックし、前の手順で取得した値を各フィールドに入力して `Apply` をクリックします。
**Enable Login**オプションを無効にすると、Googleログインが無効になります。
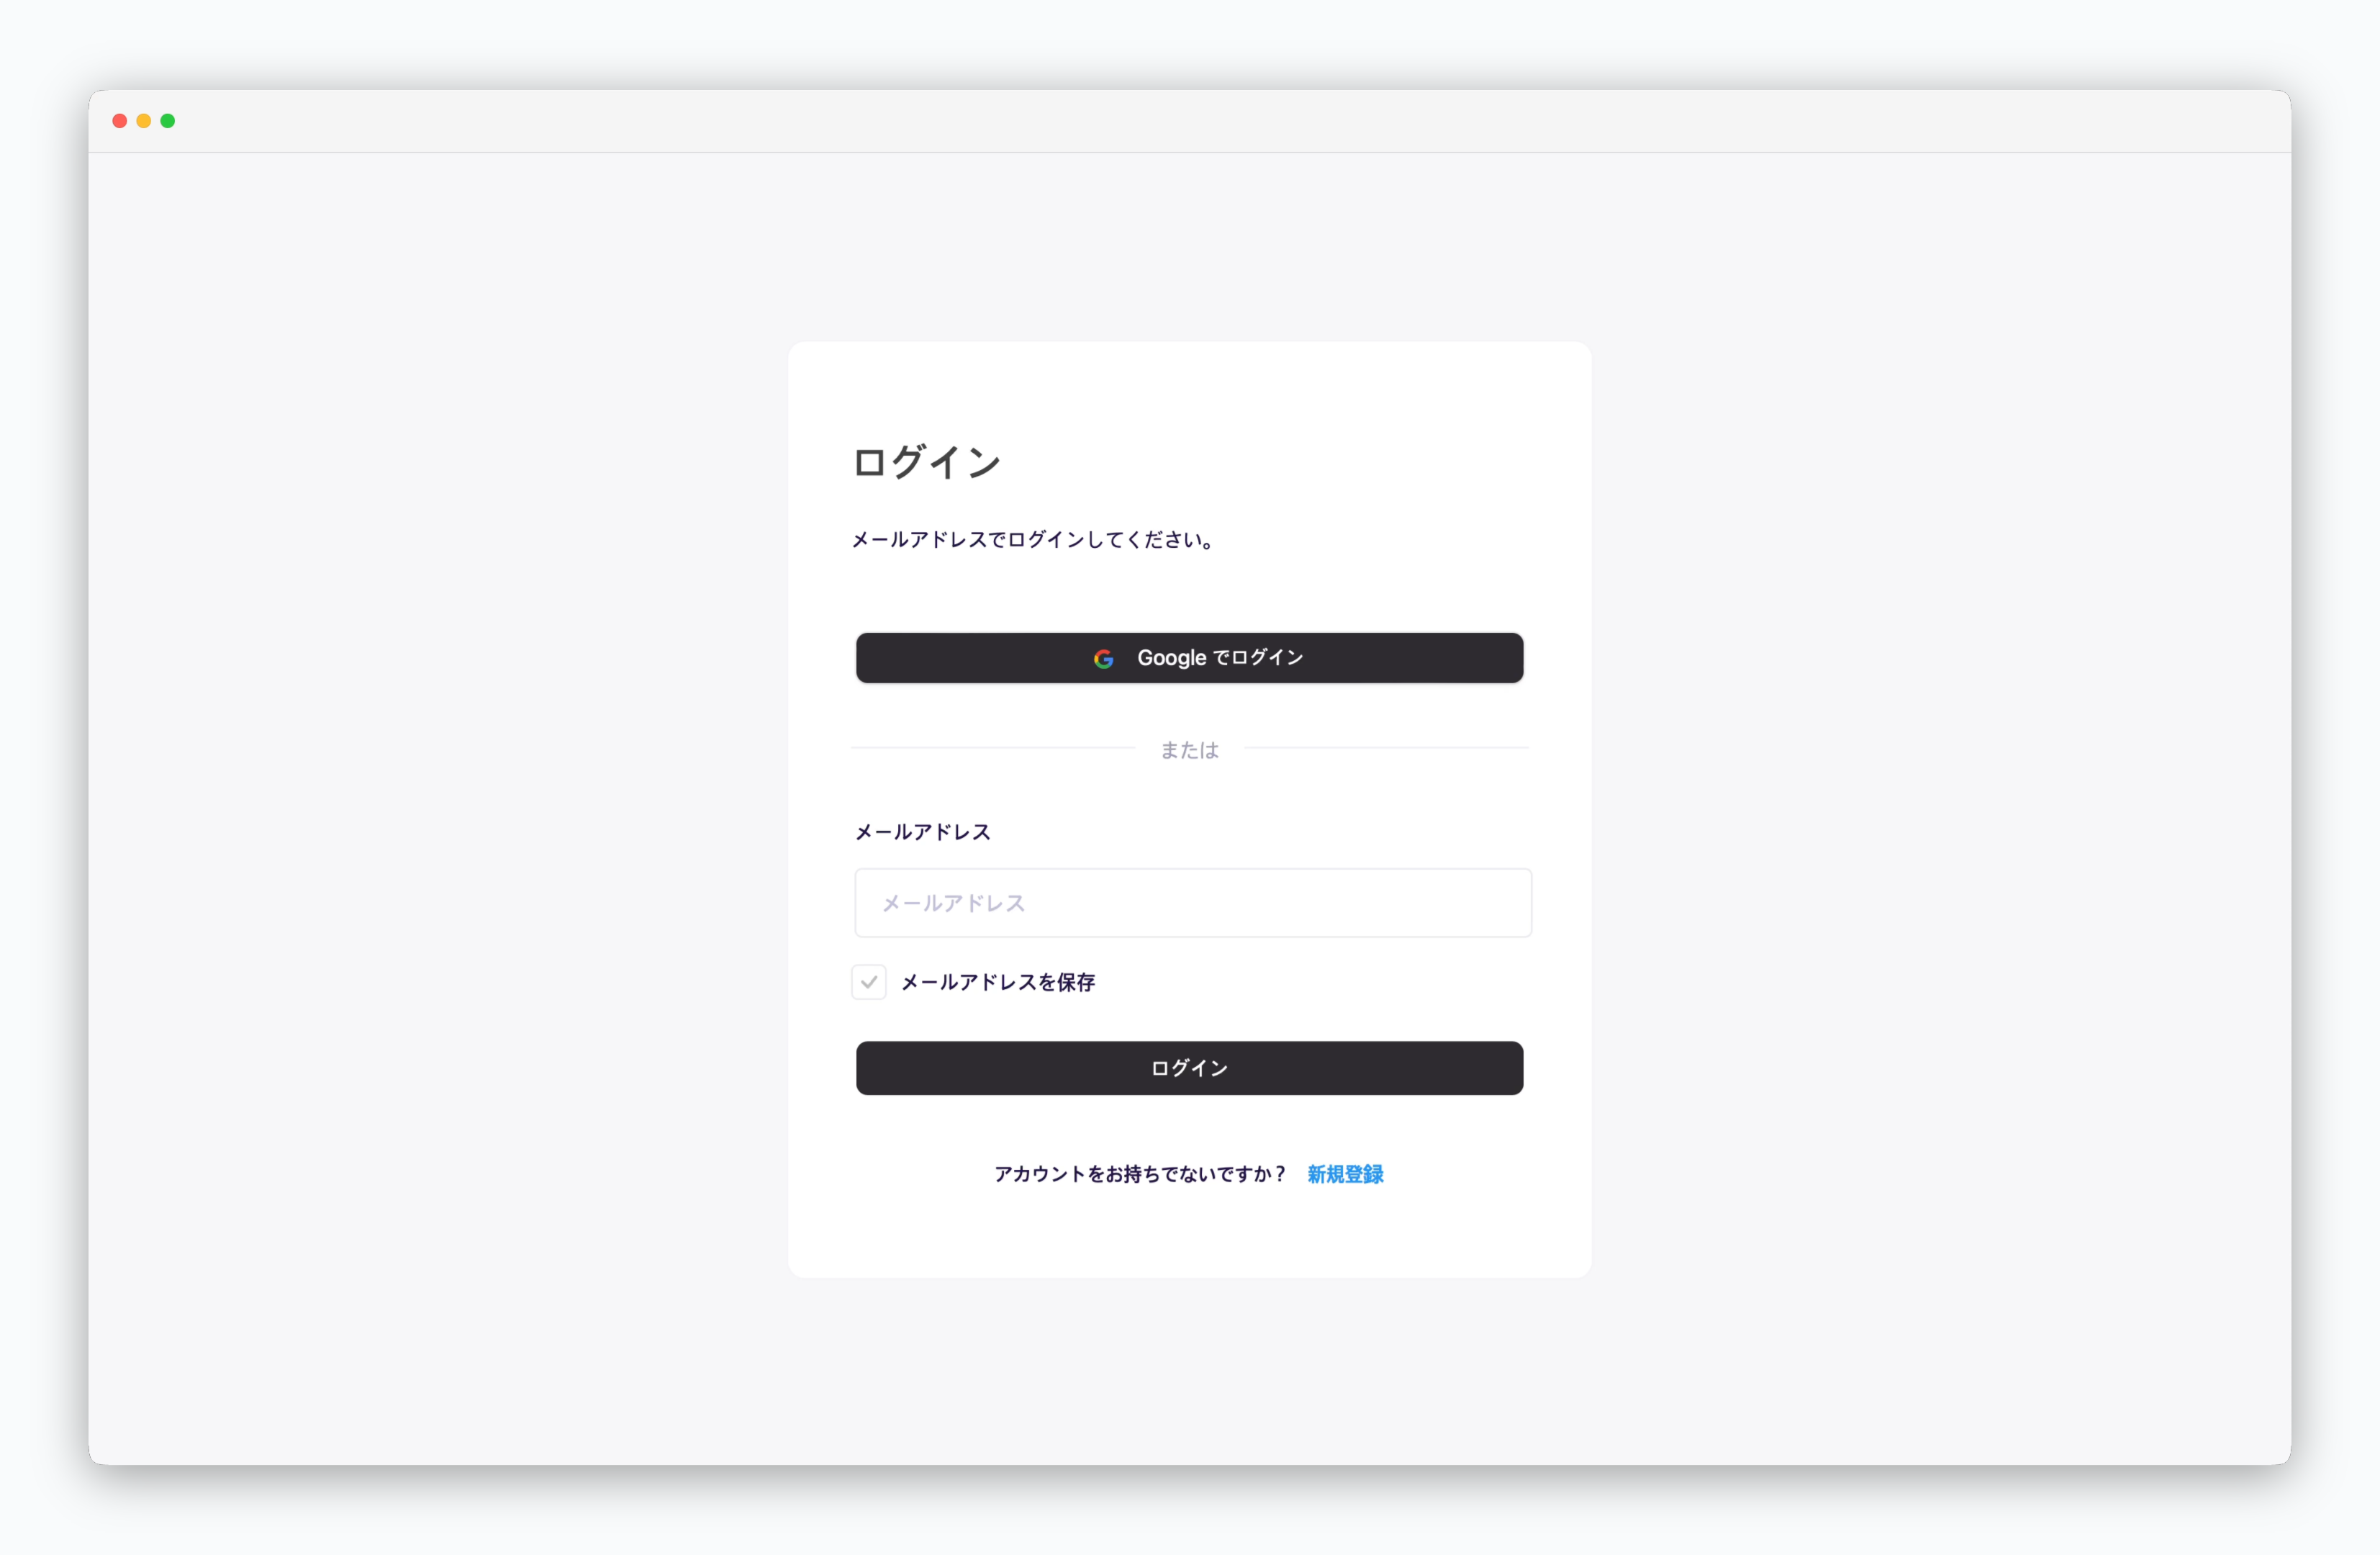
適用後、ユーザーダッシュボードページに以下のように **Sign in with Google** ボタンが表示されます。
> オペレーションシステムにアクセスし、**Settings > Authentication Methods > Google dropdown**をクリックし、前の手順で取得した値を各フィールドに入力して `Apply` をクリックします。
**Enable Login**オプションを無効にすると、Googleログインが無効になります。
適用後、ユーザーダッシュボードページに以下のように **Sign in with Google** ボタンが表示されます。
 ## Googleアカウントでログイン
### Sign Up
## Googleアカウントでログイン
### Sign Up
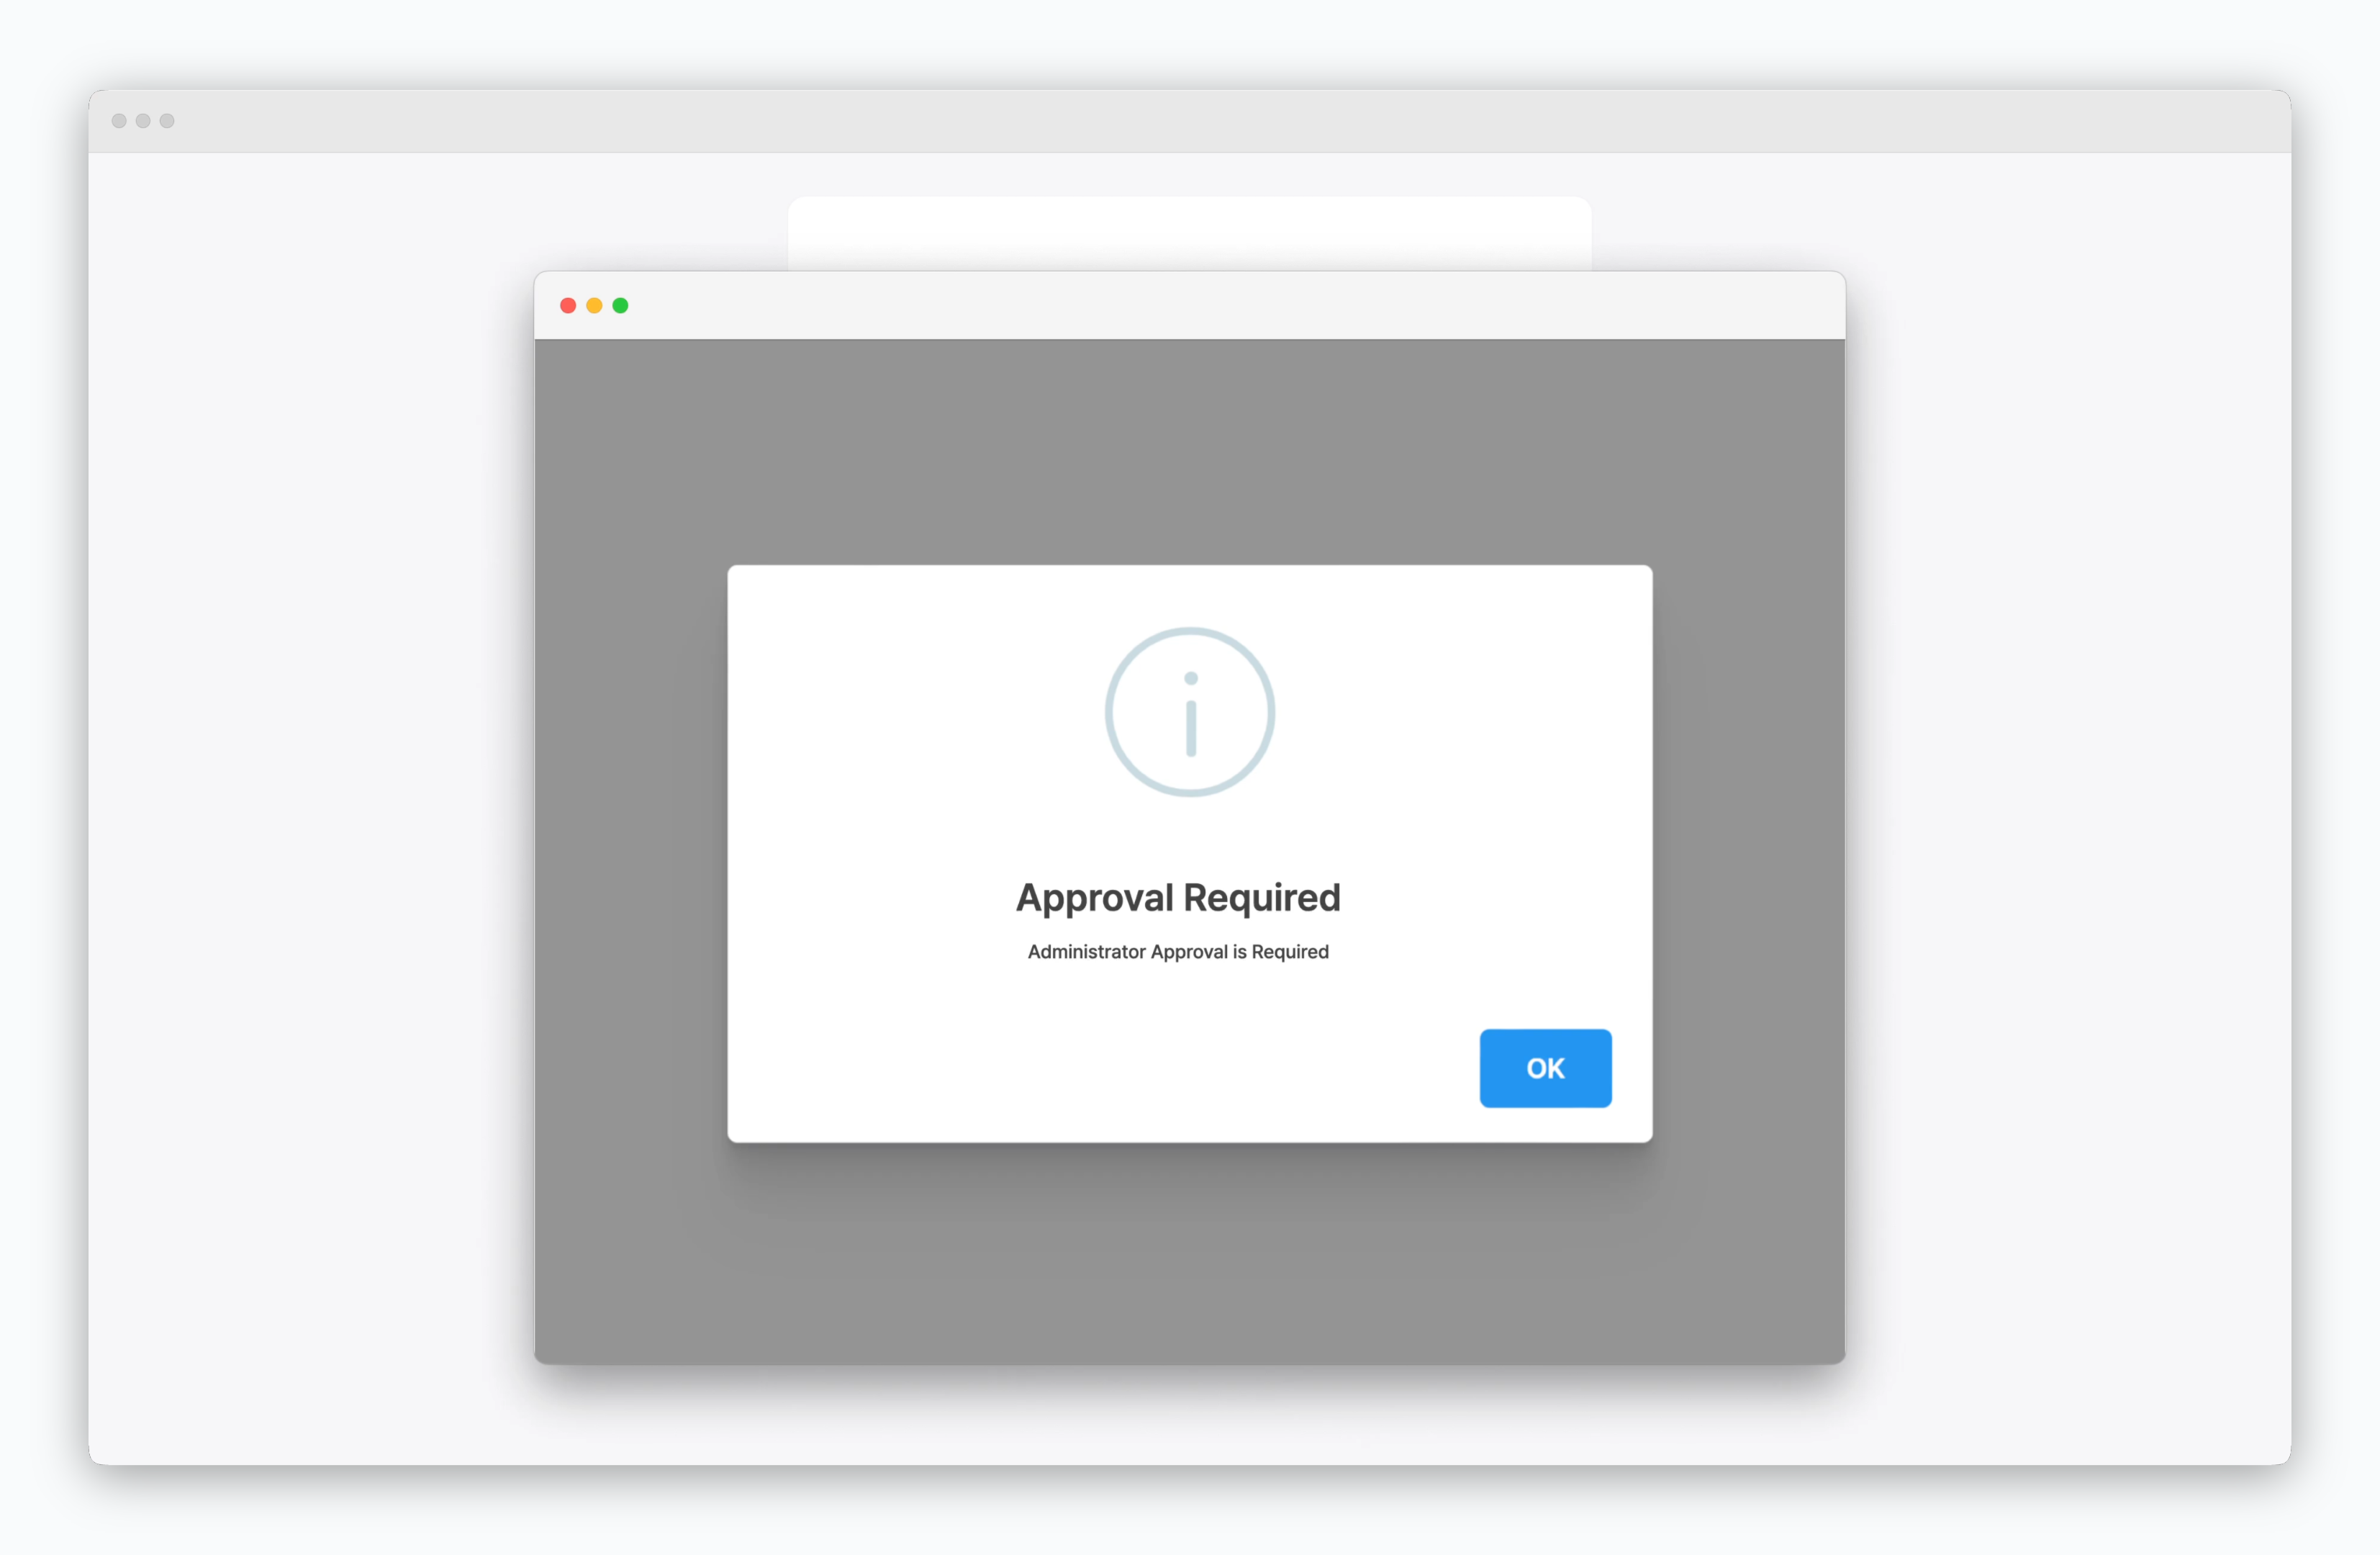 > Googleログインを完了すると、ユーザーは承認待ち状態になり、管理者承認に関するメッセージが表示されます。管理者が承認すると、`ale`にログインできます。
ユーザーの承認(有効化)については、[User Managementページ](/ja/operations/user-management#%E3%83%A6%E3%83%BC%E3%82%B6%E3%83%BC%E3%81%AE%E6%9C%89%E5%8A%B9%E5%8C%96)をご参照ください。
### Sign In
> Googleログインを完了すると、ユーザーは承認待ち状態になり、管理者承認に関するメッセージが表示されます。管理者が承認すると、`ale`にログインできます。
ユーザーの承認(有効化)については、[User Managementページ](/ja/operations/user-management#%E3%83%A6%E3%83%BC%E3%82%B6%E3%83%BC%E3%81%AE%E6%9C%89%E5%8A%B9%E5%8C%96)をご参照ください。
### Sign In
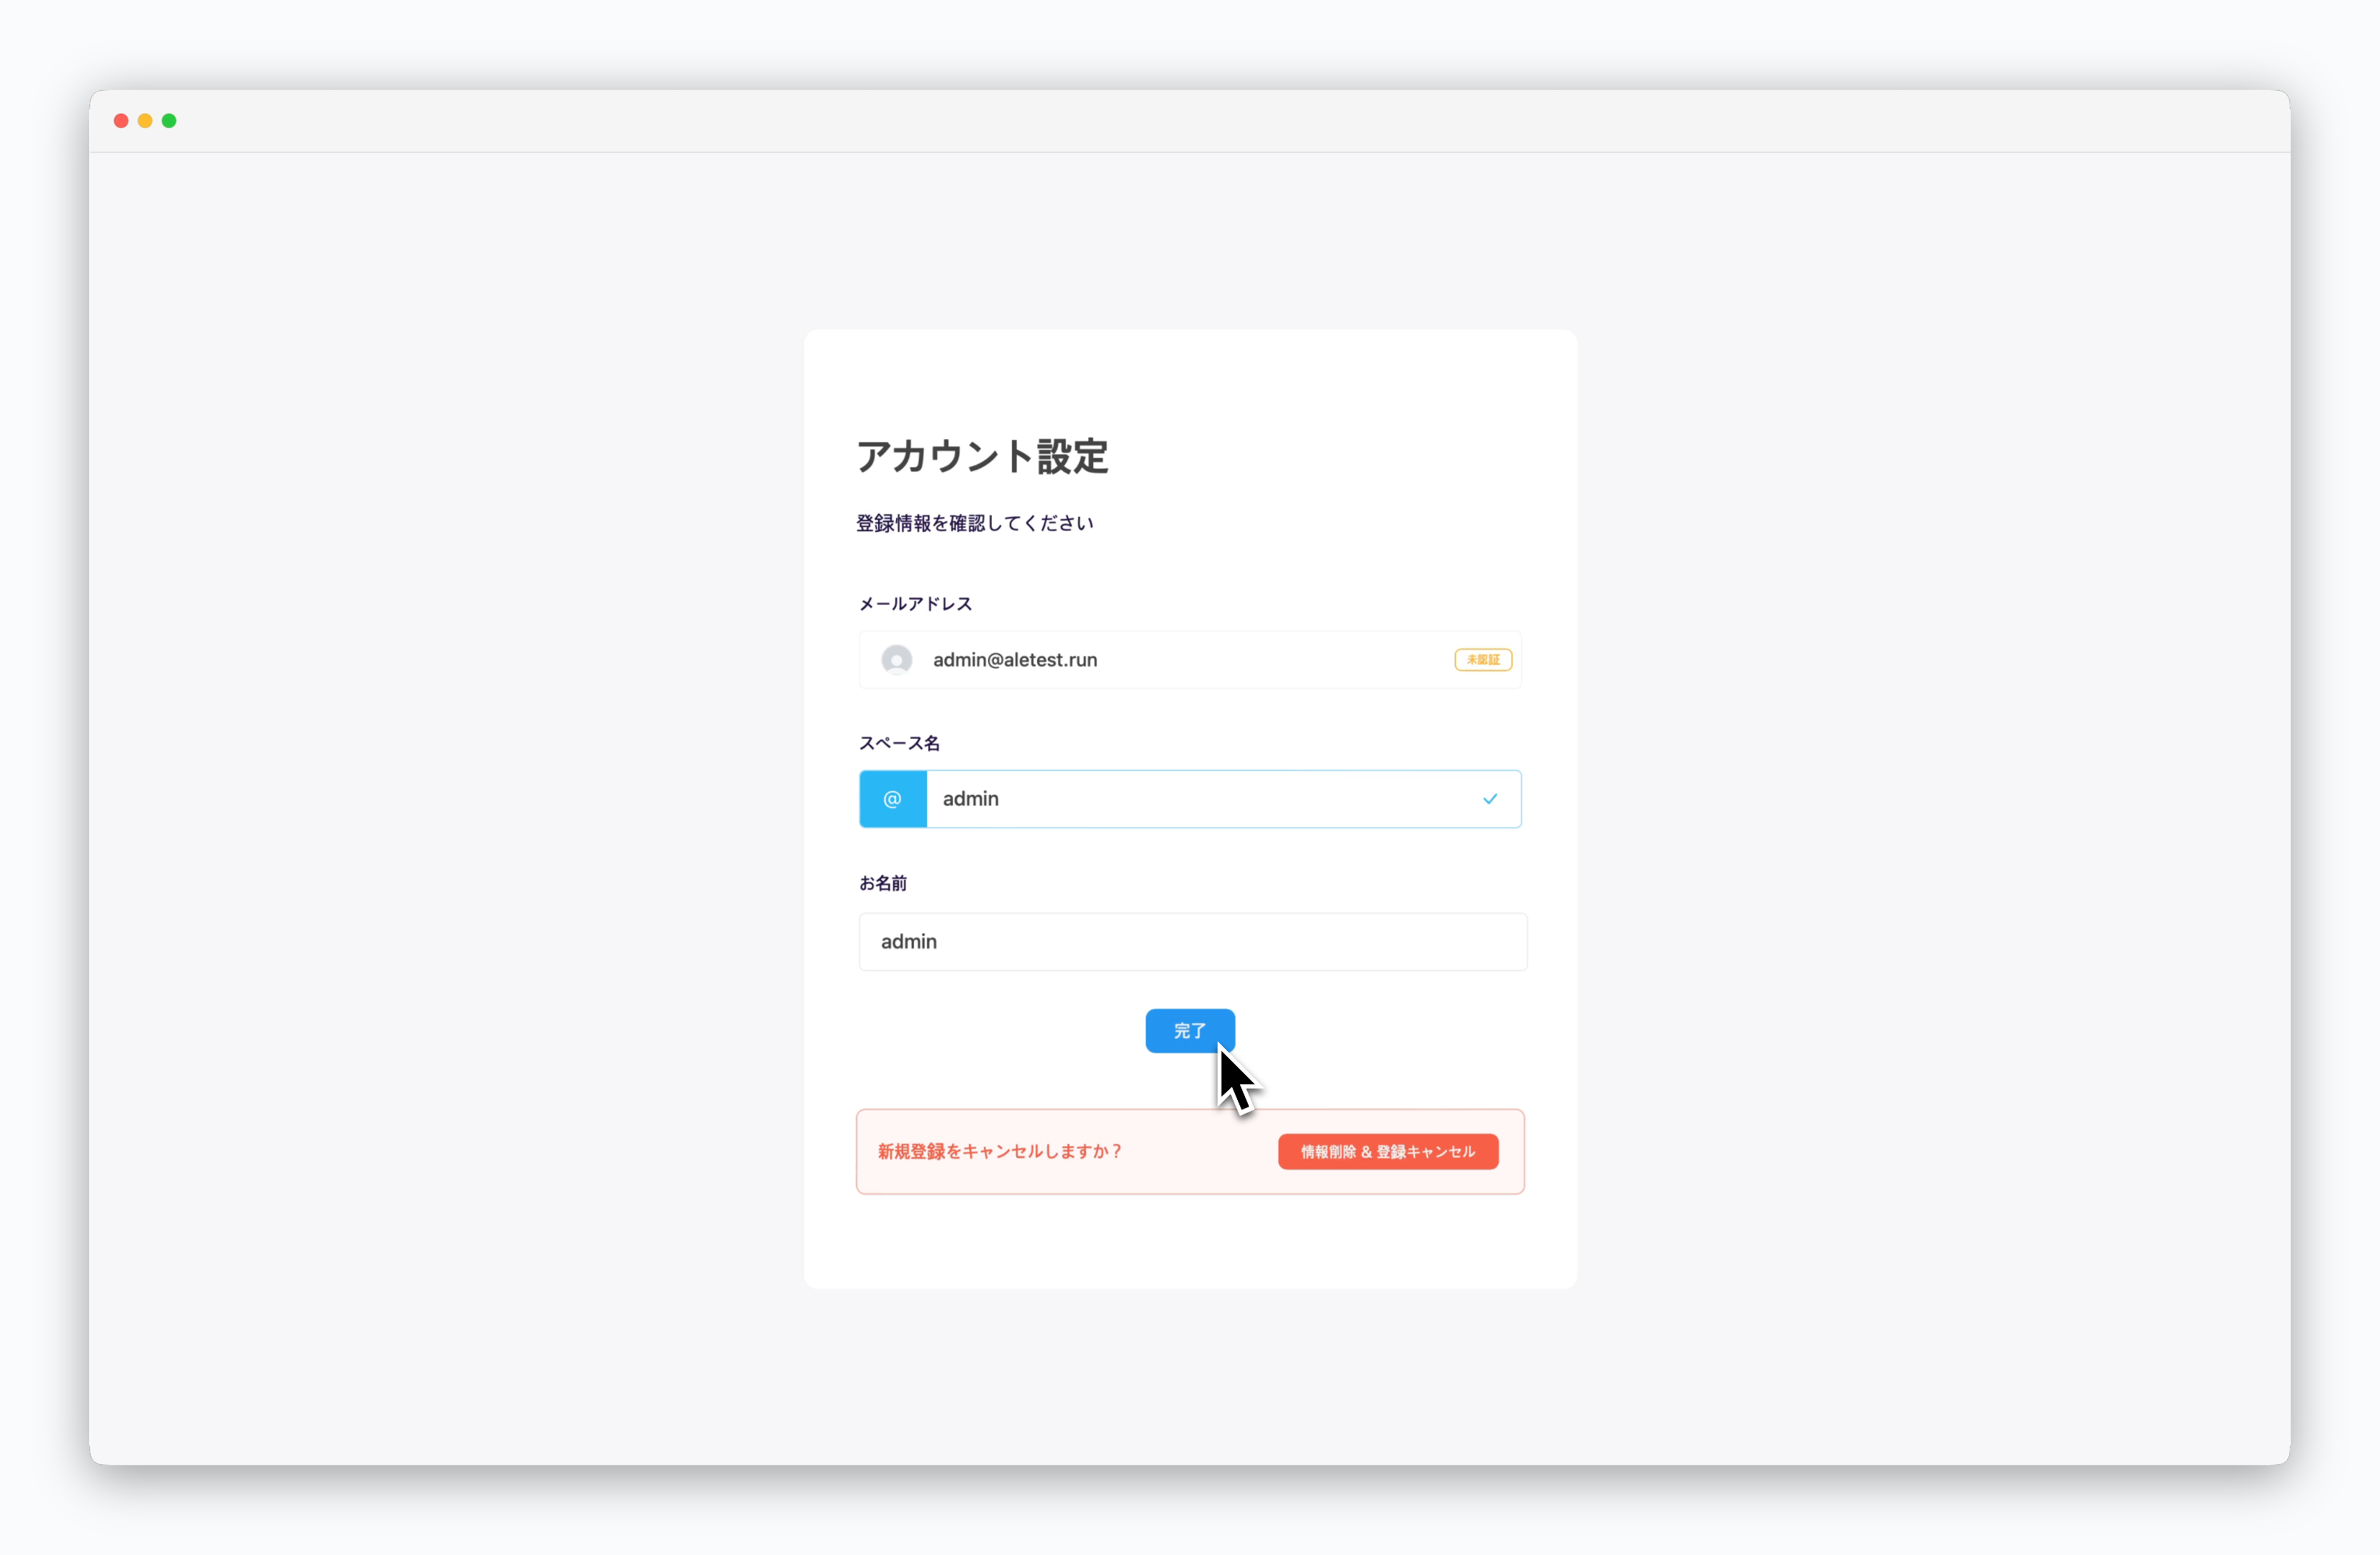 > 管理者承認後、Googleログインを試みると、**Complete Registration**ページが表示されます。適切なスペースと名前を入力し、`Complete`をクリックします。
ダッシュボードにアクセスすると、指定した名前のスペースが作成され、[オペレーションシステムで事前に定義されたデフォルトリソース](/ja/operations/settings#%E3%83%AA%E3%82%BD%E3%83%BC%E3%82%B9%E3%83%97%E3%83%AD%E3%83%95%E3%82%A1%E3%82%A4%E3%83%AB%E7%AE%A1%E7%90%86)が割り当てられます。
ユーザー登録と管理の詳細については、[User Managementページ](/ja/operations/user-management)をご参照ください。
> 管理者承認後、Googleログインを試みると、**Complete Registration**ページが表示されます。適切なスペースと名前を入力し、`Complete`をクリックします。
ダッシュボードにアクセスすると、指定した名前のスペースが作成され、[オペレーションシステムで事前に定義されたデフォルトリソース](/ja/operations/settings#%E3%83%AA%E3%82%BD%E3%83%BC%E3%82%B9%E3%83%97%E3%83%AD%E3%83%95%E3%82%A1%E3%82%A4%E3%83%AB%E7%AE%A1%E7%90%86)が割り当てられます。
ユーザー登録と管理の詳細については、[User Managementページ](/ja/operations/user-management)をご参照ください。