> ## Documentation Index
> Fetch the complete documentation index at: https://docs.ale.run/llms.txt
> Use this file to discover all available pages before exploring further.
# クイックスタート
> エールをローカル環境にインストールし、ローカル K8s クラスターにアプリをデプロイできます。
エールを使用するには、Node.js 20以上が必要です。
***
## クラスターのセットアップ
[Docker Desktop](https://www.docker.com/products/docker-desktop/) のウェブサイトにアクセスし、OSとアーキテクチャに合ったインストールファイルをダウンロードしてください。インストール完了後、ターミナルで以下のコマンドを入力してDockerが正常にインストールされたことを確認します。
```bash theme={null}
docker version
```
**Kubernetes クラスターのセットアップ**
**1.** Docker Desktopの設定画面に移動し、左のメニューから**Kubernetes**を選択します。次に、**Enable Kubernetes**を有効化し、下部の`Apply & restart`をクリックしてください。
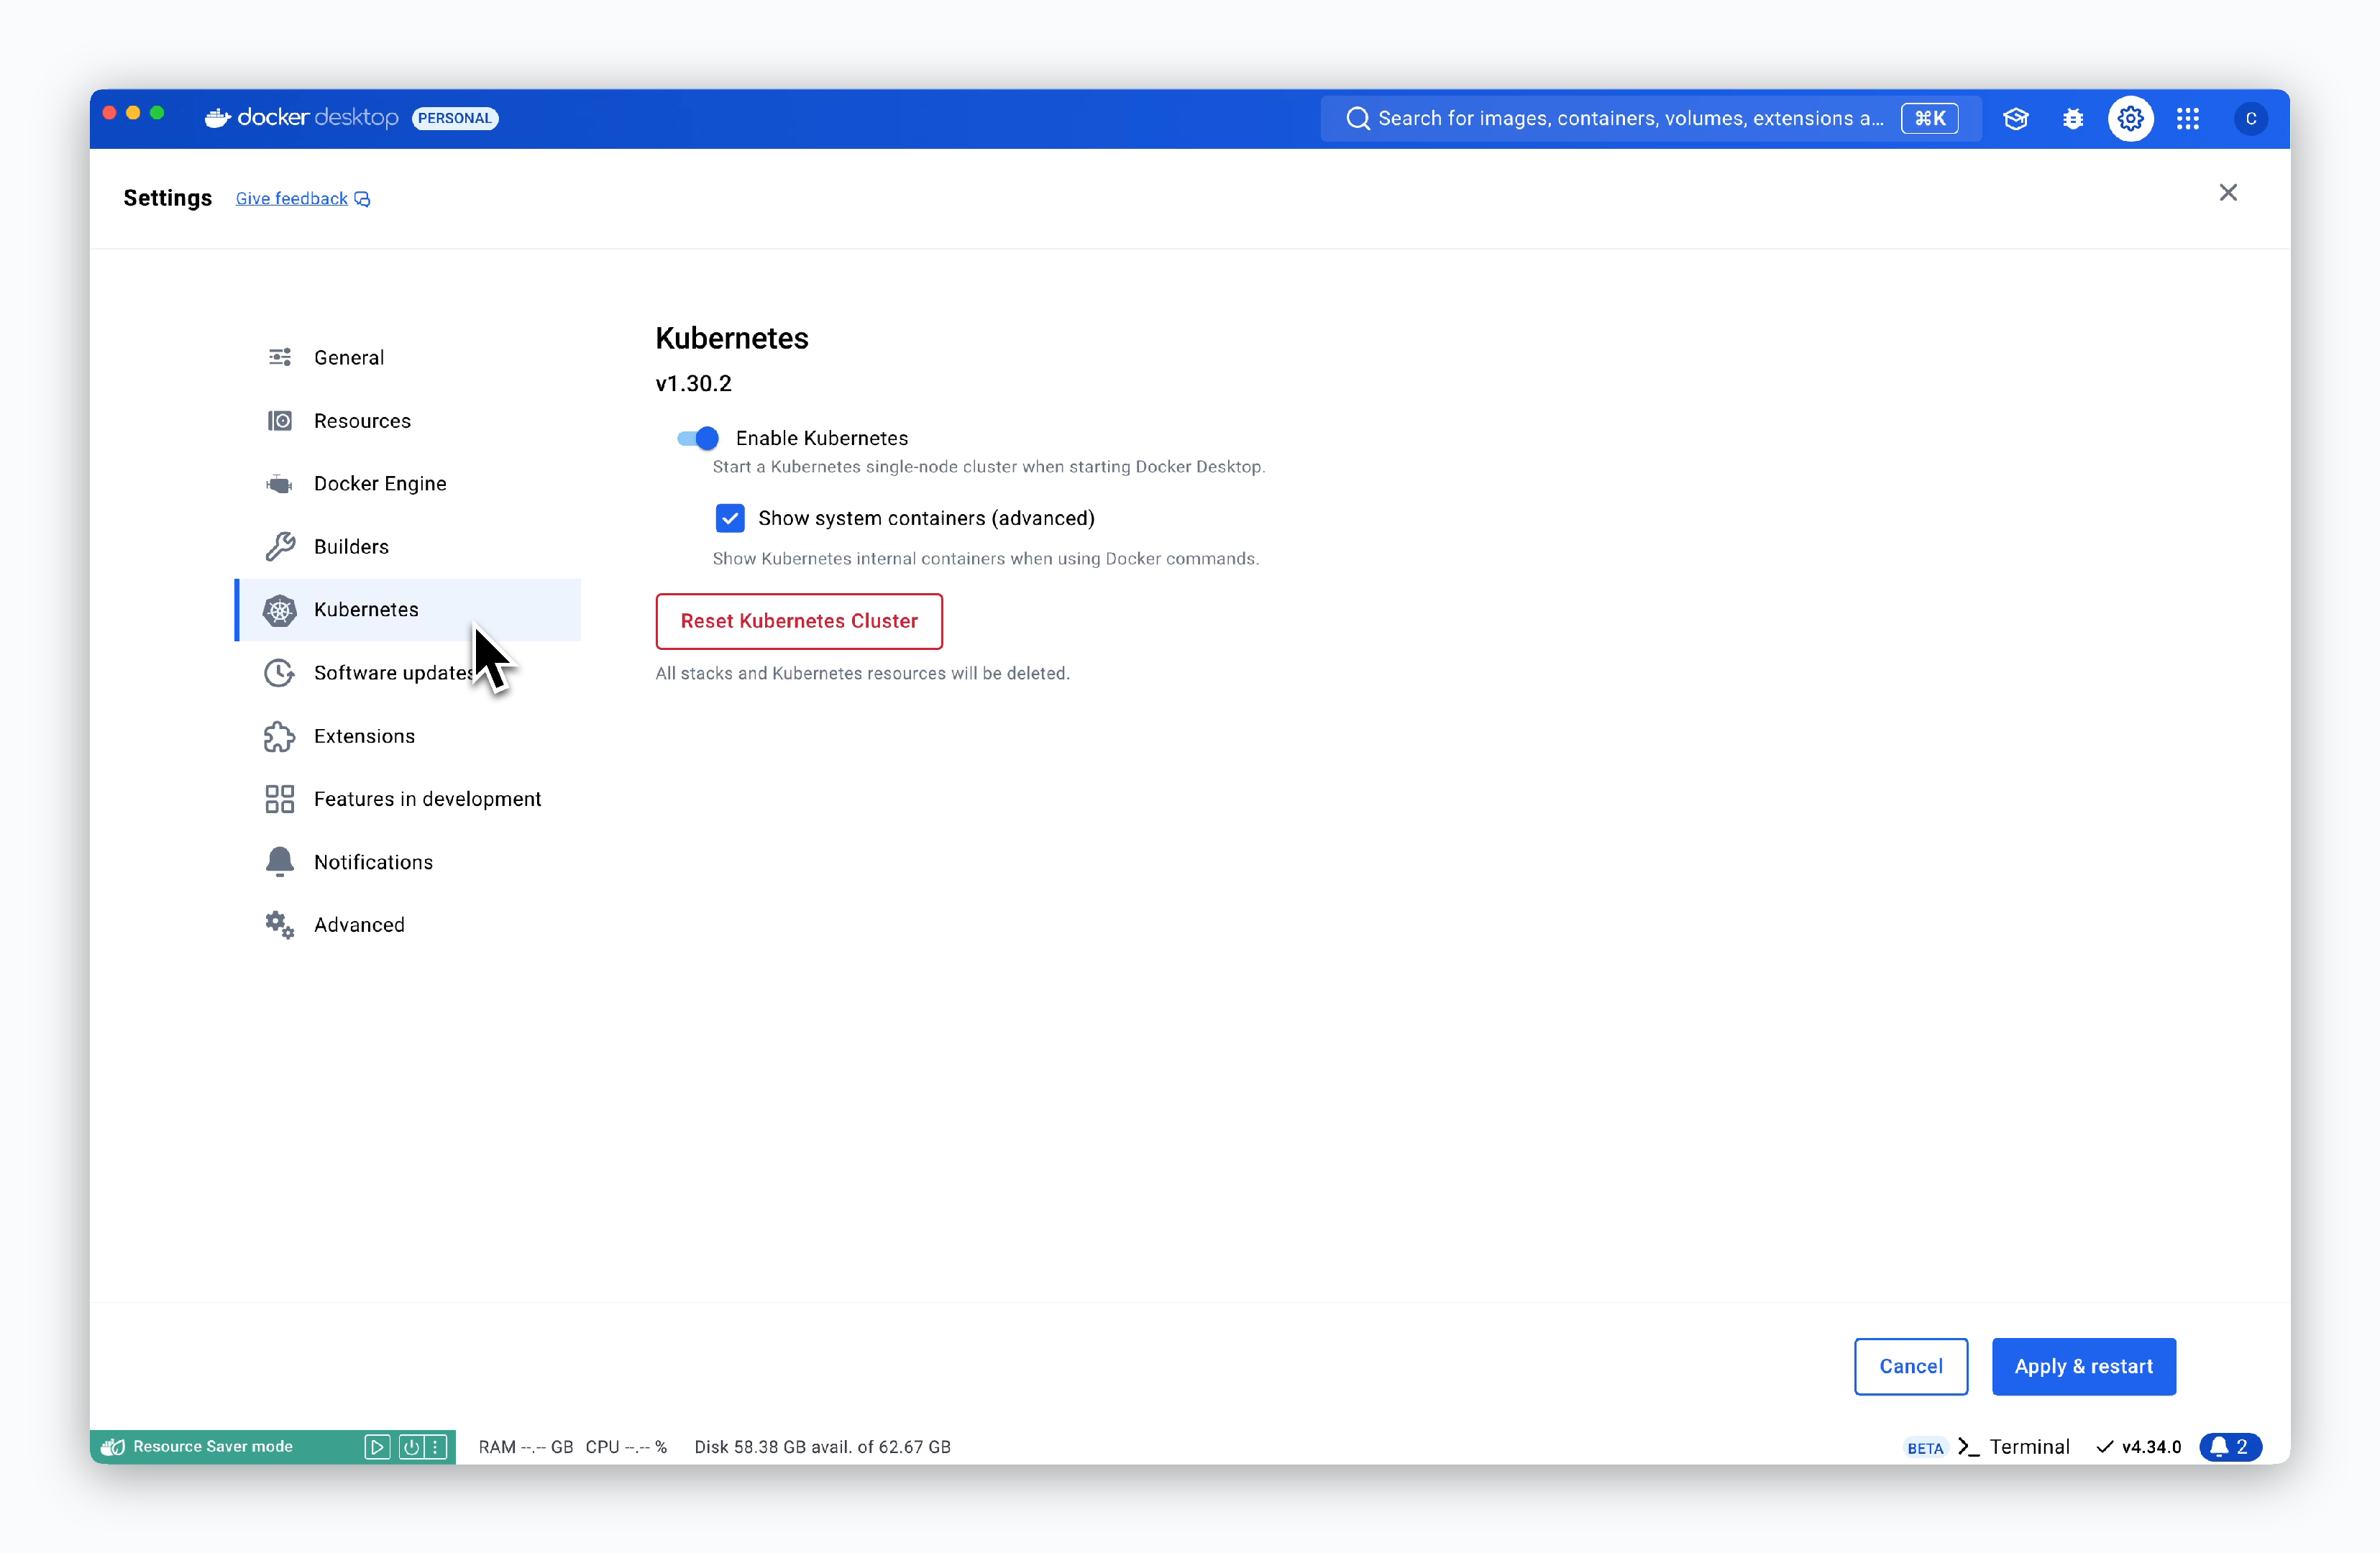 **2.** kubectlコマンドがDocker Desktopを通じて生成されたKubernetesクラスターに適用されるよう、以下のコマンドを実行してください。
```bash theme={null}
kubectl config use-context docker-desktop
```
```plain theme={null}
Switched to context "docker-desktop".
```
**3.** ターミナルで以下のコマンドを実行し、クラスターが正常に動作しているか確認できます。**STATUS**が**Ready**でない場合や、以下の内容が表示されない場合、Kubernetesクラスターが正常に利用できない状態ですので、コンテキストやDocker Desktopの状態を確認する必要があります。
```bash theme={null}
kubectl get node
```
```plain theme={null}
NAME STATUS ROLES AGE VERSION
docker-desktop Ready control-plane 37m v1.30.2
```
[HomeBrew](https://brew.sh/)がインストールされているmacOSで、以下のコマンドを実行してください。
```bash theme={null}
brew install orbstack
```
**Kubernetes クラスターのセットアップ**
**1.** OrbStackの設定画面に移動し、**Kubernetes**タブを選択します。
次に、**Enable Kubernetes cluster**および**Expose services to local network devices**にチェックを入れ、下部の`Apply`をクリックしてください。
**2.** kubectlコマンドがDocker Desktopを通じて生成されたKubernetesクラスターに適用されるよう、以下のコマンドを実行してください。
```bash theme={null}
kubectl config use-context docker-desktop
```
```plain theme={null}
Switched to context "docker-desktop".
```
**3.** ターミナルで以下のコマンドを実行し、クラスターが正常に動作しているか確認できます。**STATUS**が**Ready**でない場合や、以下の内容が表示されない場合、Kubernetesクラスターが正常に利用できない状態ですので、コンテキストやDocker Desktopの状態を確認する必要があります。
```bash theme={null}
kubectl get node
```
```plain theme={null}
NAME STATUS ROLES AGE VERSION
docker-desktop Ready control-plane 37m v1.30.2
```
[HomeBrew](https://brew.sh/)がインストールされているmacOSで、以下のコマンドを実行してください。
```bash theme={null}
brew install orbstack
```
**Kubernetes クラスターのセットアップ**
**1.** OrbStackの設定画面に移動し、**Kubernetes**タブを選択します。
次に、**Enable Kubernetes cluster**および**Expose services to local network devices**にチェックを入れ、下部の`Apply`をクリックしてください。
 **2.** kubectlコマンドがOrbStackを通じて生成されたKubernetesクラスターに適用されるよう、以下のコマンドを実行してください。
```bash theme={null}
kubectl config use-context orbstack
```
```plain theme={null}
Switched to context "orbstack".
```
**3.** ターミナルで以下のコマンドを実行し、クラスターが正常に動作しているか確認できます。**STATUS**が**Ready**でない場合や、以下の内容が表示されない場合、Kubernetesクラスターが正常に利用できない状態ですので、コンテキストやOrbStackの状態を確認する必要があります。
```bash theme={null}
kubectl get node
```
```plain theme={null}
NAME STATUS ROLES AGE VERSION
orbstack Ready control-plane,master 7m14s v1.29.3+orb1
```
kindを利用するには、v1.16以上のgoがインストールされている必要があります。
[このページ](https://go.dev/dl/)からOSごとのインストーラをダウンロードし、インストール後、以下のコマンドを入力してシェルにgoのパスを登録してください。
```bash zsh theme={null}
echo 'export PATH=$PATH:$HOME/go/bin' >> ~/.zshrc && source ~/.zshrc
```
```bash bash theme={null}
echo 'export PATH=$PATH:$HOME/go/bin' >> ~/.bashrc && source ~/.bashrc
```
ターミナルで以下のコマンドを実行してください。
```bash theme={null}
go install sigs.k8s.io/kind@v0.25.0
```
**Kubernetes クラスターのセットアップ**
**1.** ターミナルで以下のコマンドを入力します。
```bash theme={null}
cat < 19m v1.31.2
kind-worker2 Ready 19m v1.31.2
```
## エールのインストールと実行
```bash theme={null}
mkdir ale-run
cd ale-run
```
```bash theme={null}
npm i @ale-run/runtime@latest
```
```bash theme={null}
kubectl apply -f https://raw.githubusercontent.com/kubernetes/ingress-nginx/controller-v1.11.2/deploy/static/provider/cloud/deploy.yaml
```
```bash theme={null}
kubectl delete -A ValidatingWebhookConfiguration ingress-nginx-admission
```
```bash theme={null}
kubectl patch ingressclass nginx --type='merge' -p '{"metadata": {"annotations": {"ingressclass.kubernetes.io/is-default-class": "true"}}}'
```
```bash theme={null}
kubectl apply -f https://github.com/kubernetes-sigs/metrics-server/releases/latest/download/components.yaml
```
```bash theme={null}
npx aled dev
```
```bash theme={null}
? Select the k8s cluster to use. › Select the k8s cluster to use.
No Cluster
orbstack
❯ docker-desktop
```
以下のようにログが表示されたら、実行が完了したことになります。
```bash theme={null}
...
[INFO] [plugin:cloudtype-apps] plugin @cloudtype/apps is installed {}
[INFO] [plugin:cloudtype-apps] plugin @cloudtype/apps is activate {}
[INFO] [pde:init] plugin "@cloudtype/apps" loaded!
[INFO] [k8s] KubernetesClusterType initialized with agent {"connection":{"context":"docker-desktop","namespace":"ale-pde"},"stat":{"db":{"url":"mongodb://127.0.0.1:64000/","dbName":"ale-pde"}}}
[INFO] [k8s] ConfigContext initialized with {"connection":{"context":"docker-desktop","namespace":"ale-pde"},"stat":{"db":{"url":"mongodb://127.0.0.1:64000/","dbName":"ale-pde"}}}
[INFO] [k8s] connect k8s to "docker-desktop"
[INFO] [k8s] [agent] cluster agent initialized
[WARN] [k8s] ConfigMap.get ale-pde agent-config
[INFO] [pde:agent] Ale Agent is initialized with config
[INFO] [pde:init] Ale Agent httpsd is listening at 127.0.0.1:9801
[INFO] [k8s] config loaded from cluster from "ale-pde/agent-config"
[INFO] [stat] stat controller init {"collector":{"prefix":"ale"},"db":{"url":"mongodb://127.0.0.1:64000/","dbName":"ale-pde"},"connection":{"context":"docker-desktop","namespace":"ale-pde"}}
[INFO] [stat] connect k8s to "docker-desktop"
[INFO] [stat] stat watcher started
```
実行中にデータベース競合が発生した場合、以下のコマンドで既存のエールデータを削除し、再実行してください。
```bash theme={null}
rm -r ~/.ale-dev
```
ローカル環境とGitHubを連携し、GitHubリポジトリのソースコードをデプロイできます。
**1. GitHub Appsの作成**
**2.** kubectlコマンドがOrbStackを通じて生成されたKubernetesクラスターに適用されるよう、以下のコマンドを実行してください。
```bash theme={null}
kubectl config use-context orbstack
```
```plain theme={null}
Switched to context "orbstack".
```
**3.** ターミナルで以下のコマンドを実行し、クラスターが正常に動作しているか確認できます。**STATUS**が**Ready**でない場合や、以下の内容が表示されない場合、Kubernetesクラスターが正常に利用できない状態ですので、コンテキストやOrbStackの状態を確認する必要があります。
```bash theme={null}
kubectl get node
```
```plain theme={null}
NAME STATUS ROLES AGE VERSION
orbstack Ready control-plane,master 7m14s v1.29.3+orb1
```
kindを利用するには、v1.16以上のgoがインストールされている必要があります。
[このページ](https://go.dev/dl/)からOSごとのインストーラをダウンロードし、インストール後、以下のコマンドを入力してシェルにgoのパスを登録してください。
```bash zsh theme={null}
echo 'export PATH=$PATH:$HOME/go/bin' >> ~/.zshrc && source ~/.zshrc
```
```bash bash theme={null}
echo 'export PATH=$PATH:$HOME/go/bin' >> ~/.bashrc && source ~/.bashrc
```
ターミナルで以下のコマンドを実行してください。
```bash theme={null}
go install sigs.k8s.io/kind@v0.25.0
```
**Kubernetes クラスターのセットアップ**
**1.** ターミナルで以下のコマンドを入力します。
```bash theme={null}
cat < 19m v1.31.2
kind-worker2 Ready 19m v1.31.2
```
## エールのインストールと実行
```bash theme={null}
mkdir ale-run
cd ale-run
```
```bash theme={null}
npm i @ale-run/runtime@latest
```
```bash theme={null}
kubectl apply -f https://raw.githubusercontent.com/kubernetes/ingress-nginx/controller-v1.11.2/deploy/static/provider/cloud/deploy.yaml
```
```bash theme={null}
kubectl delete -A ValidatingWebhookConfiguration ingress-nginx-admission
```
```bash theme={null}
kubectl patch ingressclass nginx --type='merge' -p '{"metadata": {"annotations": {"ingressclass.kubernetes.io/is-default-class": "true"}}}'
```
```bash theme={null}
kubectl apply -f https://github.com/kubernetes-sigs/metrics-server/releases/latest/download/components.yaml
```
```bash theme={null}
npx aled dev
```
```bash theme={null}
? Select the k8s cluster to use. › Select the k8s cluster to use.
No Cluster
orbstack
❯ docker-desktop
```
以下のようにログが表示されたら、実行が完了したことになります。
```bash theme={null}
...
[INFO] [plugin:cloudtype-apps] plugin @cloudtype/apps is installed {}
[INFO] [plugin:cloudtype-apps] plugin @cloudtype/apps is activate {}
[INFO] [pde:init] plugin "@cloudtype/apps" loaded!
[INFO] [k8s] KubernetesClusterType initialized with agent {"connection":{"context":"docker-desktop","namespace":"ale-pde"},"stat":{"db":{"url":"mongodb://127.0.0.1:64000/","dbName":"ale-pde"}}}
[INFO] [k8s] ConfigContext initialized with {"connection":{"context":"docker-desktop","namespace":"ale-pde"},"stat":{"db":{"url":"mongodb://127.0.0.1:64000/","dbName":"ale-pde"}}}
[INFO] [k8s] connect k8s to "docker-desktop"
[INFO] [k8s] [agent] cluster agent initialized
[WARN] [k8s] ConfigMap.get ale-pde agent-config
[INFO] [pde:agent] Ale Agent is initialized with config
[INFO] [pde:init] Ale Agent httpsd is listening at 127.0.0.1:9801
[INFO] [k8s] config loaded from cluster from "ale-pde/agent-config"
[INFO] [stat] stat controller init {"collector":{"prefix":"ale"},"db":{"url":"mongodb://127.0.0.1:64000/","dbName":"ale-pde"},"connection":{"context":"docker-desktop","namespace":"ale-pde"}}
[INFO] [stat] connect k8s to "docker-desktop"
[INFO] [stat] stat watcher started
```
実行中にデータベース競合が発生した場合、以下のコマンドで既存のエールデータを削除し、再実行してください。
```bash theme={null}
rm -r ~/.ale-dev
```
ローカル環境とGitHubを連携し、GitHubリポジトリのソースコードをデプロイできます。
**1. GitHub Appsの作成**
 > GitHubにログイン後、**Settings > Developer Settings > GitHub Apps**ページで [New GitHub App](https://github.com/settings/apps/new) をクリックして、GitHub App作成を開始します。
**1-1. 基本情報の入力**
> GitHubにログイン後、**Settings > Developer Settings > GitHub Apps**ページで [New GitHub App](https://github.com/settings/apps/new) をクリックして、GitHub App作成を開始します。
**1-1. 基本情報の入力**
 > GitHub Appを作成するための情報を以下のように入力してください。
* **GitHub App name** : GitHub Appの名前
* **Homepage URL**
* GitHub OAuthを適用するURL
* ローカルアクセスアドレス `http://localhost:9001`
* **Callback URL(`Add Callback URL`で追加)**
* `http://localhost:9009/oauth/github/callback`
* `http://localhost:9009/oauth/github/connect/callback`
この画面で入力した**GitHub App name**はエールのGitHub OAuth登録時に使用されます。
ローカル環境のため、httpsではなく`http`で入力する必要があります。また、`localhost:9009`はエールのAPIエンドポイントアドレスです。
**1-2. Webhookの無効化**
> GitHub Appを作成するための情報を以下のように入力してください。
* **GitHub App name** : GitHub Appの名前
* **Homepage URL**
* GitHub OAuthを適用するURL
* ローカルアクセスアドレス `http://localhost:9001`
* **Callback URL(`Add Callback URL`で追加)**
* `http://localhost:9009/oauth/github/callback`
* `http://localhost:9009/oauth/github/connect/callback`
この画面で入力した**GitHub App name**はエールのGitHub OAuth登録時に使用されます。
ローカル環境のため、httpsではなく`http`で入力する必要があります。また、`localhost:9009`はエールのAPIエンドポイントアドレスです。
**1-2. Webhookの無効化**
 > WebhookセクションのActiveチェックを解除して無効化してください。
**1-3. 権限の付与とAPP作成**
> WebhookセクションのActiveチェックを解除して無効化してください。
**1-3. 権限の付与とAPP作成**
 > Permissionセクションで以下の権限を付与し、`Create GitHub App`をクリックしてAPPを作成してください。
* **Read and Write**
* Actions
* Administration
* Commit statuses
* Contents
* Deployments
* Issues
* Pull requests
* Workflows
* **Read-only**
* Metadata
* **Read and Write**
* Administration
* **Read-only**
* Members
* **Read-only**
* Email addresses
**2. GitHub App情報の取得**
> エールのGitHub OAuthを追加するために、GitHub App Name以外に以下の**4つのIDとKeyの値**が必要です。
* **App ID**
* **Client ID**
* **Client Secret**
* **Private Key**
**2-1. App IDとClient IDの取得**
> Permissionセクションで以下の権限を付与し、`Create GitHub App`をクリックしてAPPを作成してください。
* **Read and Write**
* Actions
* Administration
* Commit statuses
* Contents
* Deployments
* Issues
* Pull requests
* Workflows
* **Read-only**
* Metadata
* **Read and Write**
* Administration
* **Read-only**
* Members
* **Read-only**
* Email addresses
**2. GitHub App情報の取得**
> エールのGitHub OAuthを追加するために、GitHub App Name以外に以下の**4つのIDとKeyの値**が必要です。
* **App ID**
* **Client ID**
* **Client Secret**
* **Private Key**
**2-1. App IDとClient IDの取得**
 > 権限付与後にAppが作成されると、**App IDとClient ID**を確認できます。
**2-2. Client Secretの取得**
> 権限付与後にAppが作成されると、**App IDとClient ID**を確認できます。
**2-2. Client Secretの取得**
 > 同じ画面で`Generate a new client secret`をクリックして、**Client Secret**を生成し、確認してください。
**2-3. Private Keyの取得**
> 同じ画面で`Generate a new client secret`をクリックして、**Client Secret**を生成し、確認してください。
**2-3. Private Keyの取得**
 > 画面下部の`Generate a private key`をクリックするとpemファイルがダウンロードされます。
**3. エール運用システムへの登録**
> 画面下部の`Generate a private key`をクリックするとpemファイルがダウンロードされます。
**3. エール運用システムへの登録**
 > ブラウザのアドレスバーに`http://localhost:9001`を入力して運用システムにアクセスし、**設定 > 認証手段 > GitHub**ドロップダウンをクリックして、前の手順で取得した値を各フィールドに入力し、`適用する`をクリックしてください。
* **APP\_NAME** : GitHub Appの名前
* **APP\_ID** : App ID
* **CLIENT\_ID** : Client ID
* **CLIENT\_SECRET** : Client secret
* **APP\_PRIVATE\_KEY**: Private key pemファイルの値
## ダッシュボードにアクセス
> ブラウザのアドレスバーに`http://localhost:9001`を入力して運用システムにアクセスし、**設定 > 認証手段 > GitHub**ドロップダウンをクリックして、前の手順で取得した値を各フィールドに入力し、`適用する`をクリックしてください。
* **APP\_NAME** : GitHub Appの名前
* **APP\_ID** : App ID
* **CLIENT\_ID** : Client ID
* **CLIENT\_SECRET** : Client secret
* **APP\_PRIVATE\_KEY**: Private key pemファイルの値
## ダッシュボードにアクセス
 > ブラウザのアドレスバーに`http://localhost:9001`を入力すると、エールダッシュボードにアクセスできます。初回アクセス時は、デフォルトで作成される`@dev`スペースに接続されます。
 > 左上のスペース名をクリックして運用システムを選択すると、アクセスできます。
## デプロイ
> 左上のスペース名をクリックして運用システムを選択すると、アクセスできます。
## デプロイ
 > ダッシュボードのまたは`⌘ + K`で生成されるデプロイモーダルからHTTPBinを選択します。
 > 設定を変更せずに、画面下部の`デプロイ`をクリックします。
 > サービスの起動が完了すると、画面に表示される状態が`稼働中`に変更されます。`アクセス`をクリックすると、起動したサービスに接続できます。
ローカル環境とGitHubを連携してGitHubリポジトリをデプロイしたり、SSH認証を使用してプライベートリポジトリをデプロイすることができます。一般的なデプロイについてのガイドは[エールでデプロイページ](/ja/developers/deploy)をご参照ください。
> サービスの起動が完了すると、画面に表示される状態が`稼働中`に変更されます。`アクセス`をクリックすると、起動したサービスに接続できます。
ローカル環境とGitHubを連携してGitHubリポジトリをデプロイしたり、SSH認証を使用してプライベートリポジトリをデプロイすることができます。一般的なデプロイについてのガイドは[エールでデプロイページ](/ja/developers/deploy)をご参照ください。