> ## Documentation Index
> Fetch the complete documentation index at: https://docs.ale.run/llms.txt
> Use this file to discover all available pages before exploring further.
# AWS EC2セットアップ
> エールをインストールするAWS EC2セットアップガイドです。
エールの円滑な動作のため、以下の要件を推奨します。
* **t3.large(2vCPU, 8GiB)** 以上のインスタンス
* **amd64(x86\_64)** アーキテクチャのOS
* **60GiB** 以上のストレージ
***
## EC2インスタンスの作成
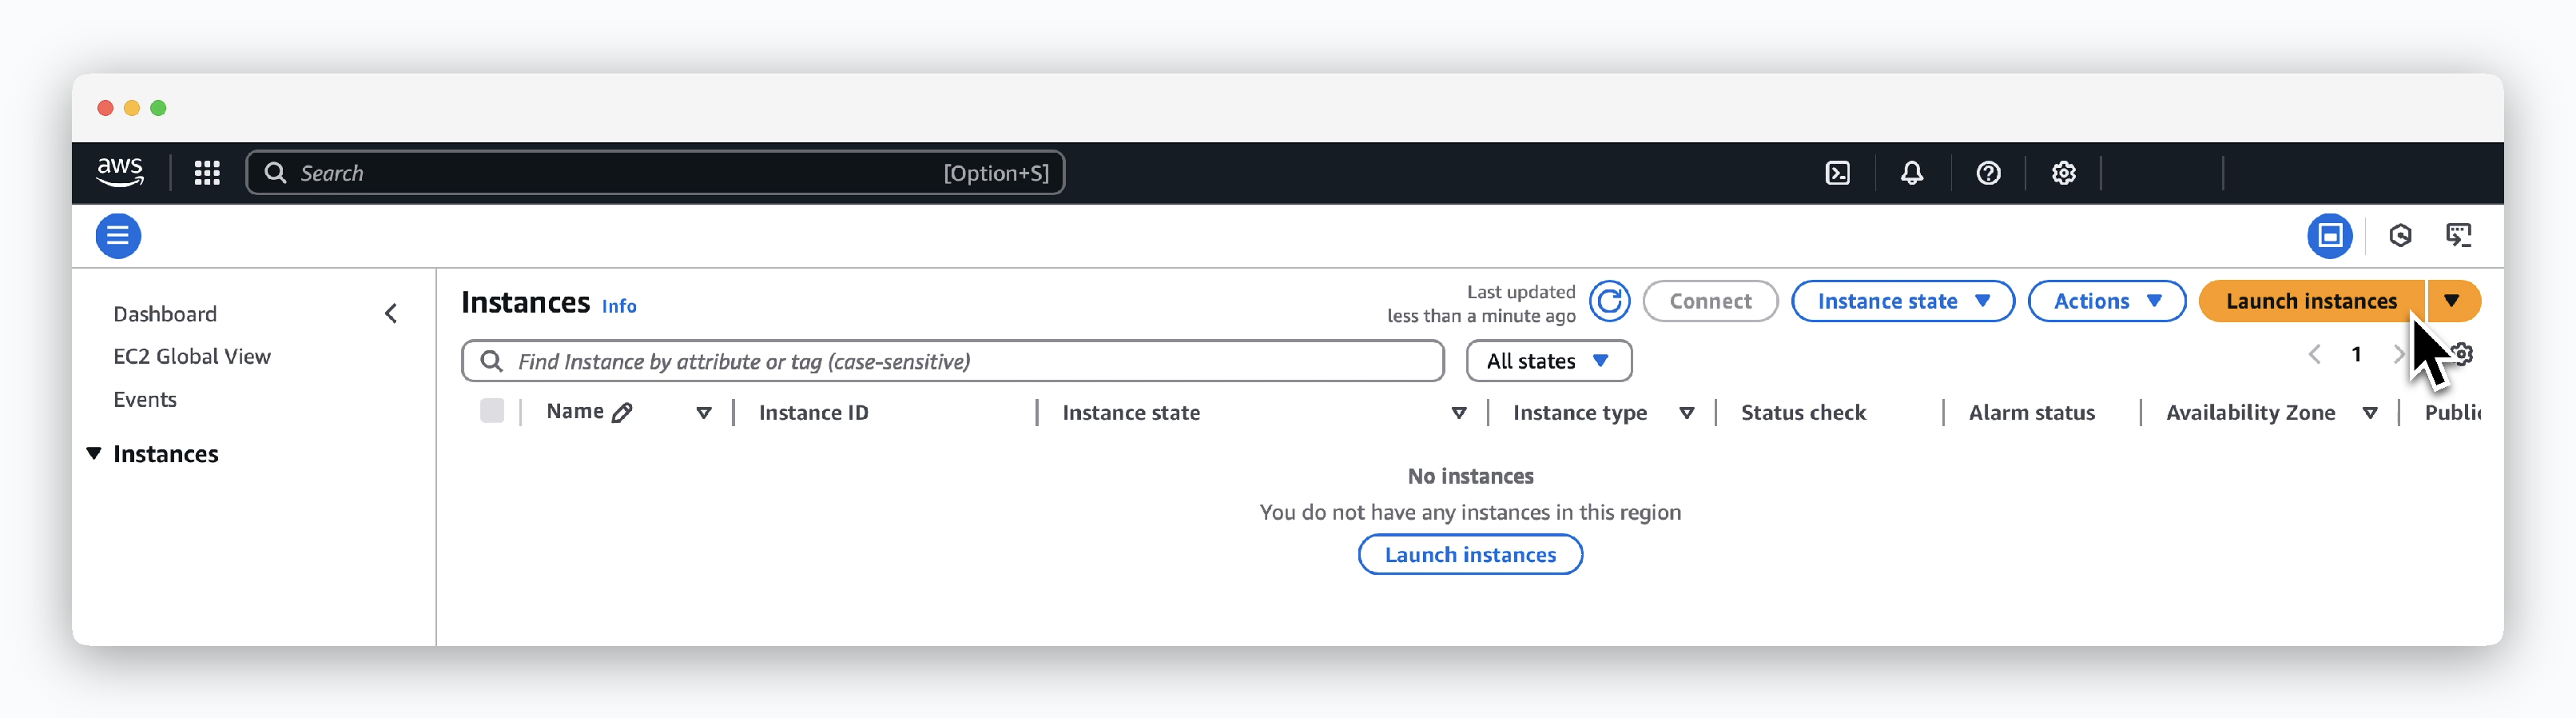 > `EC2 > Instances`で`Launch instances`をクリックしてください。
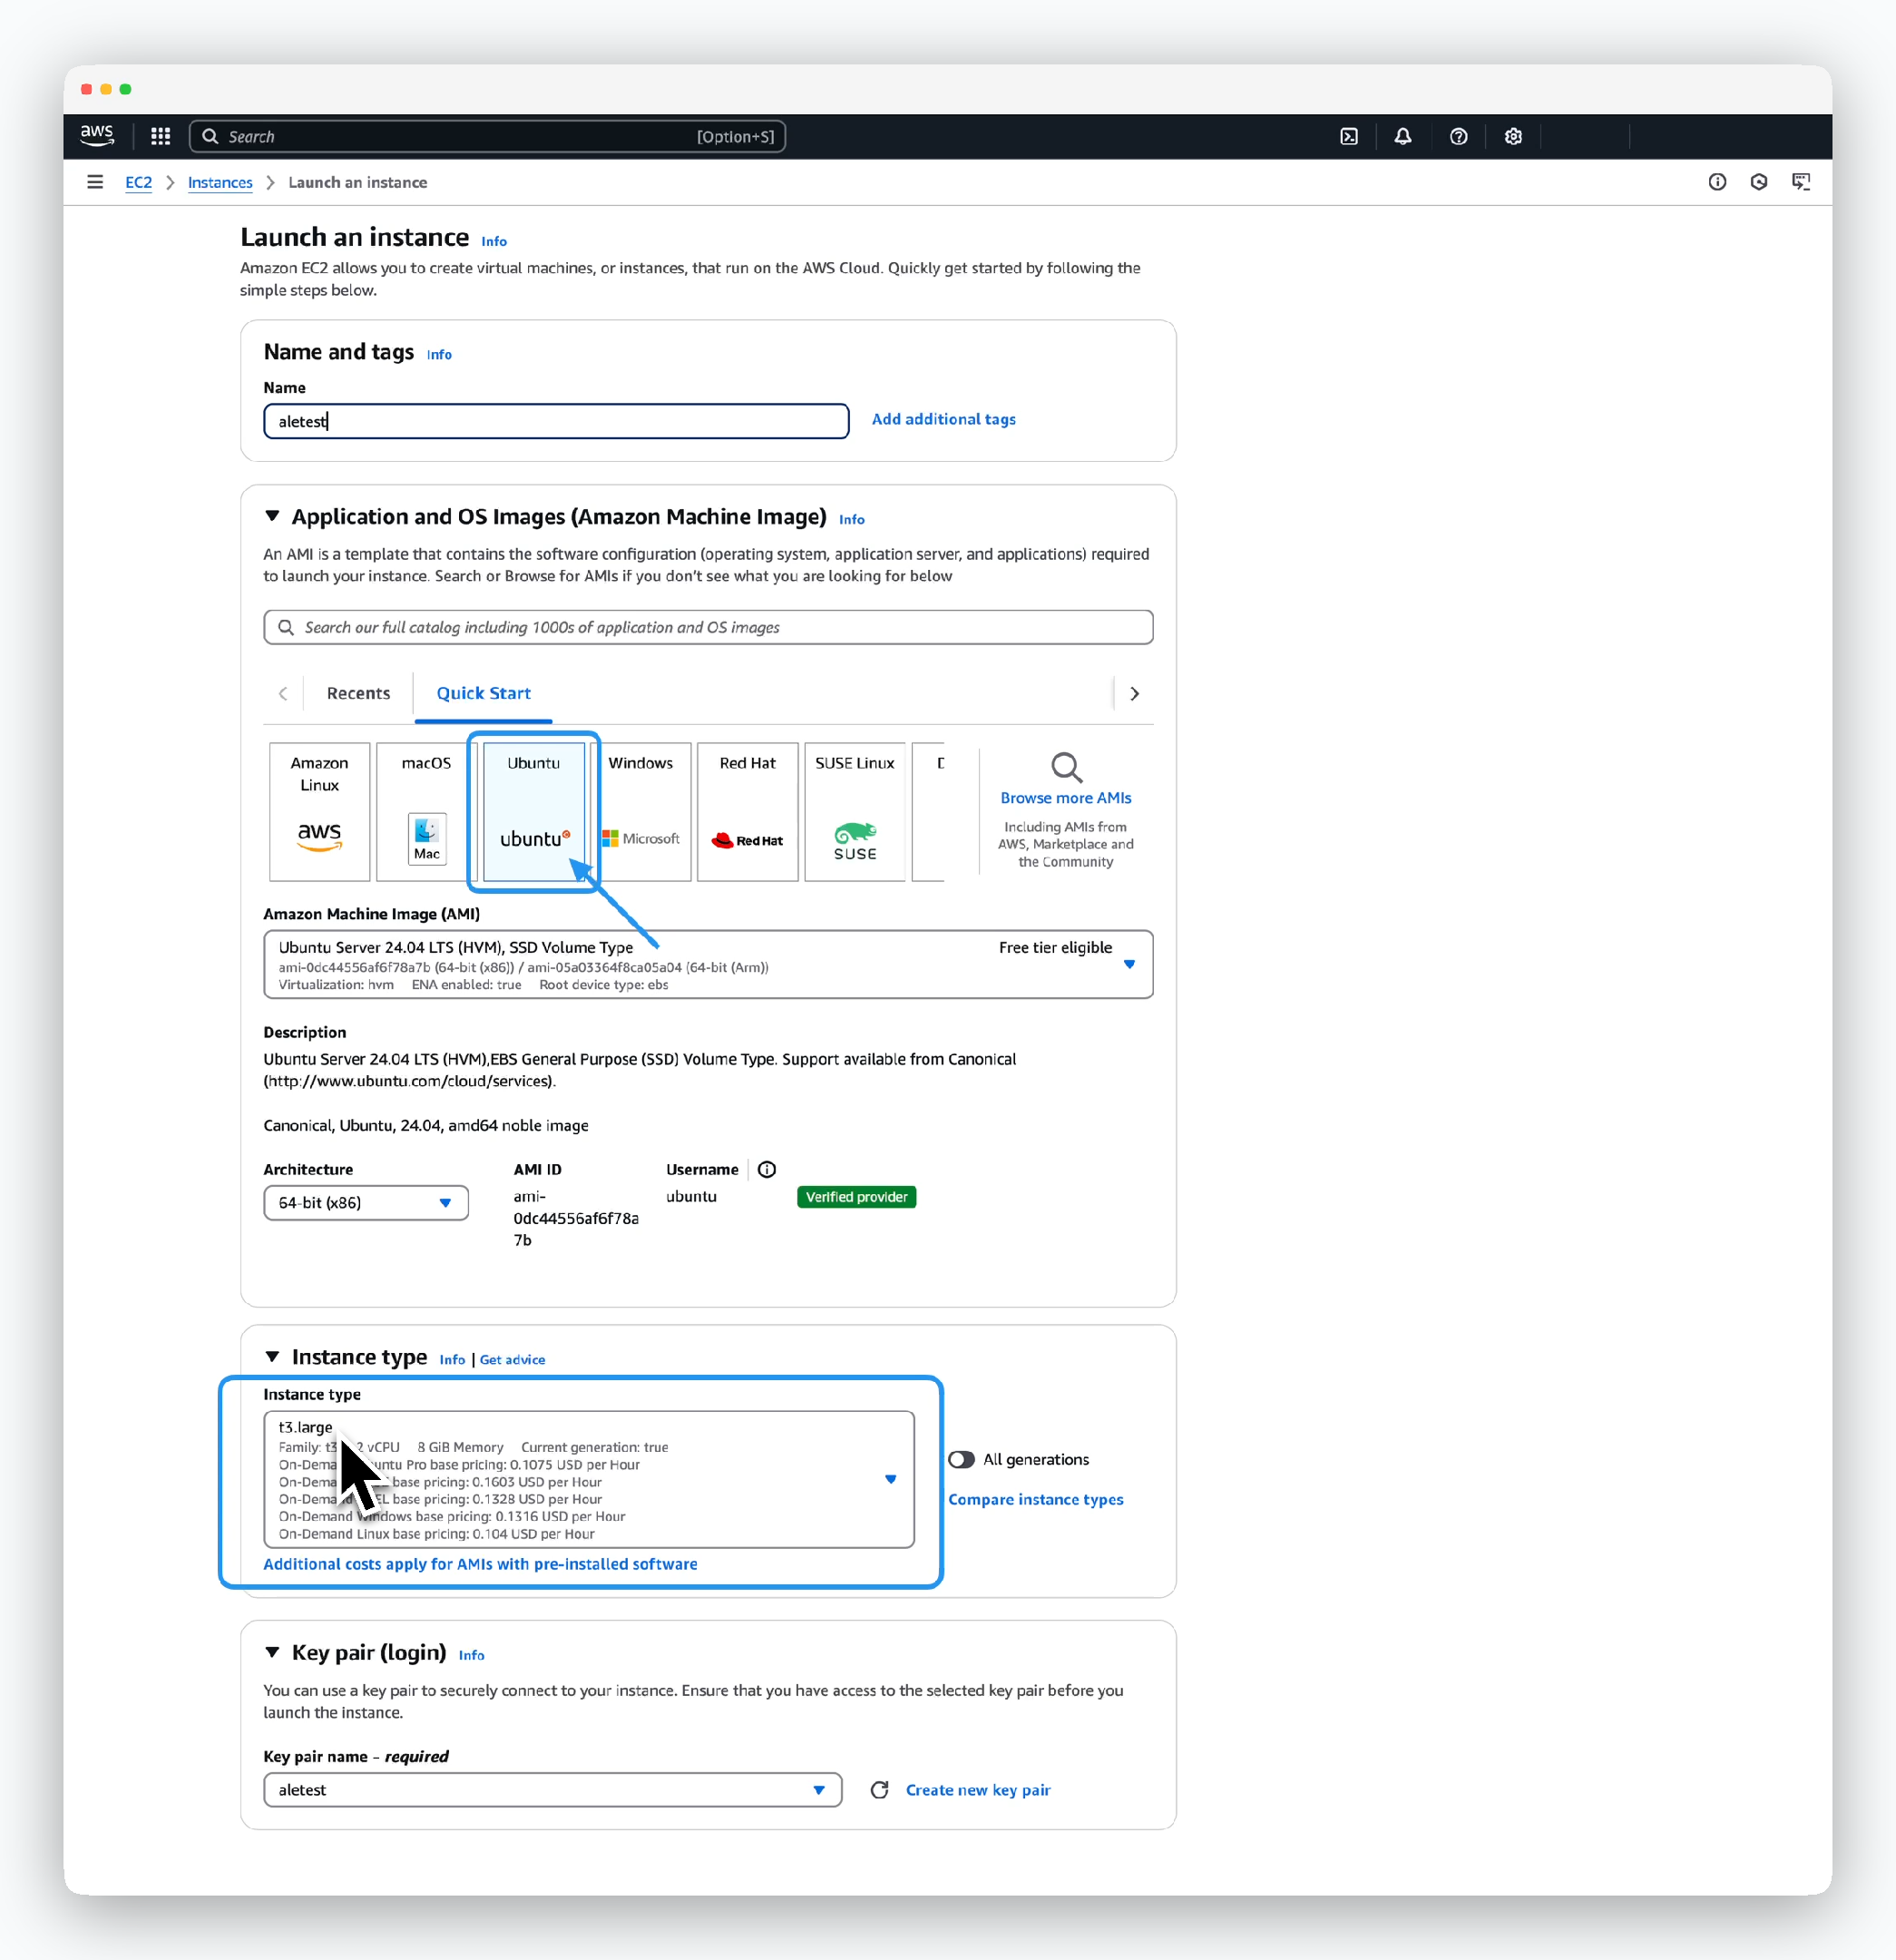 > 作成するインスタンスの情報を以下のように入力または選択してください。
* Name and tags
* Name: インスタンス名
* Application and OS Images (Amazon Machine Image)
* Amazon Machine Image (AMI): Ubuntu Server 24.04 LTS (amd64)
* Instance type
* t3.large以上のタイプを選択
* Key pair (login)
* 前の手順で作成したキーペアを選択
> 作成するインスタンスの情報を以下のように入力または選択してください。
* Name and tags
* Name: インスタンス名
* Application and OS Images (Amazon Machine Image)
* Amazon Machine Image (AMI): Ubuntu Server 24.04 LTS (amd64)
* Instance type
* t3.large以上のタイプを選択
* Key pair (login)
* 前の手順で作成したキーペアを選択
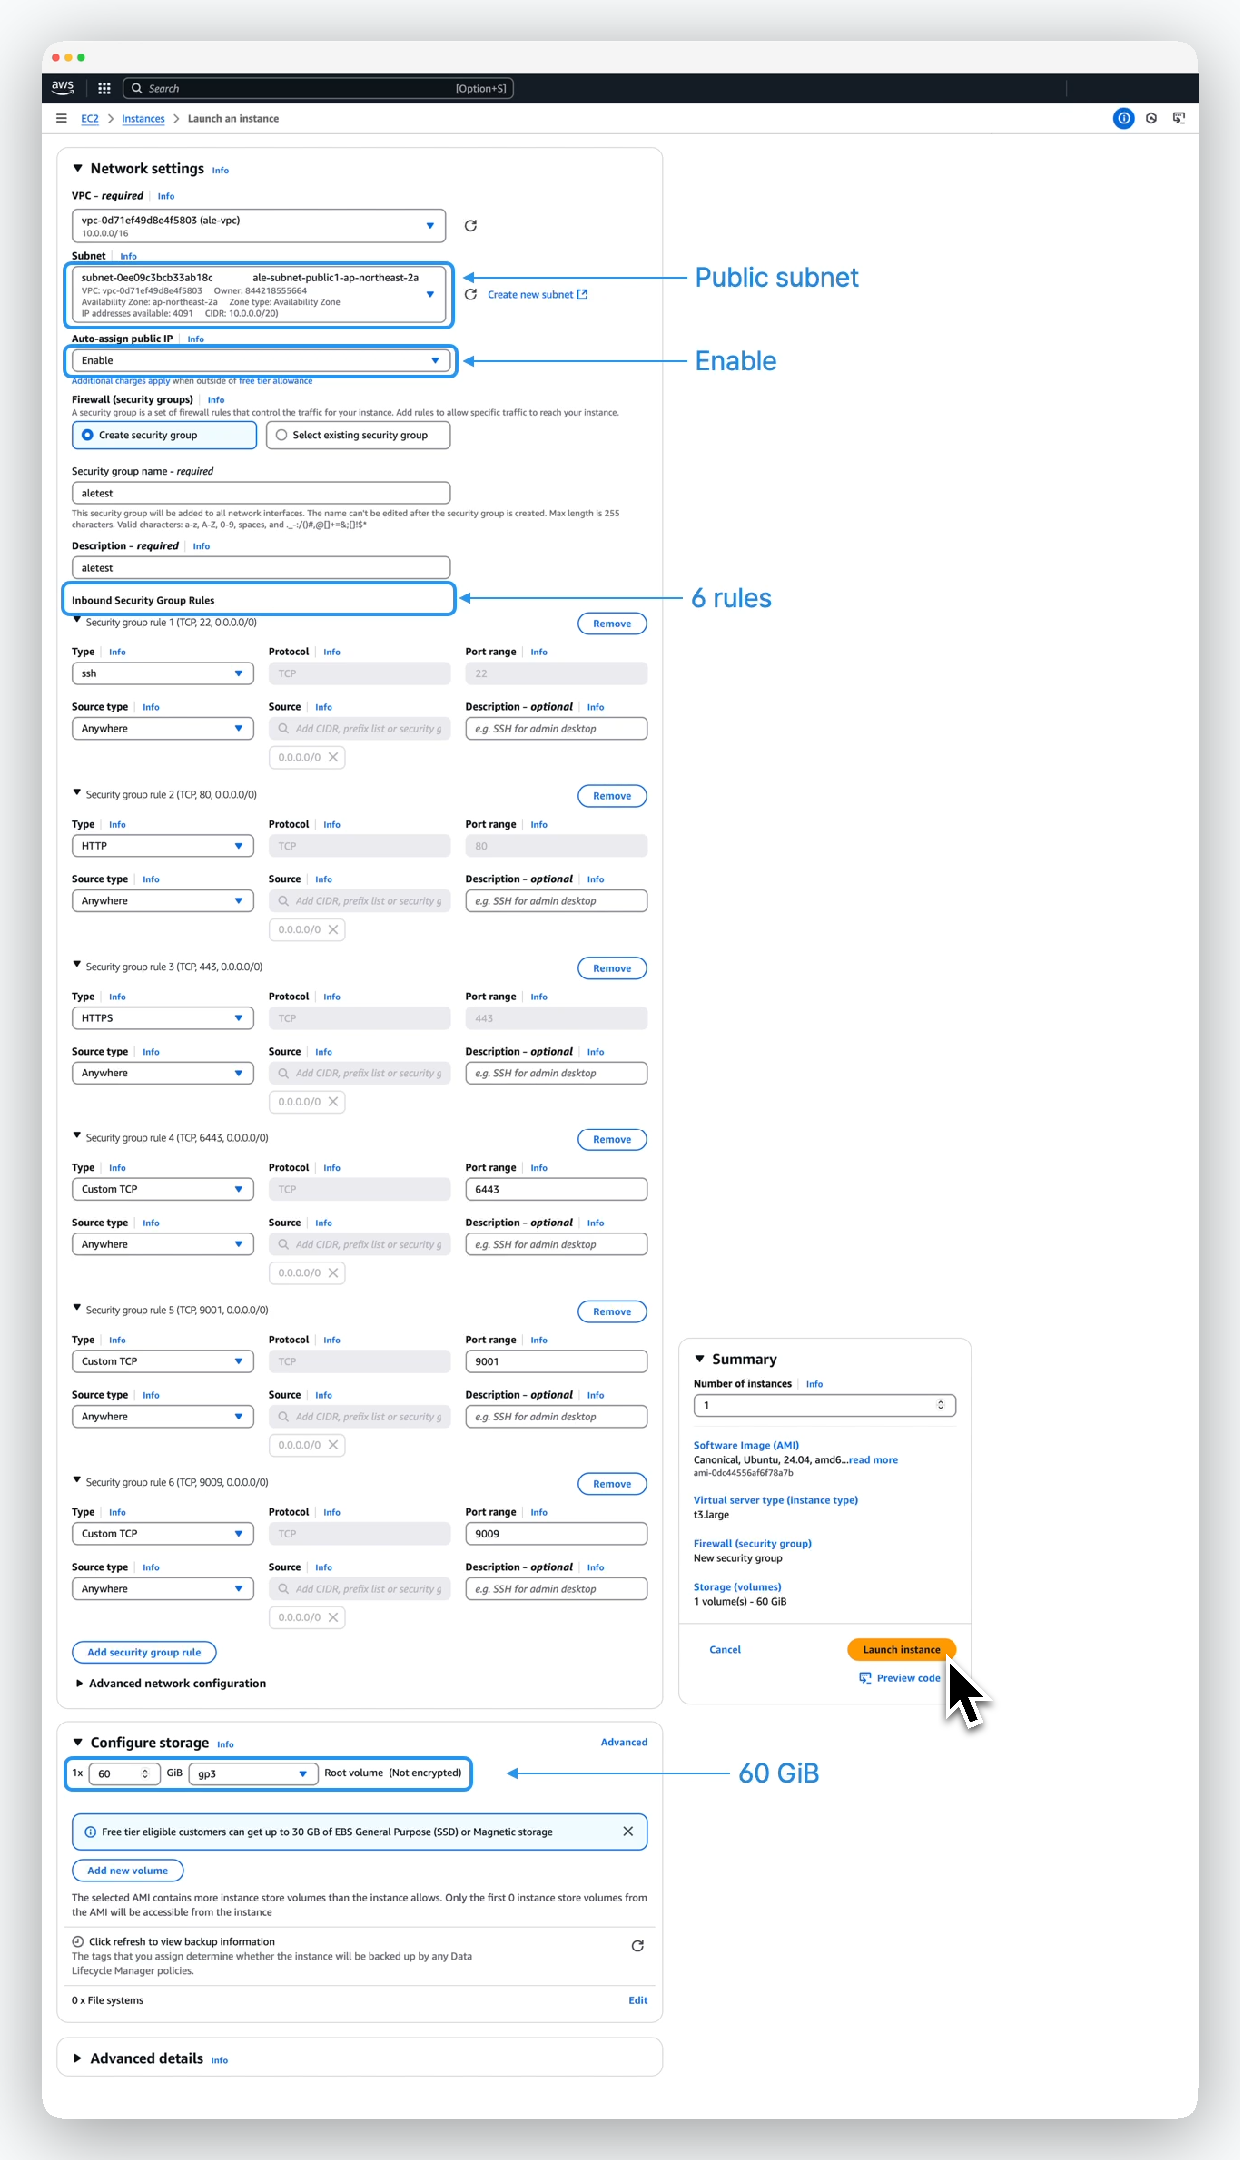 > 続いて、**6つのセキュリティグループルール**とストレージ等を設定してください。
* Network settings
* VPC: EC2をプロビジョニングするVPC(インターネット通信可能が必要)
* Subnet: インターネットゲートウェイが接続されているパブリックサブネットを選択
* Auto-assign public IP: Enable
* Firewall (security groups)
* Create security groupを選択し、適切なセキュリティグループ名を入力
* Security group name: セキュリティグループ名
* Description: セキュリティグループの説明
* Add security group rules
- Type: SSH
- Protocol: TCP
- Port range: 22
- Source: 0.0.0.0/0
* Type: HTTP
* Protocol: TCP
* Port range: 80
* Source: 0.0.0.0/0
* Type: HTTPS
* Protocol: TCP
* Port range: 443
* Source: 0.0.0.0/0
* Type: Custom TCP
* Protocol: TCP
* Port range: 6443
* Source: 0.0.0.0/0
* Type: Custom TCP
* Protocol: TCP
* Port range: 9001
* Source: 0.0.0.0/0
* Type: Custom TCP
* Protocol: TCP
* Port range: 9009
* Source: 0.0.0.0/0
* Configure storage
* 1 x 60GiB, gp3を選択
## Elastic IP addressの連携
> 続いて、**6つのセキュリティグループルール**とストレージ等を設定してください。
* Network settings
* VPC: EC2をプロビジョニングするVPC(インターネット通信可能が必要)
* Subnet: インターネットゲートウェイが接続されているパブリックサブネットを選択
* Auto-assign public IP: Enable
* Firewall (security groups)
* Create security groupを選択し、適切なセキュリティグループ名を入力
* Security group name: セキュリティグループ名
* Description: セキュリティグループの説明
* Add security group rules
- Type: SSH
- Protocol: TCP
- Port range: 22
- Source: 0.0.0.0/0
* Type: HTTP
* Protocol: TCP
* Port range: 80
* Source: 0.0.0.0/0
* Type: HTTPS
* Protocol: TCP
* Port range: 443
* Source: 0.0.0.0/0
* Type: Custom TCP
* Protocol: TCP
* Port range: 6443
* Source: 0.0.0.0/0
* Type: Custom TCP
* Protocol: TCP
* Port range: 9001
* Source: 0.0.0.0/0
* Type: Custom TCP
* Protocol: TCP
* Port range: 9009
* Source: 0.0.0.0/0
* Configure storage
* 1 x 60GiB, gp3を選択
## Elastic IP addressの連携
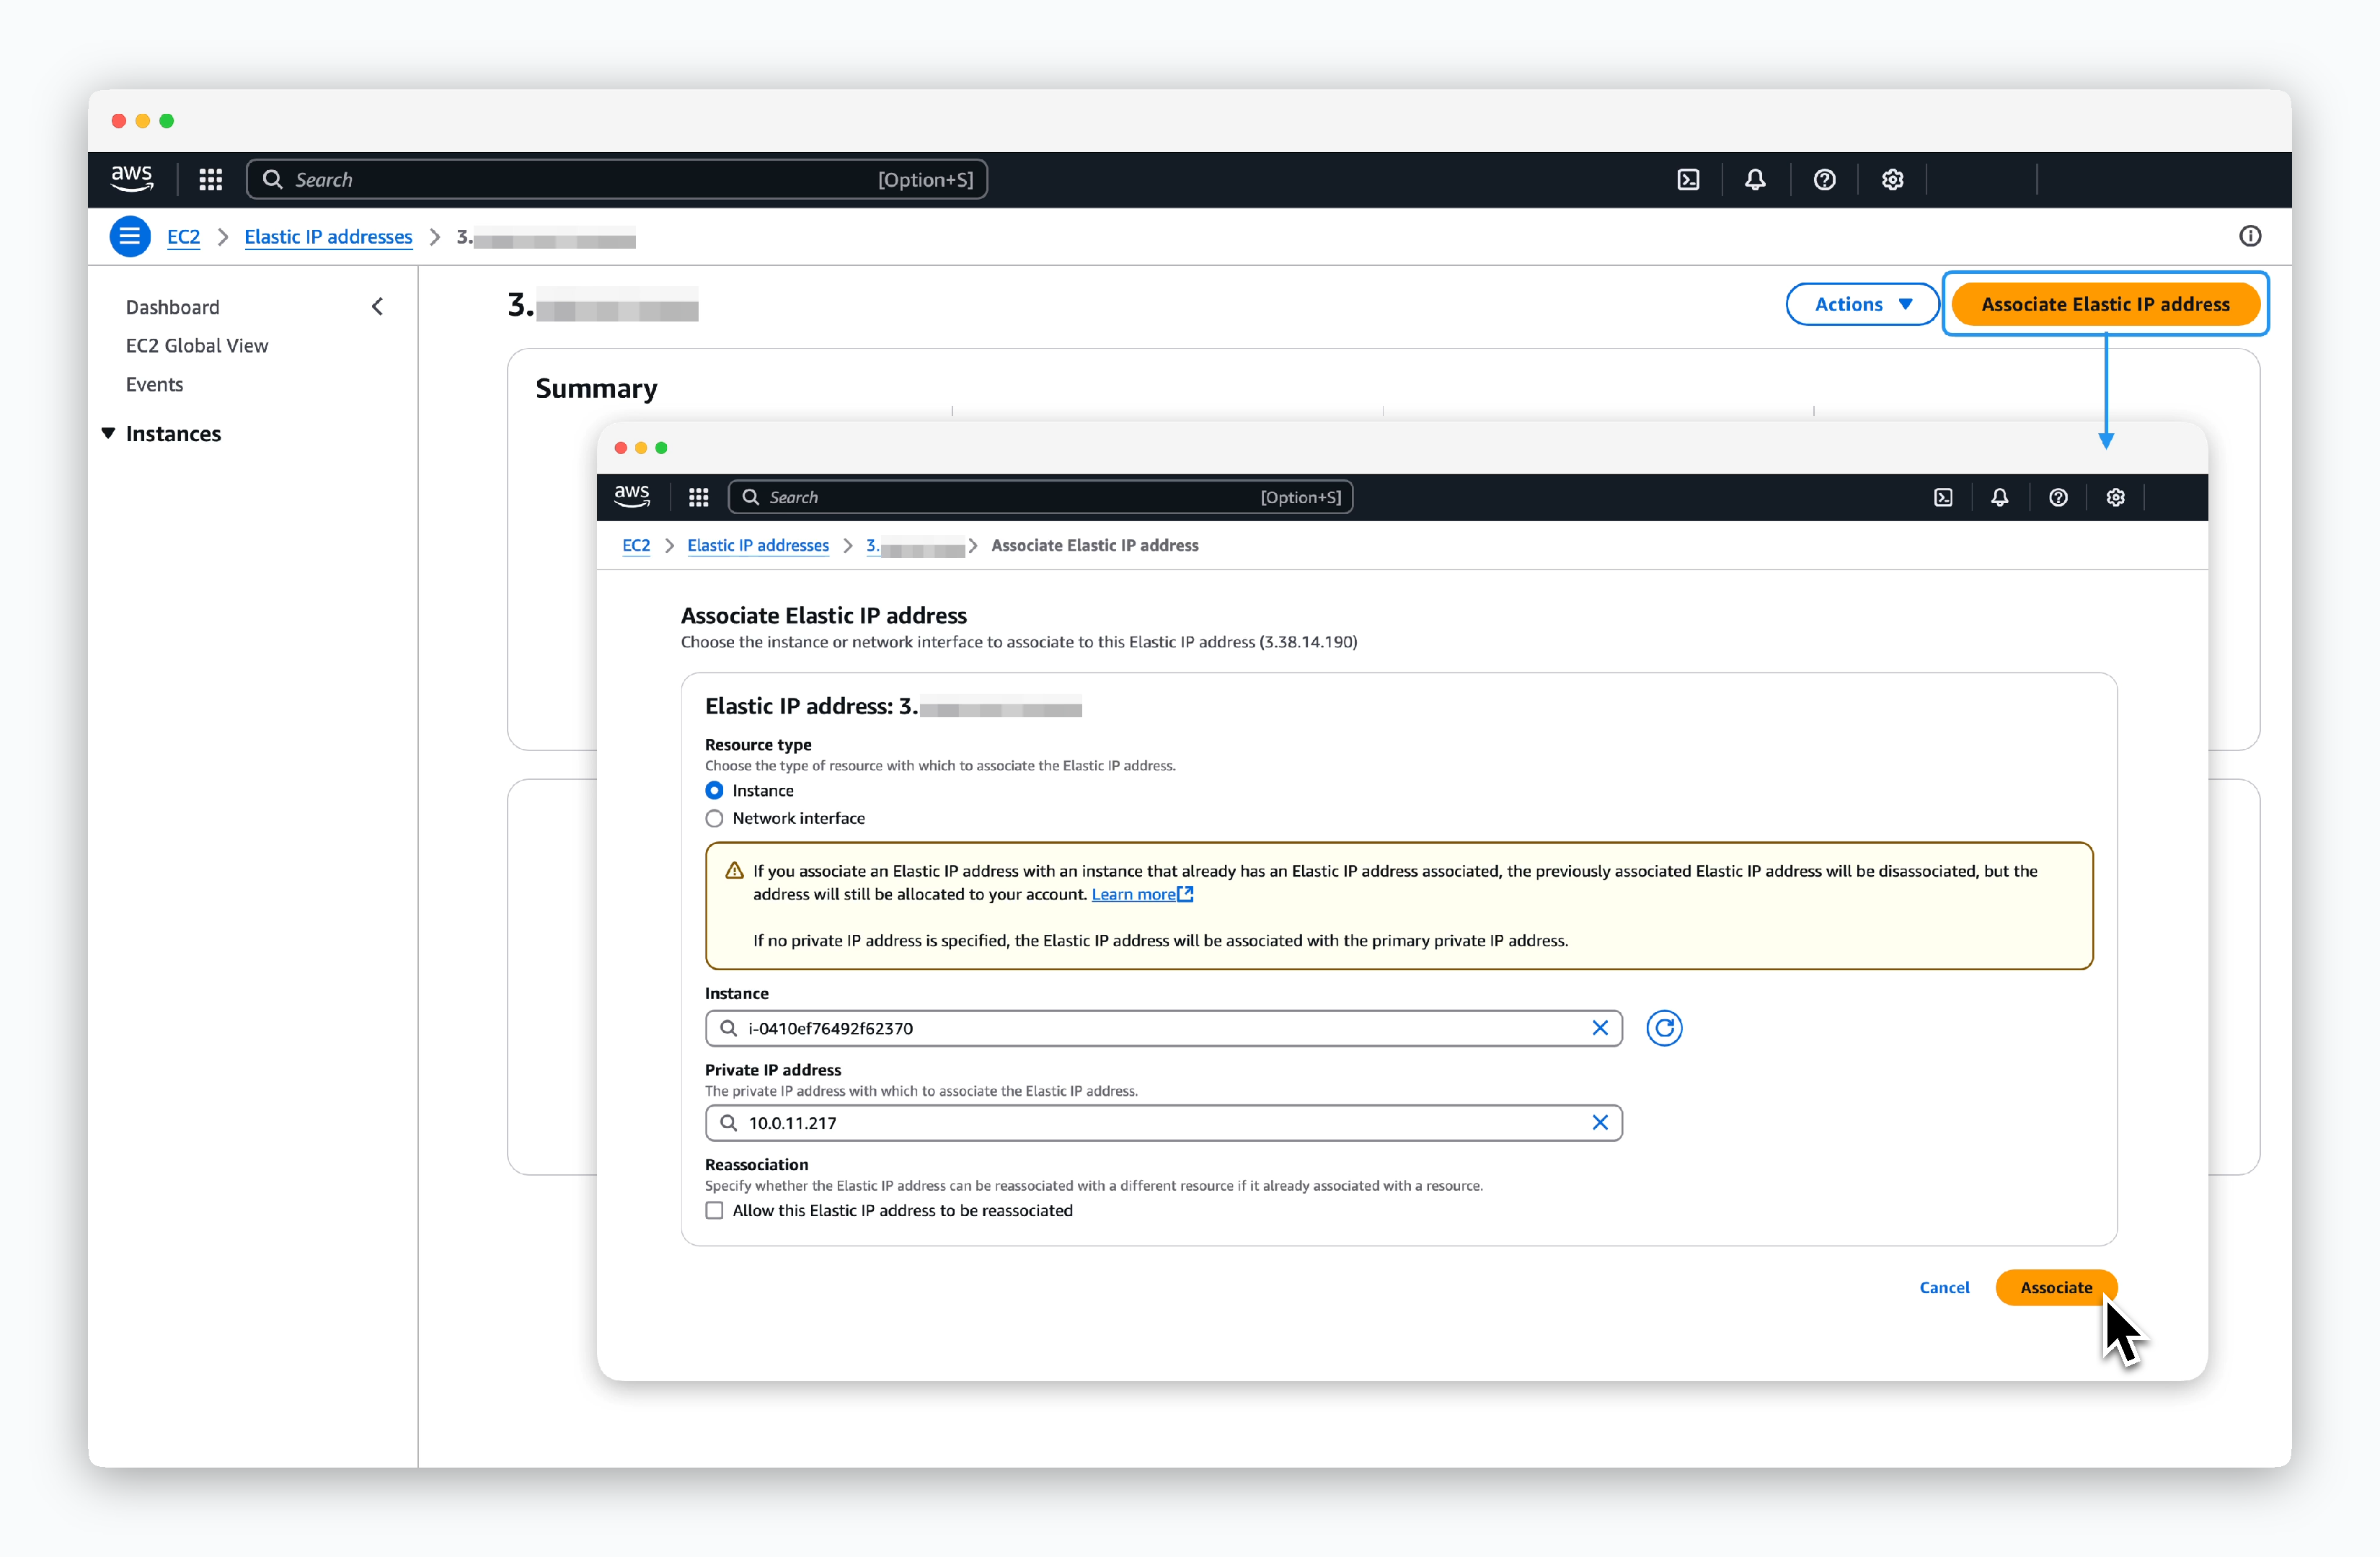 > `EC2 > Network & Security > Elastic IPs`で前の手順で割り当てられたIPをクリックし、`Associate Elastic IP address`をクリックした後、以下の情報を入力して連携してください。
* Resource type: Instance
* Instance: 前の手順で作成したEC2インスタンスを選択
* Private IP: EC2インスタンスのPrivate IPアドレス
## EC2接続とパッケージインストール
> `EC2 > Network & Security > Elastic IPs`で前の手順で割り当てられたIPをクリックし、`Associate Elastic IP address`をクリックした後、以下の情報を入力して連携してください。
* Resource type: Instance
* Instance: 前の手順で作成したEC2インスタンスを選択
* Private IP: EC2インスタンスのPrivate IPアドレス
## EC2接続とパッケージインストール
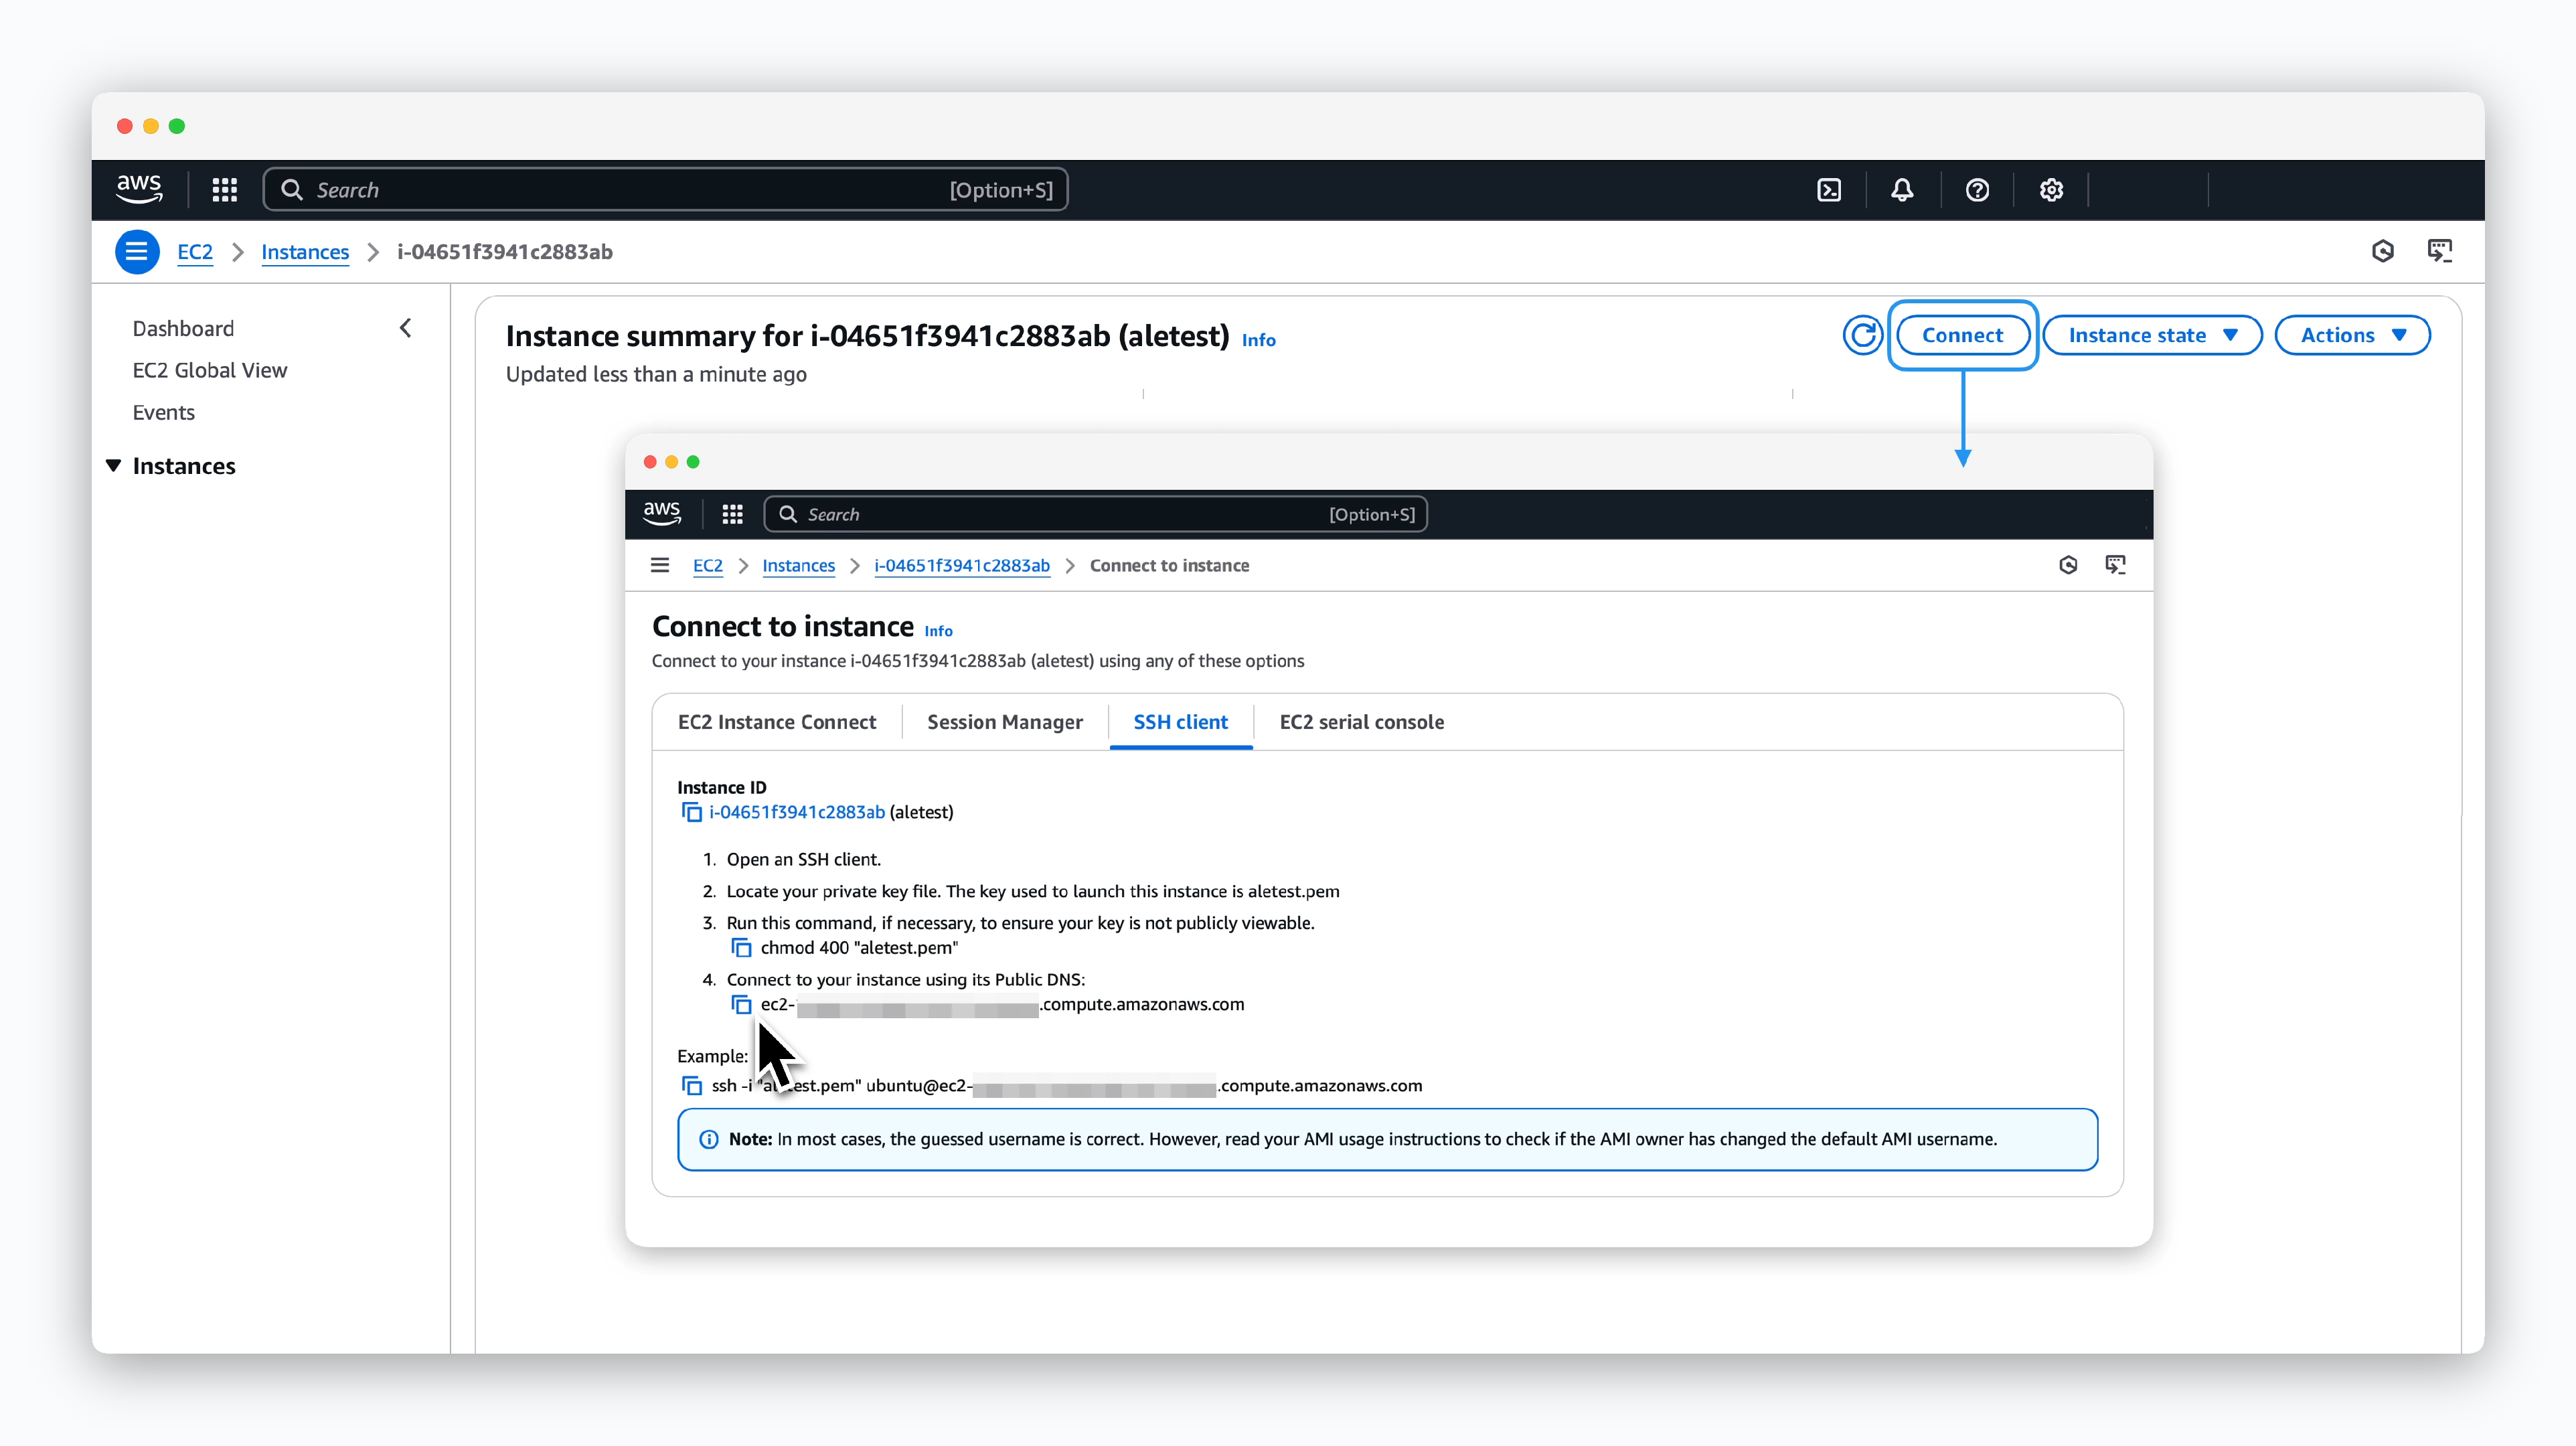 > EC2の詳細ページで`Connect`ボタンをクリックし、SSH ClientタブのSSH接続コマンドを確認します。続いて、ターミナルでコマンドを実行してEC2に接続し、以下の手順に従ってパッケージをインストールしてください。
```bash theme={null}
sudo ufw disable
```
```bash theme={null}
curl -o- https://raw.githubusercontent.com/nvm-sh/nvm/v0.40.1/install.sh | bash
```
```bash theme={null}
source ~/.bashrc
nvm install 16
nvm alias default 16
node -v
```
```bash theme={null}
npm install pm2@latest -g
```
```bash theme={null}
sudo apt-get update
sudo apt-get install ca-certificates curl
sudo install -m 0755 -d /etc/apt/keyrings
sudo curl -fsSL https://download.docker.com/linux/ubuntu/gpg -o /etc/apt/keyrings/docker.asc
sudo chmod a+r /etc/apt/keyrings/docker.asc
```
```bash theme={null}
echo \
"deb [arch=$(dpkg --print-architecture) signed-by=/etc/apt/keyrings/docker.asc] https://download.docker.com/linux/ubuntu \
$(. /etc/os-release && echo "$VERSION_CODENAME") stable" | \
sudo tee /etc/apt/sources.list.d/docker.list > /dev/null
```
```bash theme={null}
sudo apt-get update
sudo apt-get install docker-ce docker-ce-cli containerd.io docker-buildx-plugin docker-compose-plugin
```
```bash theme={null}
curl -fsSL -o get_helm.sh https://raw.githubusercontent.com/helm/helm/main/scripts/get-helm-3
```
```bash theme={null}
chmod 700 get_helm.sh
./get_helm.sh
```
## EC2環境変数の登録
```bash theme={null}
export AWS_ACCESS_KEY_ID=
export AWS_SECRET_ACCESS_KEY=
export AWS_REGION=
export AWS_HOSTED_ZONE_ID=
export AWS_DOMAIN=
export ACME_EMAIL=
```
> EC2の詳細ページで`Connect`ボタンをクリックし、SSH ClientタブのSSH接続コマンドを確認します。続いて、ターミナルでコマンドを実行してEC2に接続し、以下の手順に従ってパッケージをインストールしてください。
```bash theme={null}
sudo ufw disable
```
```bash theme={null}
curl -o- https://raw.githubusercontent.com/nvm-sh/nvm/v0.40.1/install.sh | bash
```
```bash theme={null}
source ~/.bashrc
nvm install 16
nvm alias default 16
node -v
```
```bash theme={null}
npm install pm2@latest -g
```
```bash theme={null}
sudo apt-get update
sudo apt-get install ca-certificates curl
sudo install -m 0755 -d /etc/apt/keyrings
sudo curl -fsSL https://download.docker.com/linux/ubuntu/gpg -o /etc/apt/keyrings/docker.asc
sudo chmod a+r /etc/apt/keyrings/docker.asc
```
```bash theme={null}
echo \
"deb [arch=$(dpkg --print-architecture) signed-by=/etc/apt/keyrings/docker.asc] https://download.docker.com/linux/ubuntu \
$(. /etc/os-release && echo "$VERSION_CODENAME") stable" | \
sudo tee /etc/apt/sources.list.d/docker.list > /dev/null
```
```bash theme={null}
sudo apt-get update
sudo apt-get install docker-ce docker-ce-cli containerd.io docker-buildx-plugin docker-compose-plugin
```
```bash theme={null}
curl -fsSL -o get_helm.sh https://raw.githubusercontent.com/helm/helm/main/scripts/get-helm-3
```
```bash theme={null}
chmod 700 get_helm.sh
./get_helm.sh
```
## EC2環境変数の登録
```bash theme={null}
export AWS_ACCESS_KEY_ID=
export AWS_SECRET_ACCESS_KEY=
export AWS_REGION=
export AWS_HOSTED_ZONE_ID=
export AWS_DOMAIN=
export ACME_EMAIL=
```
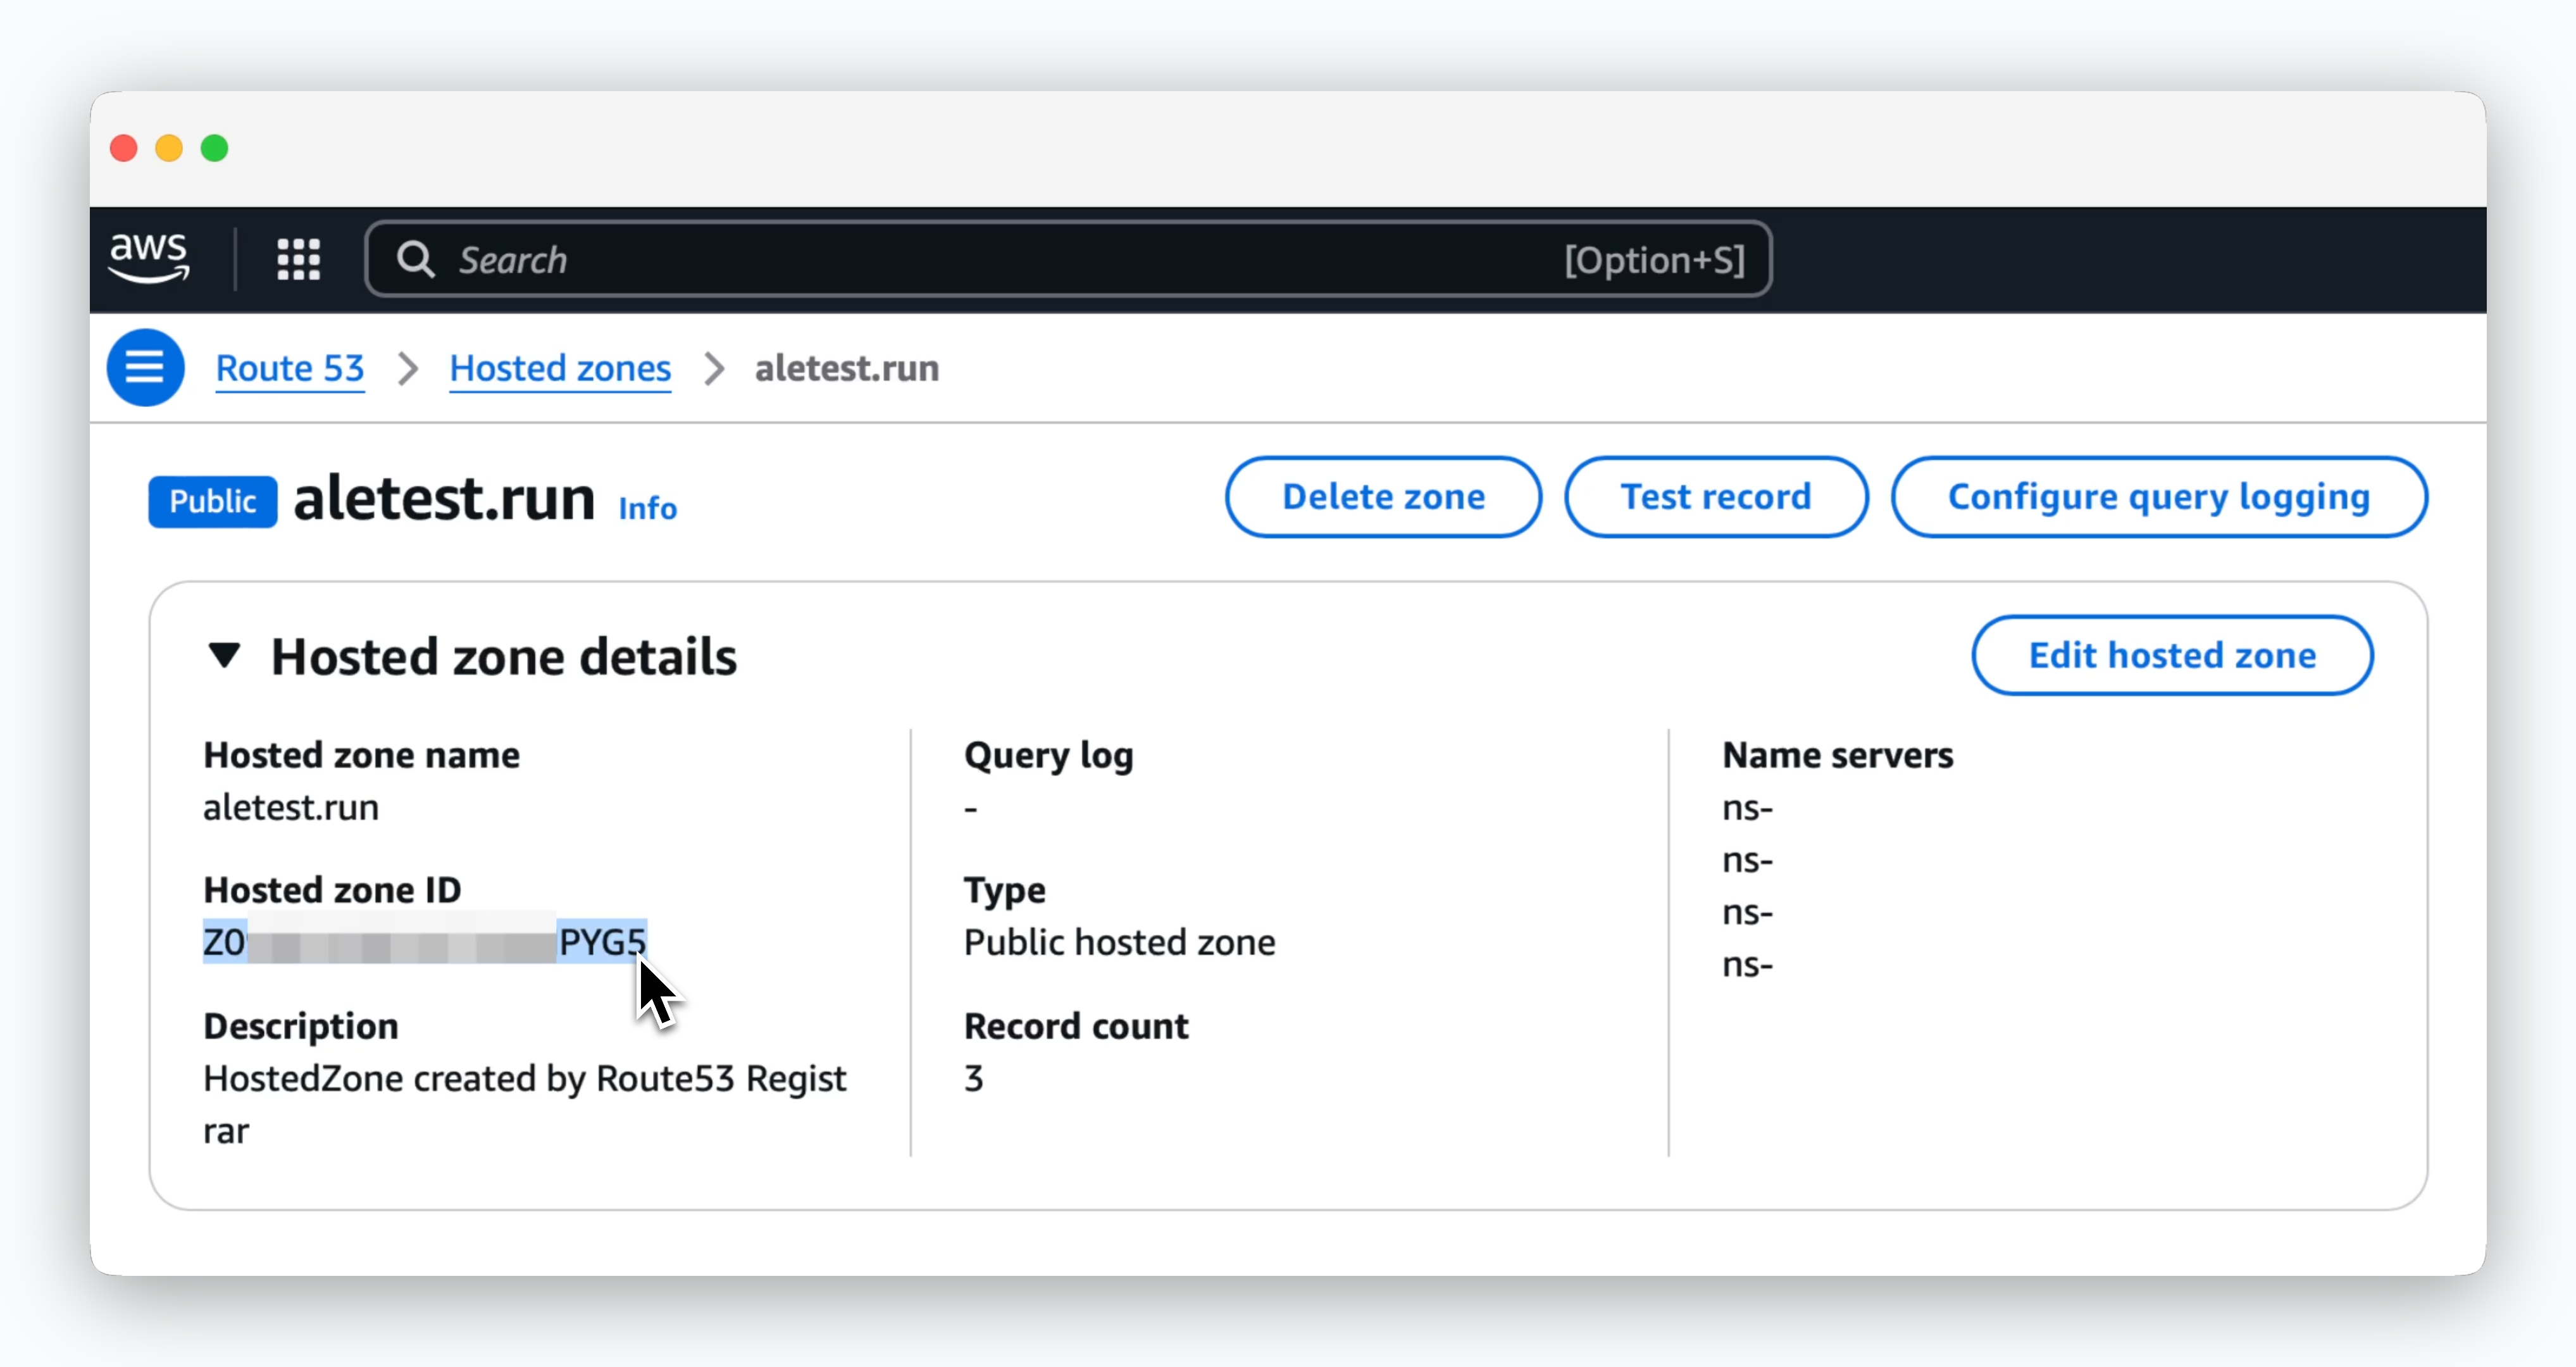 > `Hosted Zones > Hosted Zone Details`で**Hosted Zone ID**値を確認できます。