> ## Documentation Index
> Fetch the complete documentation index at: https://docs.ale.run/llms.txt
> Use this file to discover all available pages before exploring further.
# AWS ALBの作成
## ターゲットグループの作成
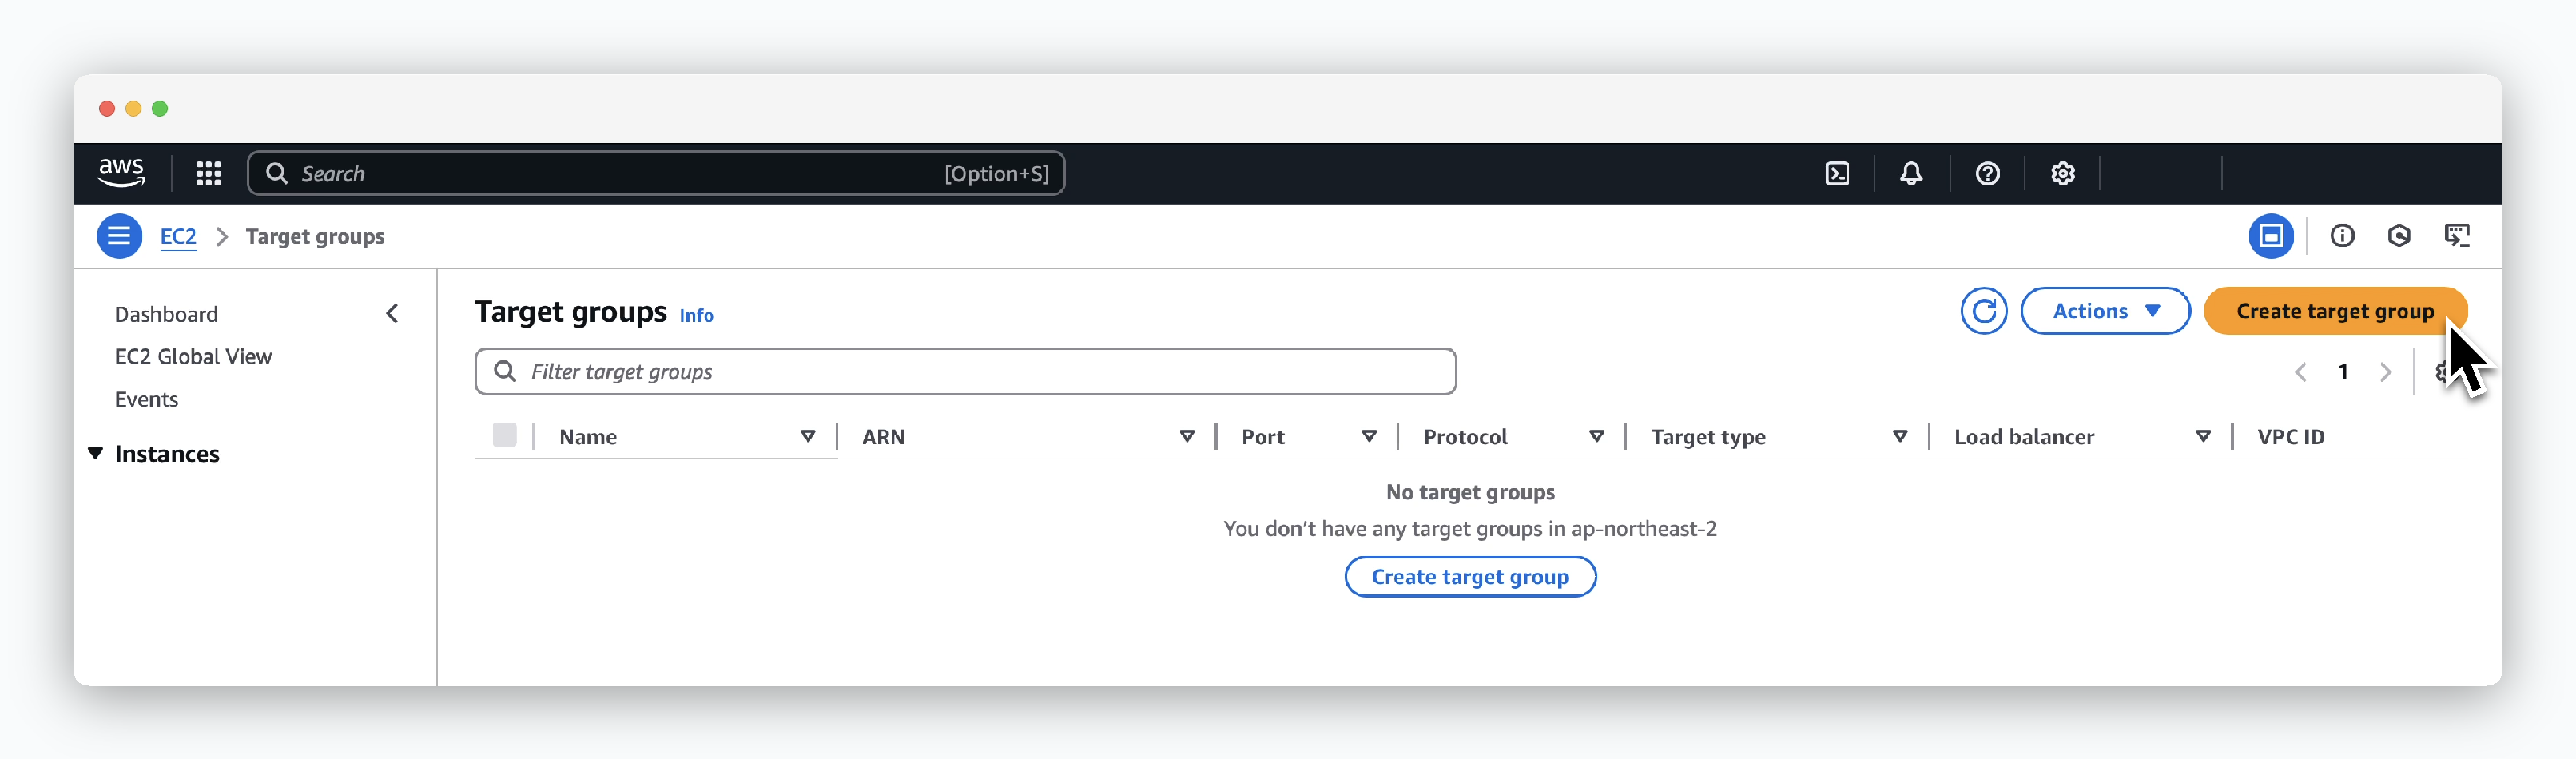 > `EC2 > Load Balancing > Target groups`で`Create target group`をクリックします。
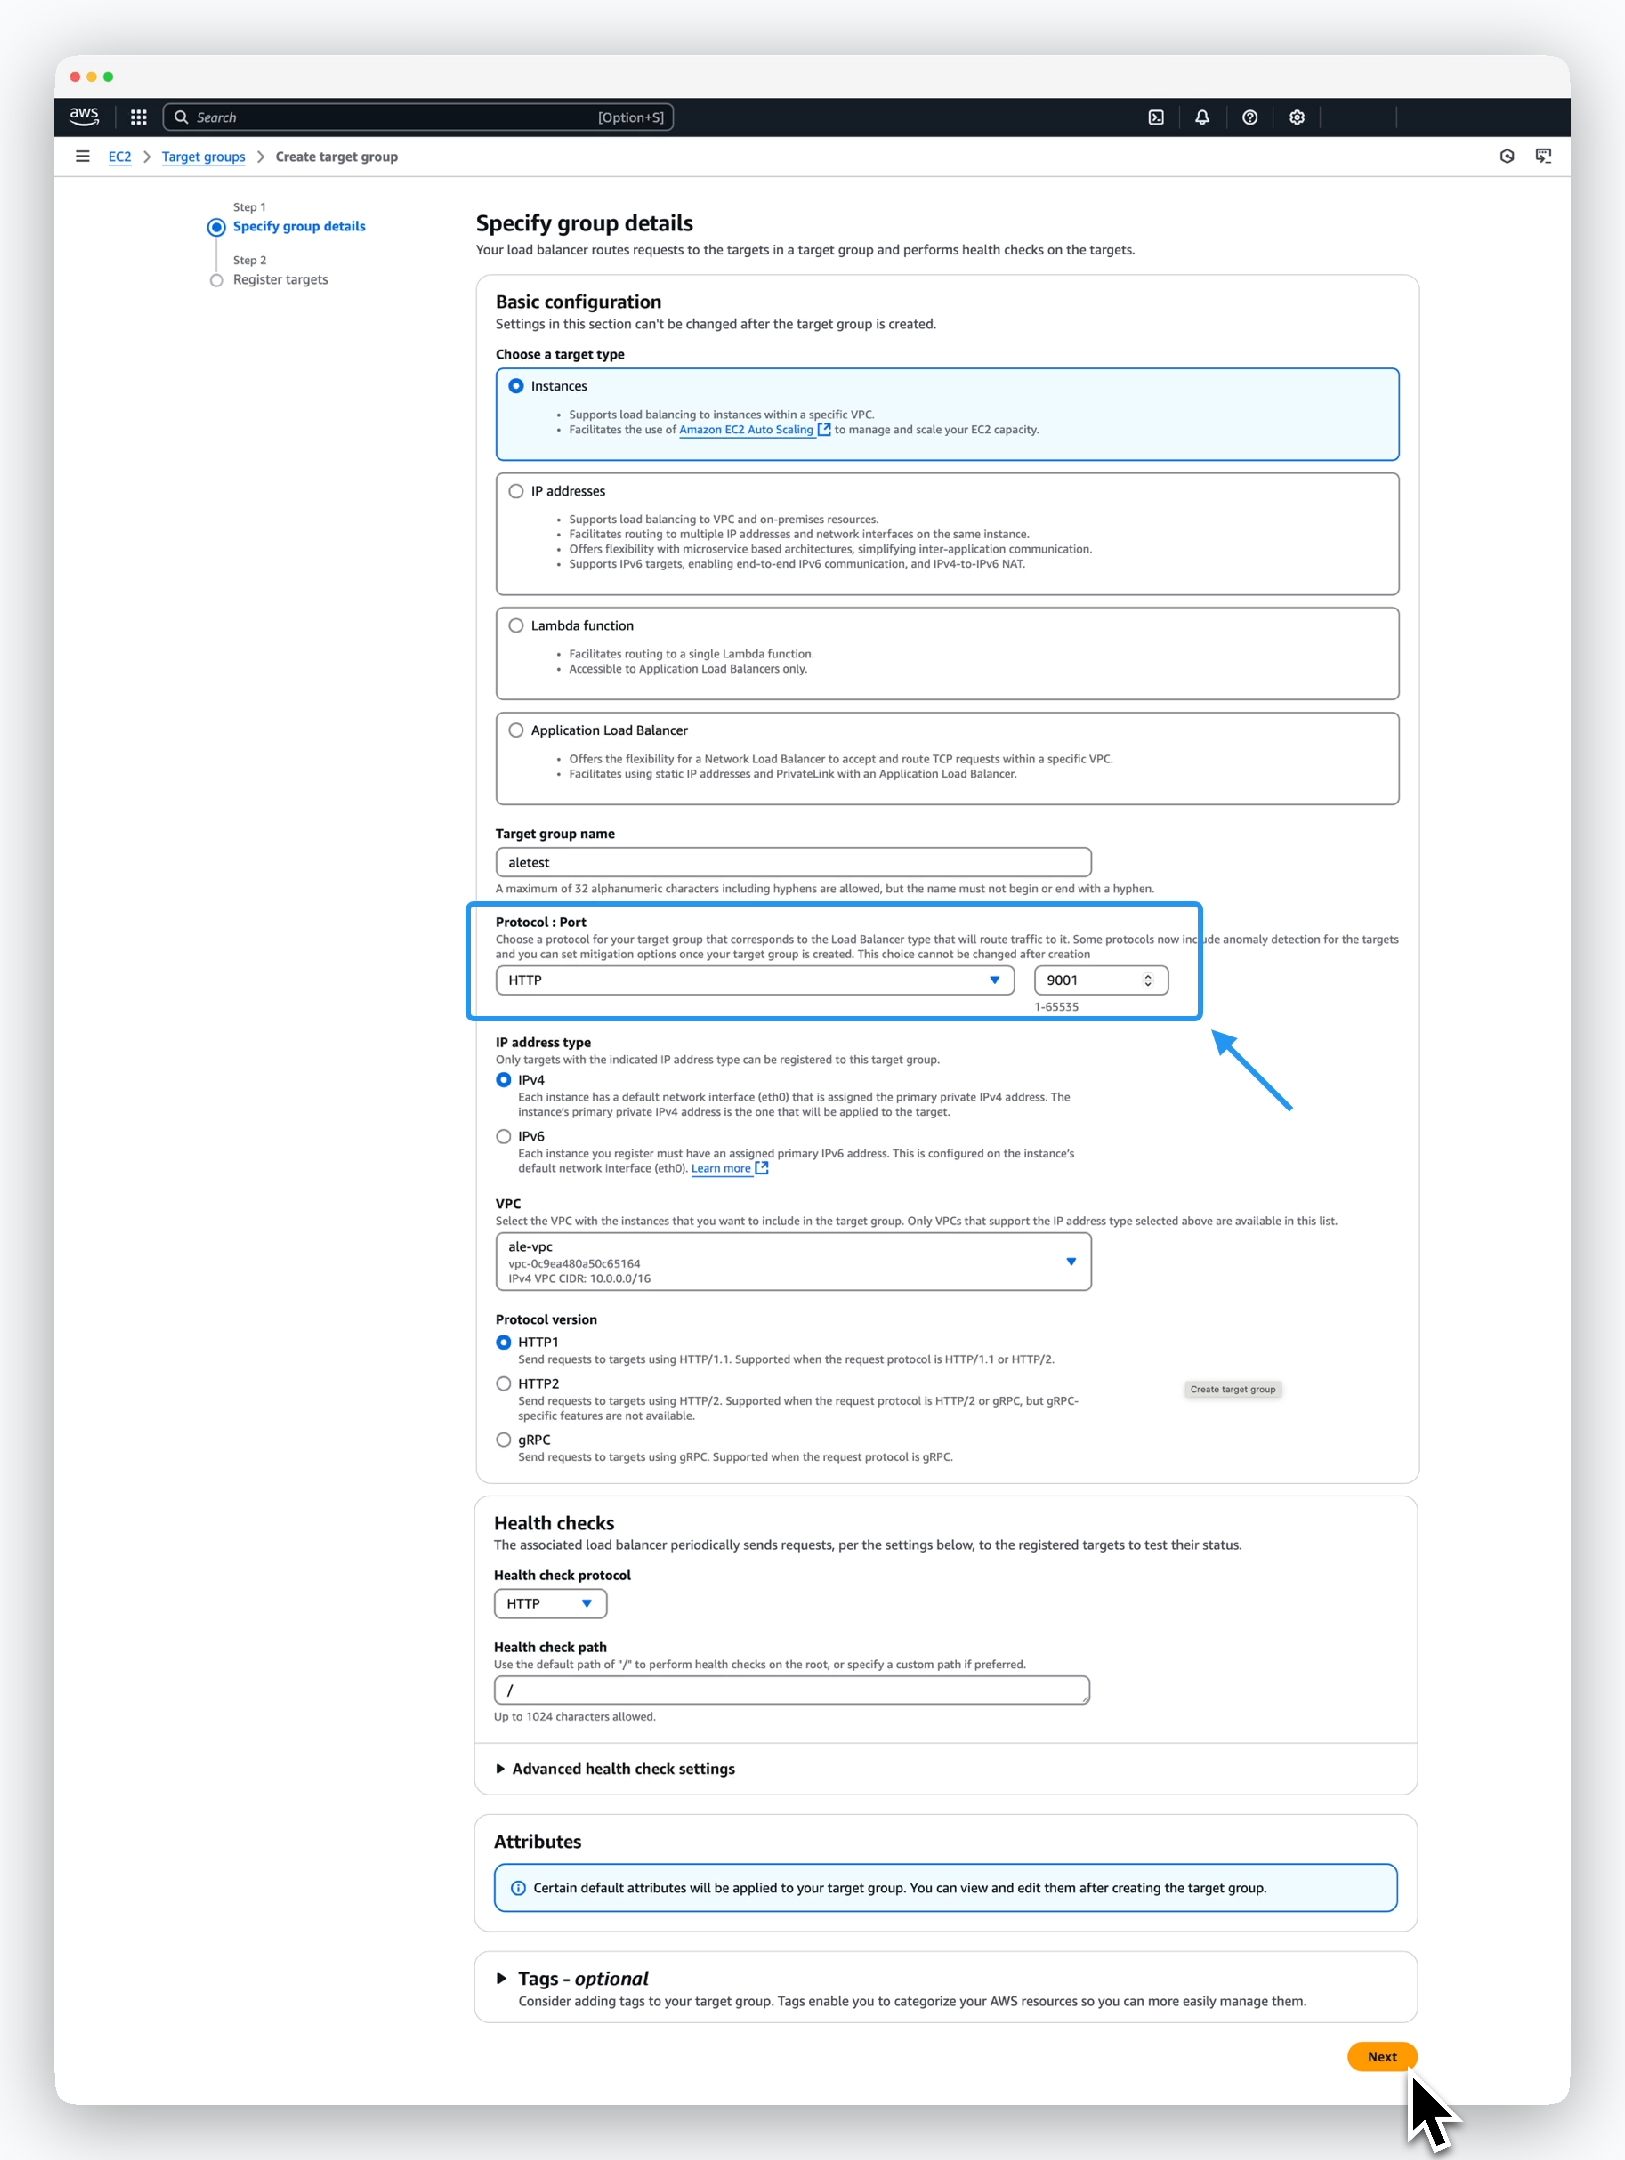 > Specify group detailsメニューでターゲットグループ情報を次のように入力または選択し、`Next`をクリックします。
* Basic configuration
* Choose a target type: Instances
* Target group name: ターゲットグループ名
* Protocol-Port: HTTP, 9001
* IP address type: IPv4
* VPC: インスタンスが属するVPC
* Protocol version: HTTP1
> Specify group detailsメニューでターゲットグループ情報を次のように入力または選択し、`Next`をクリックします。
* Basic configuration
* Choose a target type: Instances
* Target group name: ターゲットグループ名
* Protocol-Port: HTTP, 9001
* IP address type: IPv4
* VPC: インスタンスが属するVPC
* Protocol version: HTTP1
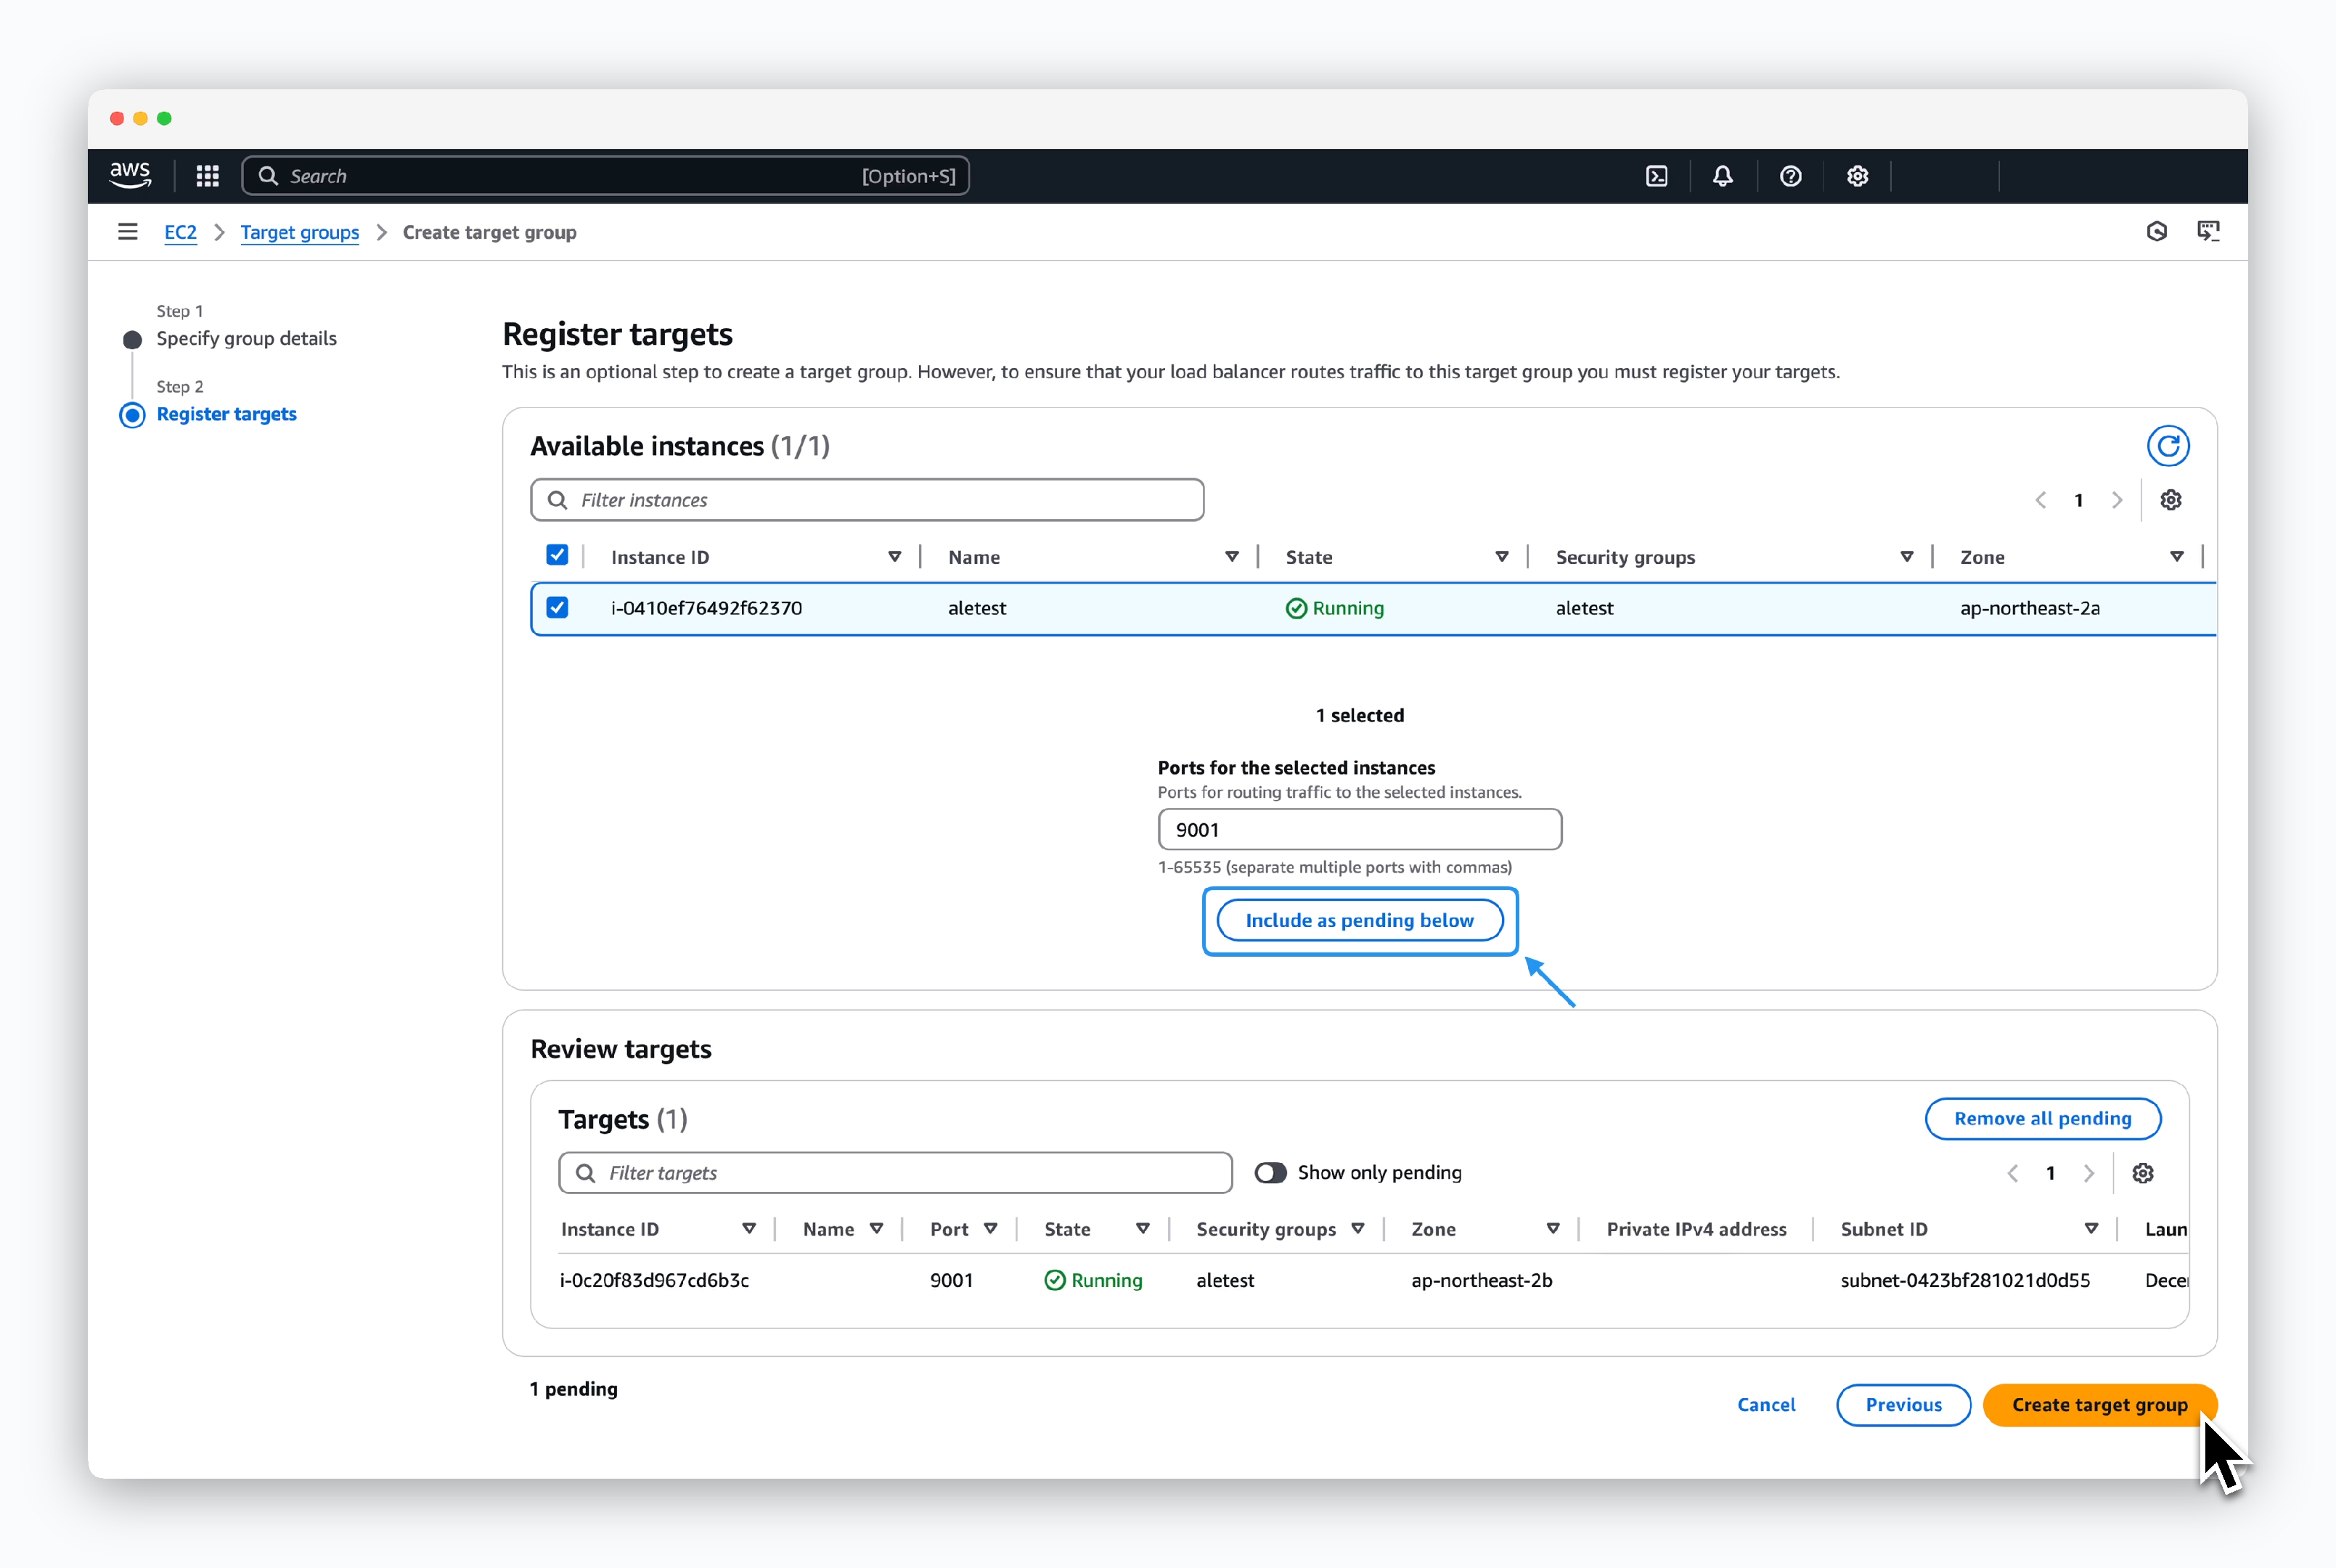 > エールをインストールしたインスタンスを選択し、Ports for the selected instancesに9001を入力して`Include as pending below`をクリックします。その後`Create target group`をクリックします。
## ALBの作成
> エールをインストールしたインスタンスを選択し、Ports for the selected instancesに9001を入力して`Include as pending below`をクリックします。その後`Create target group`をクリックします。
## ALBの作成
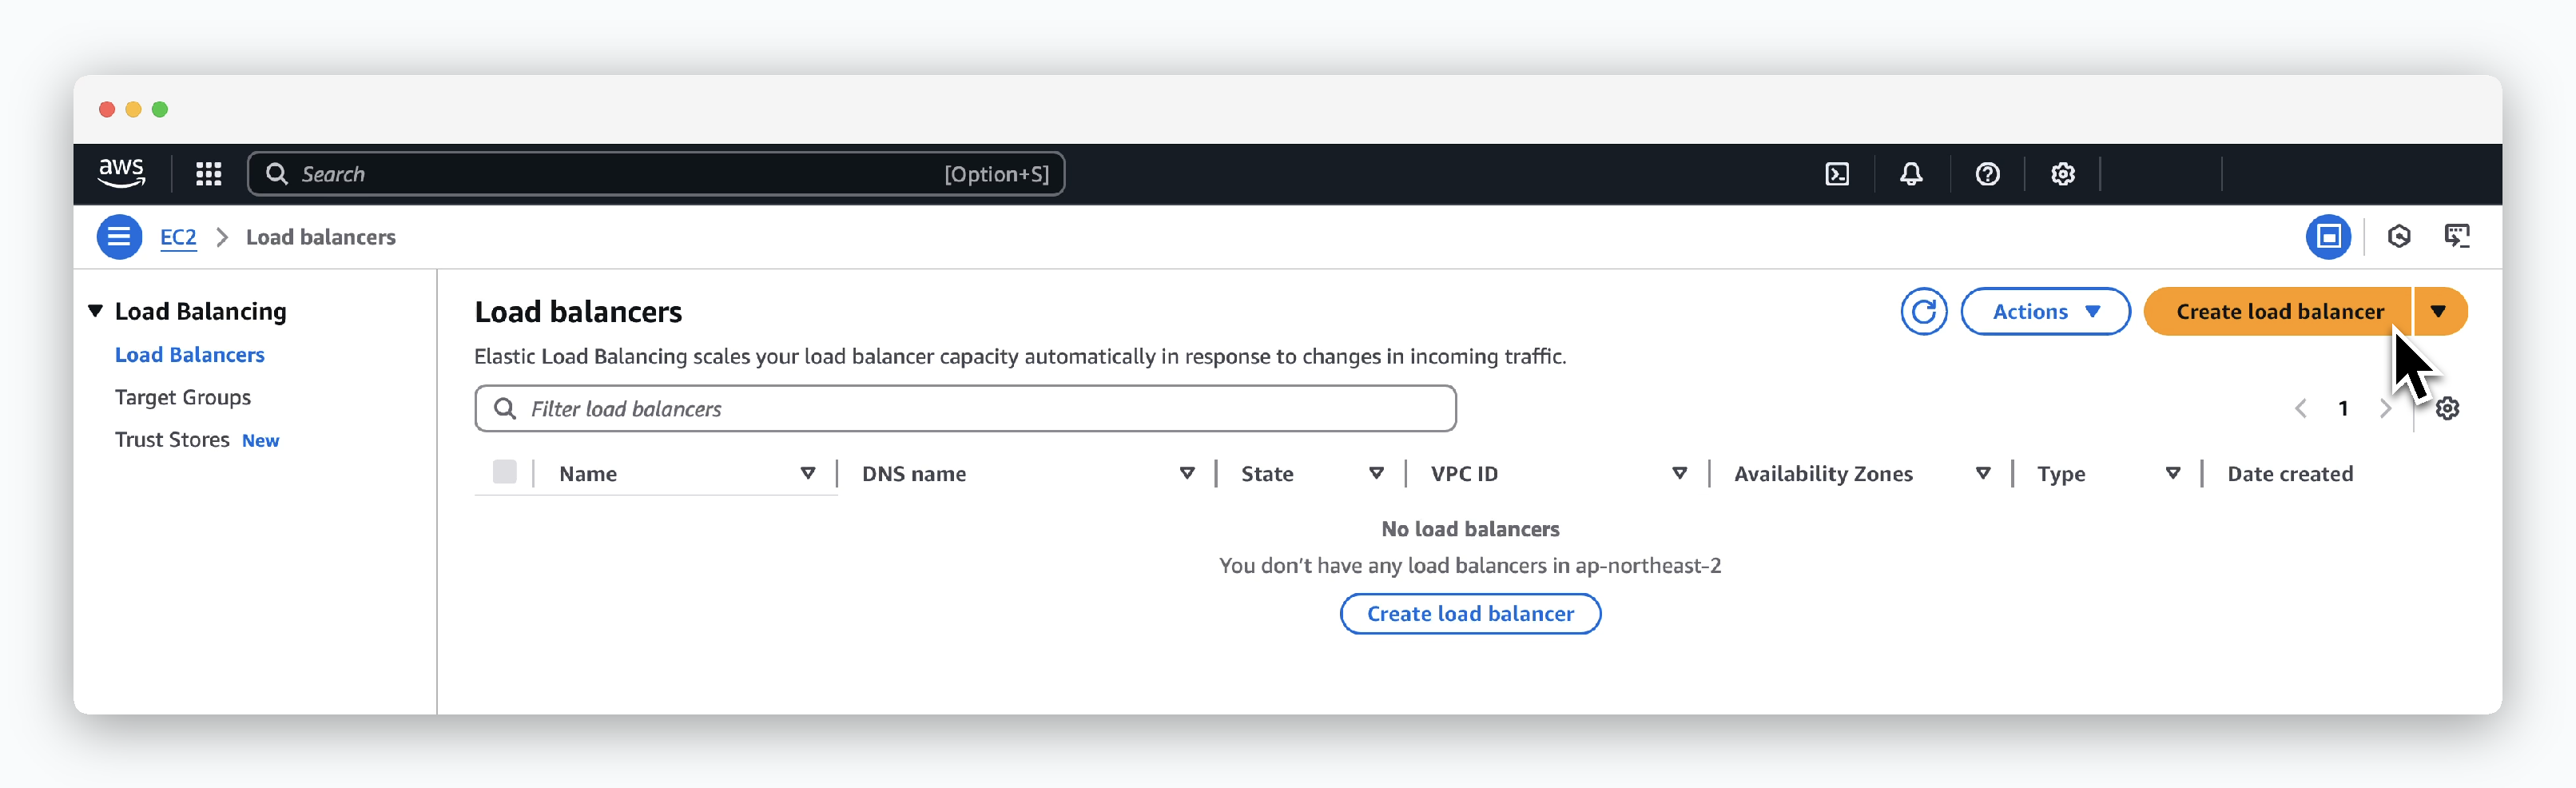 > `EC2 > Load Balancing > Load balancers`で`Create Load Balancer`をクリックし、**Application Load Balancer**を選択します。
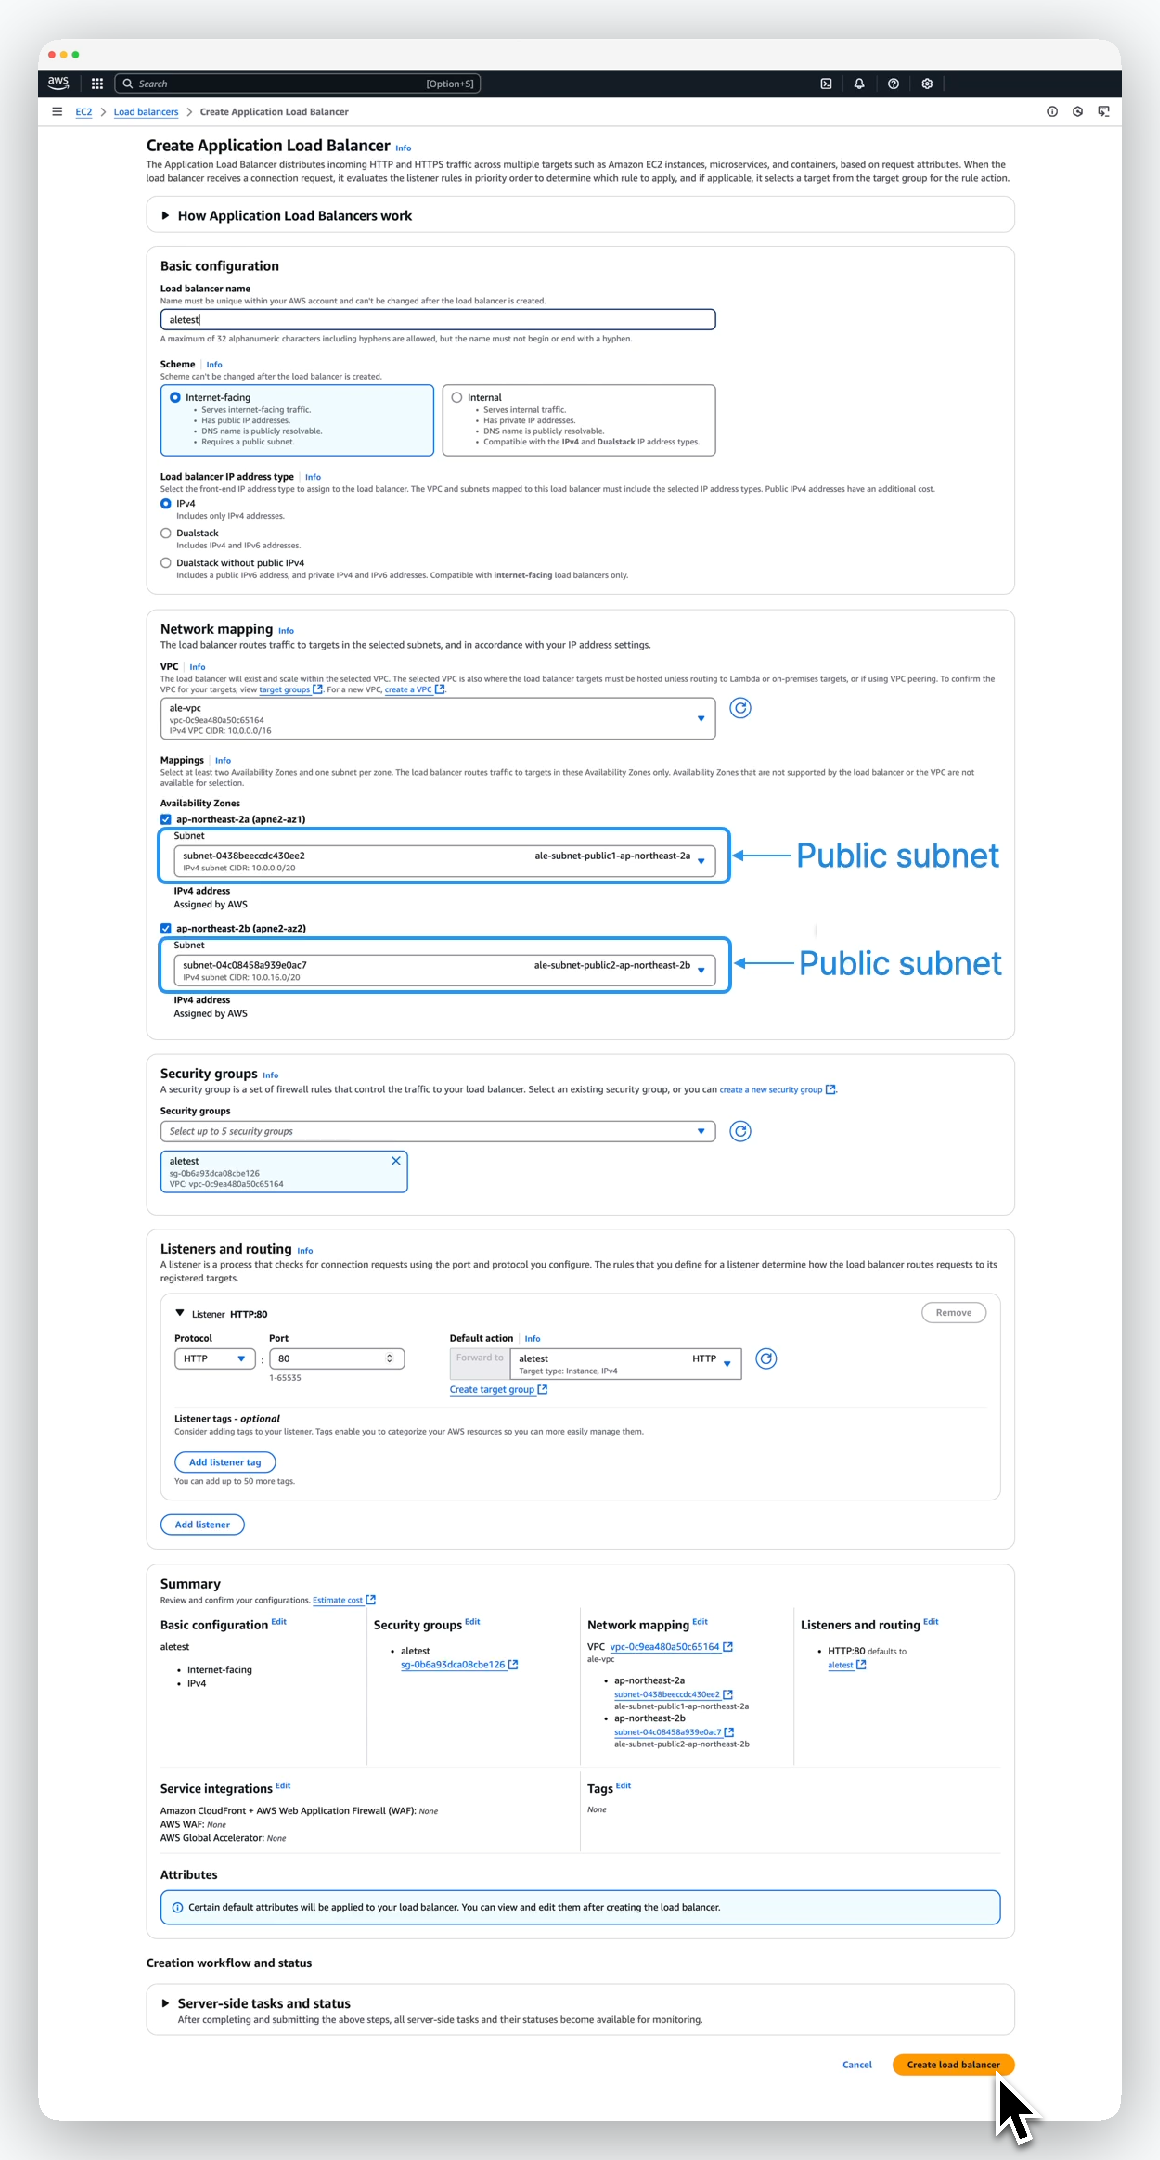 > Load balancer情報を入力または選択し、`Create load balancer`をクリックします。
* Basic configuration
* Name: ALB名
* Scheme: internet-facing
* IP address type: ipv4
* Network mapping
* VPC: インスタンスが属するVPC
* Availability Zones: すべての使用可能なサブネットを選択
* Security groups
* Security groups: EC2インスタンスに適用されたセキュリティグループを選択
* Listeners and routing
* Listener port: 80
* Target group: 前に作成したターゲットグループを選択
> Load balancer情報を入力または選択し、`Create load balancer`をクリックします。
* Basic configuration
* Name: ALB名
* Scheme: internet-facing
* IP address type: ipv4
* Network mapping
* VPC: インスタンスが属するVPC
* Availability Zones: すべての使用可能なサブネットを選択
* Security groups
* Security groups: EC2インスタンスに適用されたセキュリティグループを選択
* Listeners and routing
* Listener port: 80
* Target group: 前に作成したターゲットグループを選択
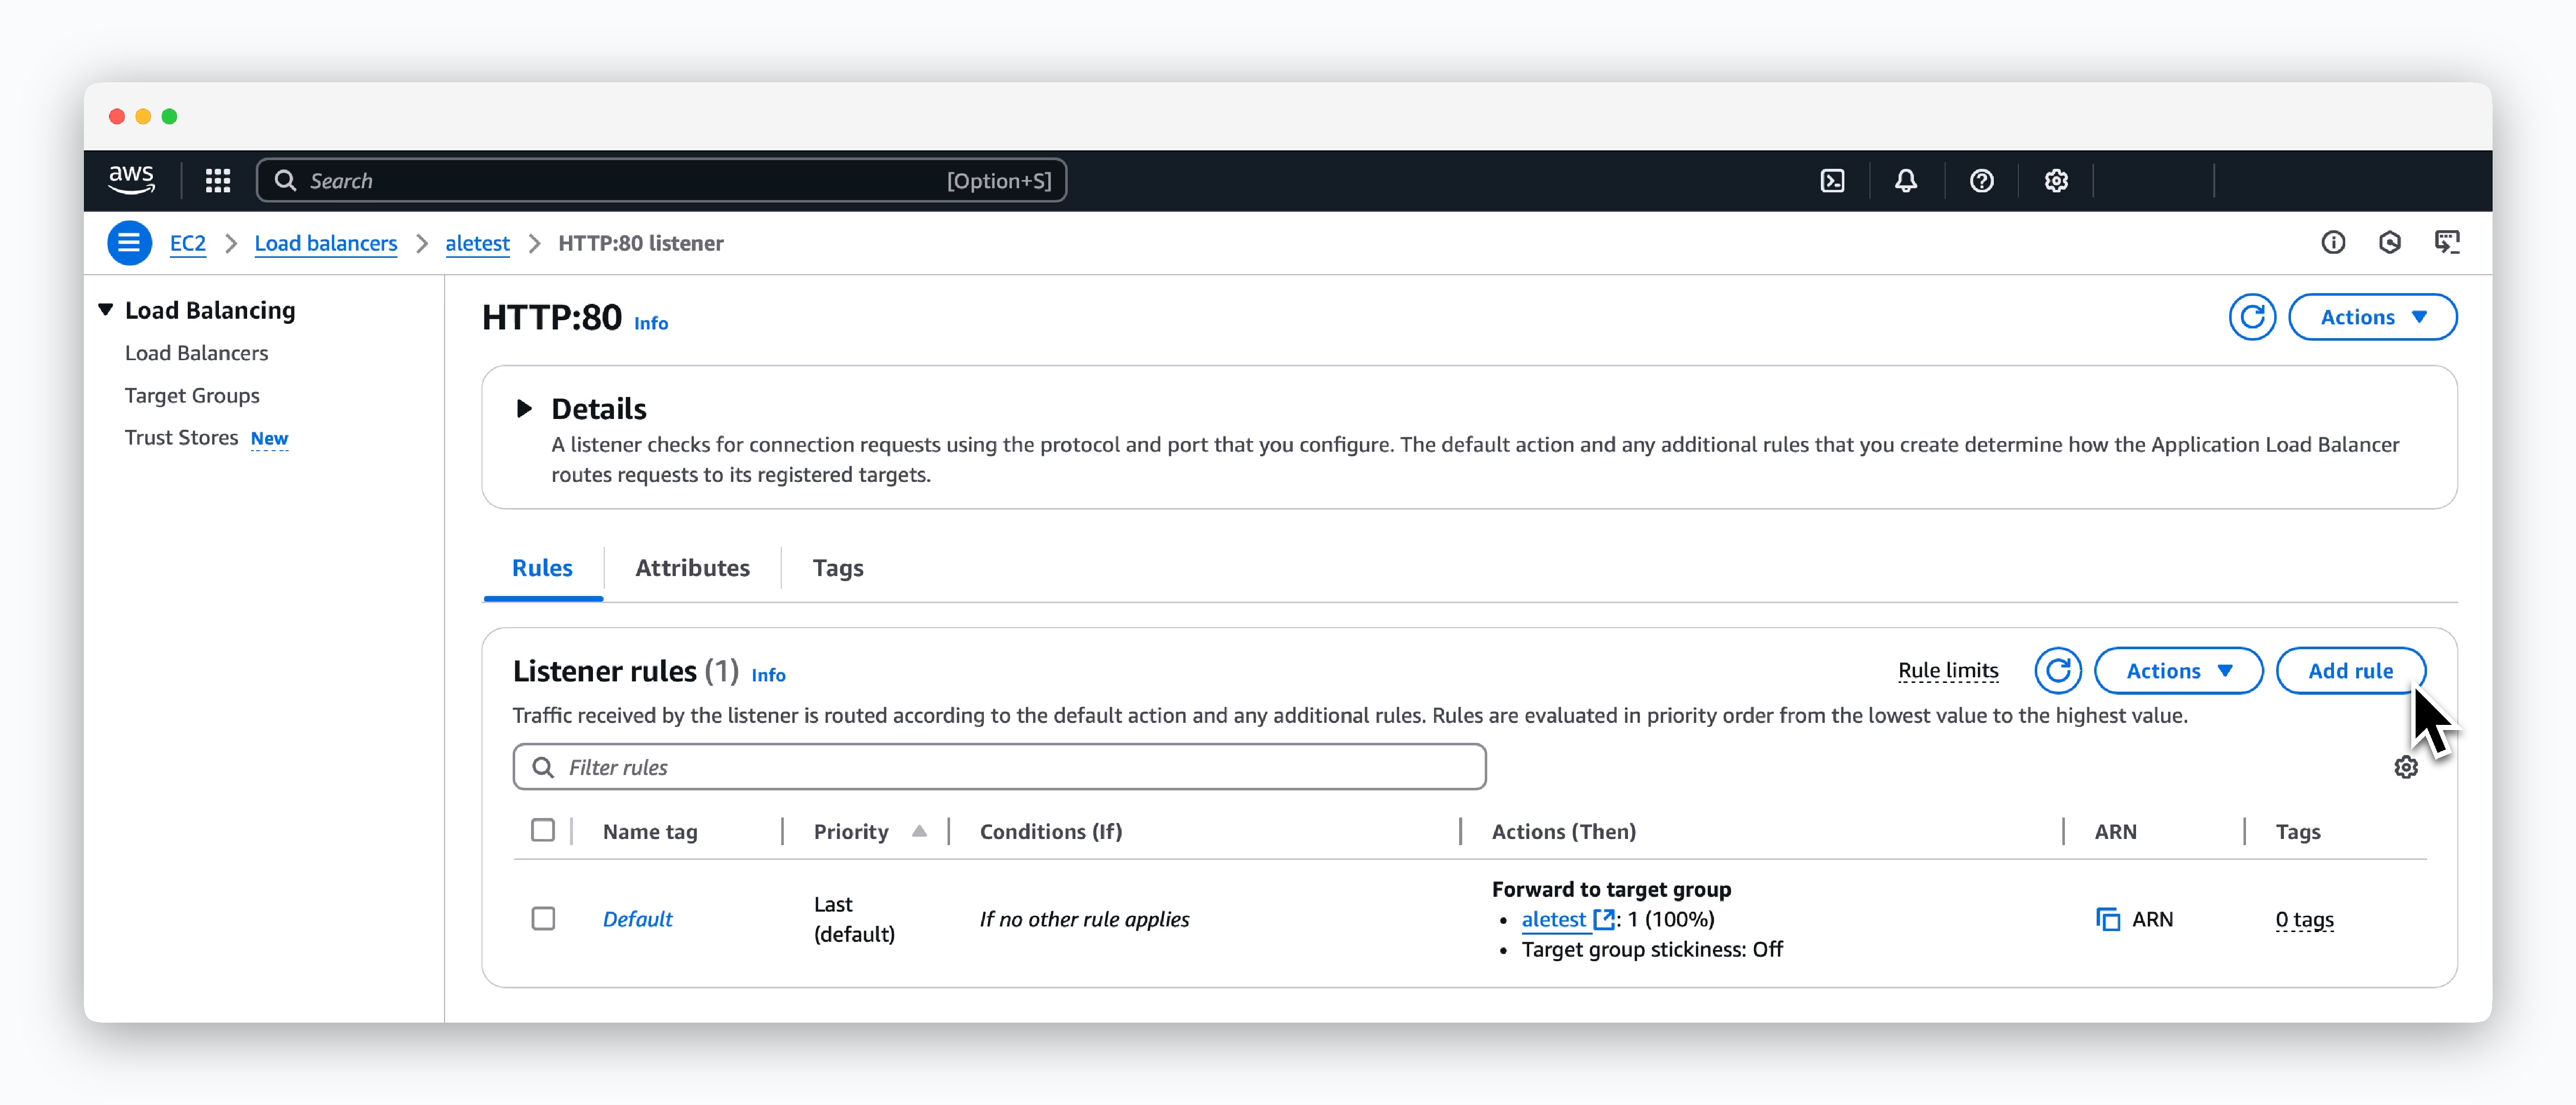 > 生成されたLoad balancerページで`Add rule`をクリックし、以下の5ステップでルールを作成します。
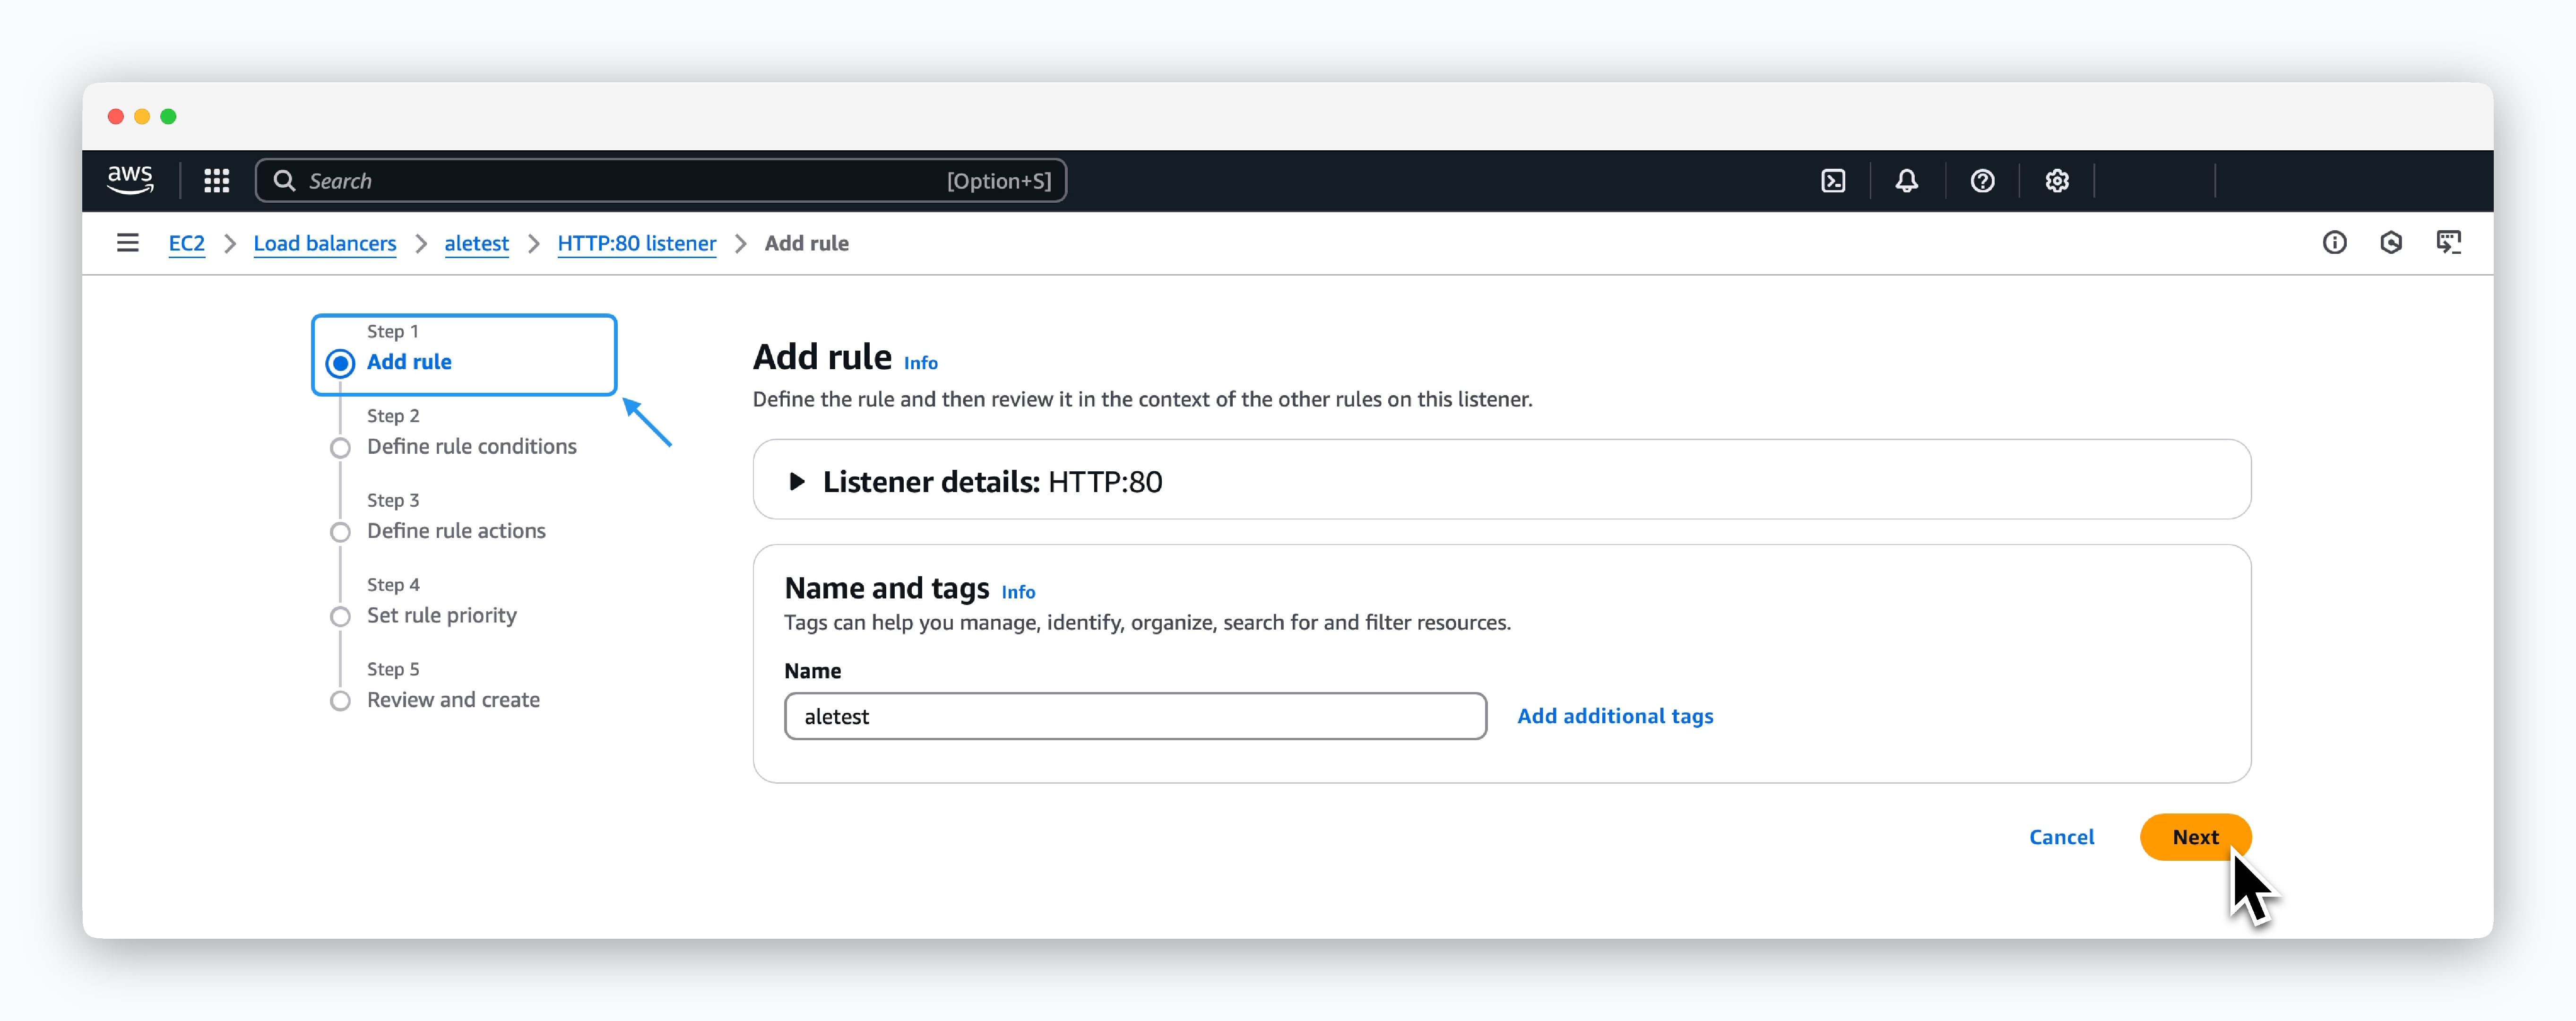 > Nameフィールドにルール名を入力してください。
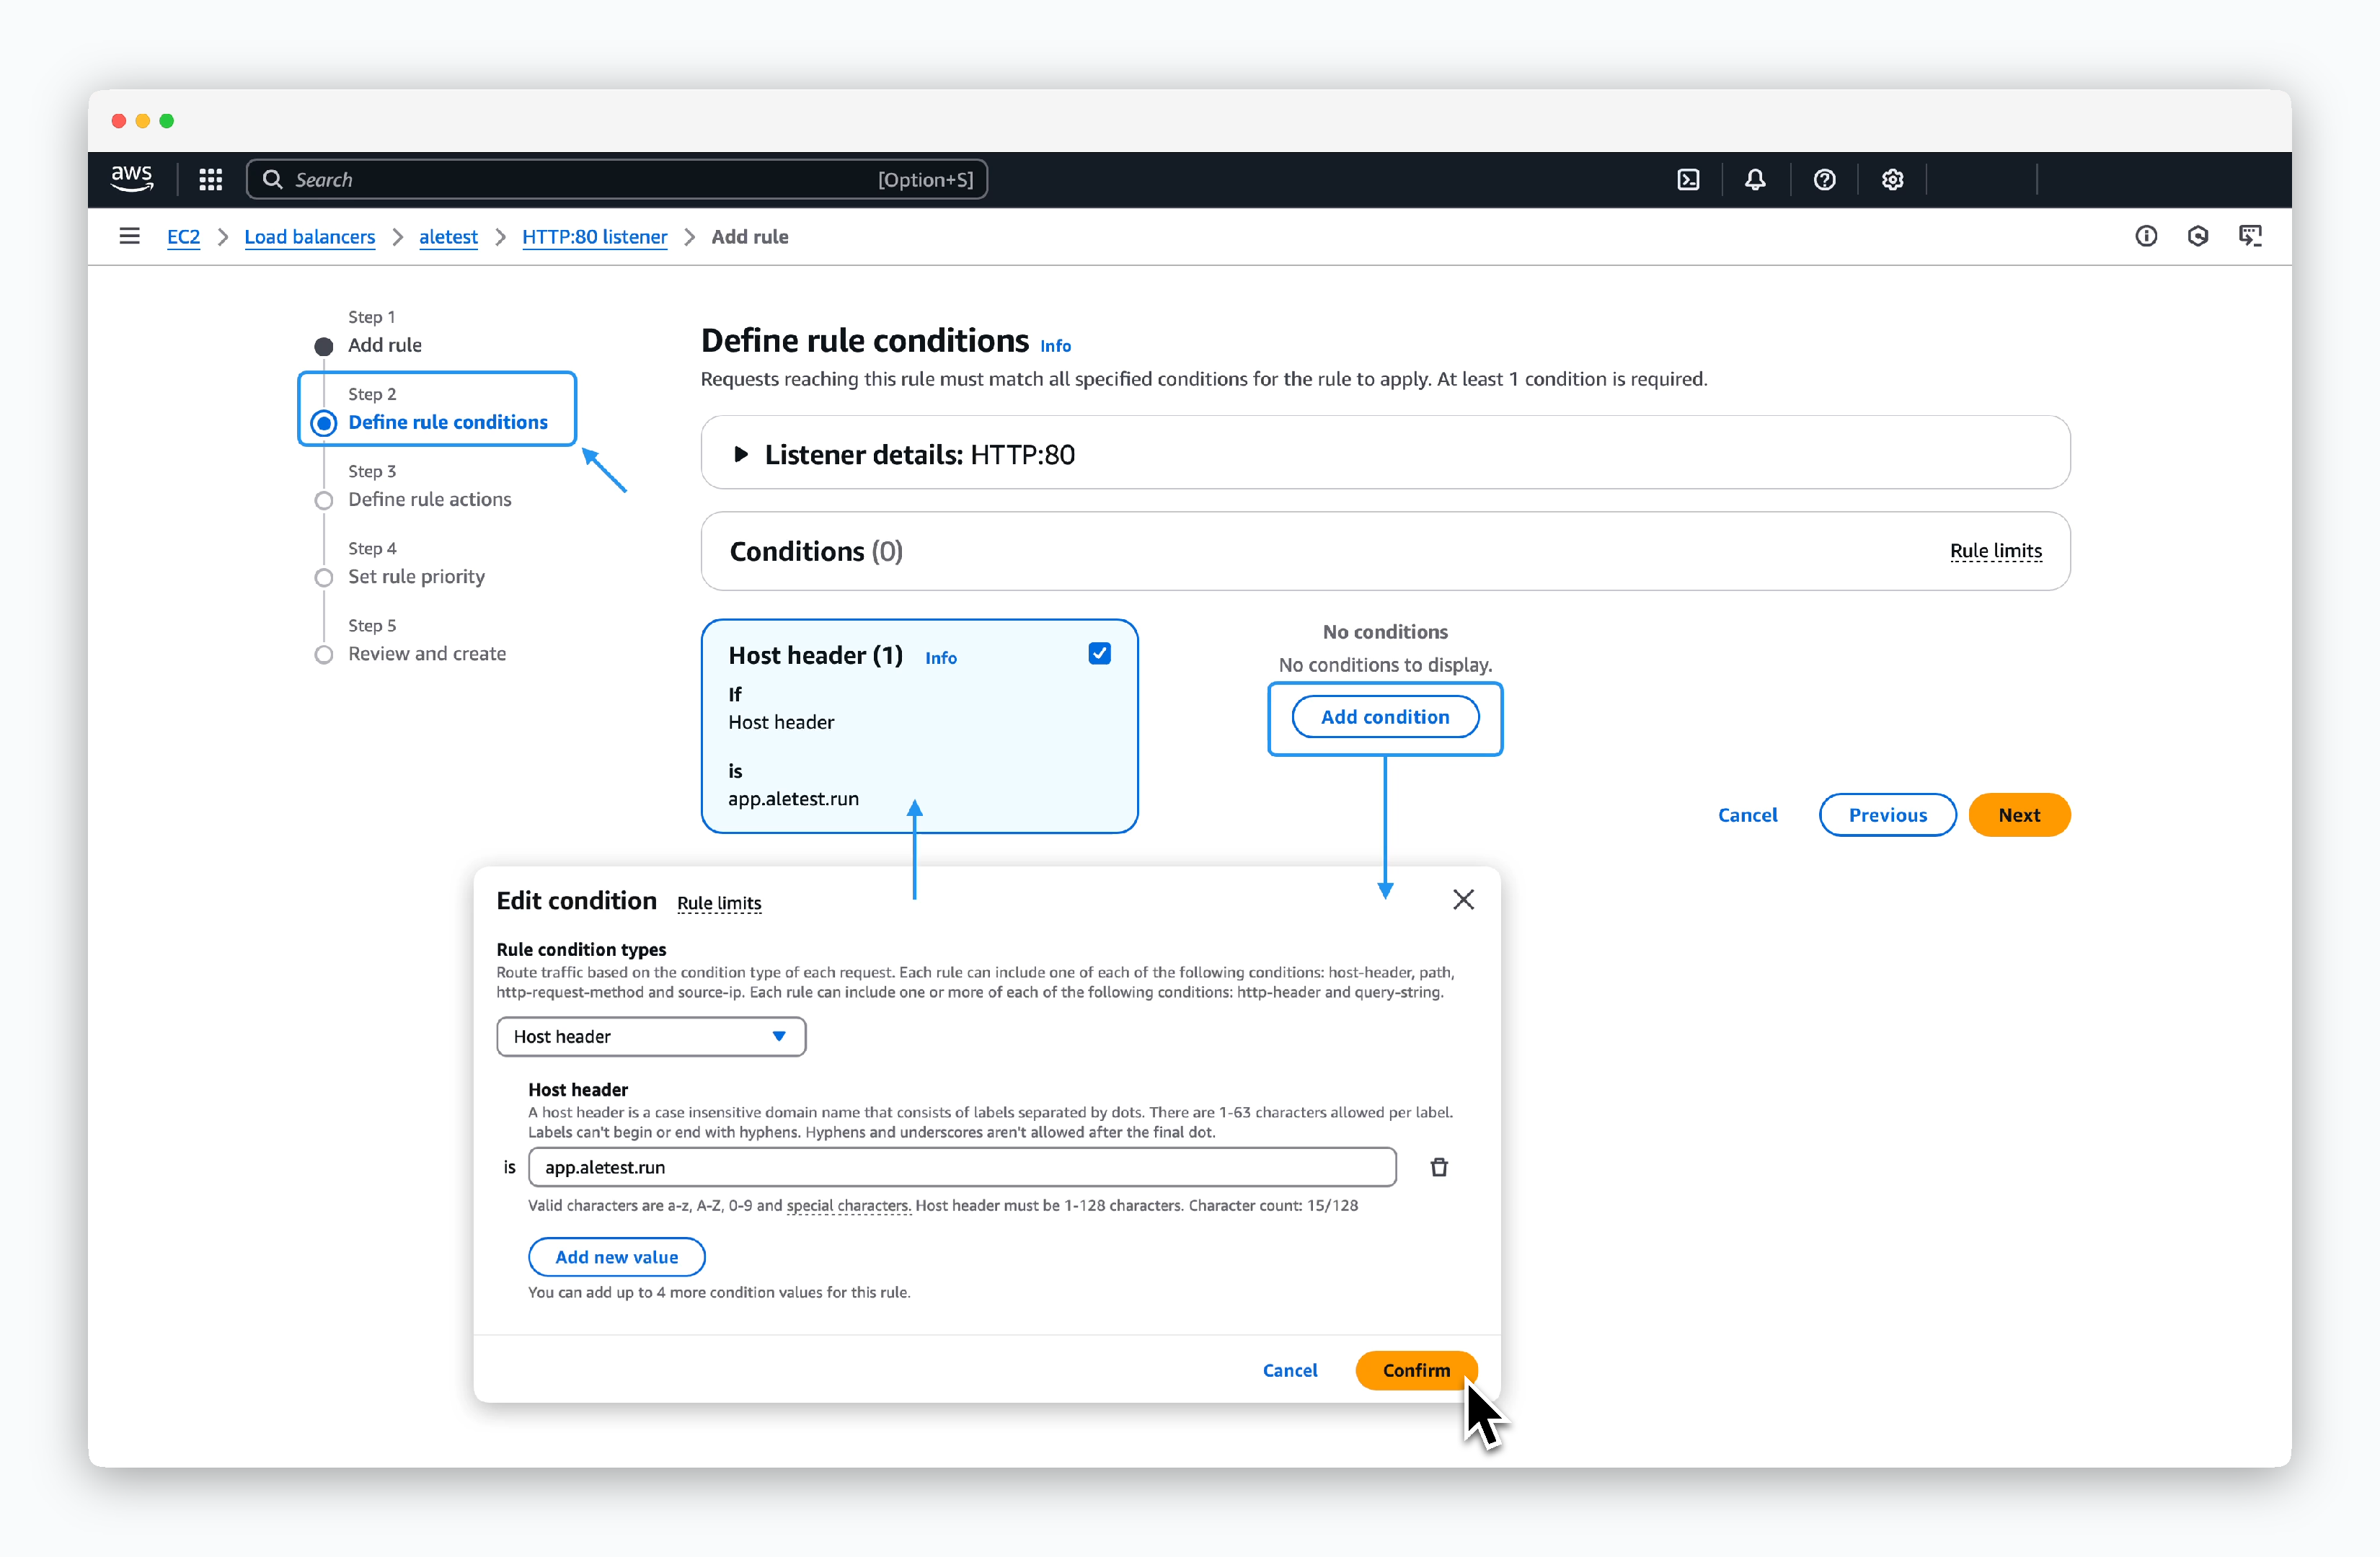 > `Add condition`をクリックして生成されるモーダルでHost headerを選択し、`app.[ドメイン]`を入力して`confirm`をクリックするとConditionカードが生成されます。その後`Next`をクリックしてください。
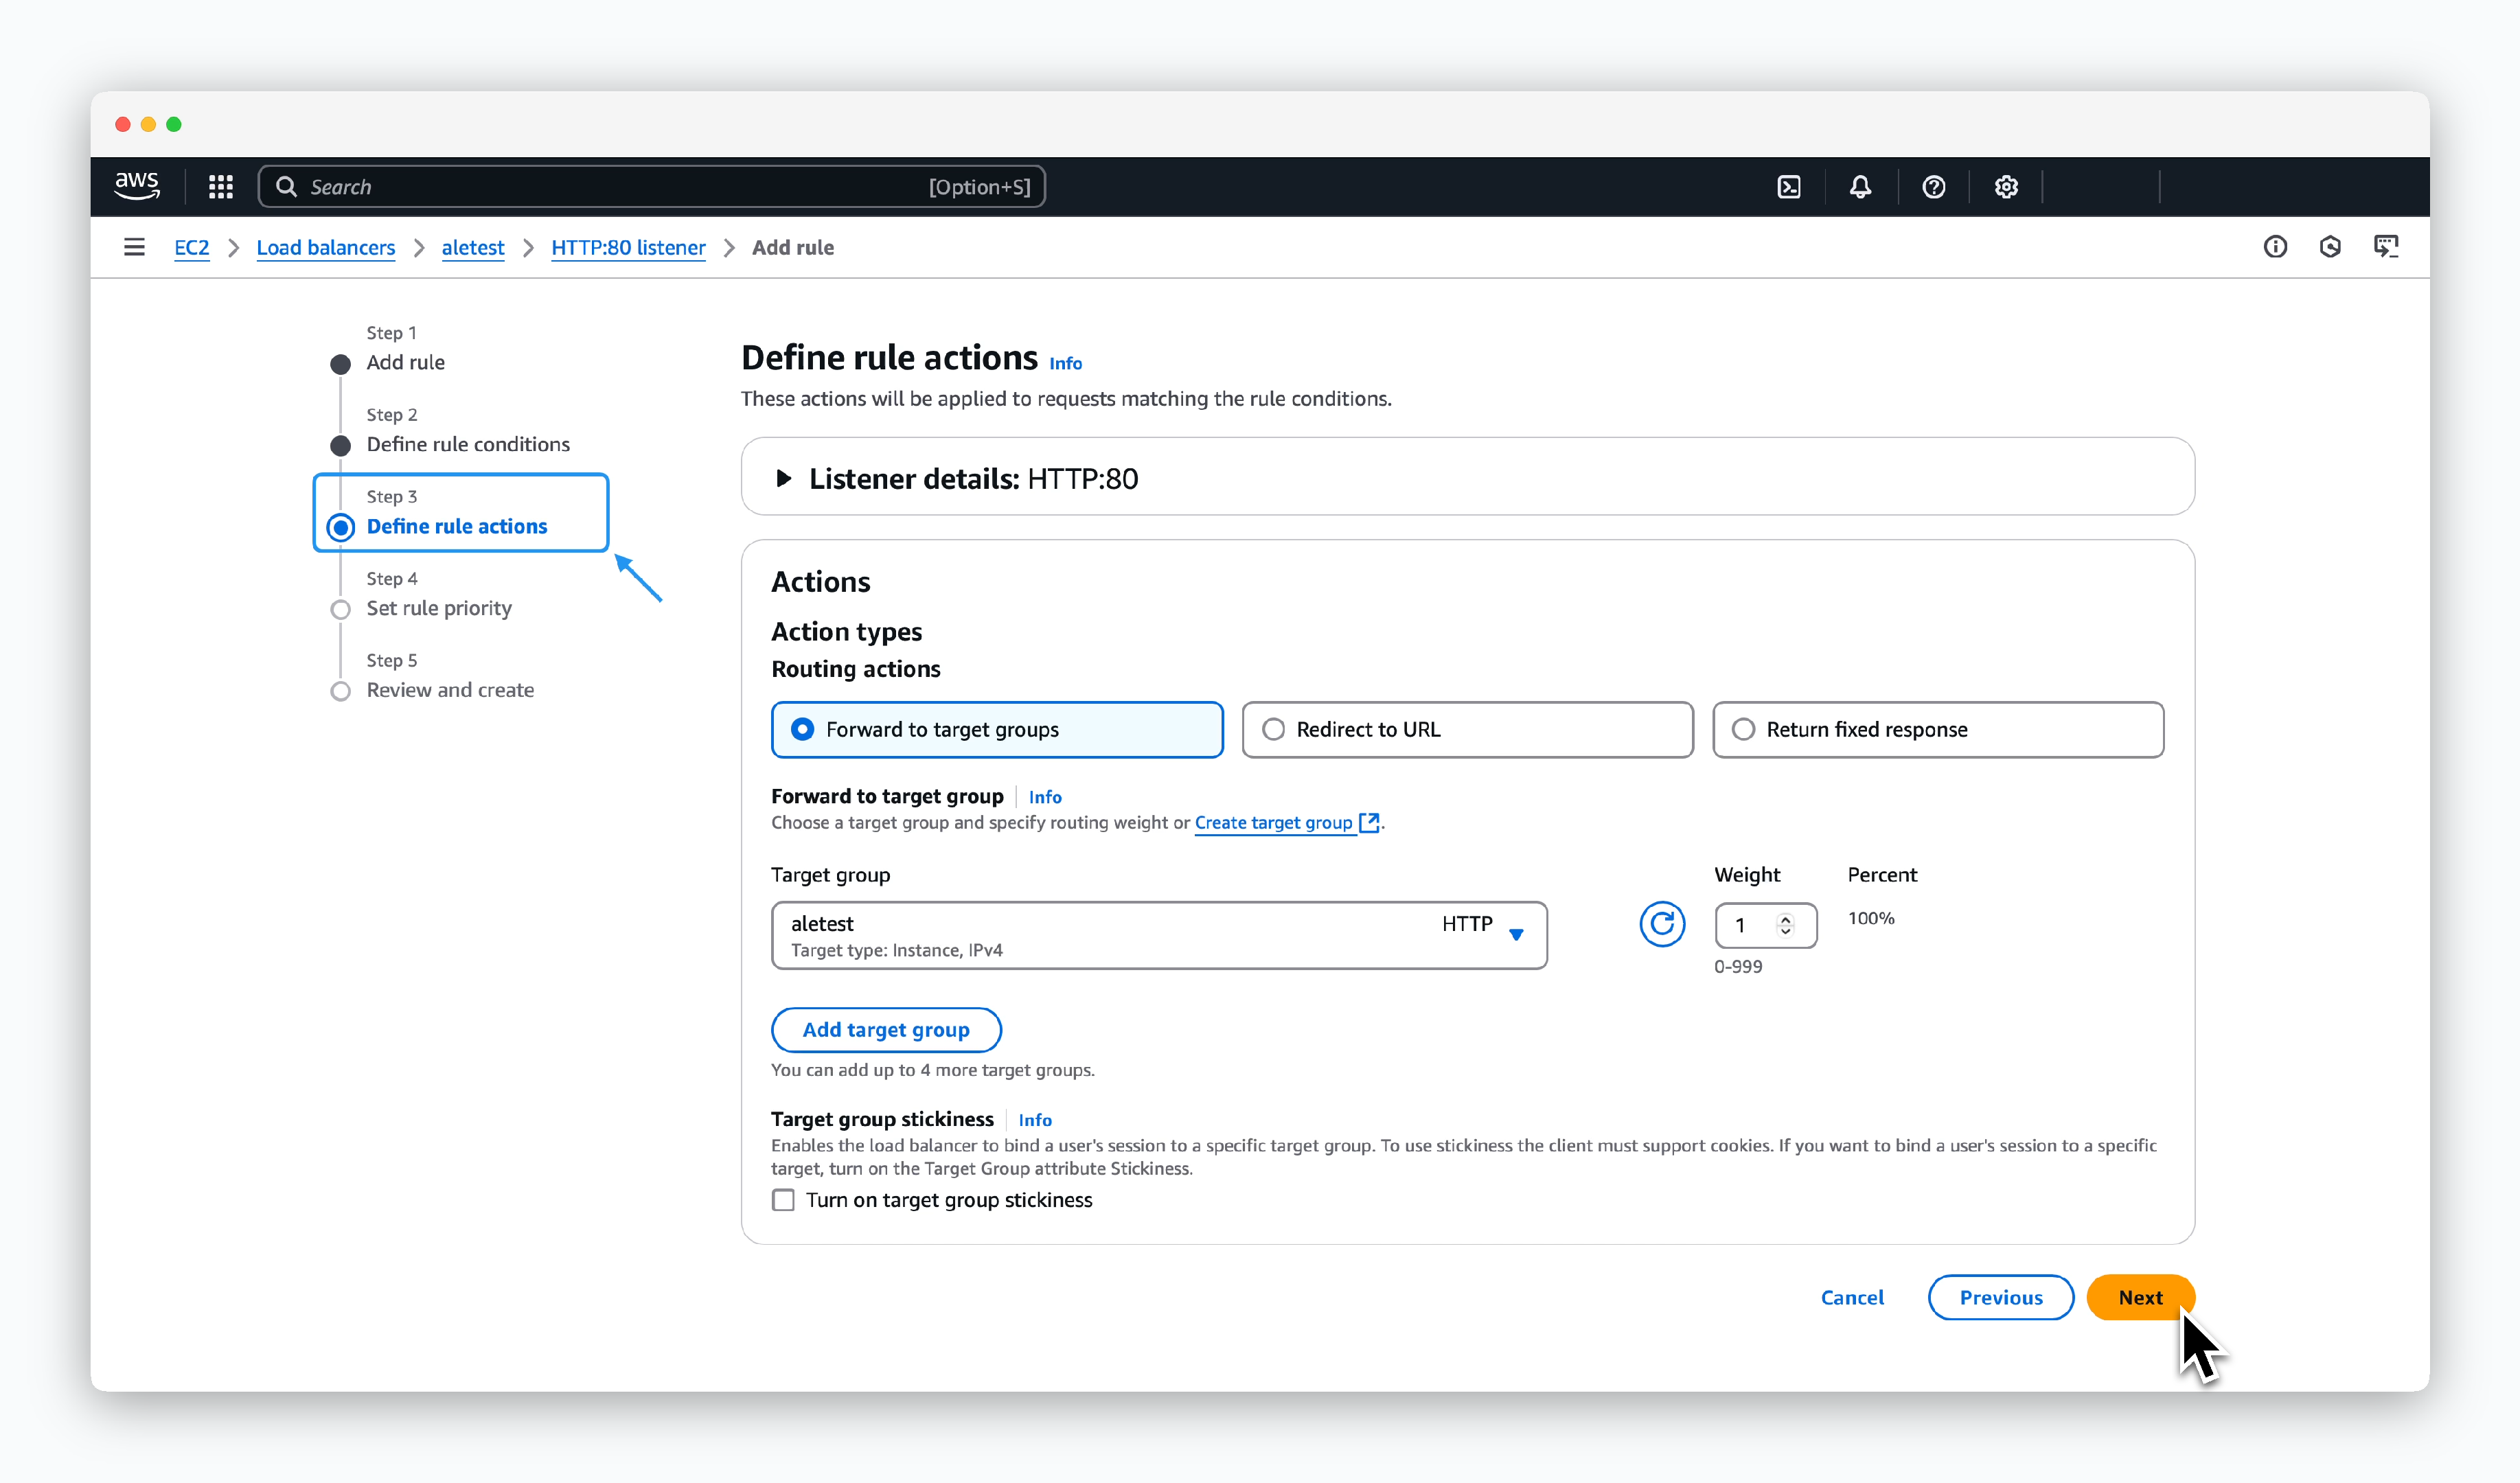 > Action typesでForward to target groupsを選択し、前に作成したターゲットグループを選択して`Next`をクリックしてください。
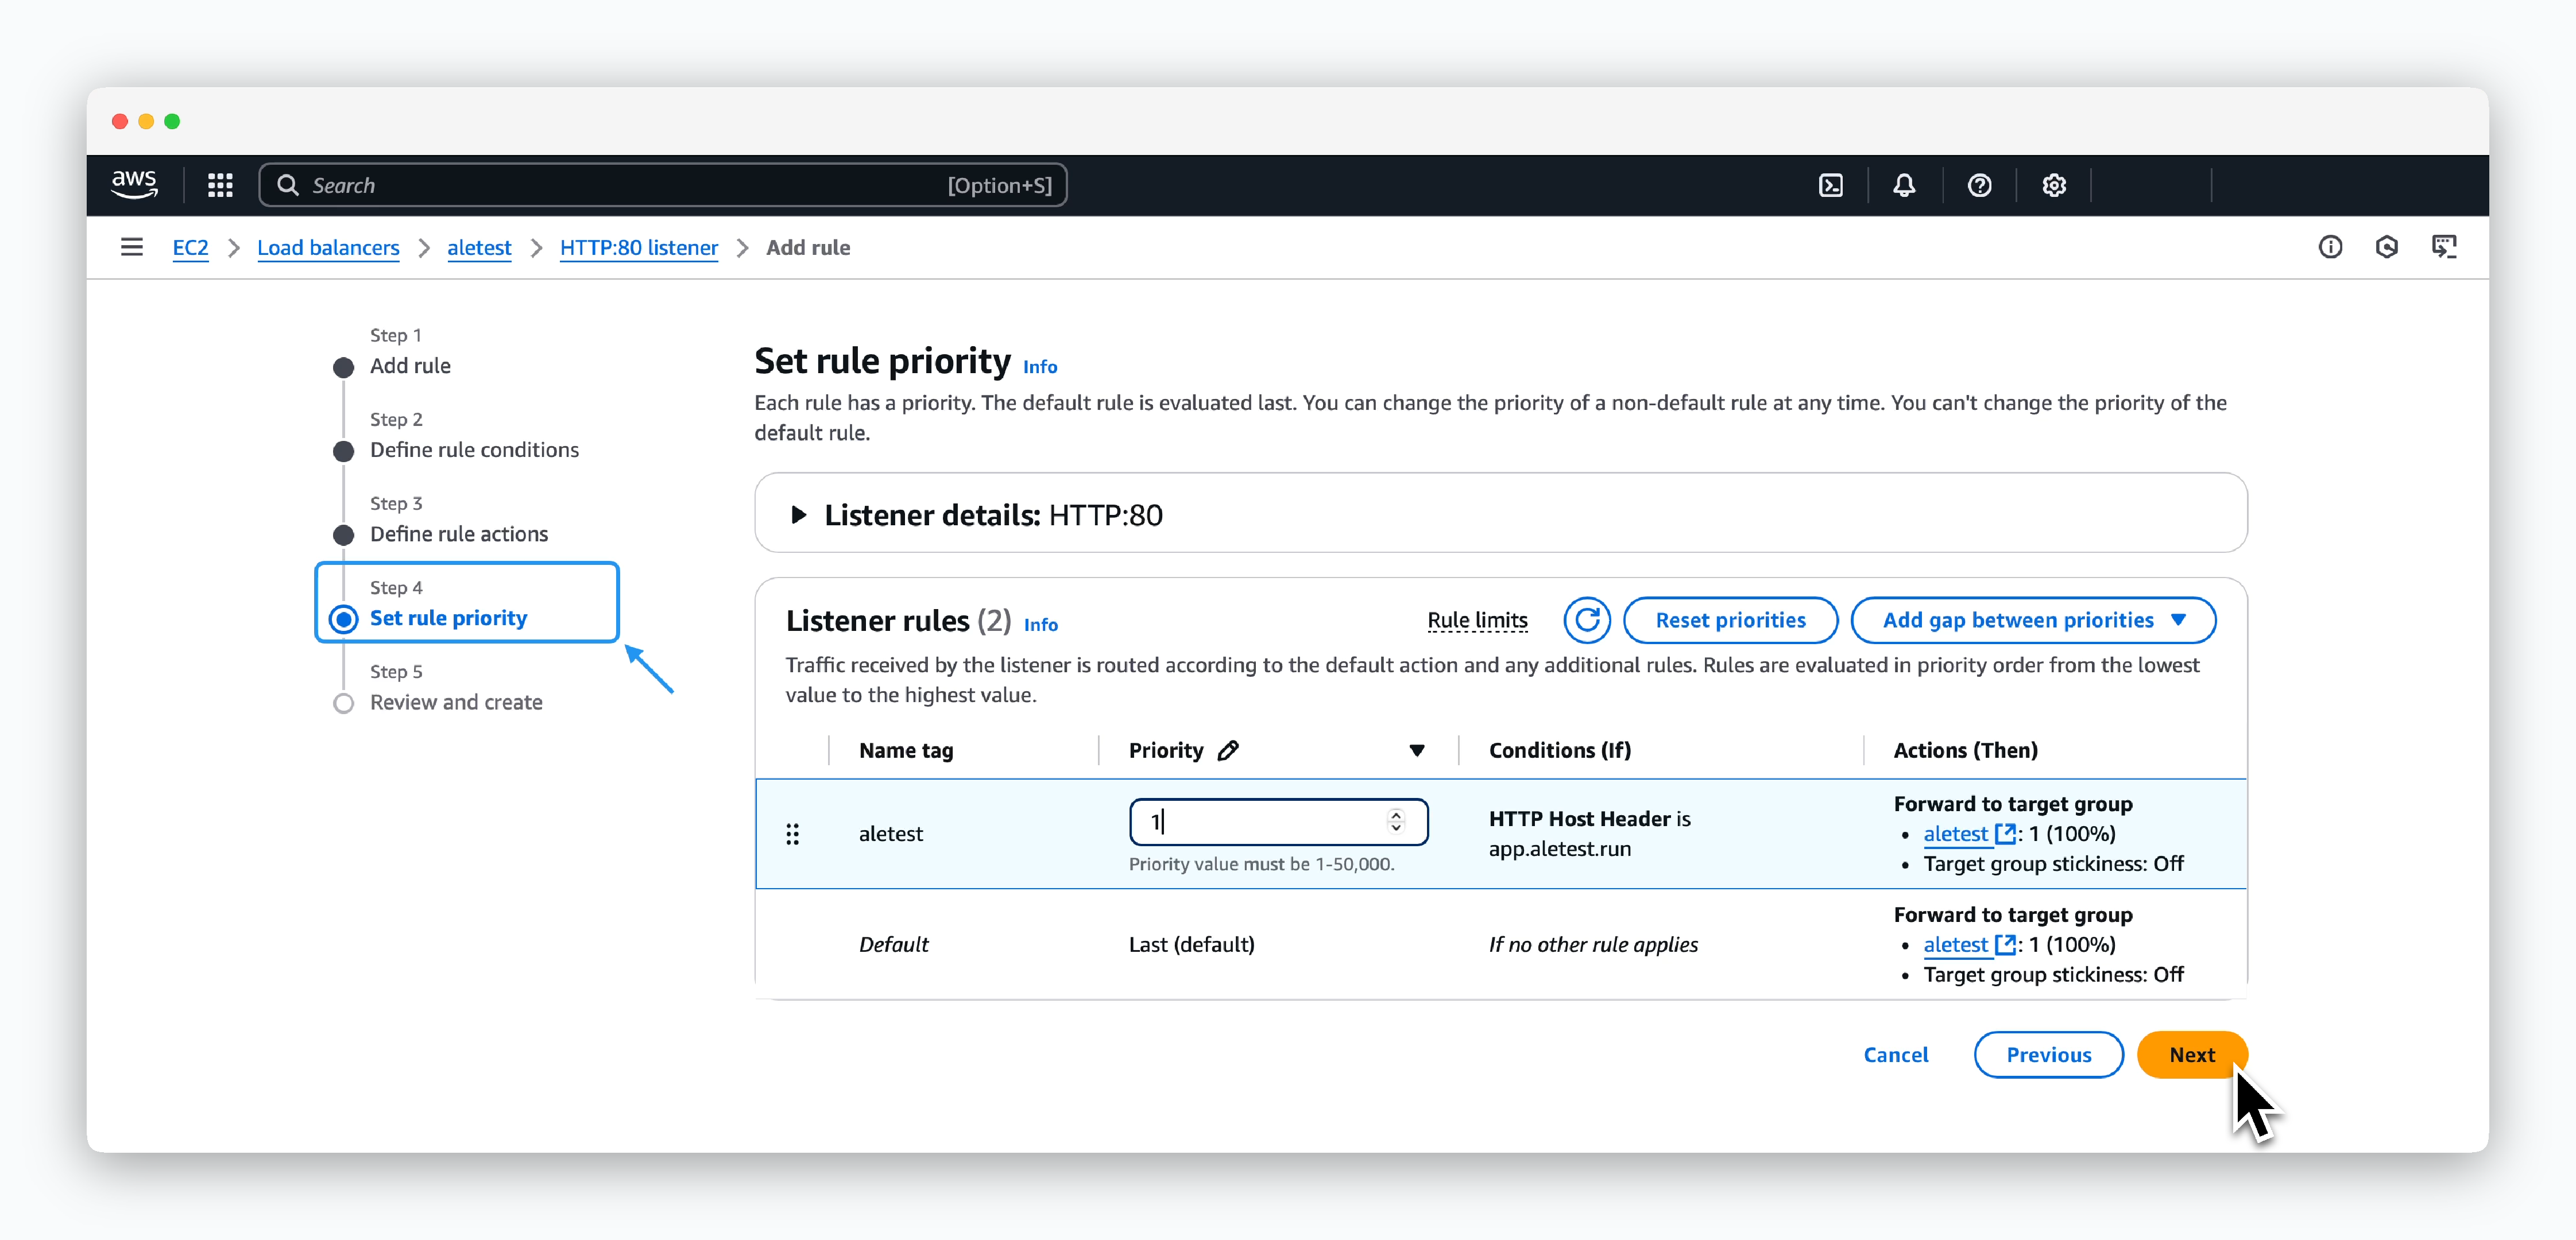 > Priorityを1に設定して`Next`をクリックしてください。
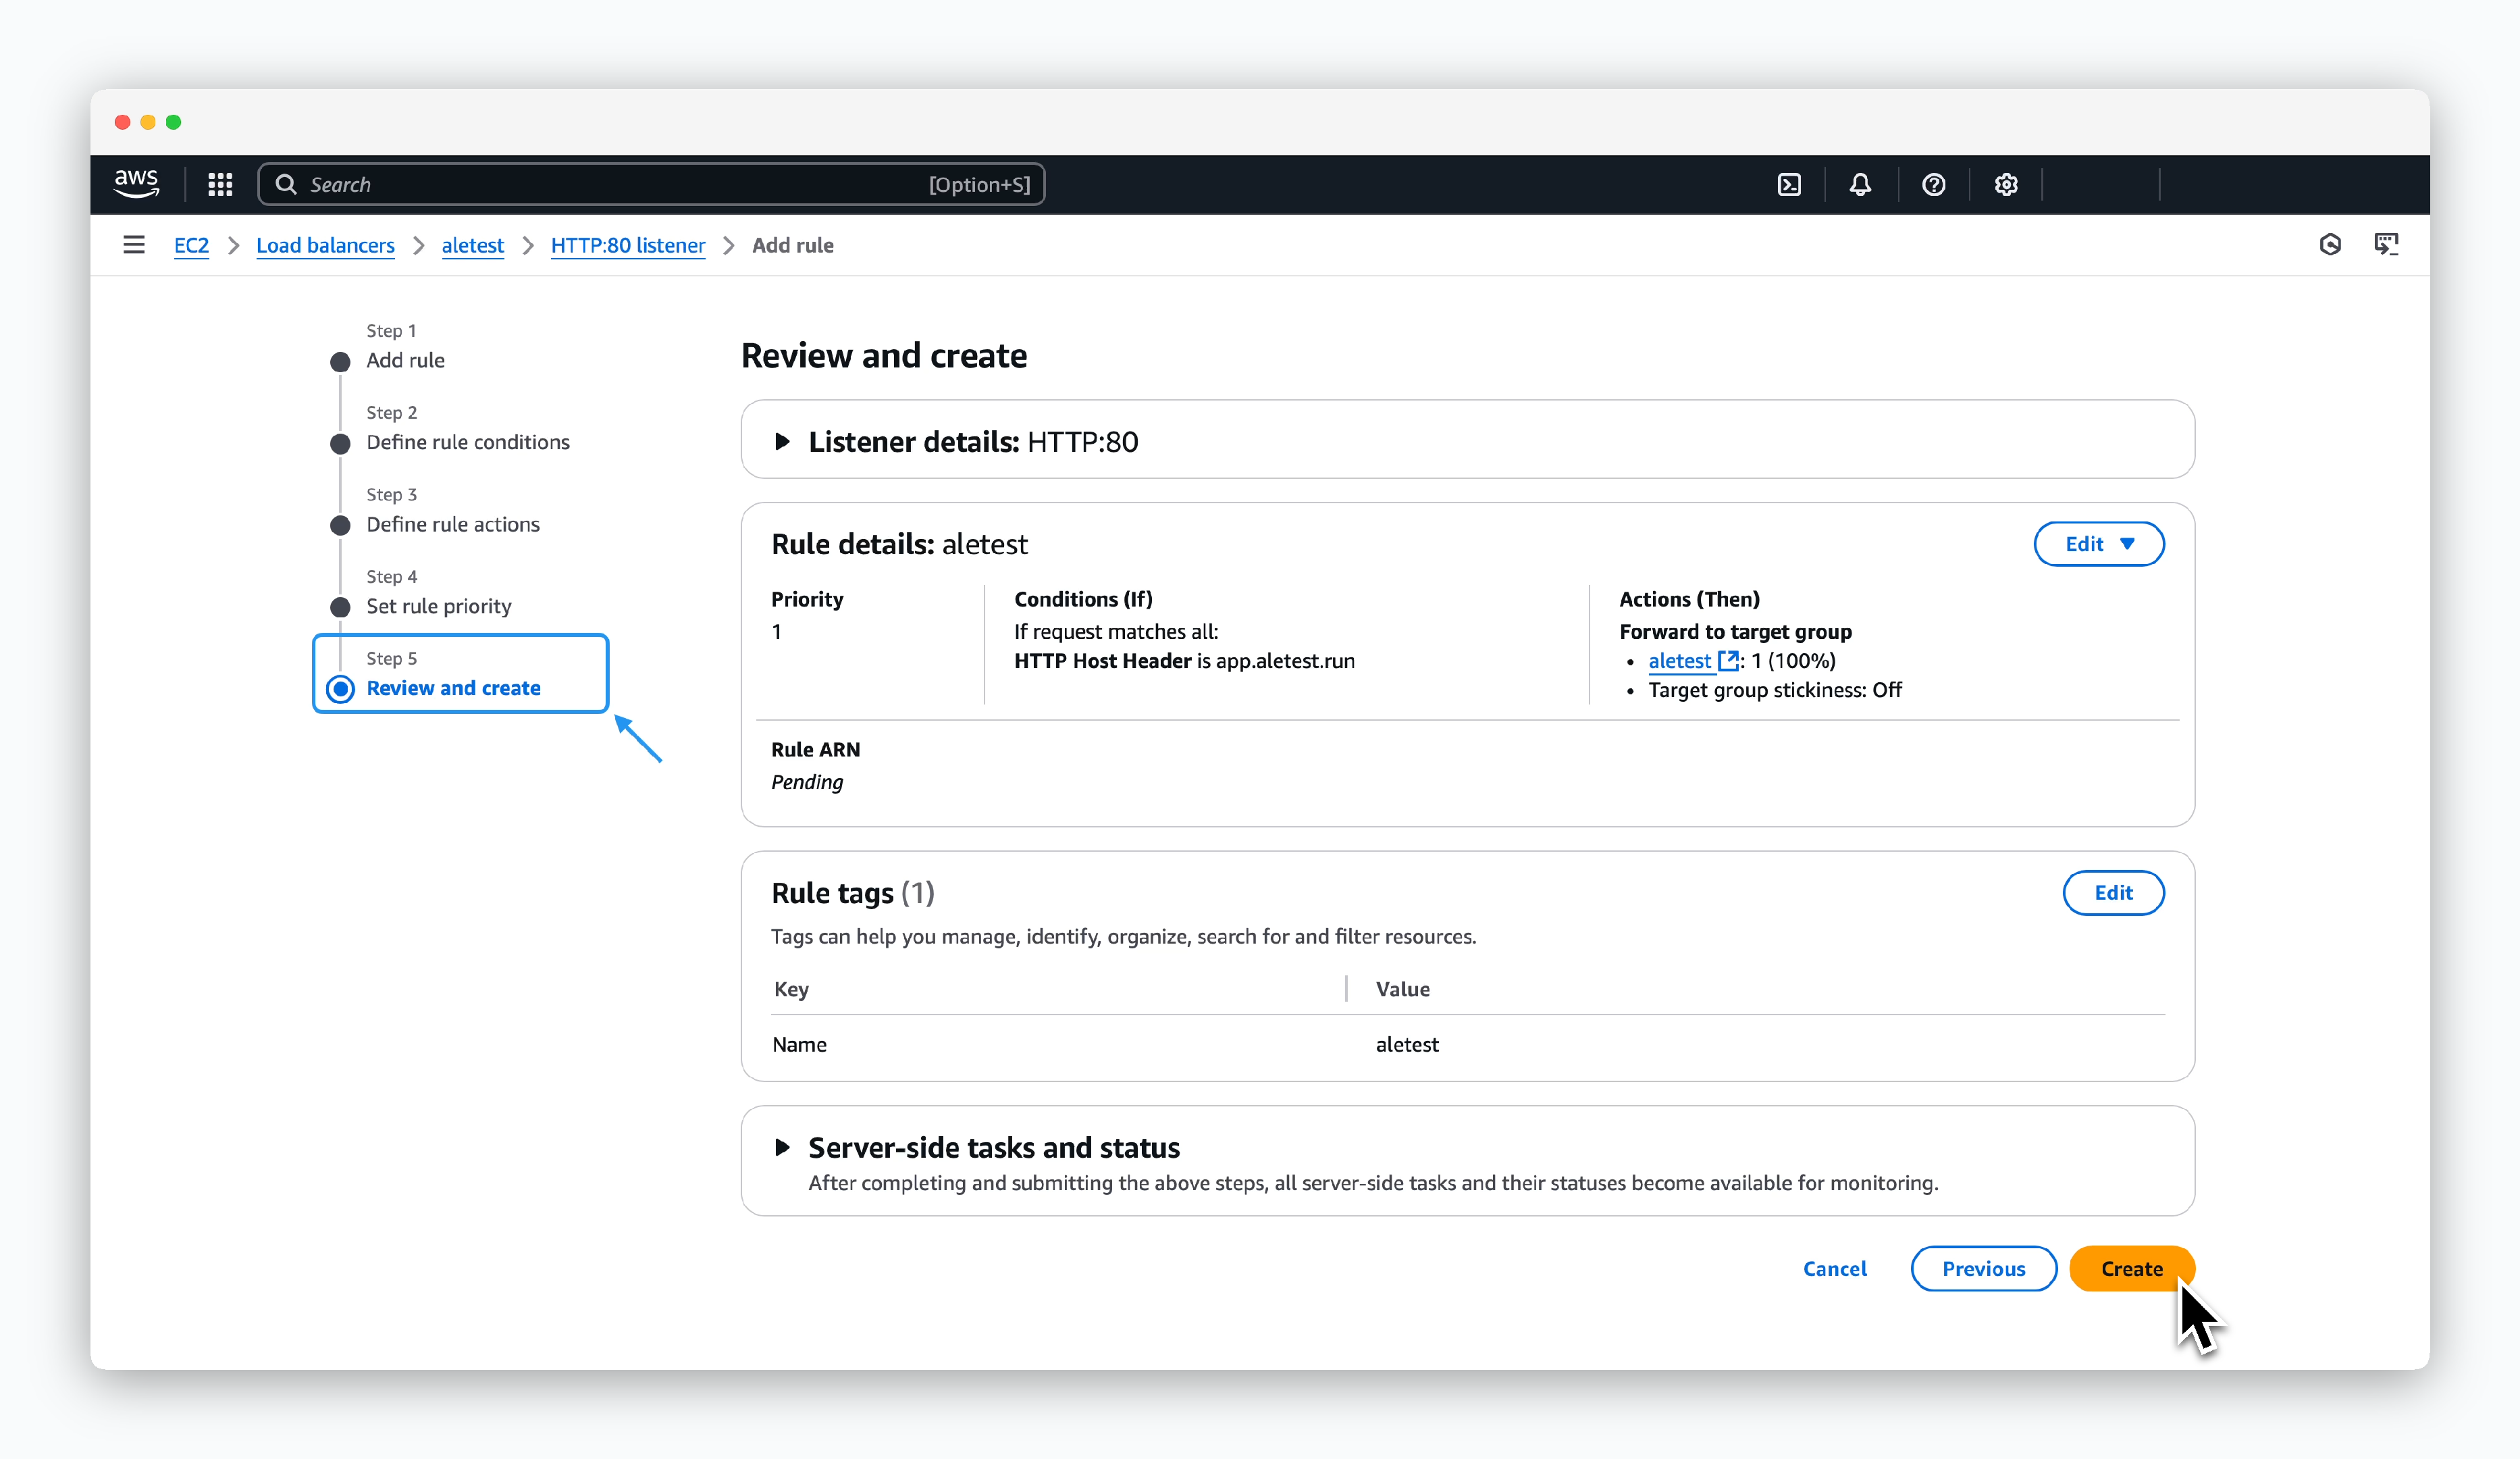 > 最終的に`Create`をクリックするとルールが生成されます。
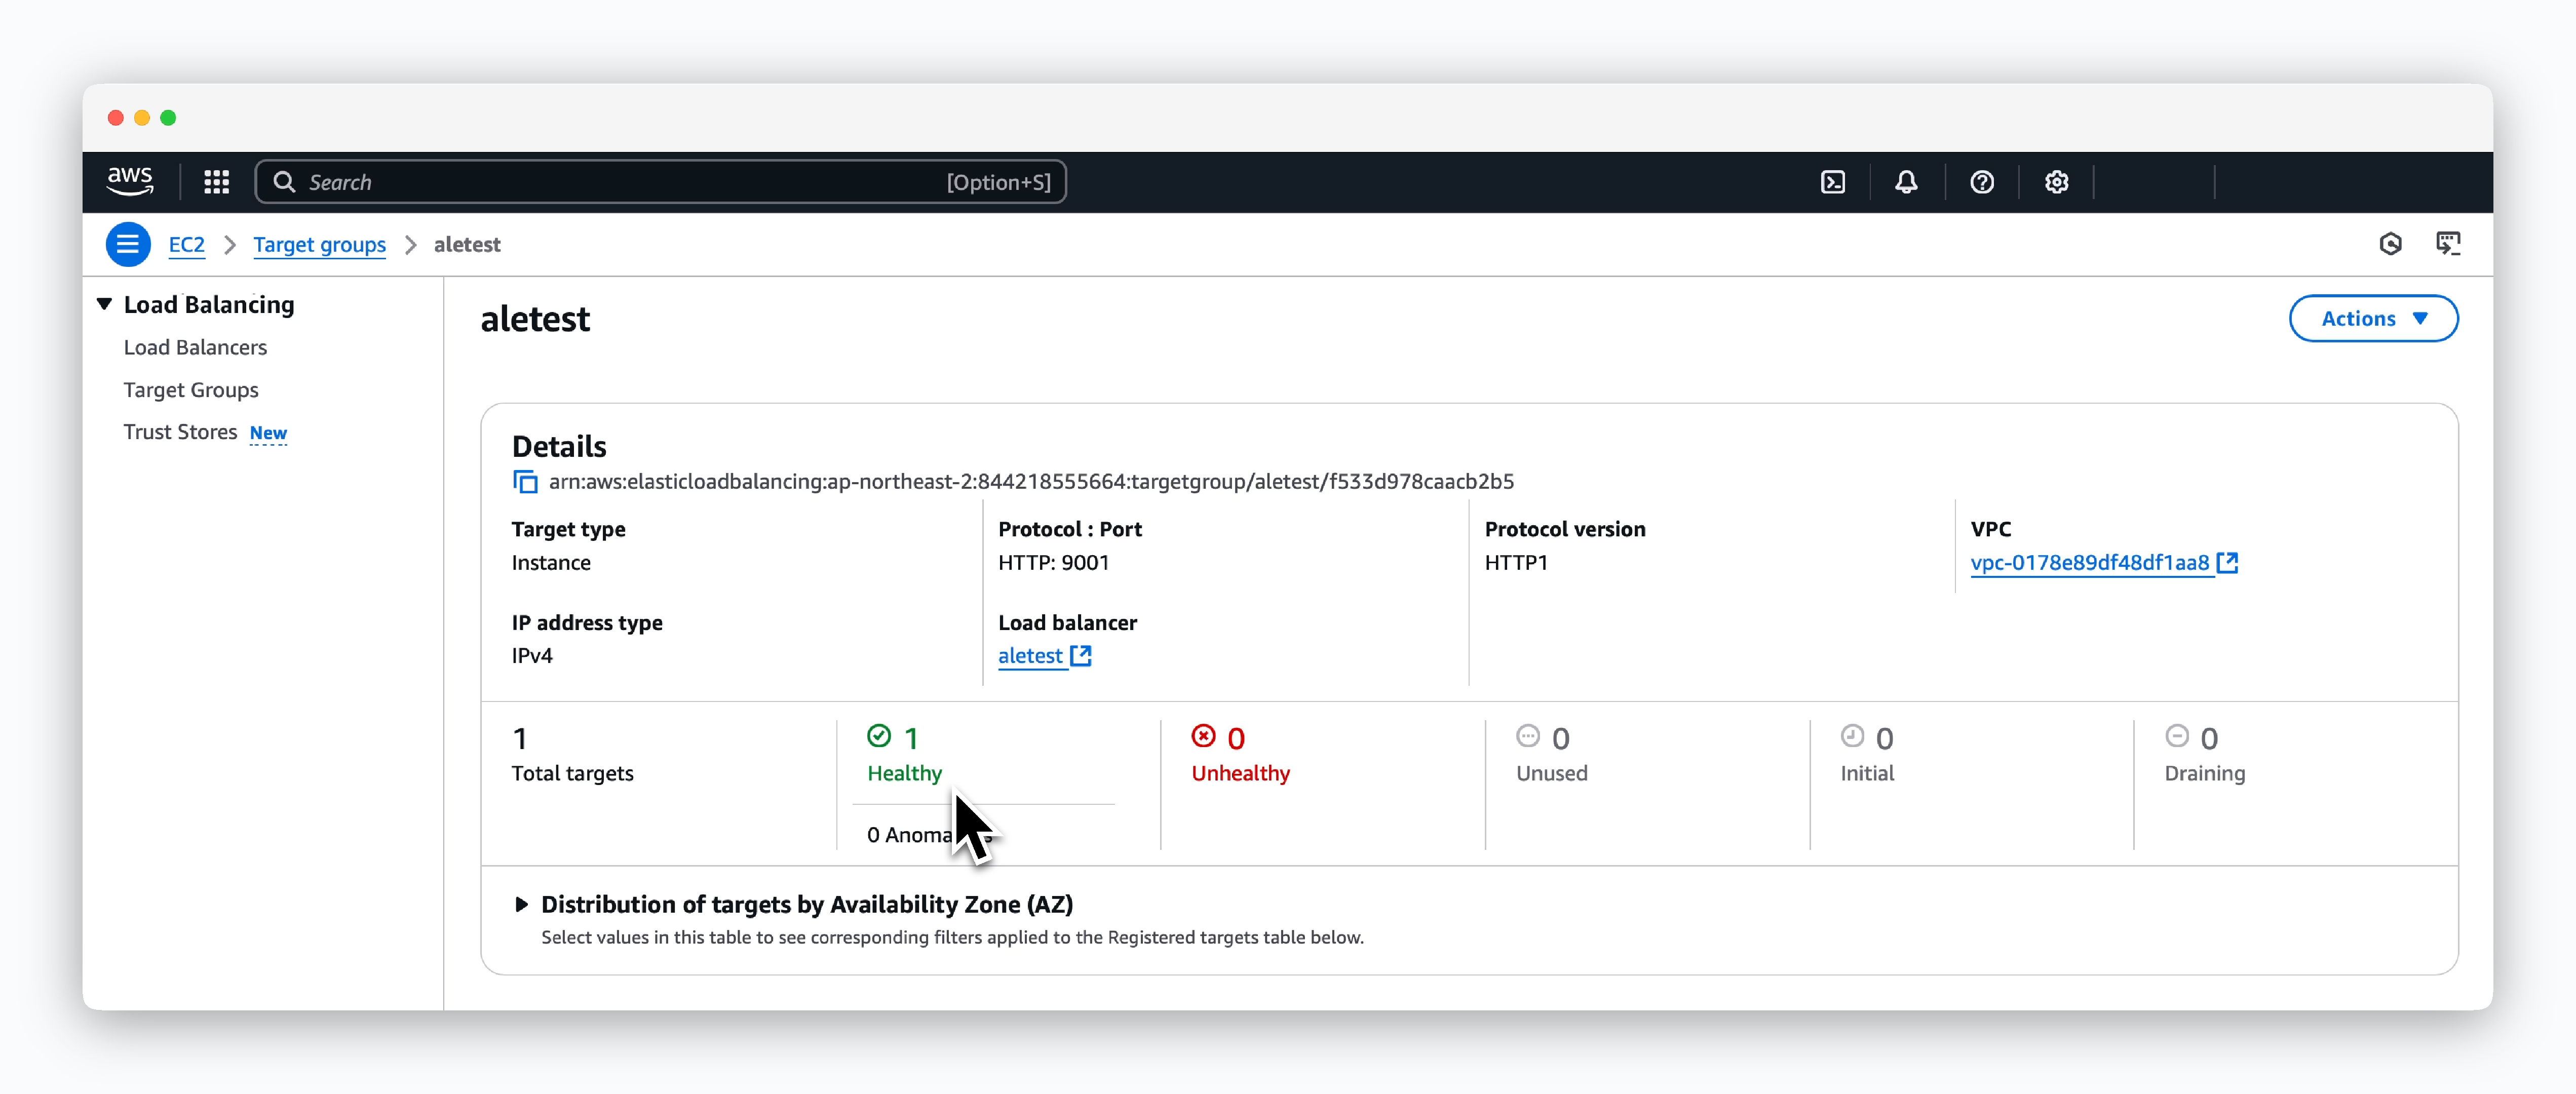
ルール生成後少し待機すると、エールがインスタンスで正常に実行されている場合、ALBでルーティングするターゲットグループの状態が以下の画像のようにHealthyと表示されます。
> 最終的に`Create`をクリックするとルールが生成されます。
ルール生成後少し待機すると、エールがインスタンスで正常に実行されている場合、ALBでルーティングするターゲットグループの状態が以下の画像のようにHealthyと表示されます。
 ## DNSレコードの登録とALB適用
 > `Route53 > Hosted zones > 適用対象のドメイン`ページで`Create record`をクリックします。
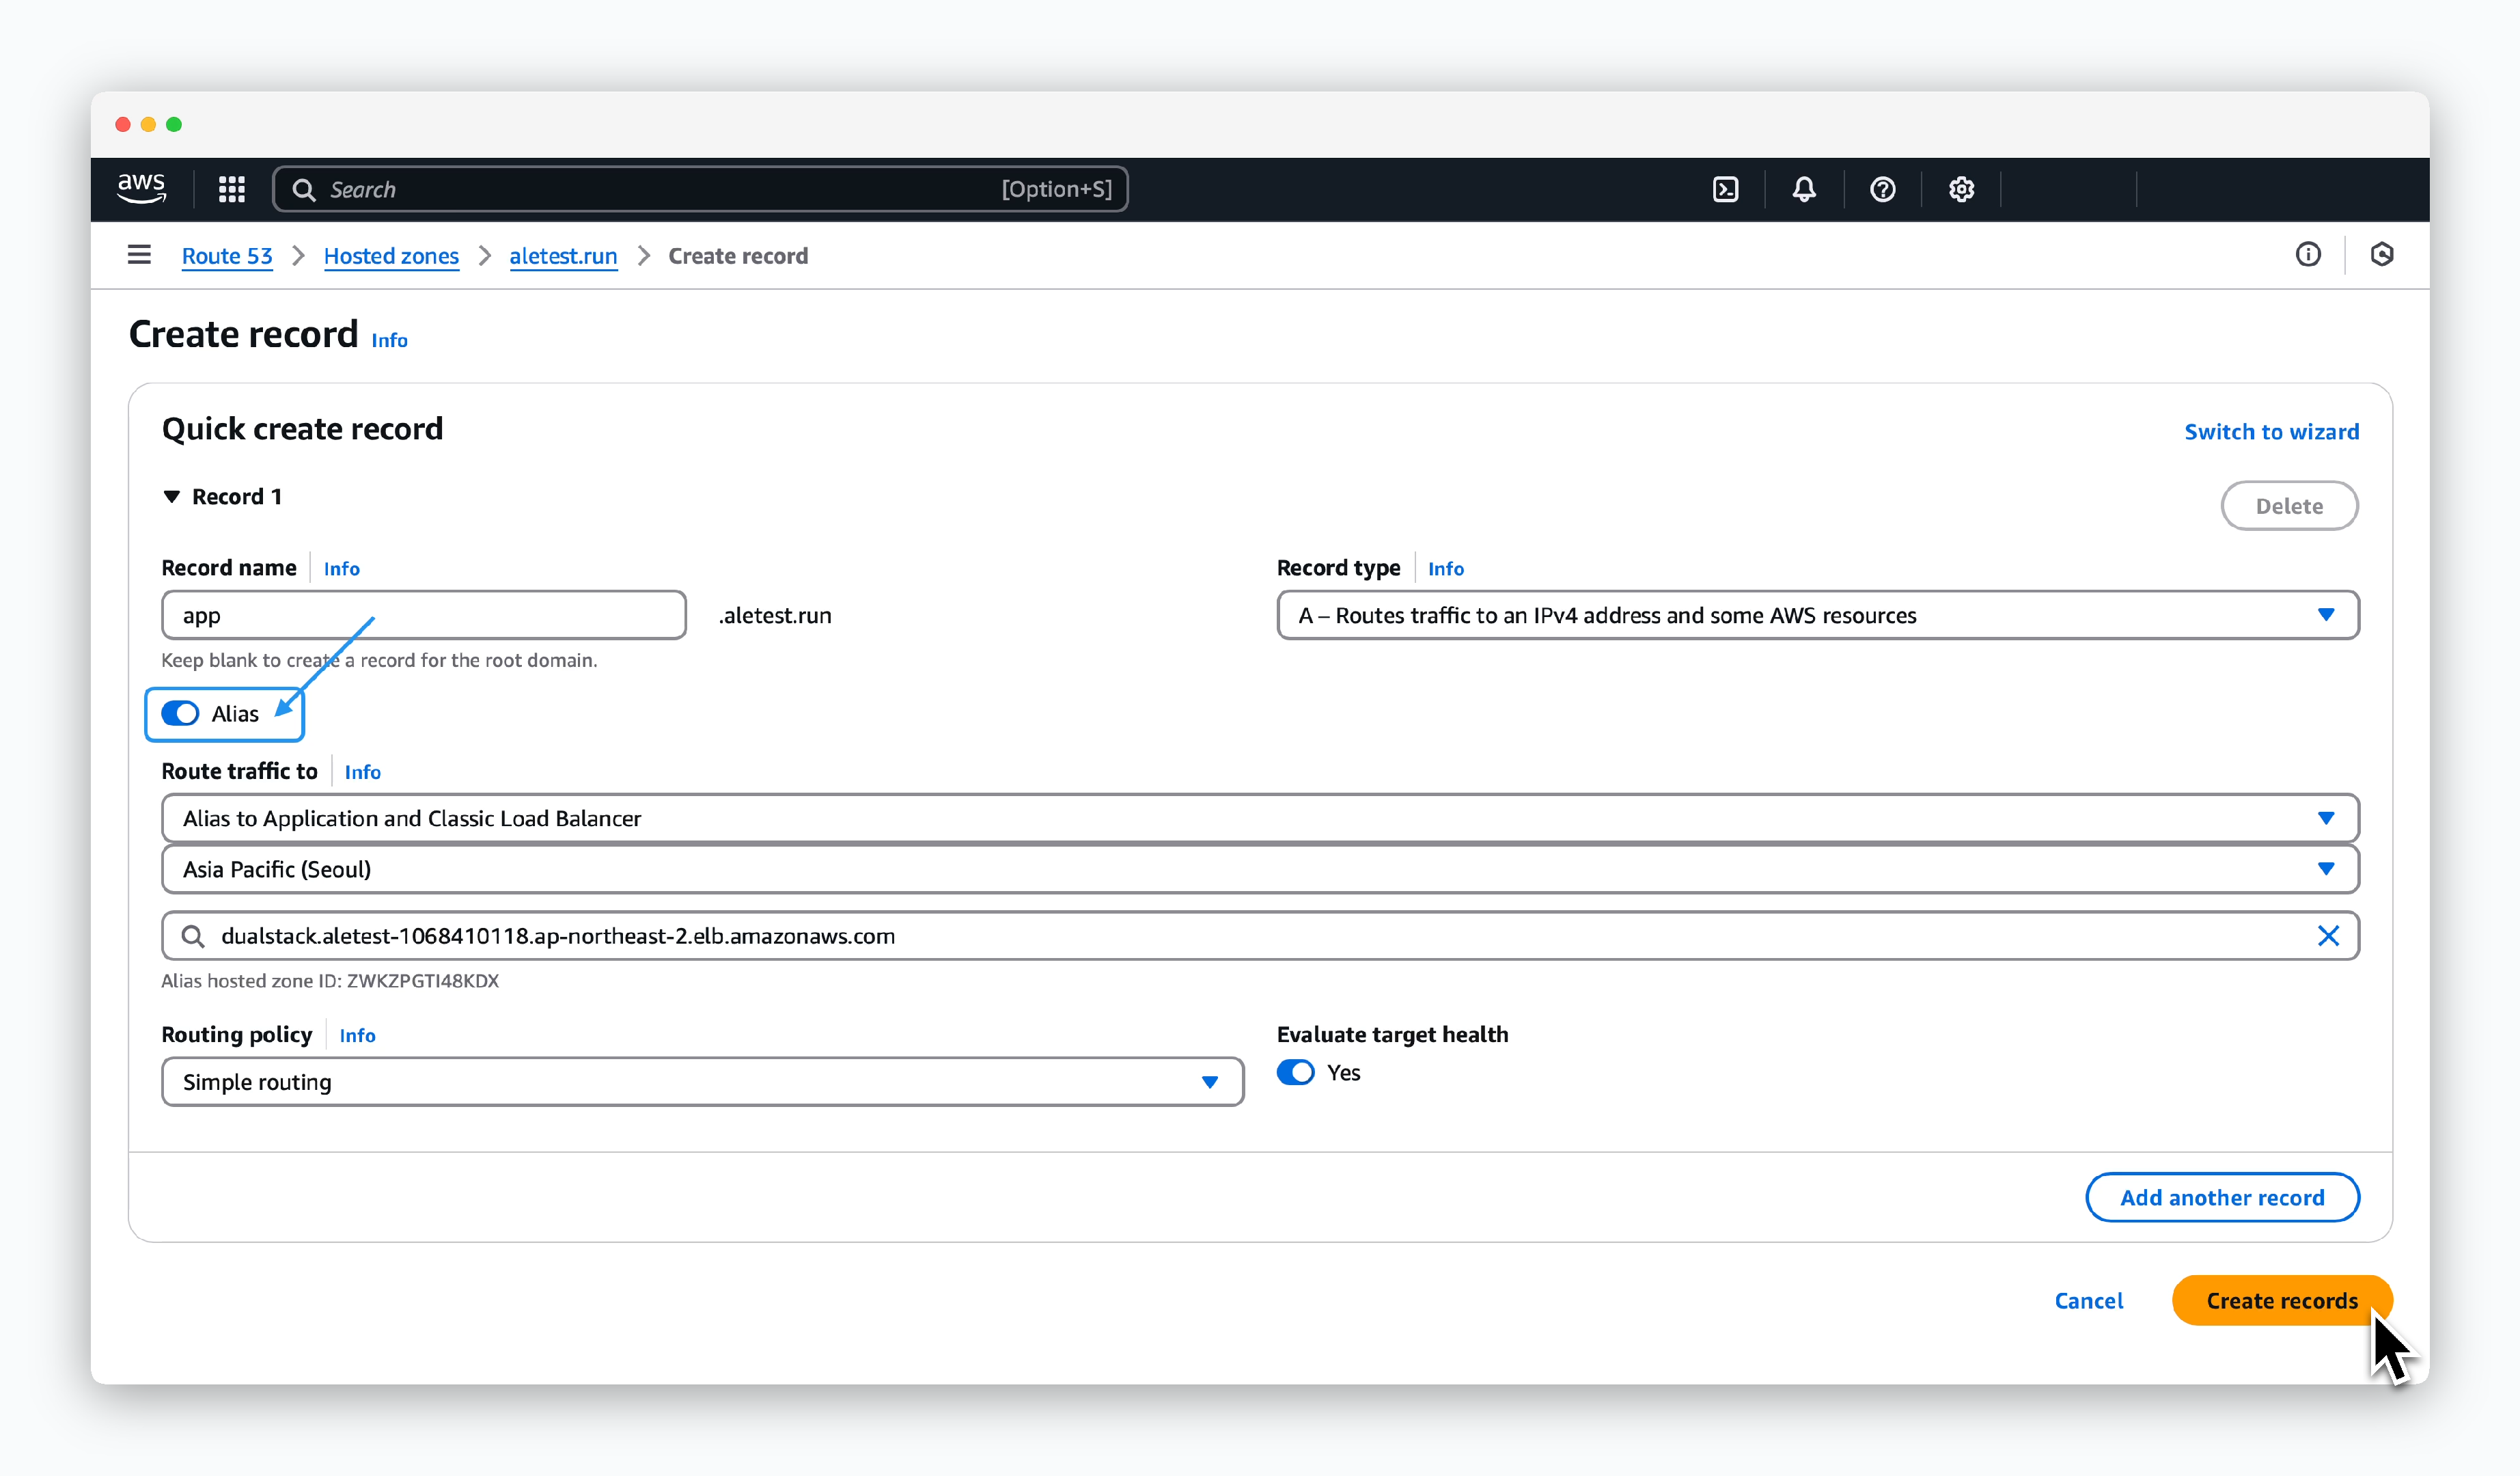 > レコード生成ページで以下のように値を入力し、`Create record`をクリックします。
* **Record name**: app
* **Record type**: A
* **Alias**: 有効化
* **Route traffic to**
* **Alias to Application and Classic Load Balancer**
* **Region**: VPCのリージョン
* **ALB**: 前に作成したALBを選択
設定したレコード名のドメイン(ex. app.aletest.run)はエールの接続ドメインとして使用されます。
## ACM証明書の生成及び適用
> レコード生成ページで以下のように値を入力し、`Create record`をクリックします。
* **Record name**: app
* **Record type**: A
* **Alias**: 有効化
* **Route traffic to**
* **Alias to Application and Classic Load Balancer**
* **Region**: VPCのリージョン
* **ALB**: 前に作成したALBを選択
設定したレコード名のドメイン(ex. app.aletest.run)はエールの接続ドメインとして使用されます。
## ACM証明書の生成及び適用
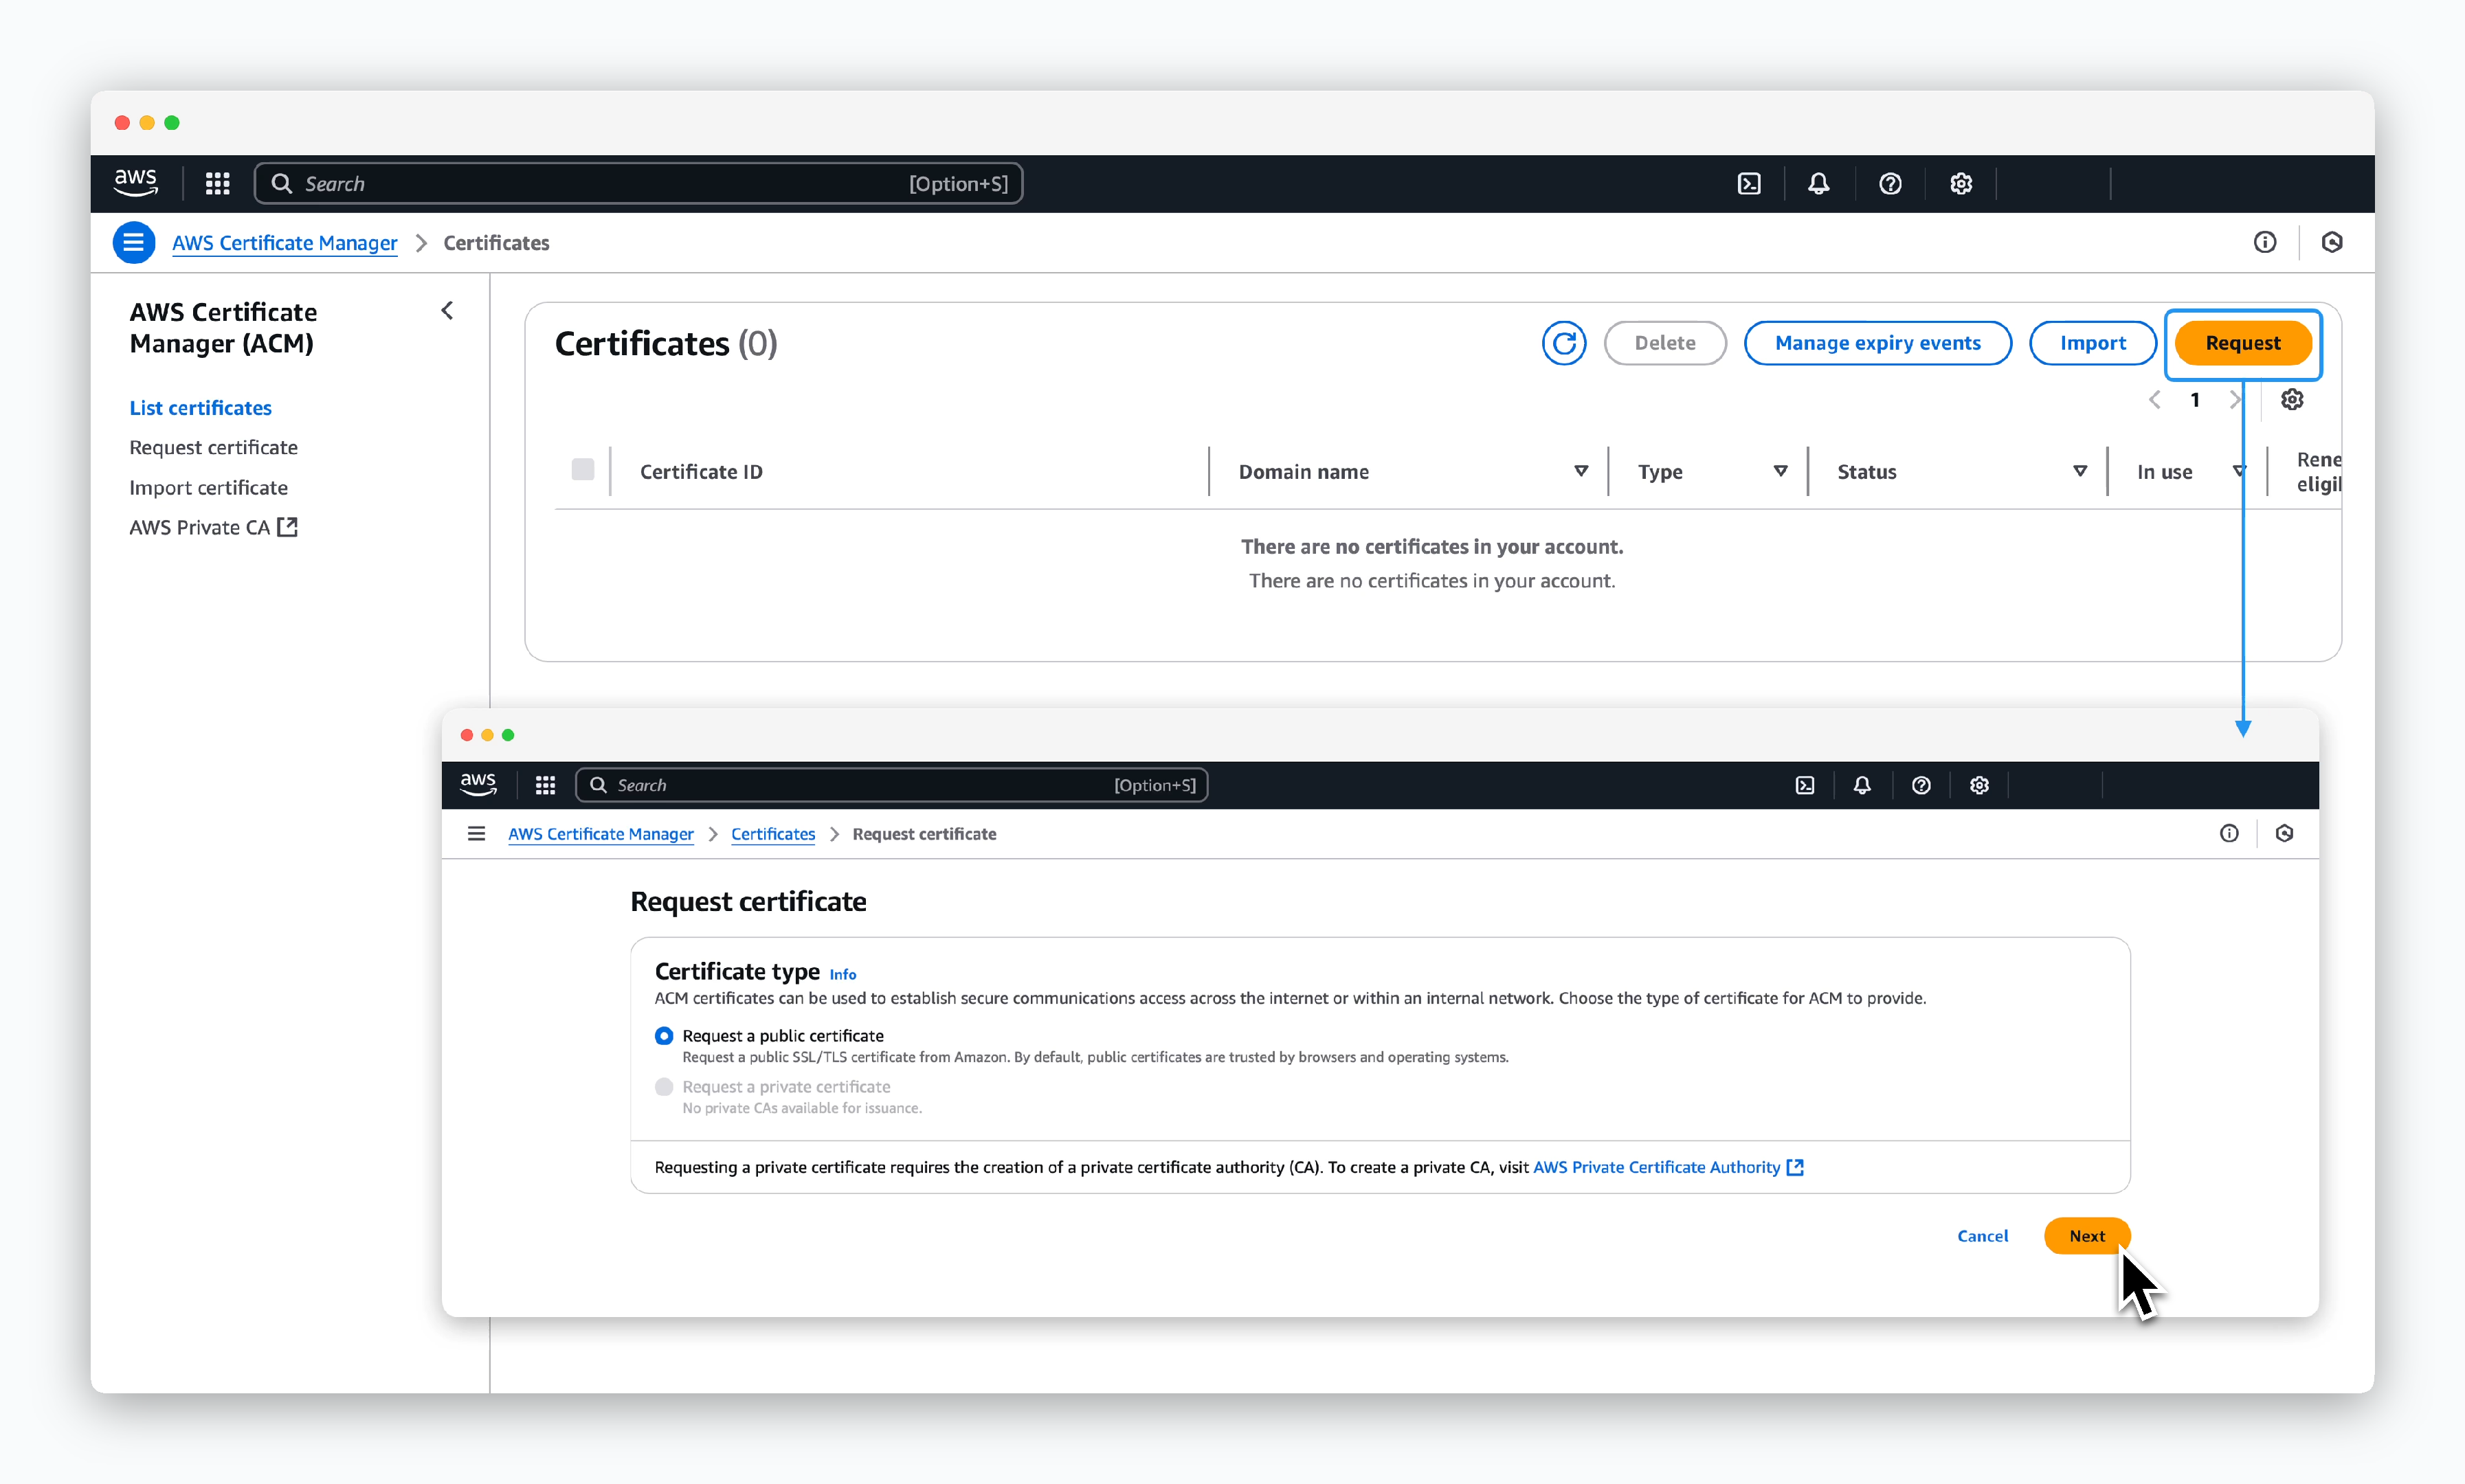 > AWS Certificate Managerダッシュボードで`Request`をクリックし、続く画面でRequest a public certificateを選択し`Next`をクリックしてください。
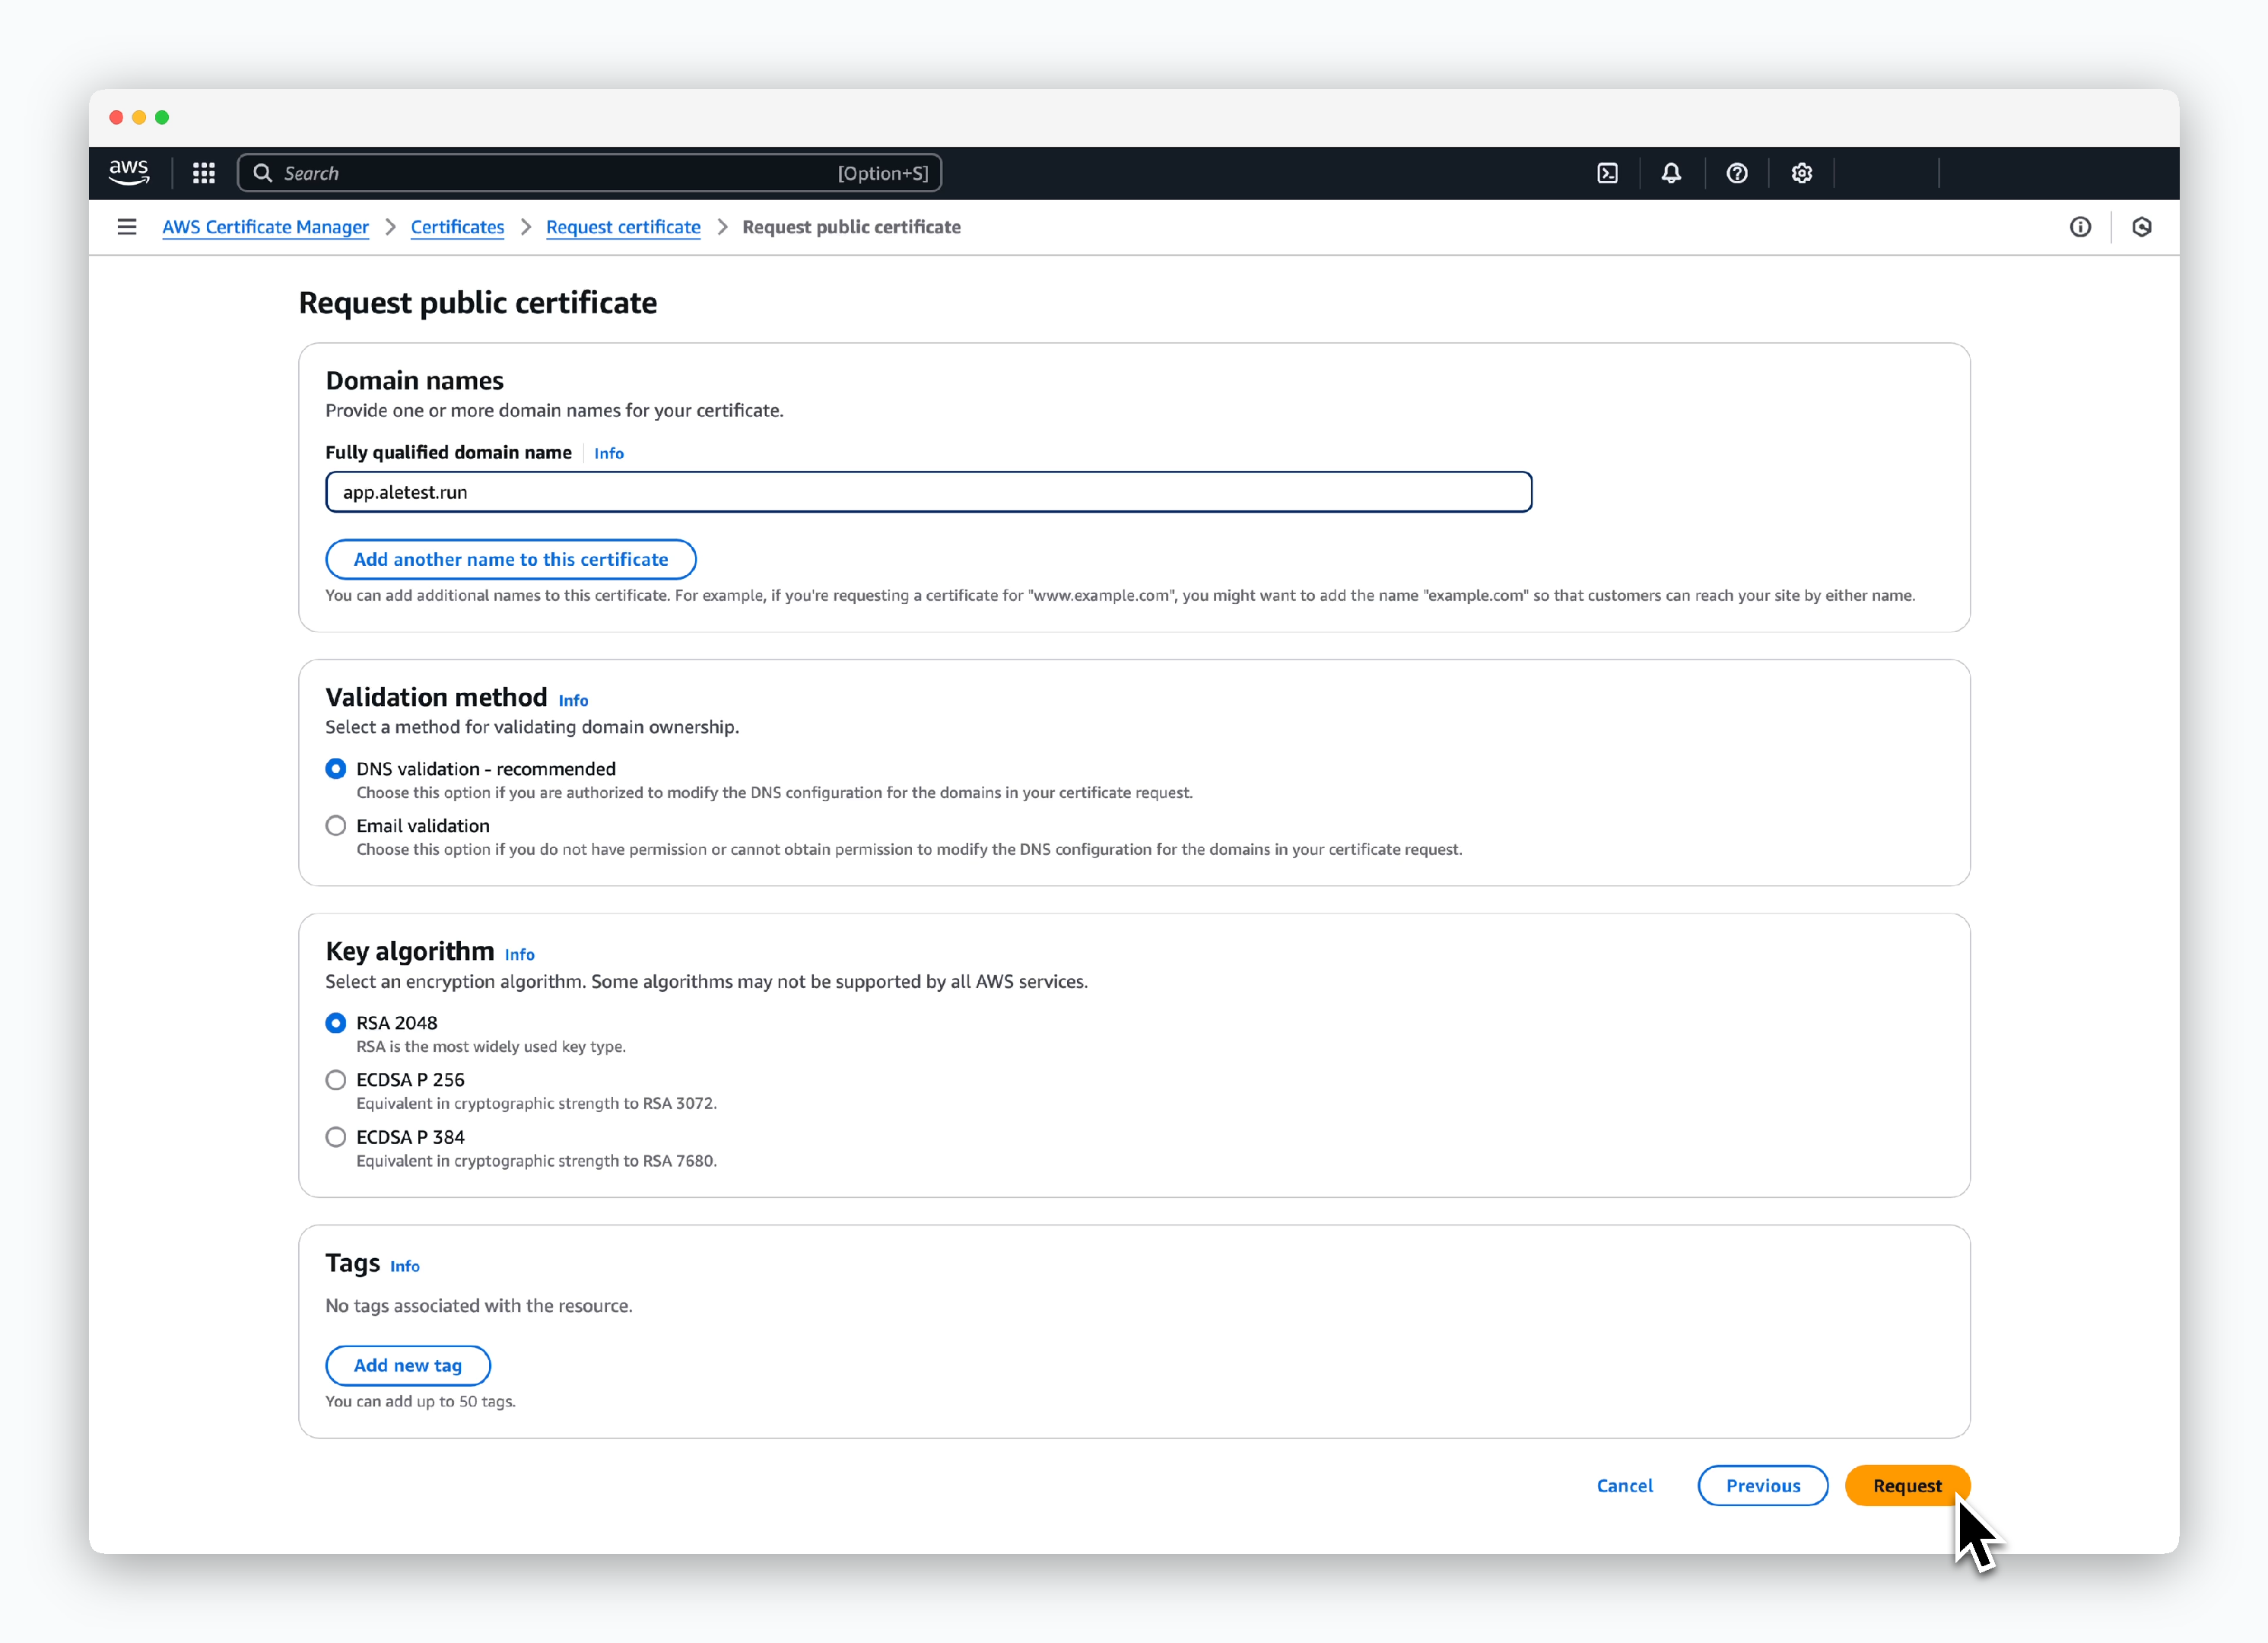 > 証明書情報を次のように入力し、`Request`をクリックしてください。
* Domain names
* Fully qualified domain name: app.\[ドメイン]
* Validation method
* DNS validation
* Key configuration
* RSA 2048
> 証明書情報を次のように入力し、`Request`をクリックしてください。
* Domain names
* Fully qualified domain name: app.\[ドメイン]
* Validation method
* DNS validation
* Key configuration
* RSA 2048
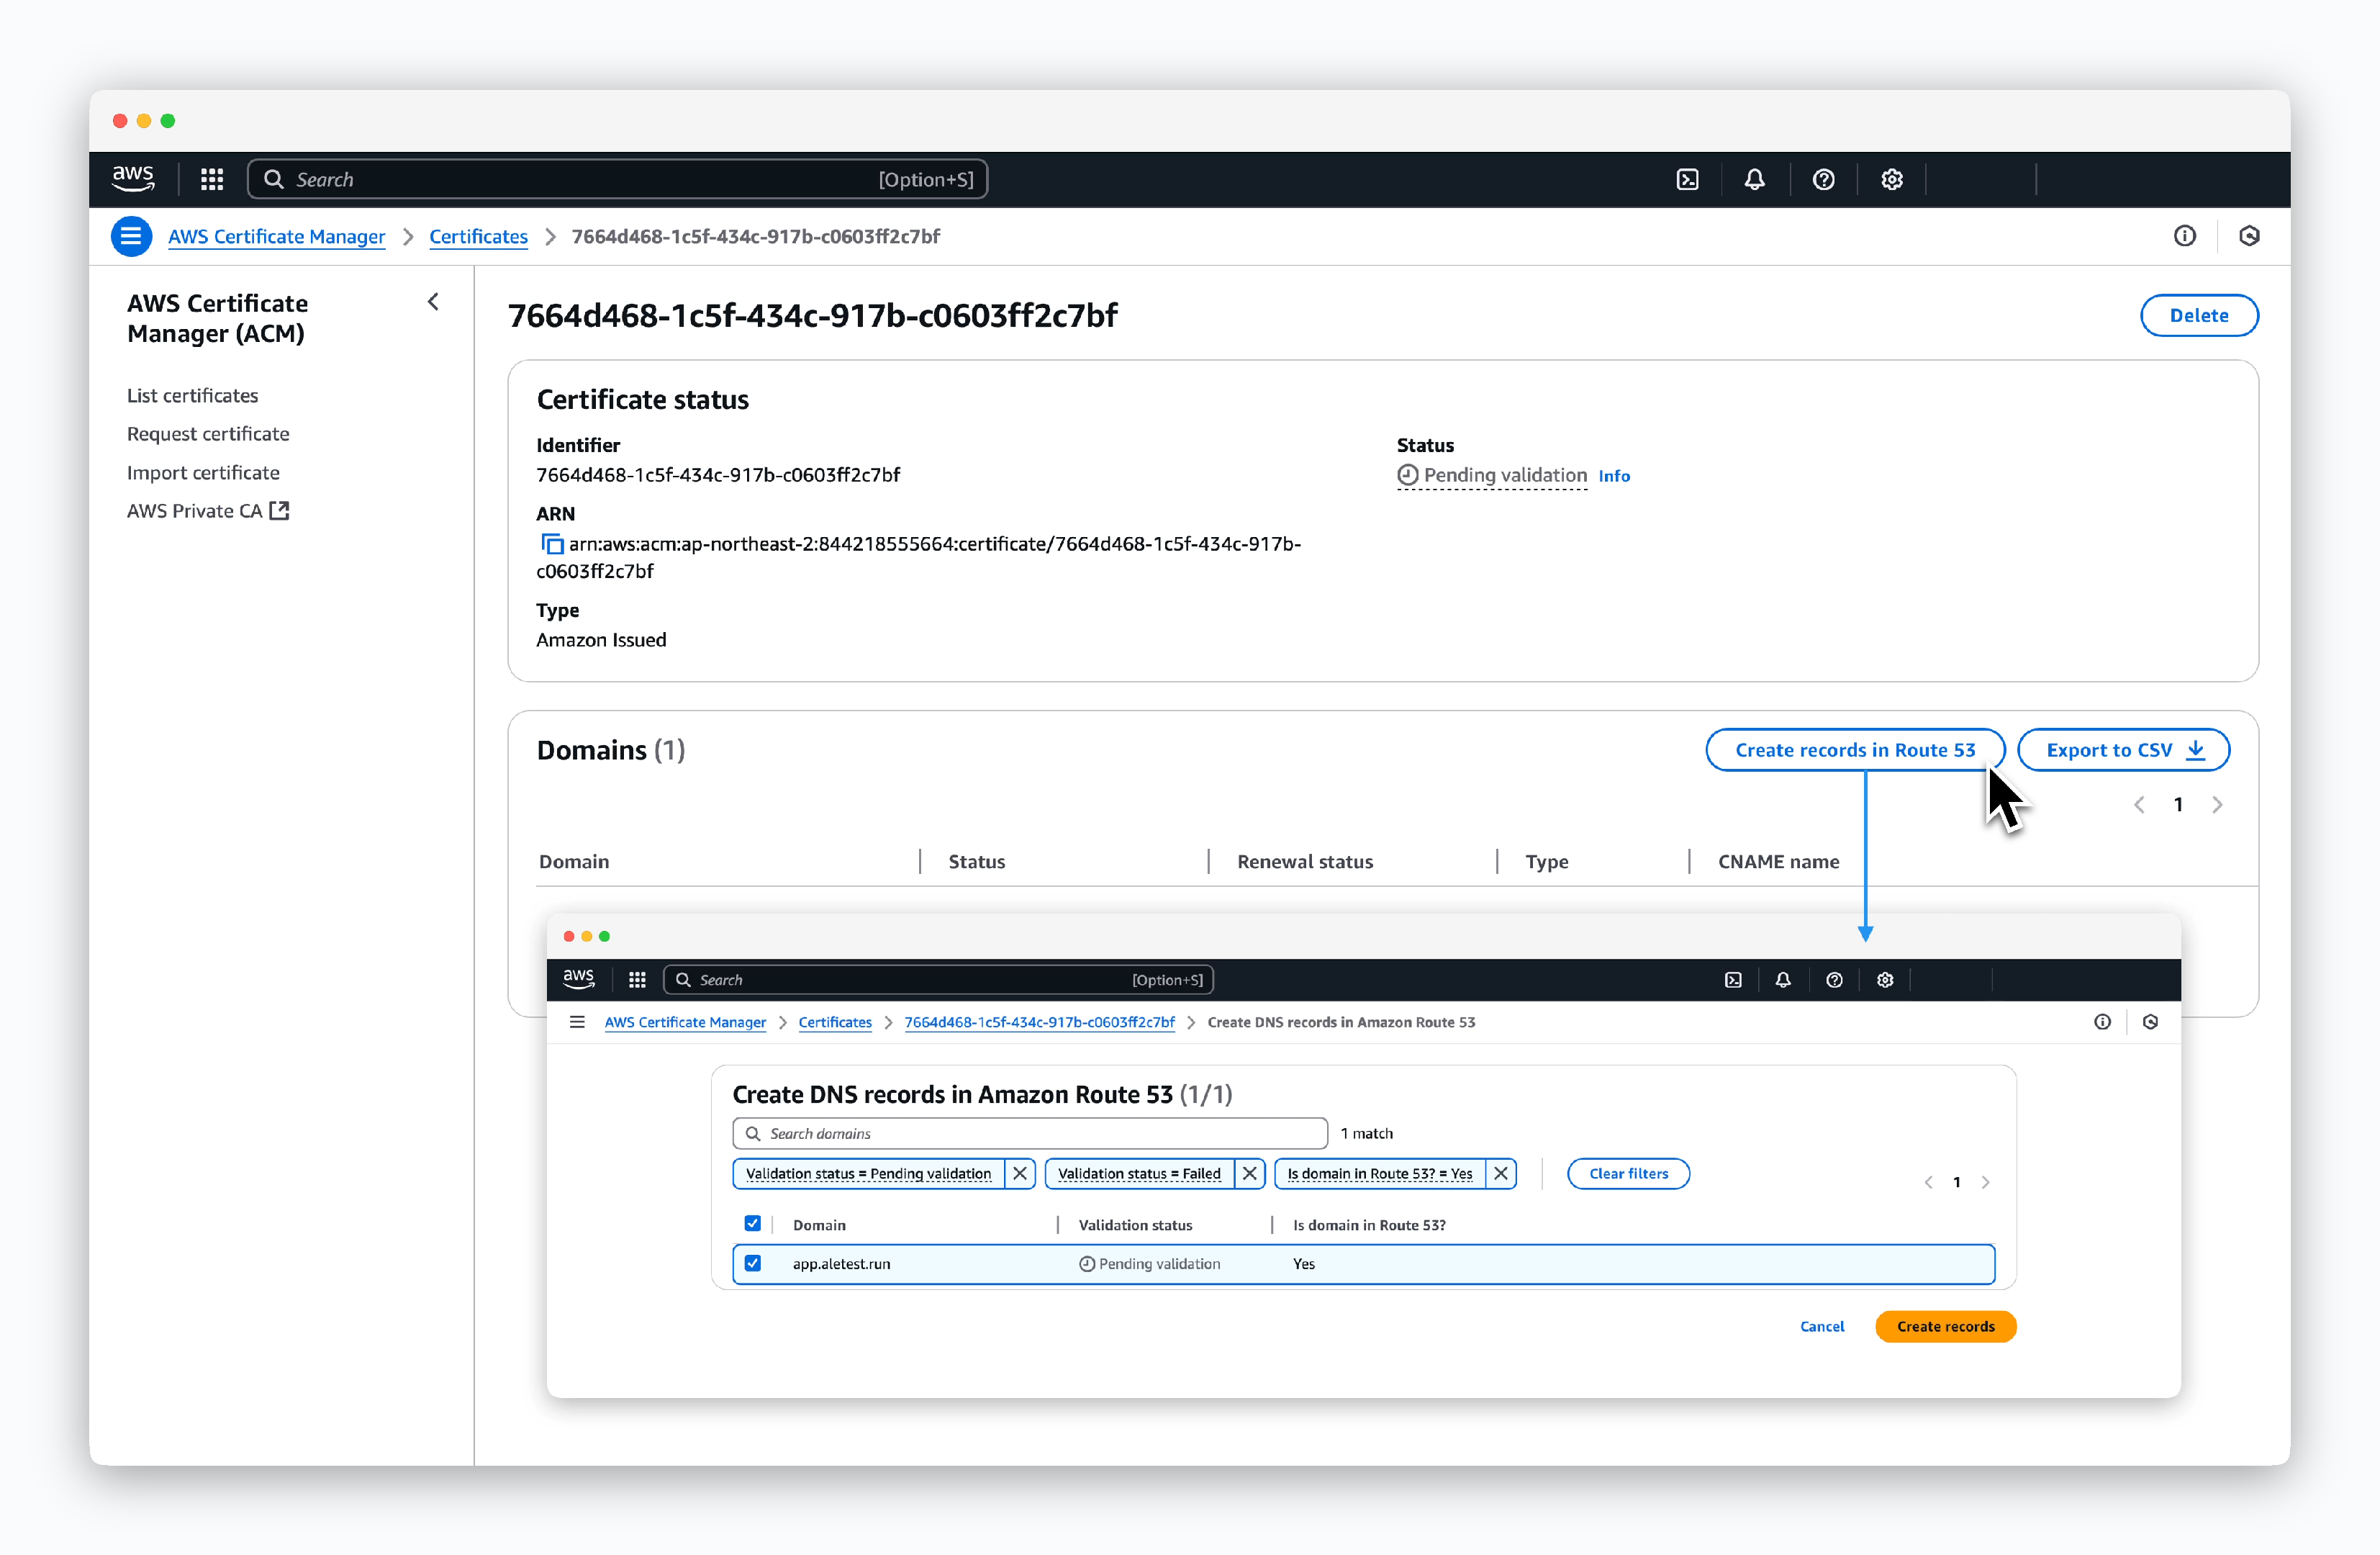 > DNS validationのため生成された証明書ページで`Create record in Route 53`をクリックし、続いて`Create records`をクリックしてください。
## ALB HTTPSリスナー追加
> DNS validationのため生成された証明書ページで`Create record in Route 53`をクリックし、続いて`Create records`をクリックしてください。
## ALB HTTPSリスナー追加
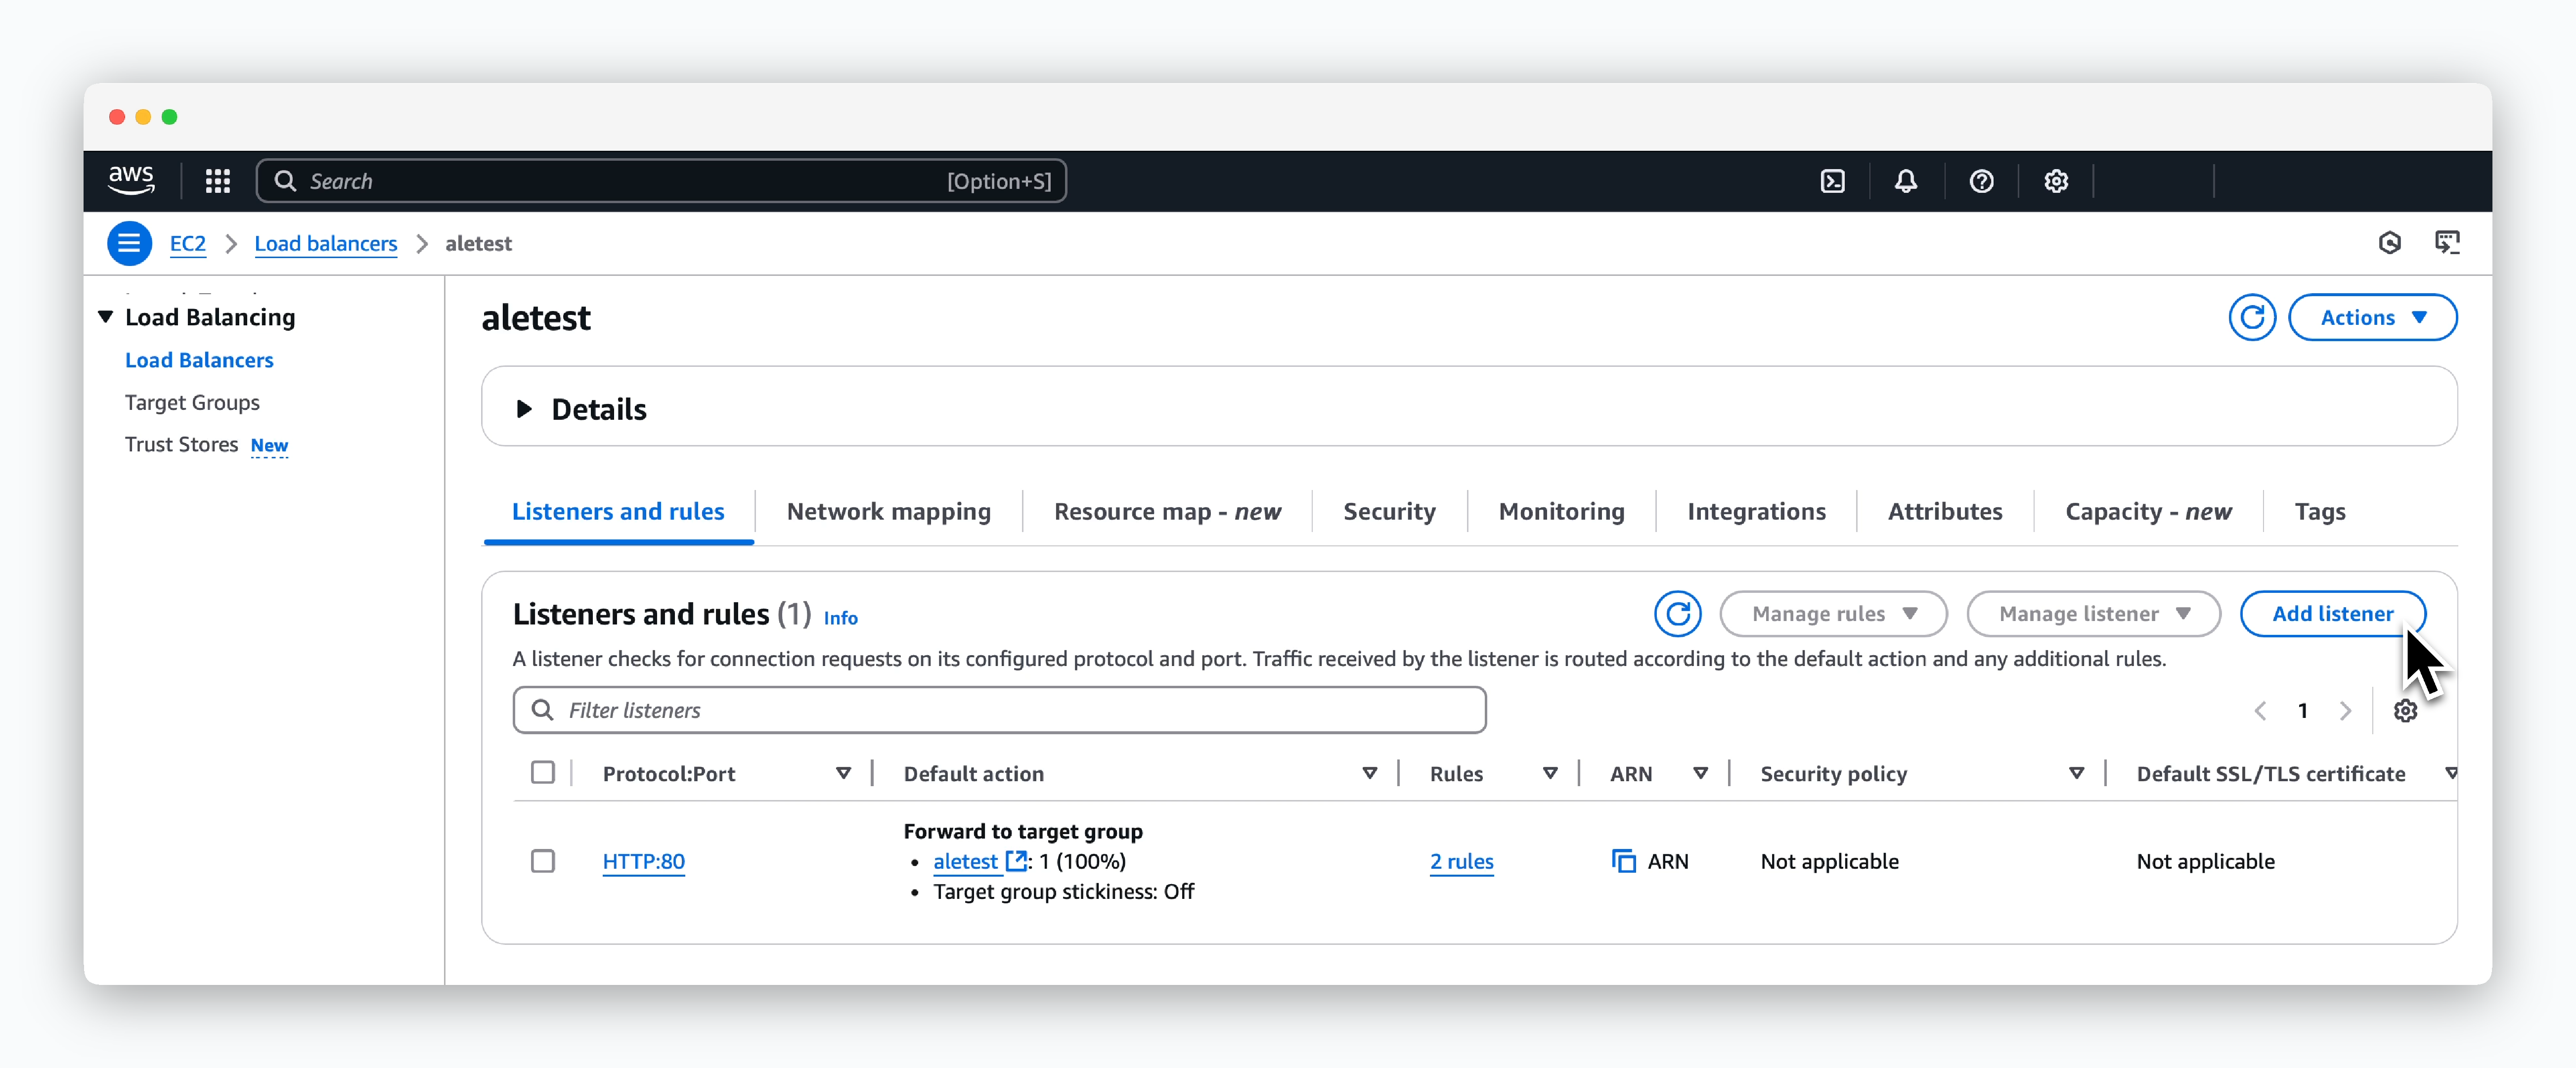 > `EC2 > Load Balancing > Load Balancers`の生成されたLoad balancerページで`Add listener`をクリックしてください。
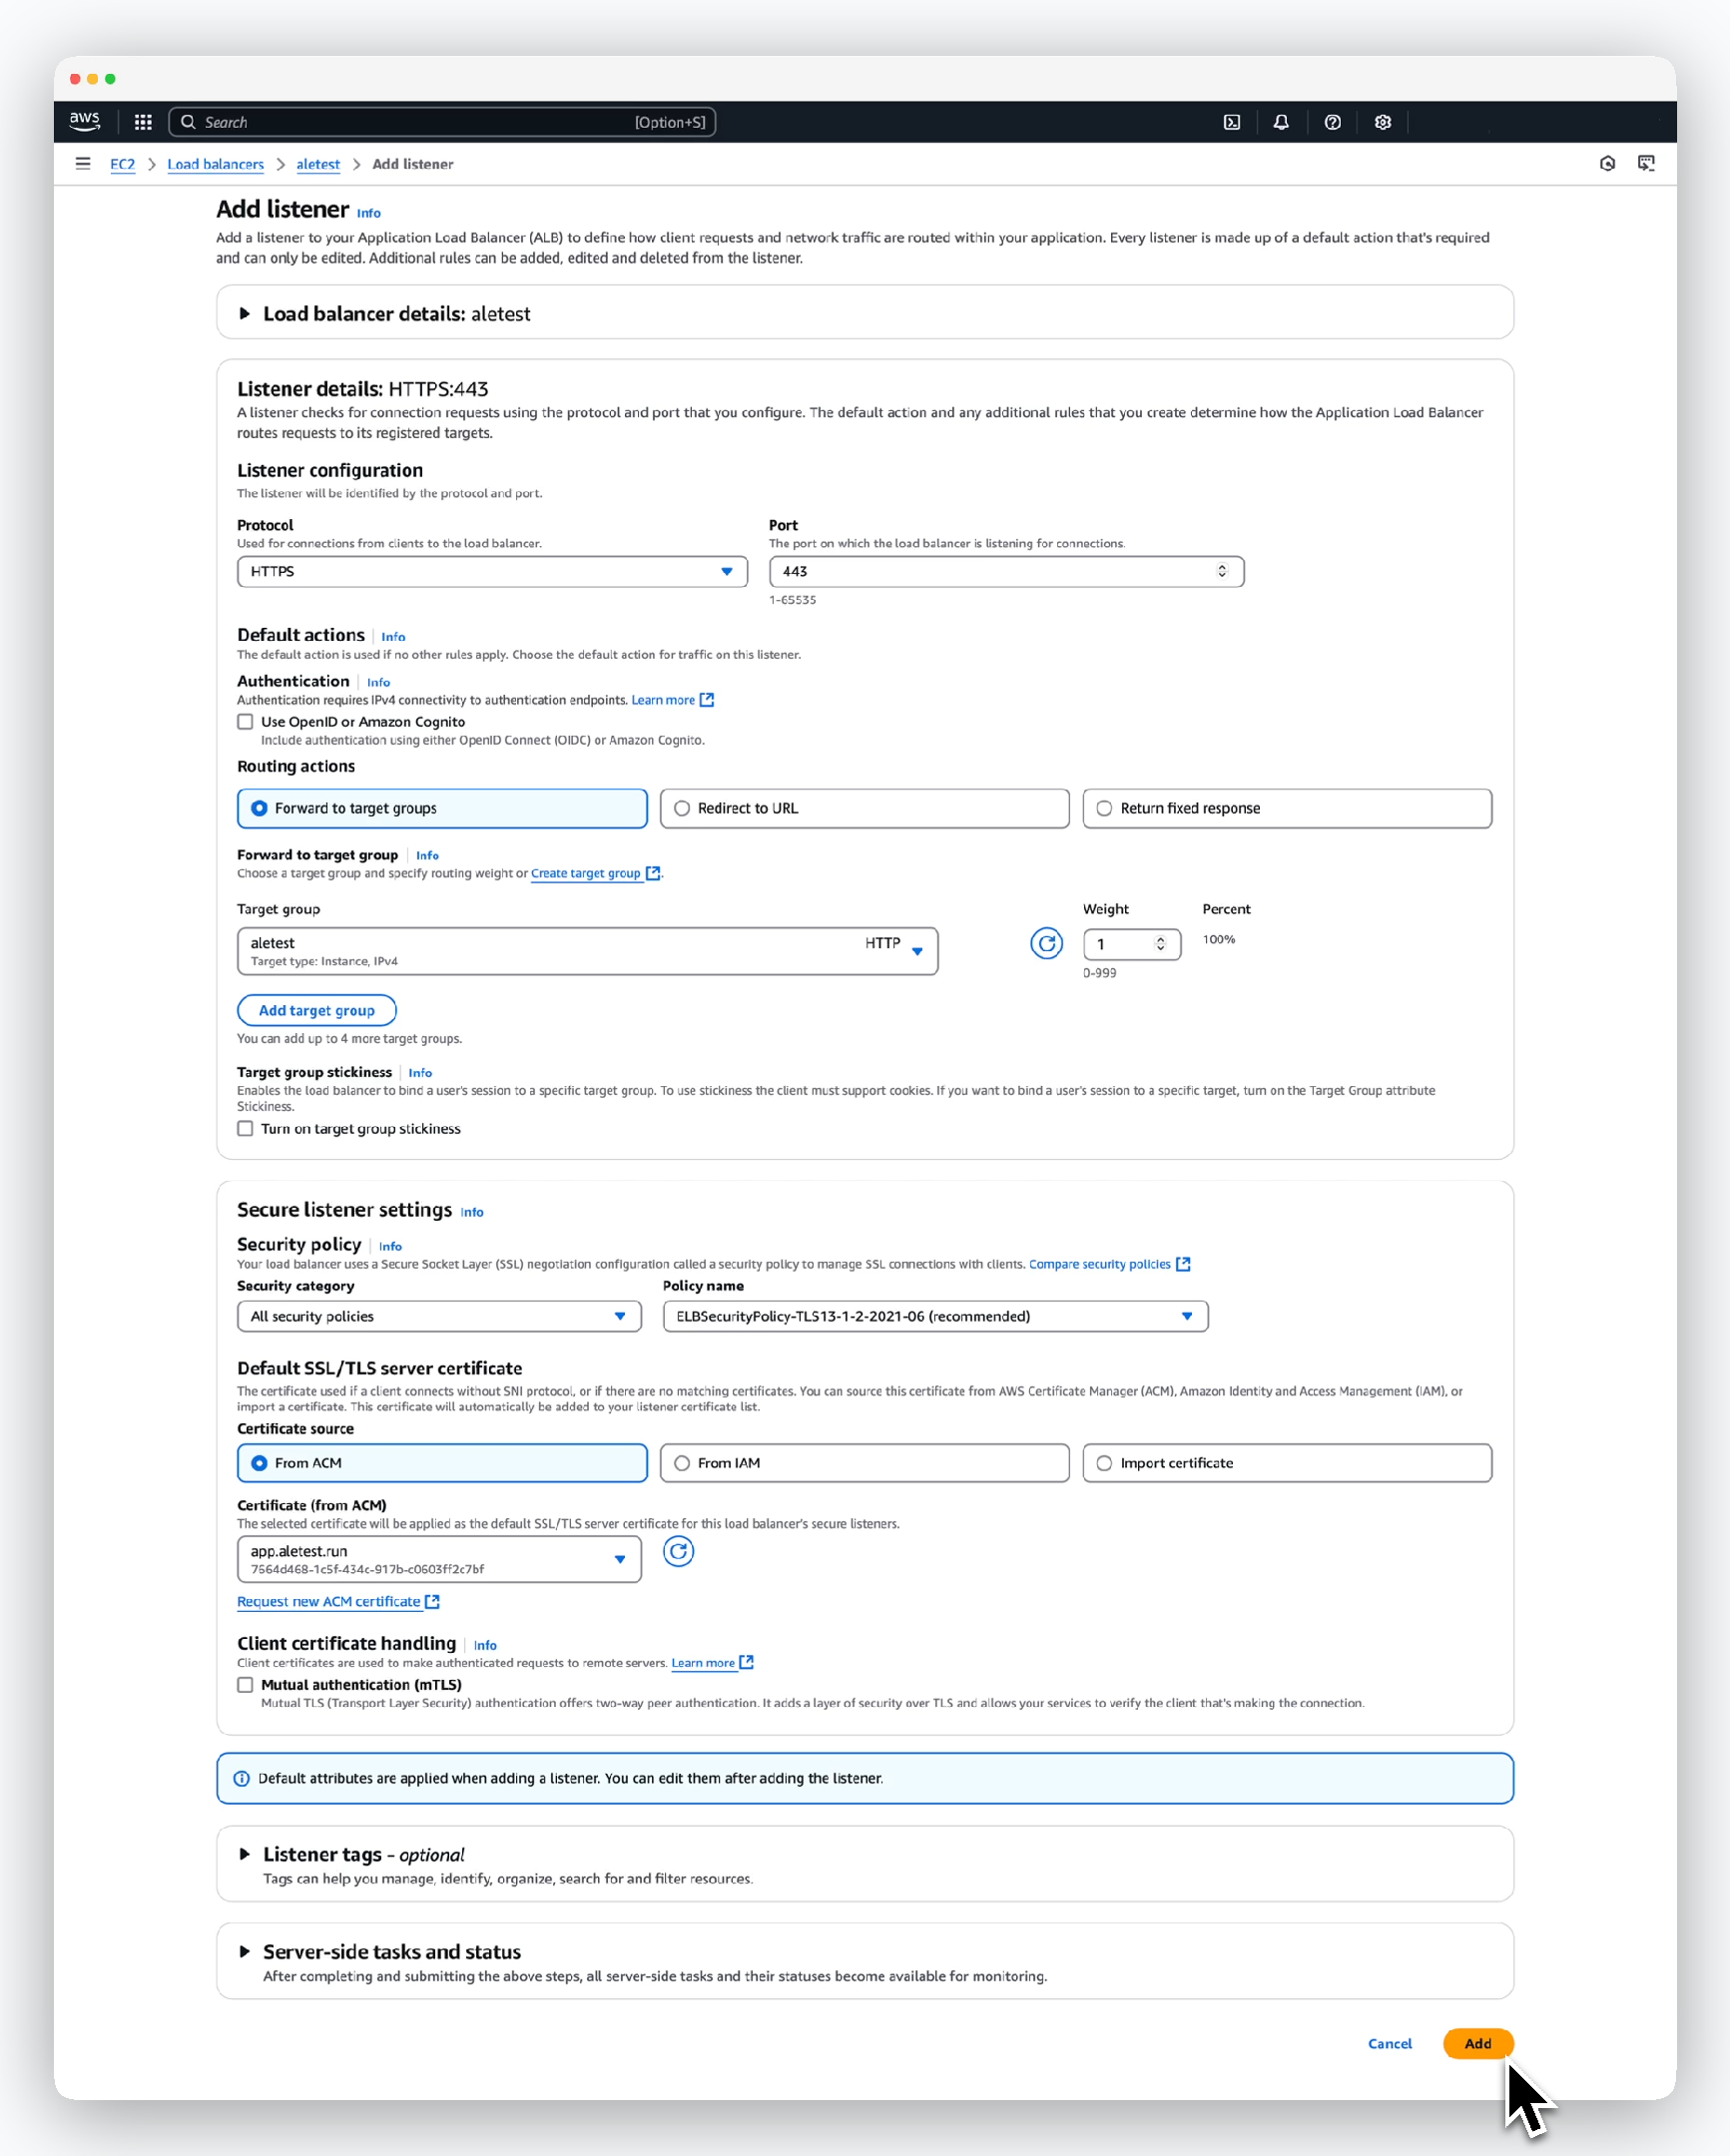 > 続く画面で次のように値を入力し、`Add`をクリックしてください。
* Listener configuration
* Protocol: HTTPS
* Port: 443
* Default actions
* Routing actions: Forward to target groups
* Target group: 前に作成したターゲットグループを選択
* Security Policy
* Security category: All security policies
* Policy name: `recommended`が表示されたポリシーを適用
* Default SSL/TLS server certificate
* Certificate source: From ACM
* Certificate: 前に生成したACM証明書を選択
`https://app.[ドメイン]`にアクセスしてエールに正常に接続できることを確認してください。
> 続く画面で次のように値を入力し、`Add`をクリックしてください。
* Listener configuration
* Protocol: HTTPS
* Port: 443
* Default actions
* Routing actions: Forward to target groups
* Target group: 前に作成したターゲットグループを選択
* Security Policy
* Security category: All security policies
* Policy name: `recommended`が表示されたポリシーを適用
* Default SSL/TLS server certificate
* Certificate source: From ACM
* Certificate: 前に生成したACM証明書を選択
`https://app.[ドメイン]`にアクセスしてエールに正常に接続できることを確認してください。
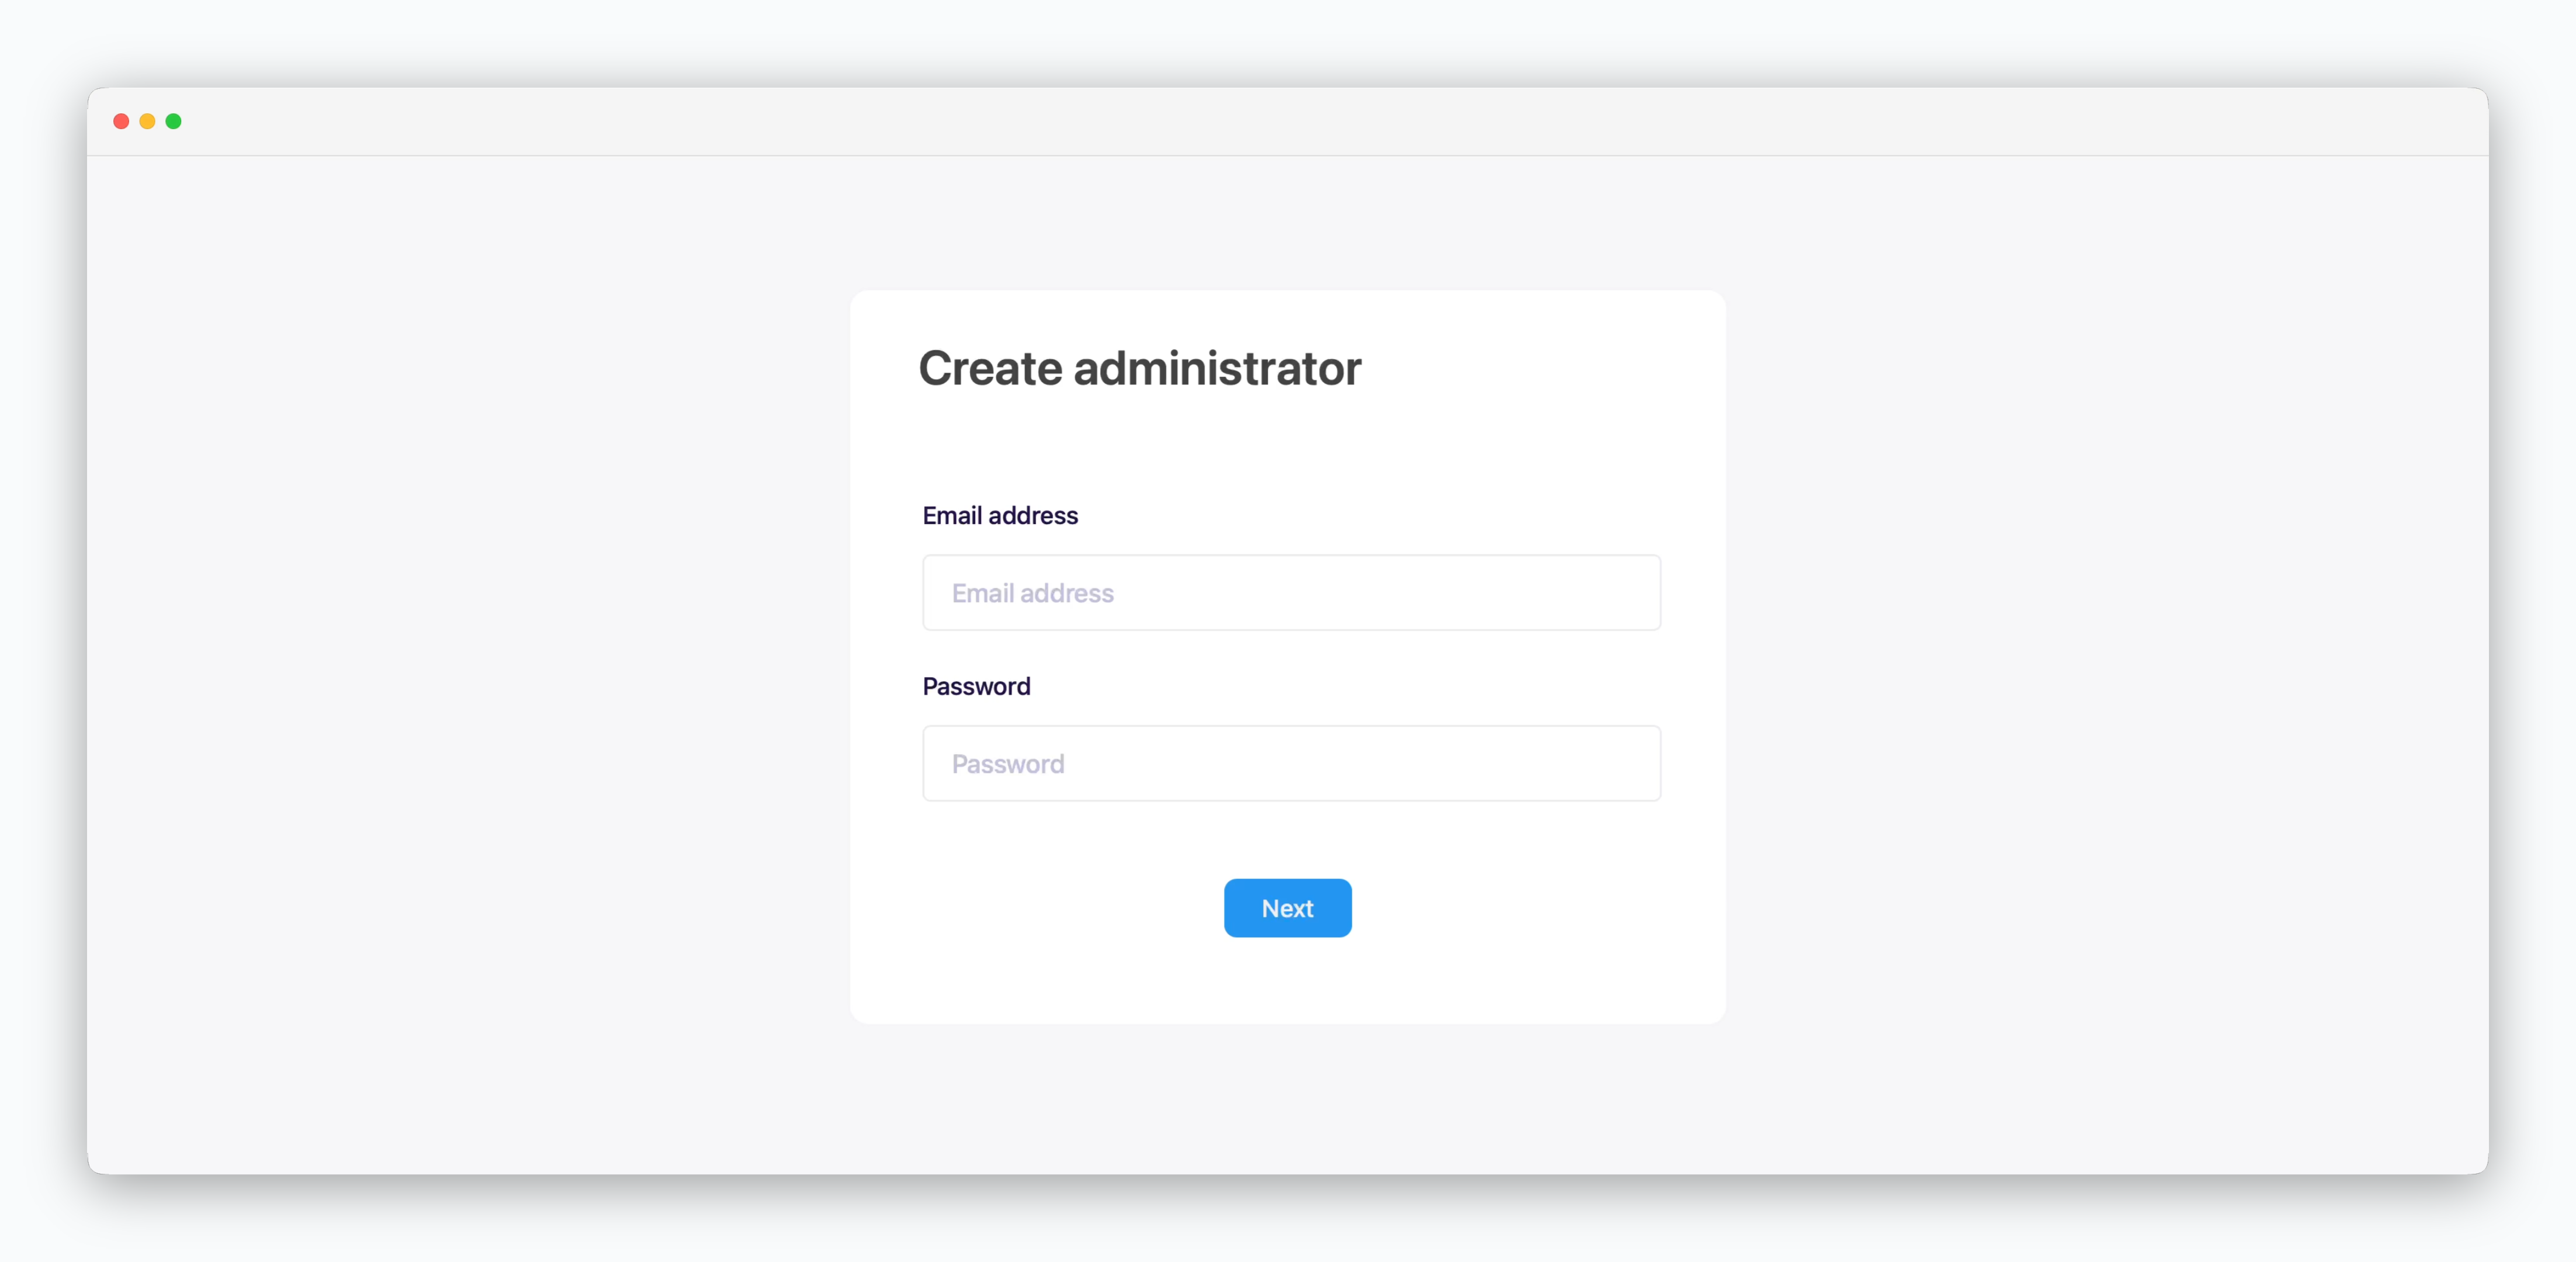 正常な使用のため、続くイングレス構成プロセスが必要です。