> ## Documentation Index
> Fetch the complete documentation index at: https://docs.ale.run/llms.txt
> Use this file to discover all available pages before exploring further.
# 멀티 클러스터 추가 및 관리
> `ale`에 클러스터를 추가로 등록하고 관리할 수 있습니다.
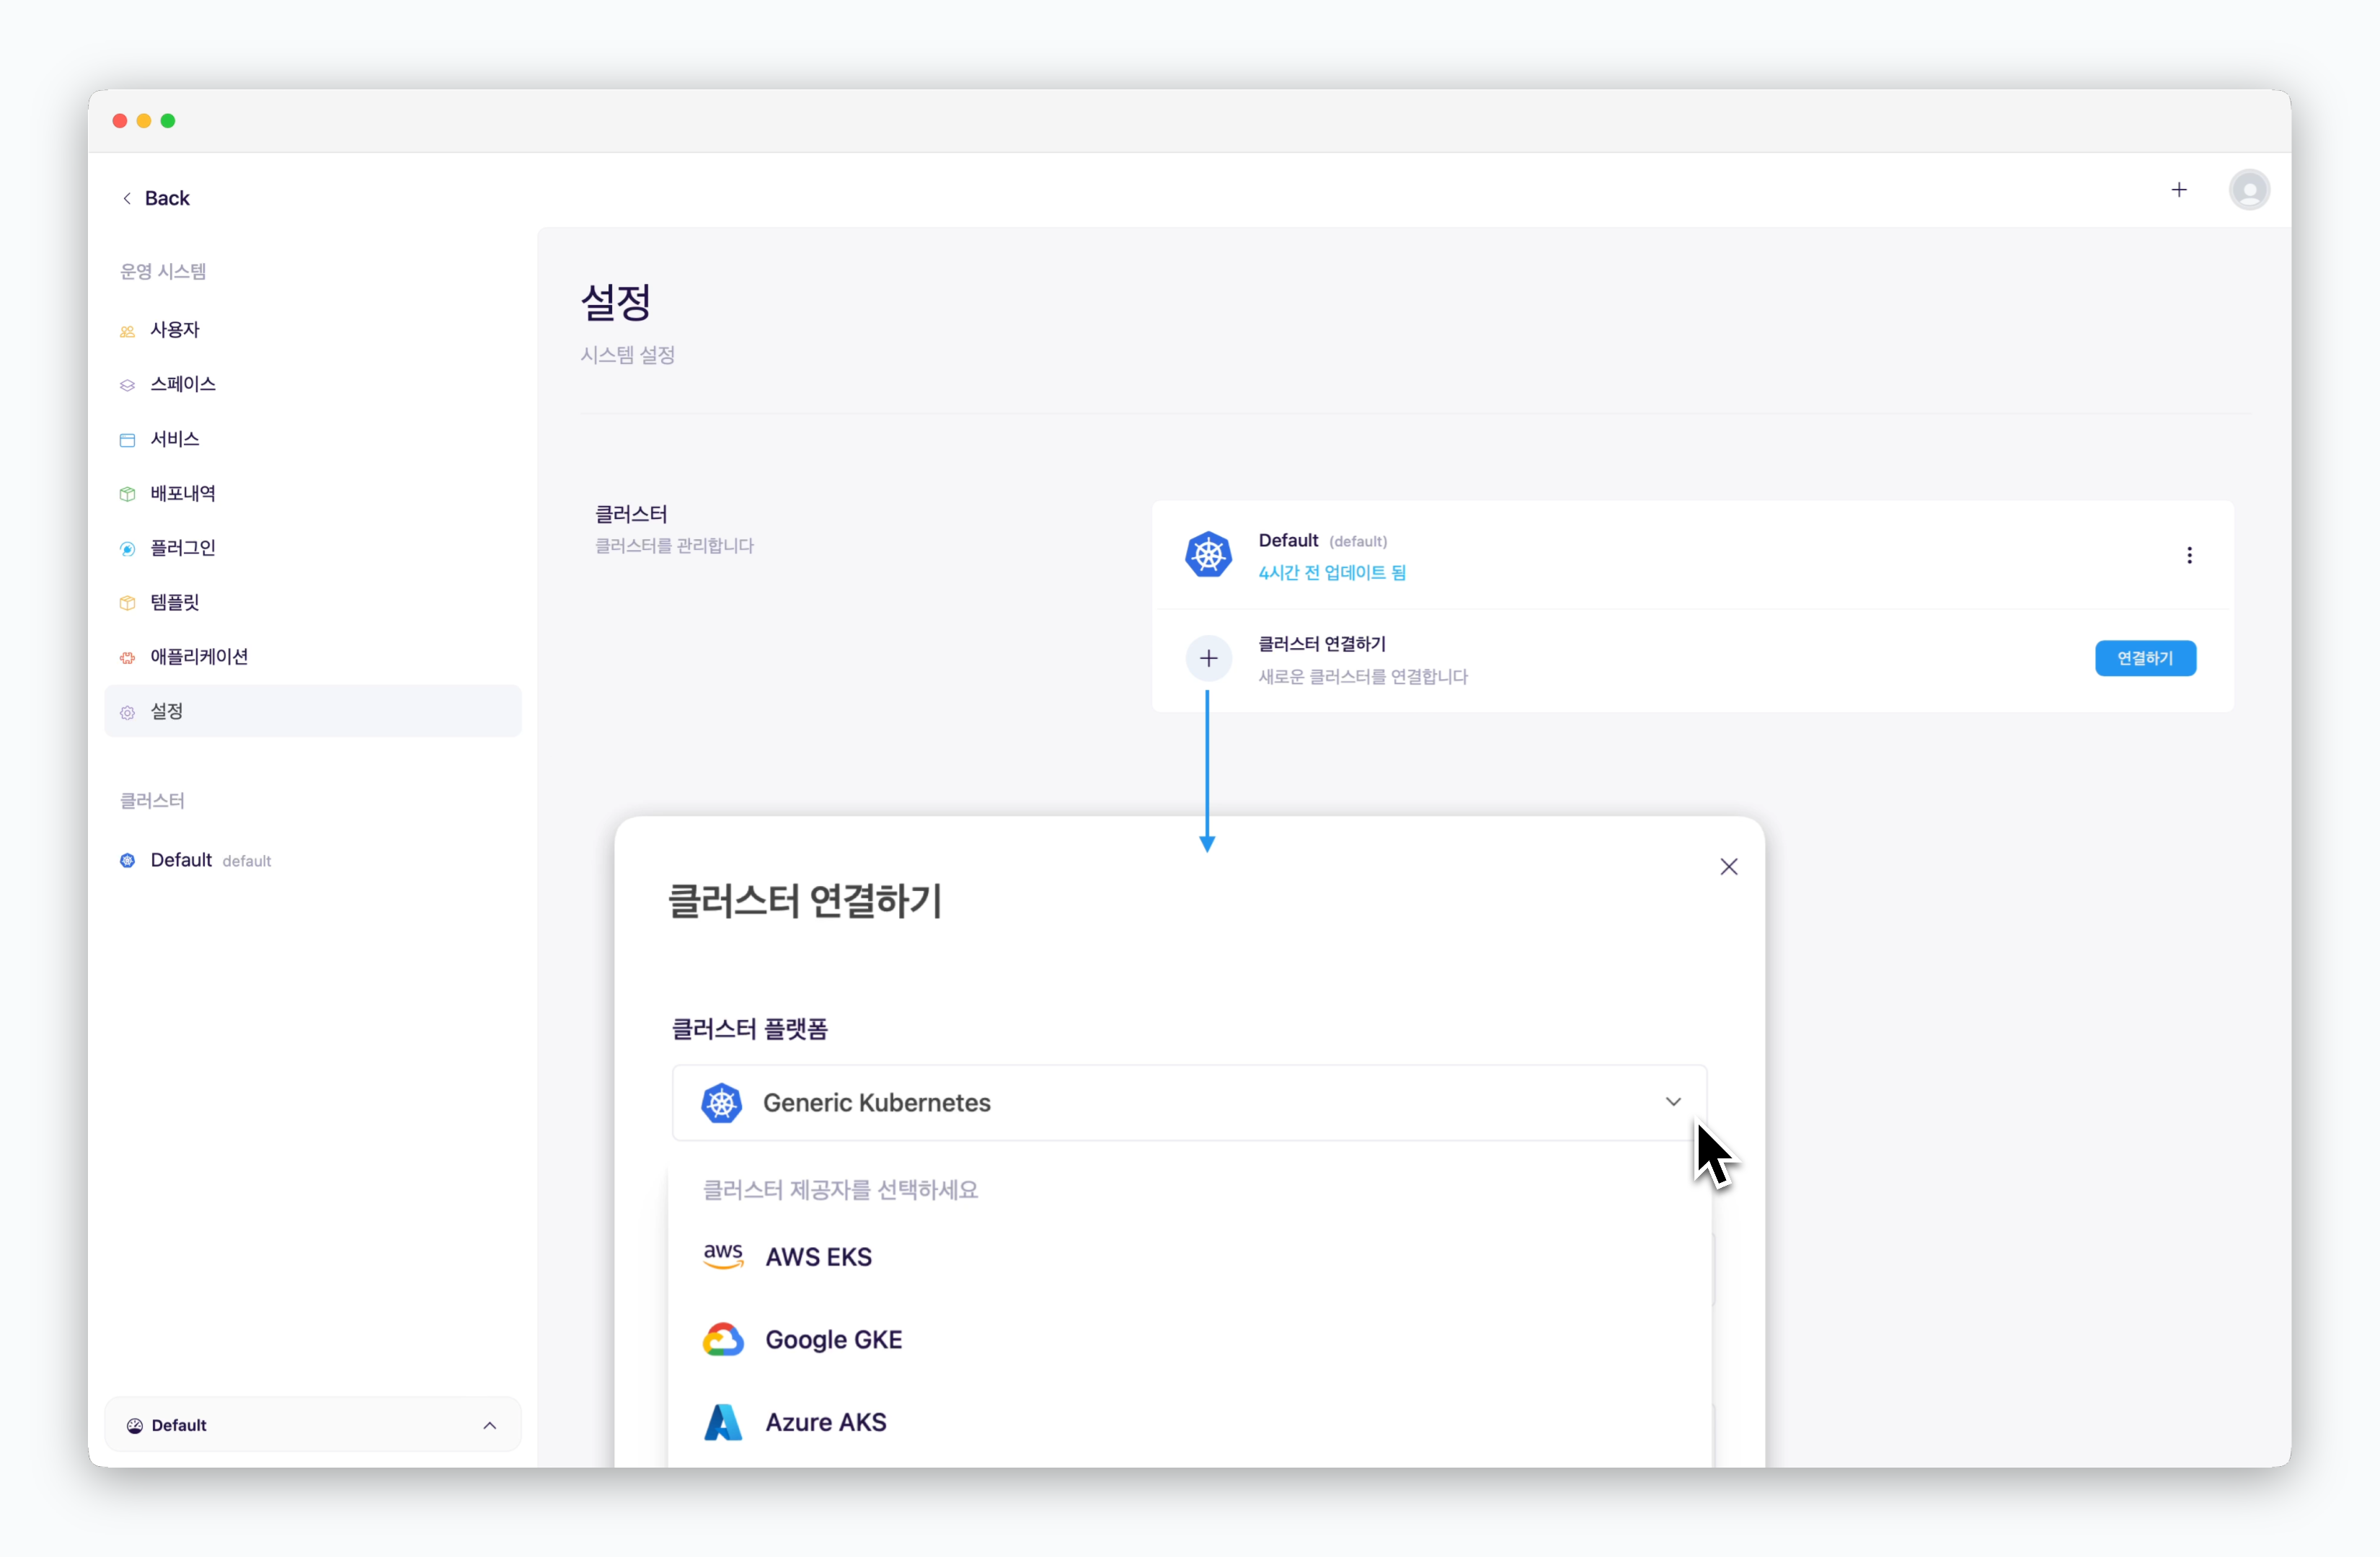 > `ale` 은 주요 CSP의 Kubernetes 클러스터 뿐만 아니라 Generic 형태의 클러스터 연결도 모두 지원합니다. 에이전트를 실행하는 방식에 따라 다음과 같이 클러스터를 추가로 등록하고 관리할 수 있습니다.
## Node로 실행
AWS EC2에서 ale을 실행하는 경우 아래를 참고해 ale-run 패키지를 설치하기 전까지의 과정까지 진행하세요.
* [AWS EC2에 ale 설치하기](/ko/setup/ec2/01_ec2-prerequisite)
```bash theme={null}
mkdir ale-run
cd ale-run
```
```bash theme={null}
npm i @ale-run/runtime@latest
```
```bash theme={null}
pm2 start "npx aled agent -c [Kubernetes 클러스터명]" --name "ale-agent" --watch
```
```bash theme={null}
pm2 log ale-agent
```
```bash theme={null}
...
0|ale-agent | [INFO] [runtime:init] using embedded mongodb "mongodb://127.0.0.1:27017/ale" at "/home/ubuntu/.ale/mongodb"
0|ale-agent | [INFO] [runtime:init] using cluster: default
0|ale-agent | [INFO] [k8s] KubernetesClusterDriver initialized with agent {"connection":{"context":"default","namespace":"ale"},"stat":{"db":{"url":"mongodb://127.0.0.1:27017/","dbName":"ale"}}}
0|ale-agent | [INFO] [k8s] ConfigContext initialized with {"connection":{"context":"default","namespace":"ale"},"stat":{"db":{"url":"mongodb://127.0.0.1:27017/","dbName":"ale"}}}
0|ale-agent | [INFO] [k8s] connect k8s to "default"
0|ale-agent | [INFO] [k8s] [agent] cluster agent initialized
0|ale-agent | [INFO] [runtime:agent] Ale Agent is initialized with config
0|ale-agent | [INFO] [agent-server] token loaded from secret "ale/agent-secrets"
0|ale-agent | [INFO] [runtime:init] agent httpsd is listening at 0.0.0.0:9801
0|ale-agent | [INFO] [runtime:init] agent token is cat-c5a7cea7b25709a0863ac64a80155d46.930d450e5893040b54820c83
0|ale-agent | [INFO] [k8s] config loaded from cluster from "ale/agent-config"
0|ale-agent | [INFO] [stat] stat controller init {"collector":{"prefix":"ale"},"db":{"url":"mongodb://127.0.0.1:27017/","dbName":"ale"},"connection":{"context":"default","namespace":"ale"}}
0|ale-agent | [INFO] [stat] connect k8s to "default"
0|ale-agent | [INFO] [stat] stat watcher started
```
실행 중 데이터베이스 충돌이 발생하거나 설정을 초기화 하려는 경우, 다음의 명령을 입력하여 기존에 생성된 ale 데이터를 삭제 후 재실행하세요.
```bash theme={null}
rm -r ~/.ale
```
> `ale` 은 주요 CSP의 Kubernetes 클러스터 뿐만 아니라 Generic 형태의 클러스터 연결도 모두 지원합니다. 에이전트를 실행하는 방식에 따라 다음과 같이 클러스터를 추가로 등록하고 관리할 수 있습니다.
## Node로 실행
AWS EC2에서 ale을 실행하는 경우 아래를 참고해 ale-run 패키지를 설치하기 전까지의 과정까지 진행하세요.
* [AWS EC2에 ale 설치하기](/ko/setup/ec2/01_ec2-prerequisite)
```bash theme={null}
mkdir ale-run
cd ale-run
```
```bash theme={null}
npm i @ale-run/runtime@latest
```
```bash theme={null}
pm2 start "npx aled agent -c [Kubernetes 클러스터명]" --name "ale-agent" --watch
```
```bash theme={null}
pm2 log ale-agent
```
```bash theme={null}
...
0|ale-agent | [INFO] [runtime:init] using embedded mongodb "mongodb://127.0.0.1:27017/ale" at "/home/ubuntu/.ale/mongodb"
0|ale-agent | [INFO] [runtime:init] using cluster: default
0|ale-agent | [INFO] [k8s] KubernetesClusterDriver initialized with agent {"connection":{"context":"default","namespace":"ale"},"stat":{"db":{"url":"mongodb://127.0.0.1:27017/","dbName":"ale"}}}
0|ale-agent | [INFO] [k8s] ConfigContext initialized with {"connection":{"context":"default","namespace":"ale"},"stat":{"db":{"url":"mongodb://127.0.0.1:27017/","dbName":"ale"}}}
0|ale-agent | [INFO] [k8s] connect k8s to "default"
0|ale-agent | [INFO] [k8s] [agent] cluster agent initialized
0|ale-agent | [INFO] [runtime:agent] Ale Agent is initialized with config
0|ale-agent | [INFO] [agent-server] token loaded from secret "ale/agent-secrets"
0|ale-agent | [INFO] [runtime:init] agent httpsd is listening at 0.0.0.0:9801
0|ale-agent | [INFO] [runtime:init] agent token is cat-c5a7cea7b25709a0863ac64a80155d46.930d450e5893040b54820c83
0|ale-agent | [INFO] [k8s] config loaded from cluster from "ale/agent-config"
0|ale-agent | [INFO] [stat] stat controller init {"collector":{"prefix":"ale"},"db":{"url":"mongodb://127.0.0.1:27017/","dbName":"ale"},"connection":{"context":"default","namespace":"ale"}}
0|ale-agent | [INFO] [stat] connect k8s to "default"
0|ale-agent | [INFO] [stat] stat watcher started
```
실행 중 데이터베이스 충돌이 발생하거나 설정을 초기화 하려는 경우, 다음의 명령을 입력하여 기존에 생성된 ale 데이터를 삭제 후 재실행하세요.
```bash theme={null}
rm -r ~/.ale
```
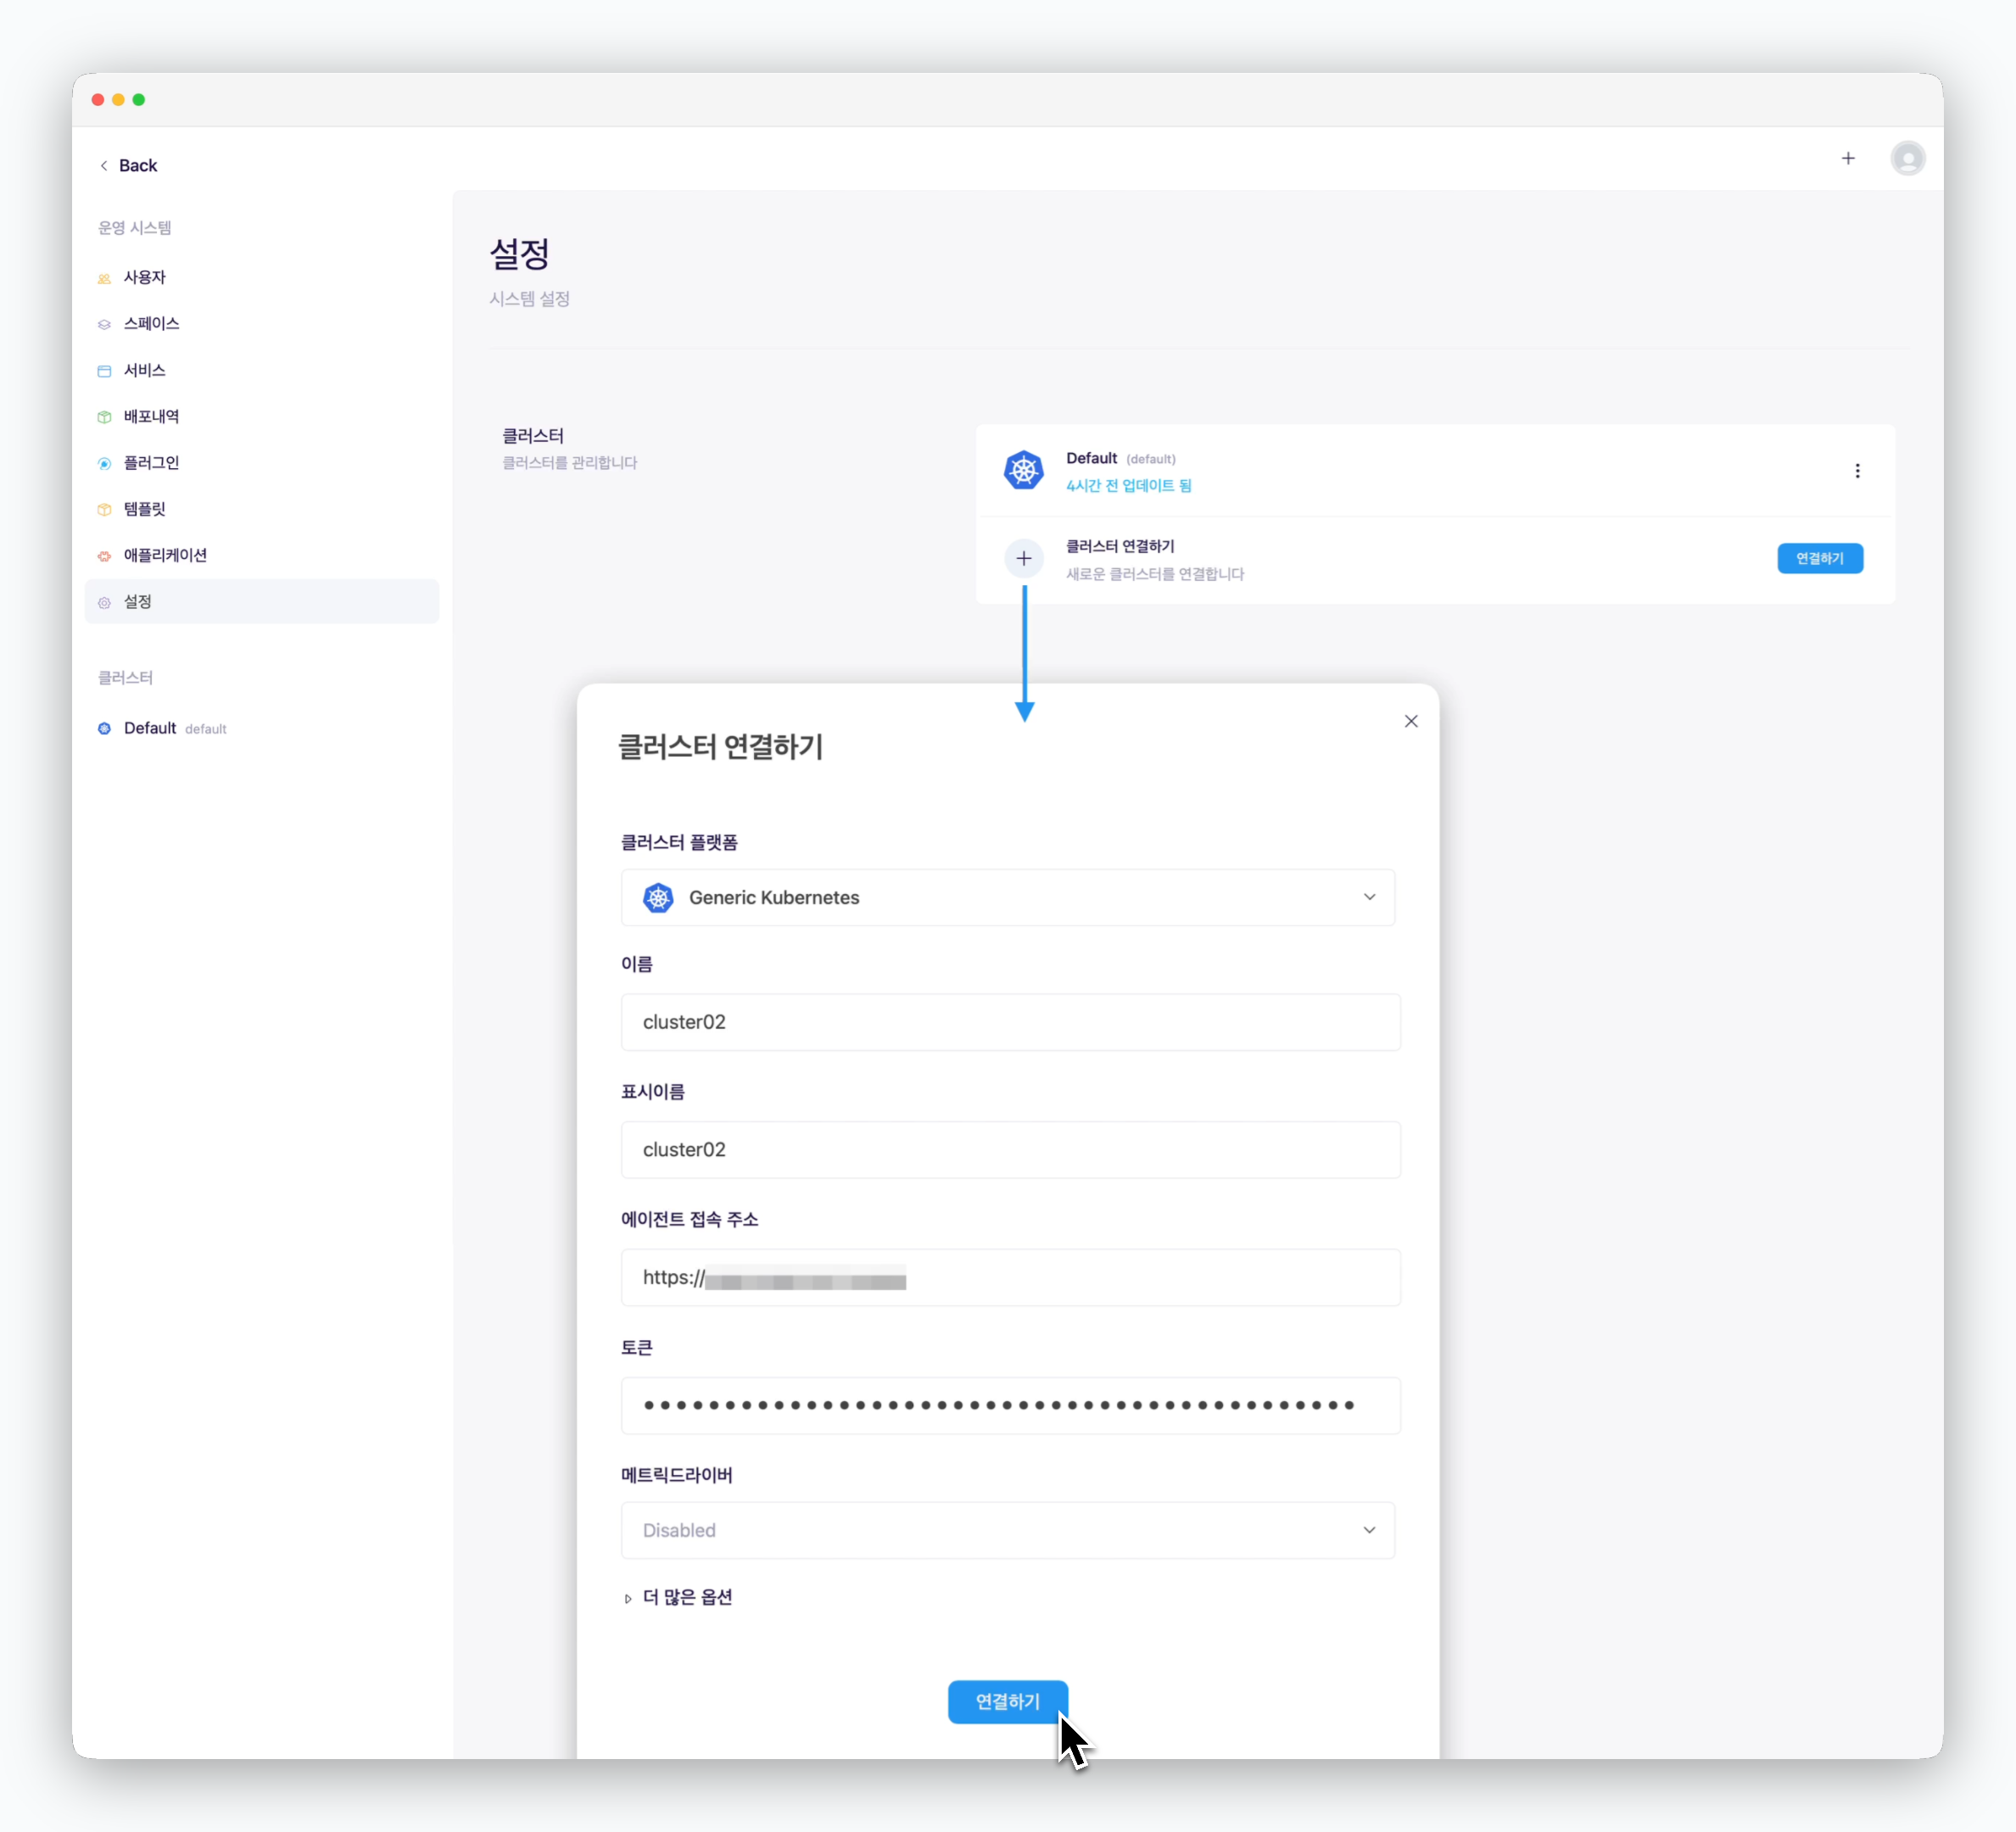 * **클러스터 플랫폼** : Generic Kubernetes
* **이름, 표시명** : 대시보드에 표시될 이름
* **에이전트 접속 주소**
* **토큰** : 전 과정에서 조회한 토큰값
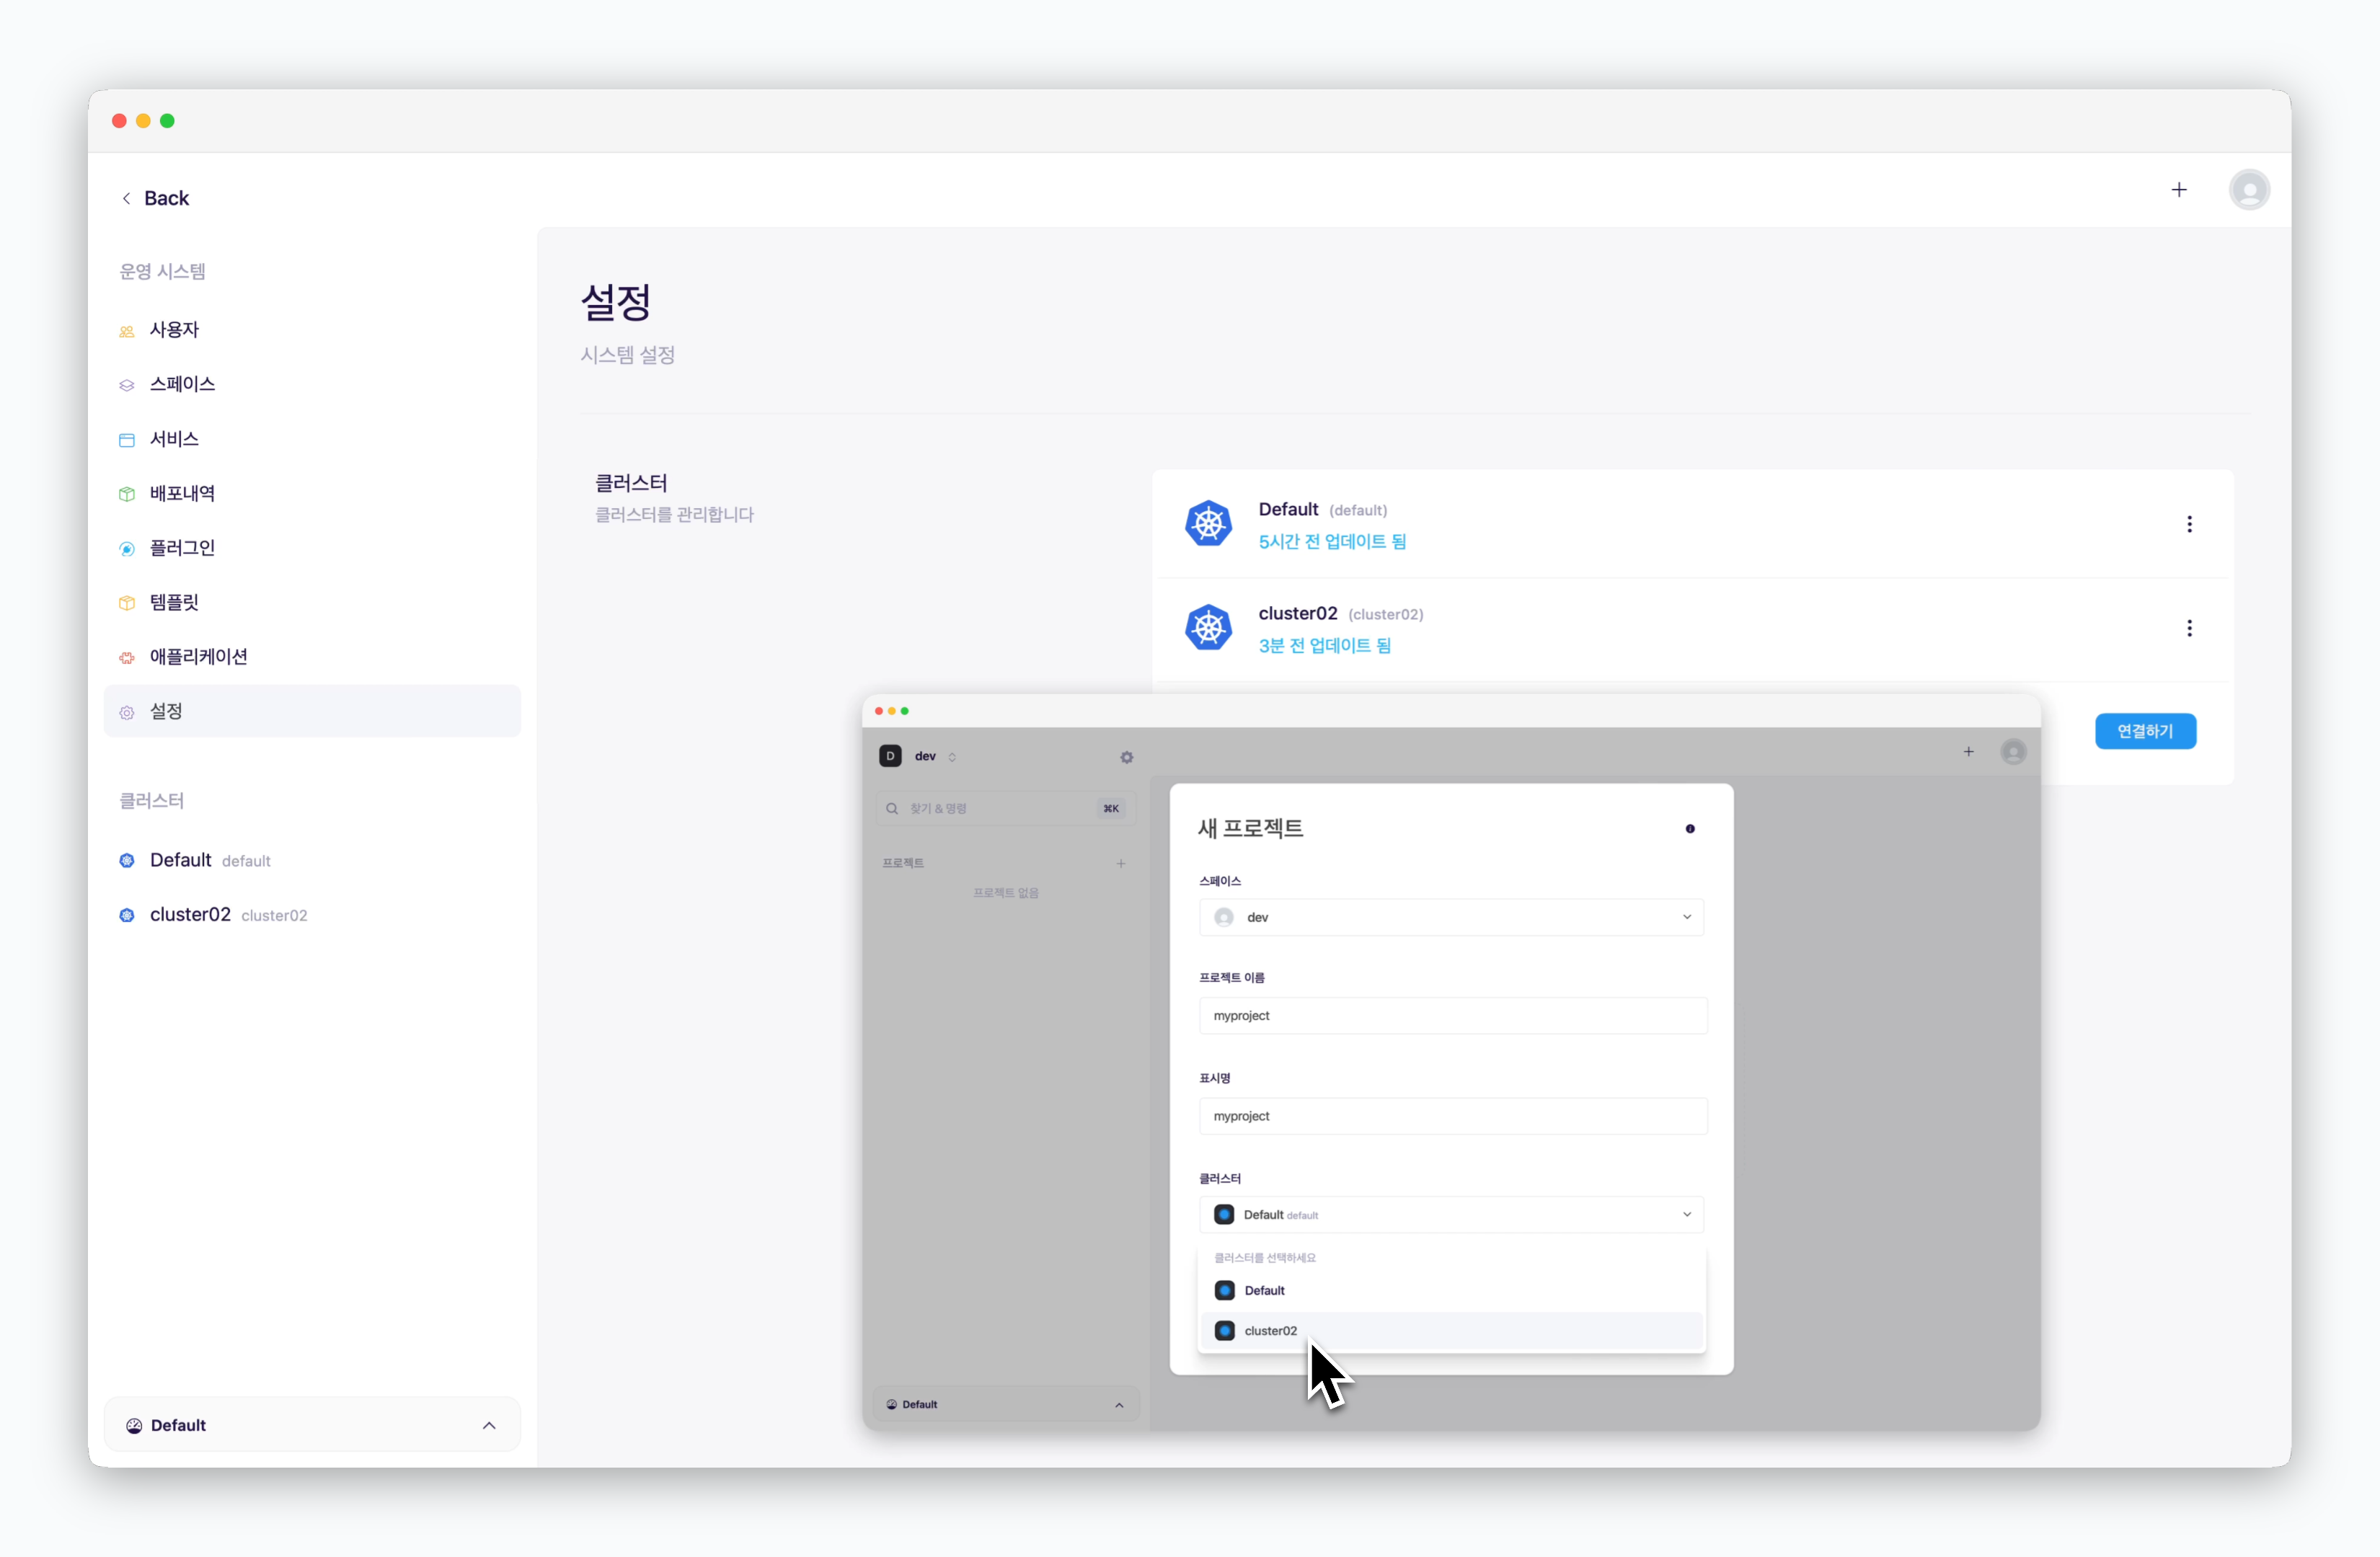
연결된 클러스터는 대시보드에서 서비스 배포를 위한 프로젝트 또는 배포환경 생성 시, 서비스가 배포될 클러스터로 선택할 수 있습니다.
* **클러스터 플랫폼** : Generic Kubernetes
* **이름, 표시명** : 대시보드에 표시될 이름
* **에이전트 접속 주소**
* **토큰** : 전 과정에서 조회한 토큰값
연결된 클러스터는 대시보드에서 서비스 배포를 위한 프로젝트 또는 배포환경 생성 시, 서비스가 배포될 클러스터로 선택할 수 있습니다.
 ## Kubernetes Pod로 실행
Kubernetes 클러스터에 ale을 설치하는 경우 다음의 페이지를 참고하여 진행하세요.
* [AWS EKS](/ko/setup/eks-eksctl/01_aws-prerequisite)
* [GCP GKE](/ko/setup/gke/01_gke-prerequisite)
```bash AWS EKS - hostname theme={null}
kubectl get svc \
-n ale \
ale-agent-lb \
-o jsonpath='{.status.loadBalancer.ingress[0].hostname}' \
| xargs -I{} echo "https://{}"
```
```bash GKE, AKE - ip theme={null}
kubectl get svc \
-n ale \
ale-agent-lb \
-o jsonpath='{.status.loadBalancer.ingress[0].ip}' \
| xargs -I{} echo "https://{}"
```
```bash theme={null}
kubectl get secrets agent-secrets -n ale -o jsonpath='{.data.AGENT_TOKEN}' | base64 --decode
```
* **클러스터 플랫폼** : 연결할 클러스터의 제공자 선택
* **이름, 표시명** : 대시보드에 표시될 이름
* **에이전트 접속 주소**
* **토큰** : 전 과정에서 조회한 토큰값
연결된 클러스터는 대시보드에서 서비스 배포를 위한 프로젝트 또는 배포환경 생성 시, 서비스가 배포될 클러스터로 선택할 수 있습니다.
## Kubernetes Pod로 실행
Kubernetes 클러스터에 ale을 설치하는 경우 다음의 페이지를 참고하여 진행하세요.
* [AWS EKS](/ko/setup/eks-eksctl/01_aws-prerequisite)
* [GCP GKE](/ko/setup/gke/01_gke-prerequisite)
```bash AWS EKS - hostname theme={null}
kubectl get svc \
-n ale \
ale-agent-lb \
-o jsonpath='{.status.loadBalancer.ingress[0].hostname}' \
| xargs -I{} echo "https://{}"
```
```bash GKE, AKE - ip theme={null}
kubectl get svc \
-n ale \
ale-agent-lb \
-o jsonpath='{.status.loadBalancer.ingress[0].ip}' \
| xargs -I{} echo "https://{}"
```
```bash theme={null}
kubectl get secrets agent-secrets -n ale -o jsonpath='{.data.AGENT_TOKEN}' | base64 --decode
```
* **클러스터 플랫폼** : 연결할 클러스터의 제공자 선택
* **이름, 표시명** : 대시보드에 표시될 이름
* **에이전트 접속 주소**
* **토큰** : 전 과정에서 조회한 토큰값
연결된 클러스터는 대시보드에서 서비스 배포를 위한 프로젝트 또는 배포환경 생성 시, 서비스가 배포될 클러스터로 선택할 수 있습니다.