> ## Documentation Index
> Fetch the complete documentation index at: https://docs.ale.run/llms.txt
> Use this file to discover all available pages before exploring further.
# Google
> Google OAuth를 `ale` 에 추가하는 가이드입니다.
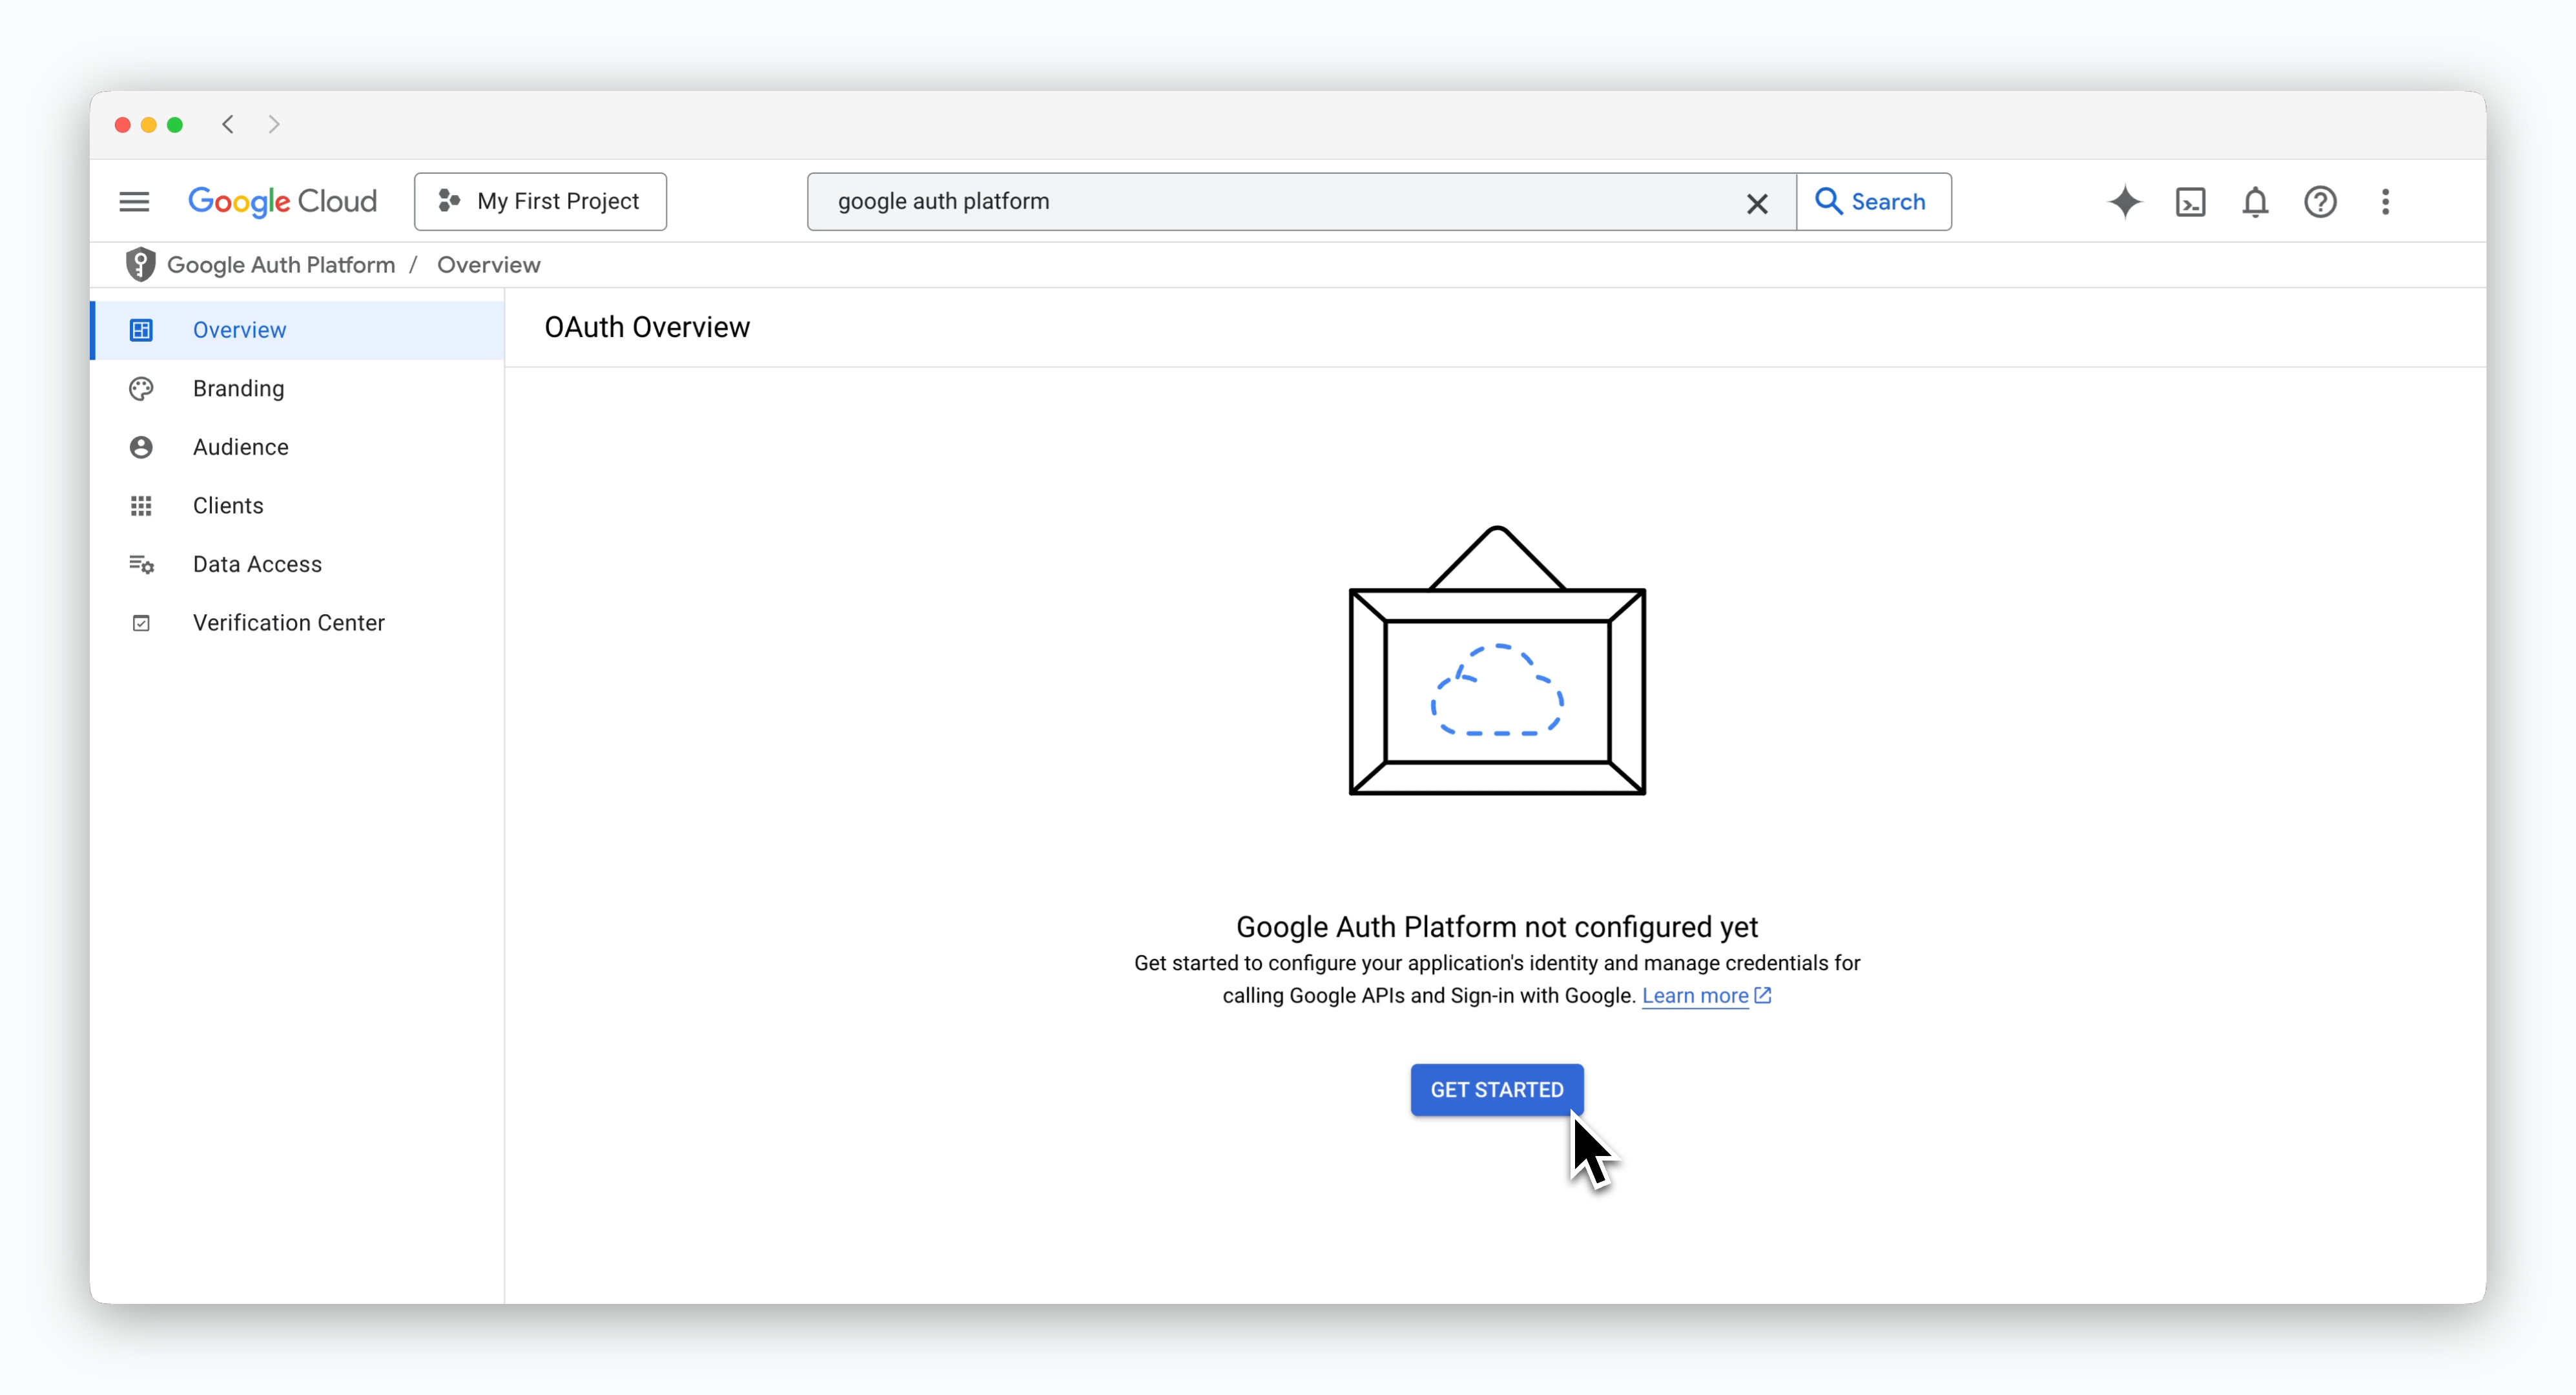 > Google Cloud 콘솔의 Google Auth Platform 페이지에서 `GET STARTED`를 클릭하는 것으로 시작합니다.
***
## Overview
> Google Cloud 콘솔의 Google Auth Platform 페이지에서 `GET STARTED`를 클릭하는 것으로 시작합니다.
***
## Overview
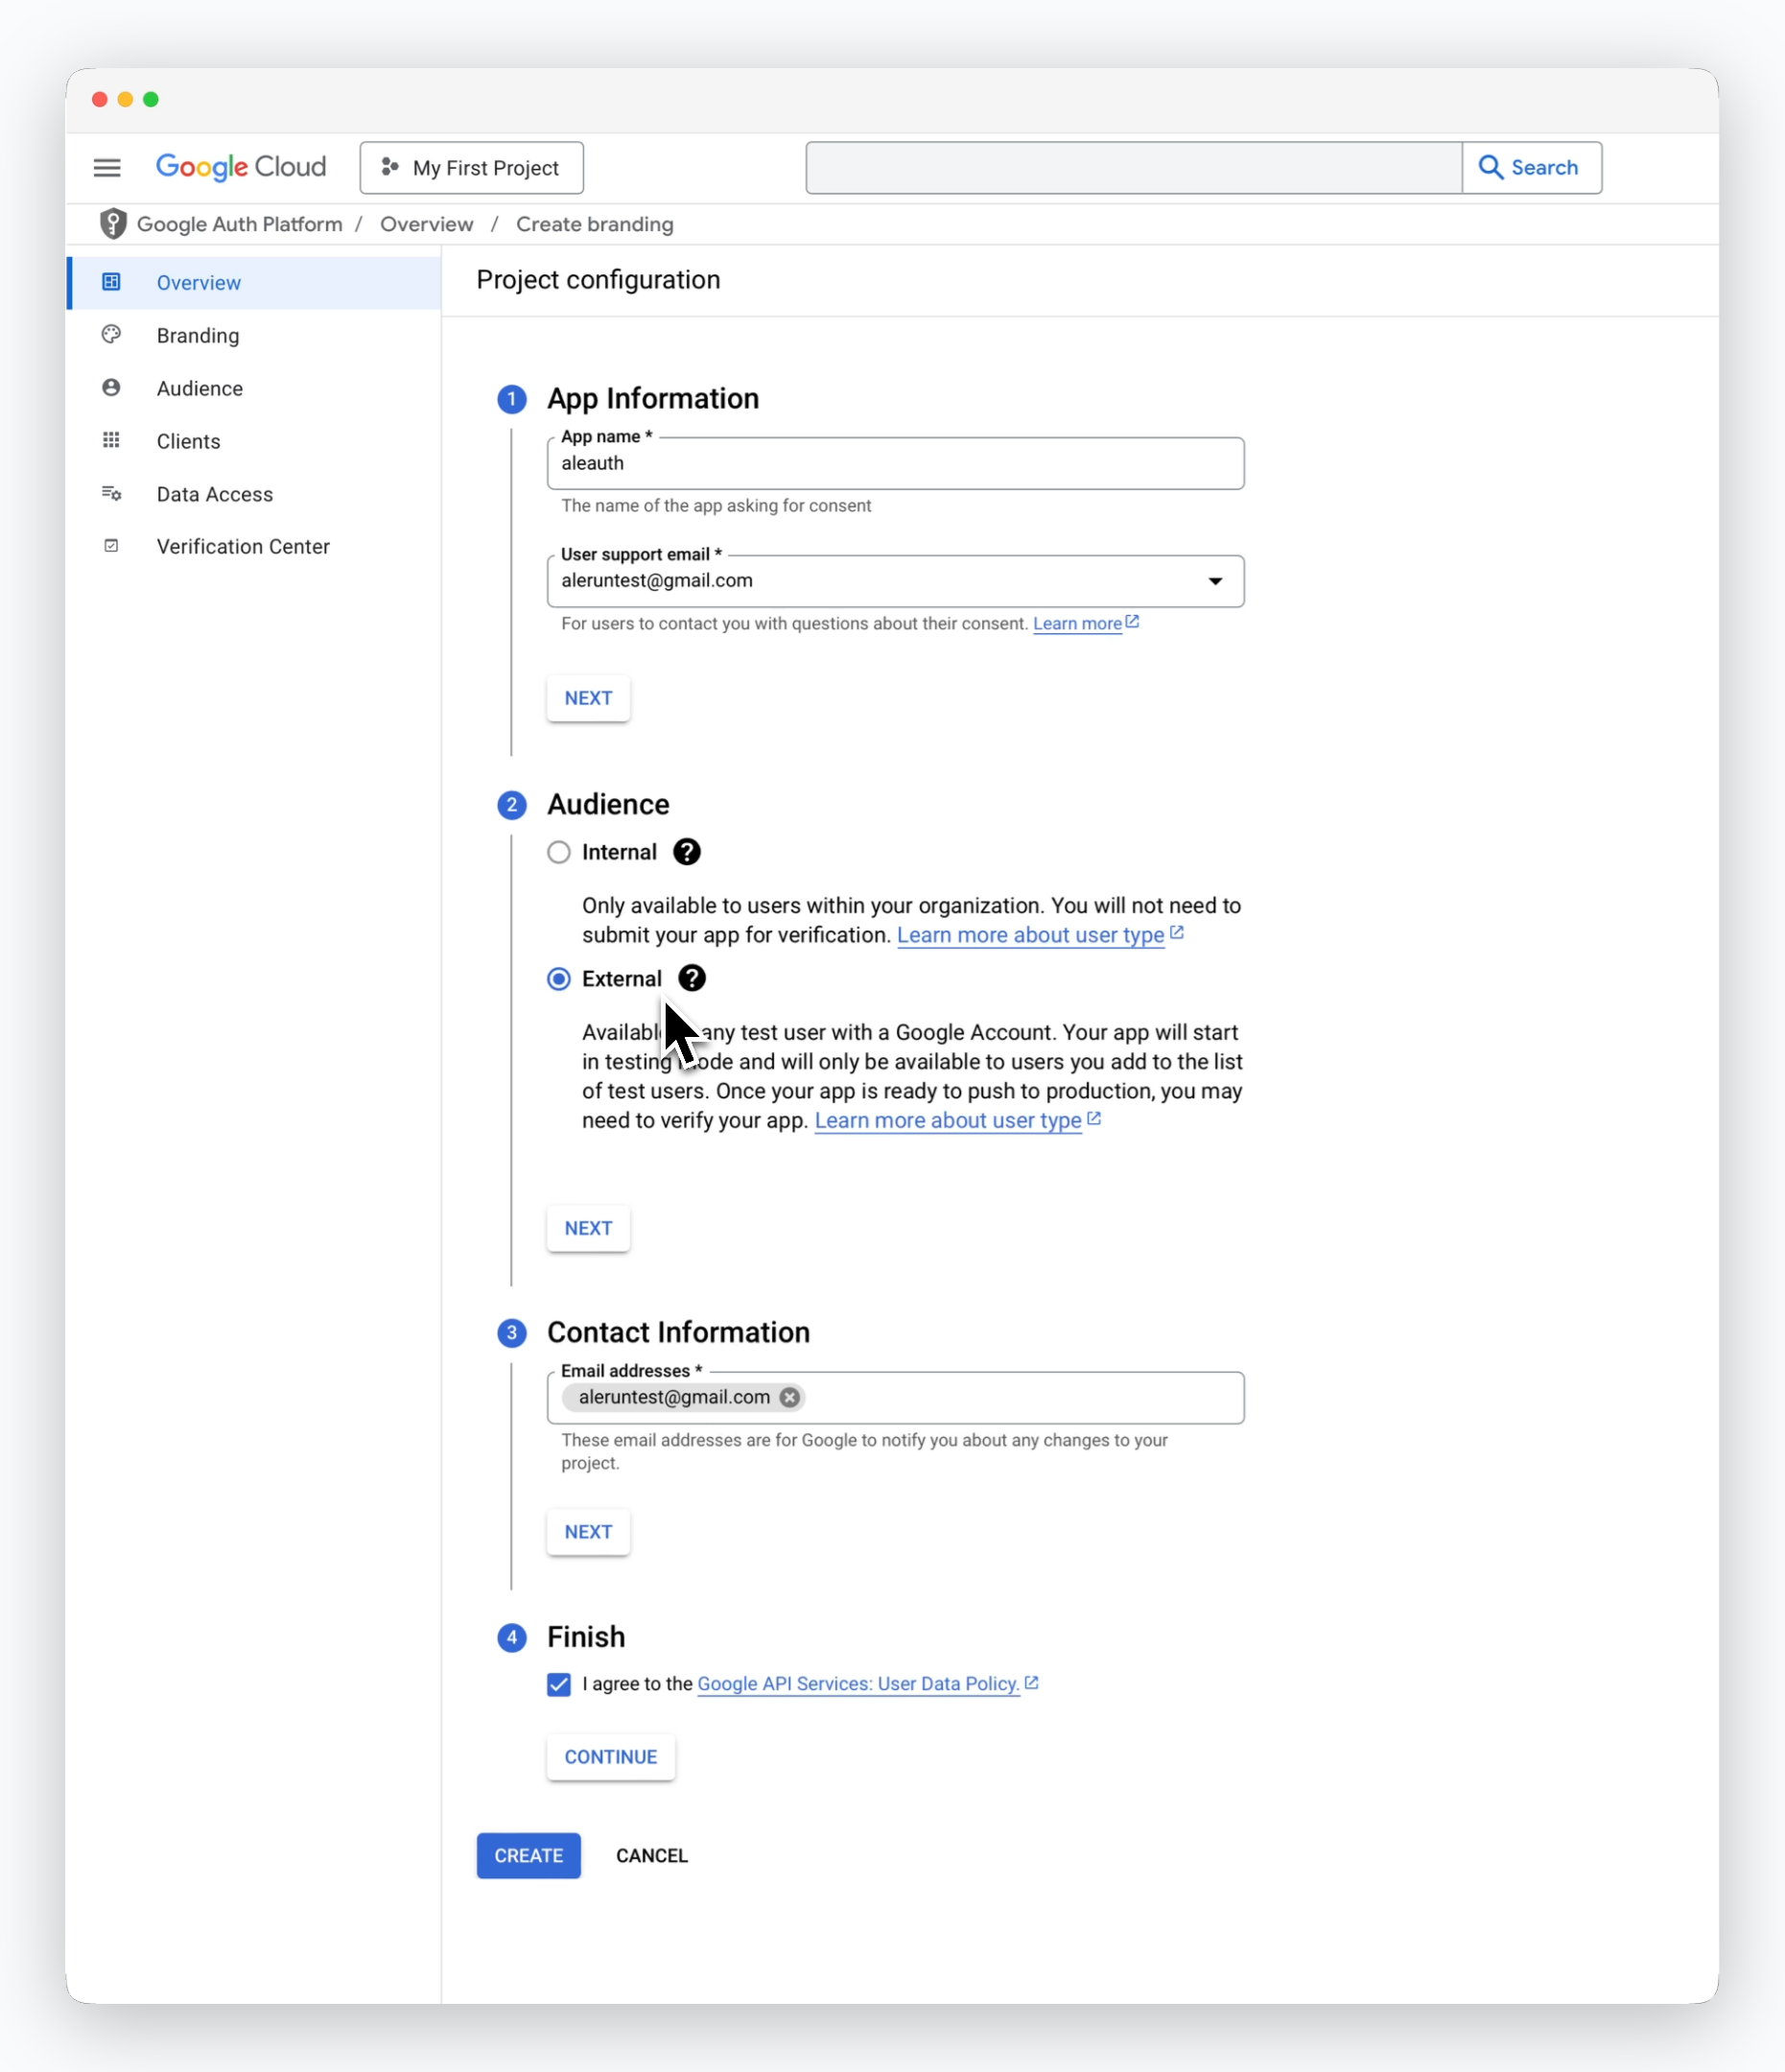 > Overview 페이지의 각 과정에서 아래의 값을 입력하고 `CREATE`를 클릭하세요.
* **App Information:** 앱 이름과 Google OAuth 동의 관련 문의 이메일
* **Audience:** External
* **Contact Informaion:** Google Cloud 프로젝트 내 변경사항 수신 이메일
* **Finish:** 구글 정책 동의 체크
## Branding
> Overview 페이지의 각 과정에서 아래의 값을 입력하고 `CREATE`를 클릭하세요.
* **App Information:** 앱 이름과 Google OAuth 동의 관련 문의 이메일
* **Audience:** External
* **Contact Informaion:** Google Cloud 프로젝트 내 변경사항 수신 이메일
* **Finish:** 구글 정책 동의 체크
## Branding
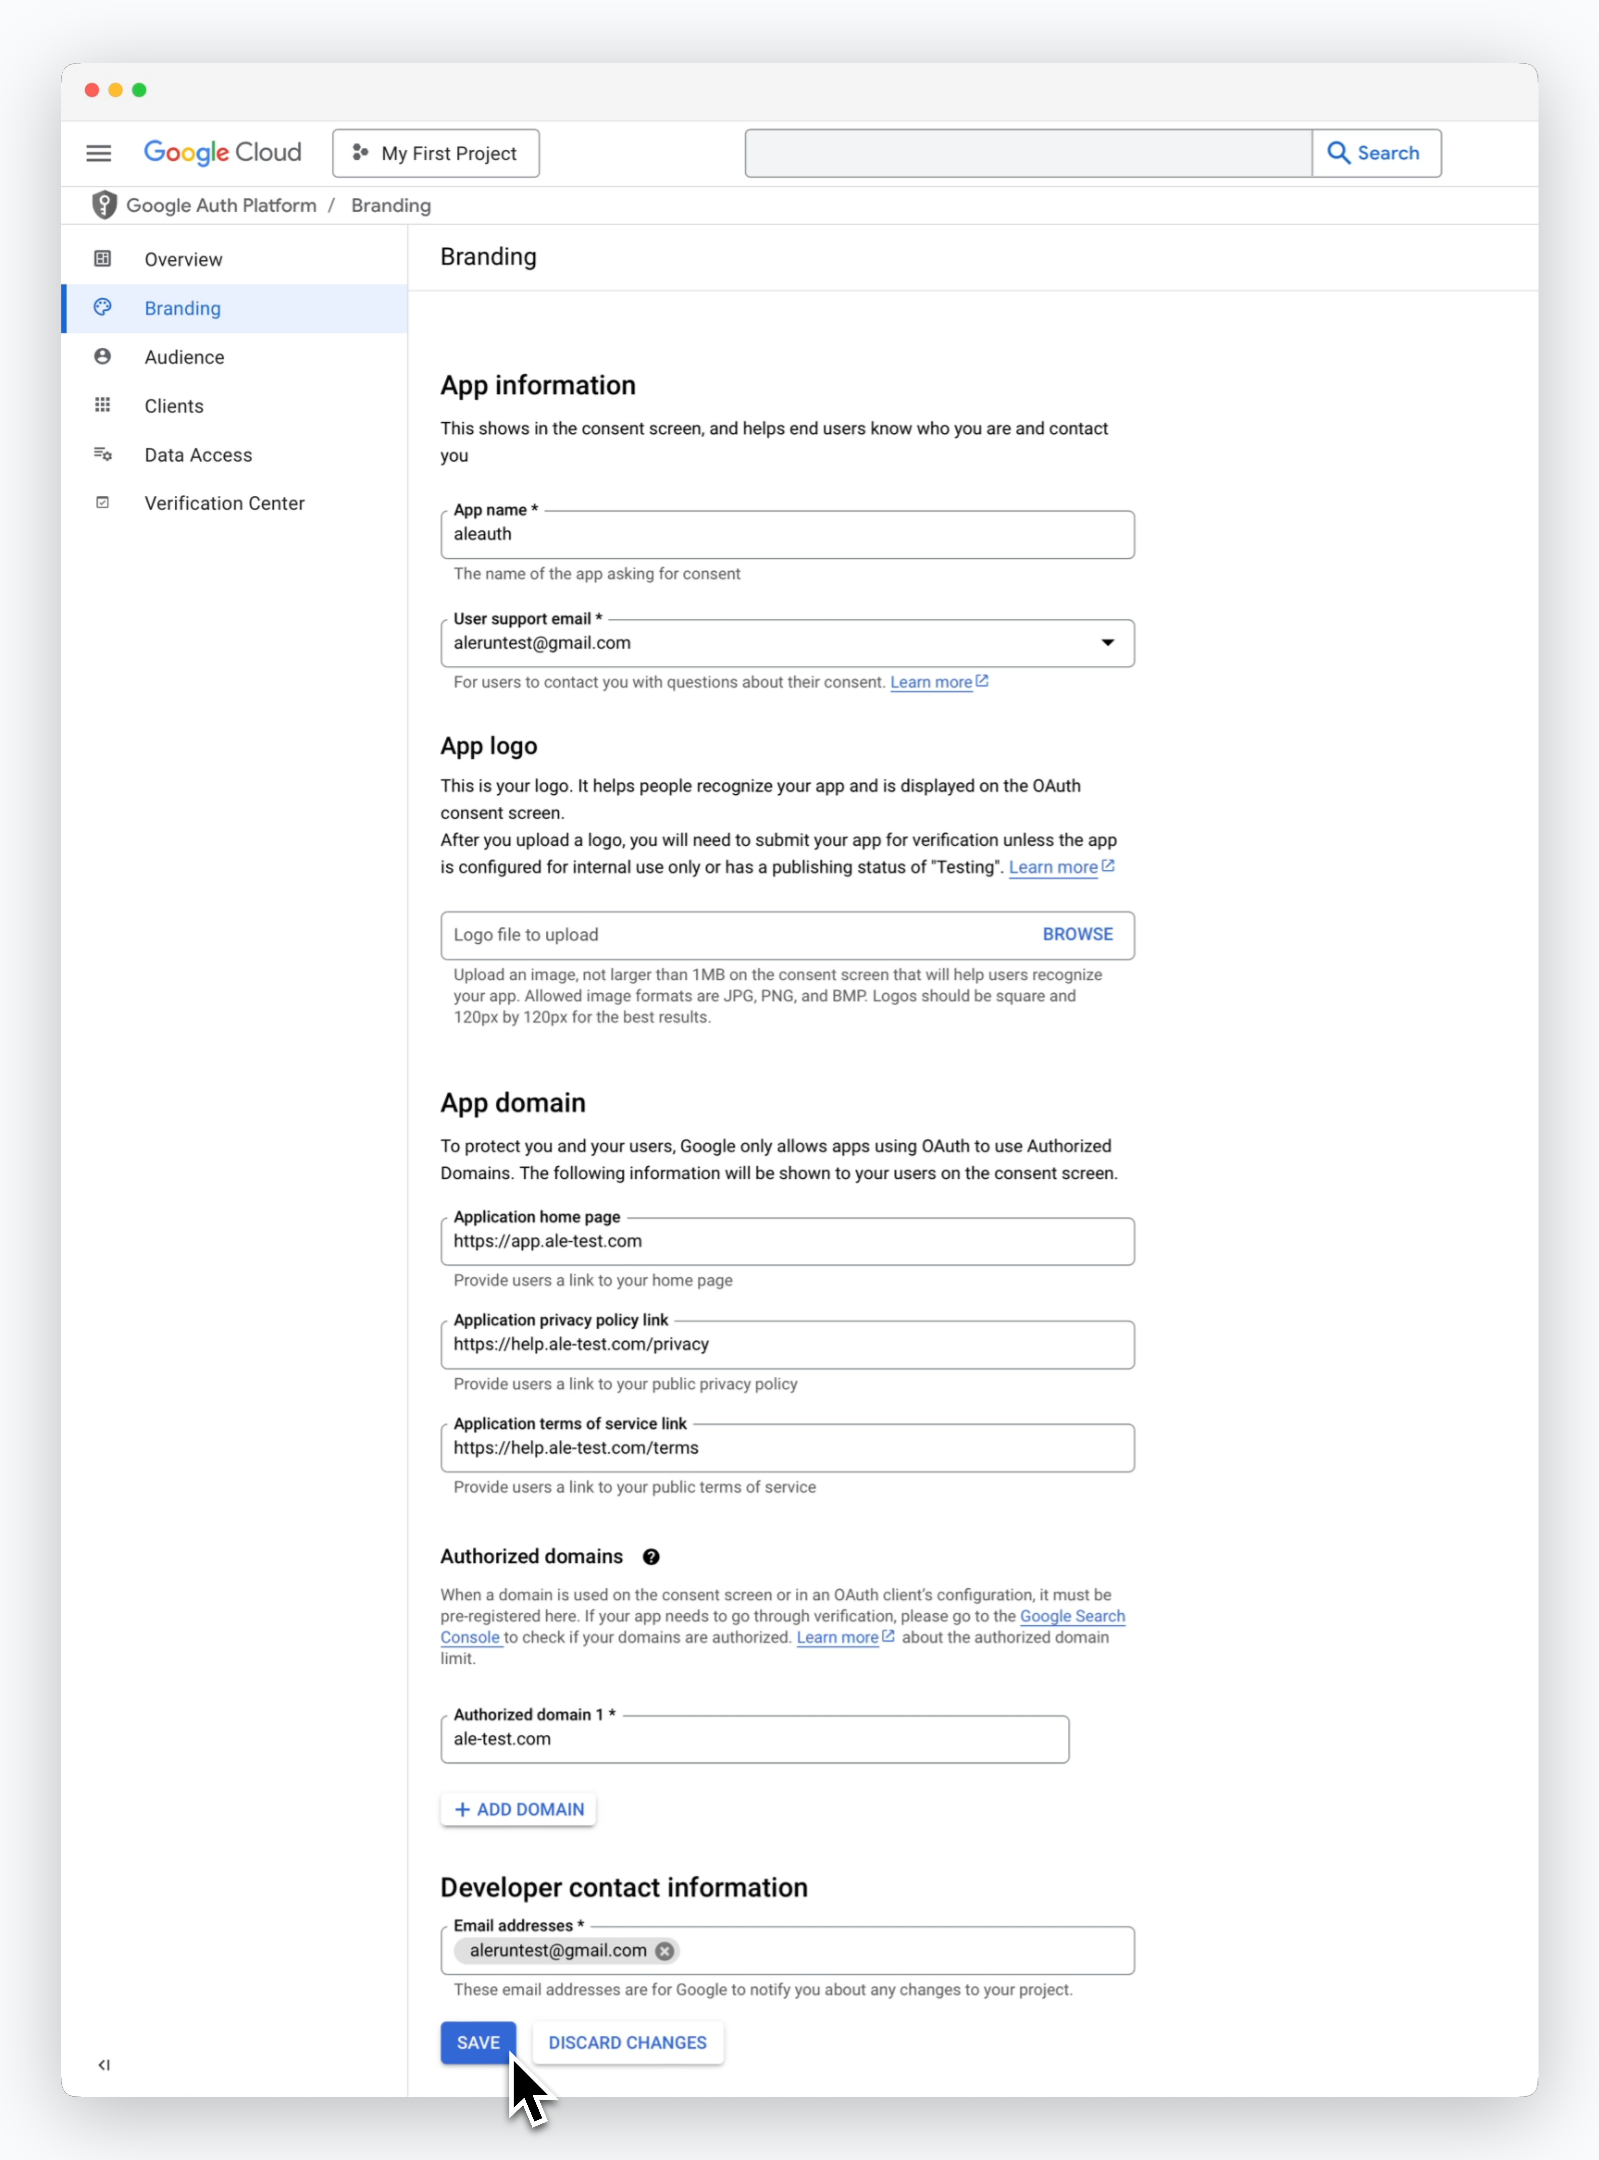 > Branding 페이지에서 App domain에 관한 정보를 아래와 같이 입력하세요.
* **Application home page:** 배포한 `ale`의 URL `https://app.[도메인]`
* **Application privacy policy link:** Google OAuth를 사용하는 서비스의 개인정보처리방침 URL
* **Application terms of service link:** Google OAuth를 사용하는 서비스의 서비스 약관 링크
* **Authorized domains:**
* 애플리케이션 홈페이지, 개인정보처리방침 링크, 서비스 약관 링크에서 사용된 도메인 입력
* 상이한 도메인 사용 시, `ADD DOMAIN`을 클릭해 사용된 모든 도메인 입력
이 과정에서 로고를 등록하지 않아도 Google OAuth를 사용할 수 있으며, 로고를 등록할 경우 로고에 대한 인증과정이 필요합니다.
## Audience
> Branding 페이지에서 App domain에 관한 정보를 아래와 같이 입력하세요.
* **Application home page:** 배포한 `ale`의 URL `https://app.[도메인]`
* **Application privacy policy link:** Google OAuth를 사용하는 서비스의 개인정보처리방침 URL
* **Application terms of service link:** Google OAuth를 사용하는 서비스의 서비스 약관 링크
* **Authorized domains:**
* 애플리케이션 홈페이지, 개인정보처리방침 링크, 서비스 약관 링크에서 사용된 도메인 입력
* 상이한 도메인 사용 시, `ADD DOMAIN`을 클릭해 사용된 모든 도메인 입력
이 과정에서 로고를 등록하지 않아도 Google OAuth를 사용할 수 있으며, 로고를 등록할 경우 로고에 대한 인증과정이 필요합니다.
## Audience
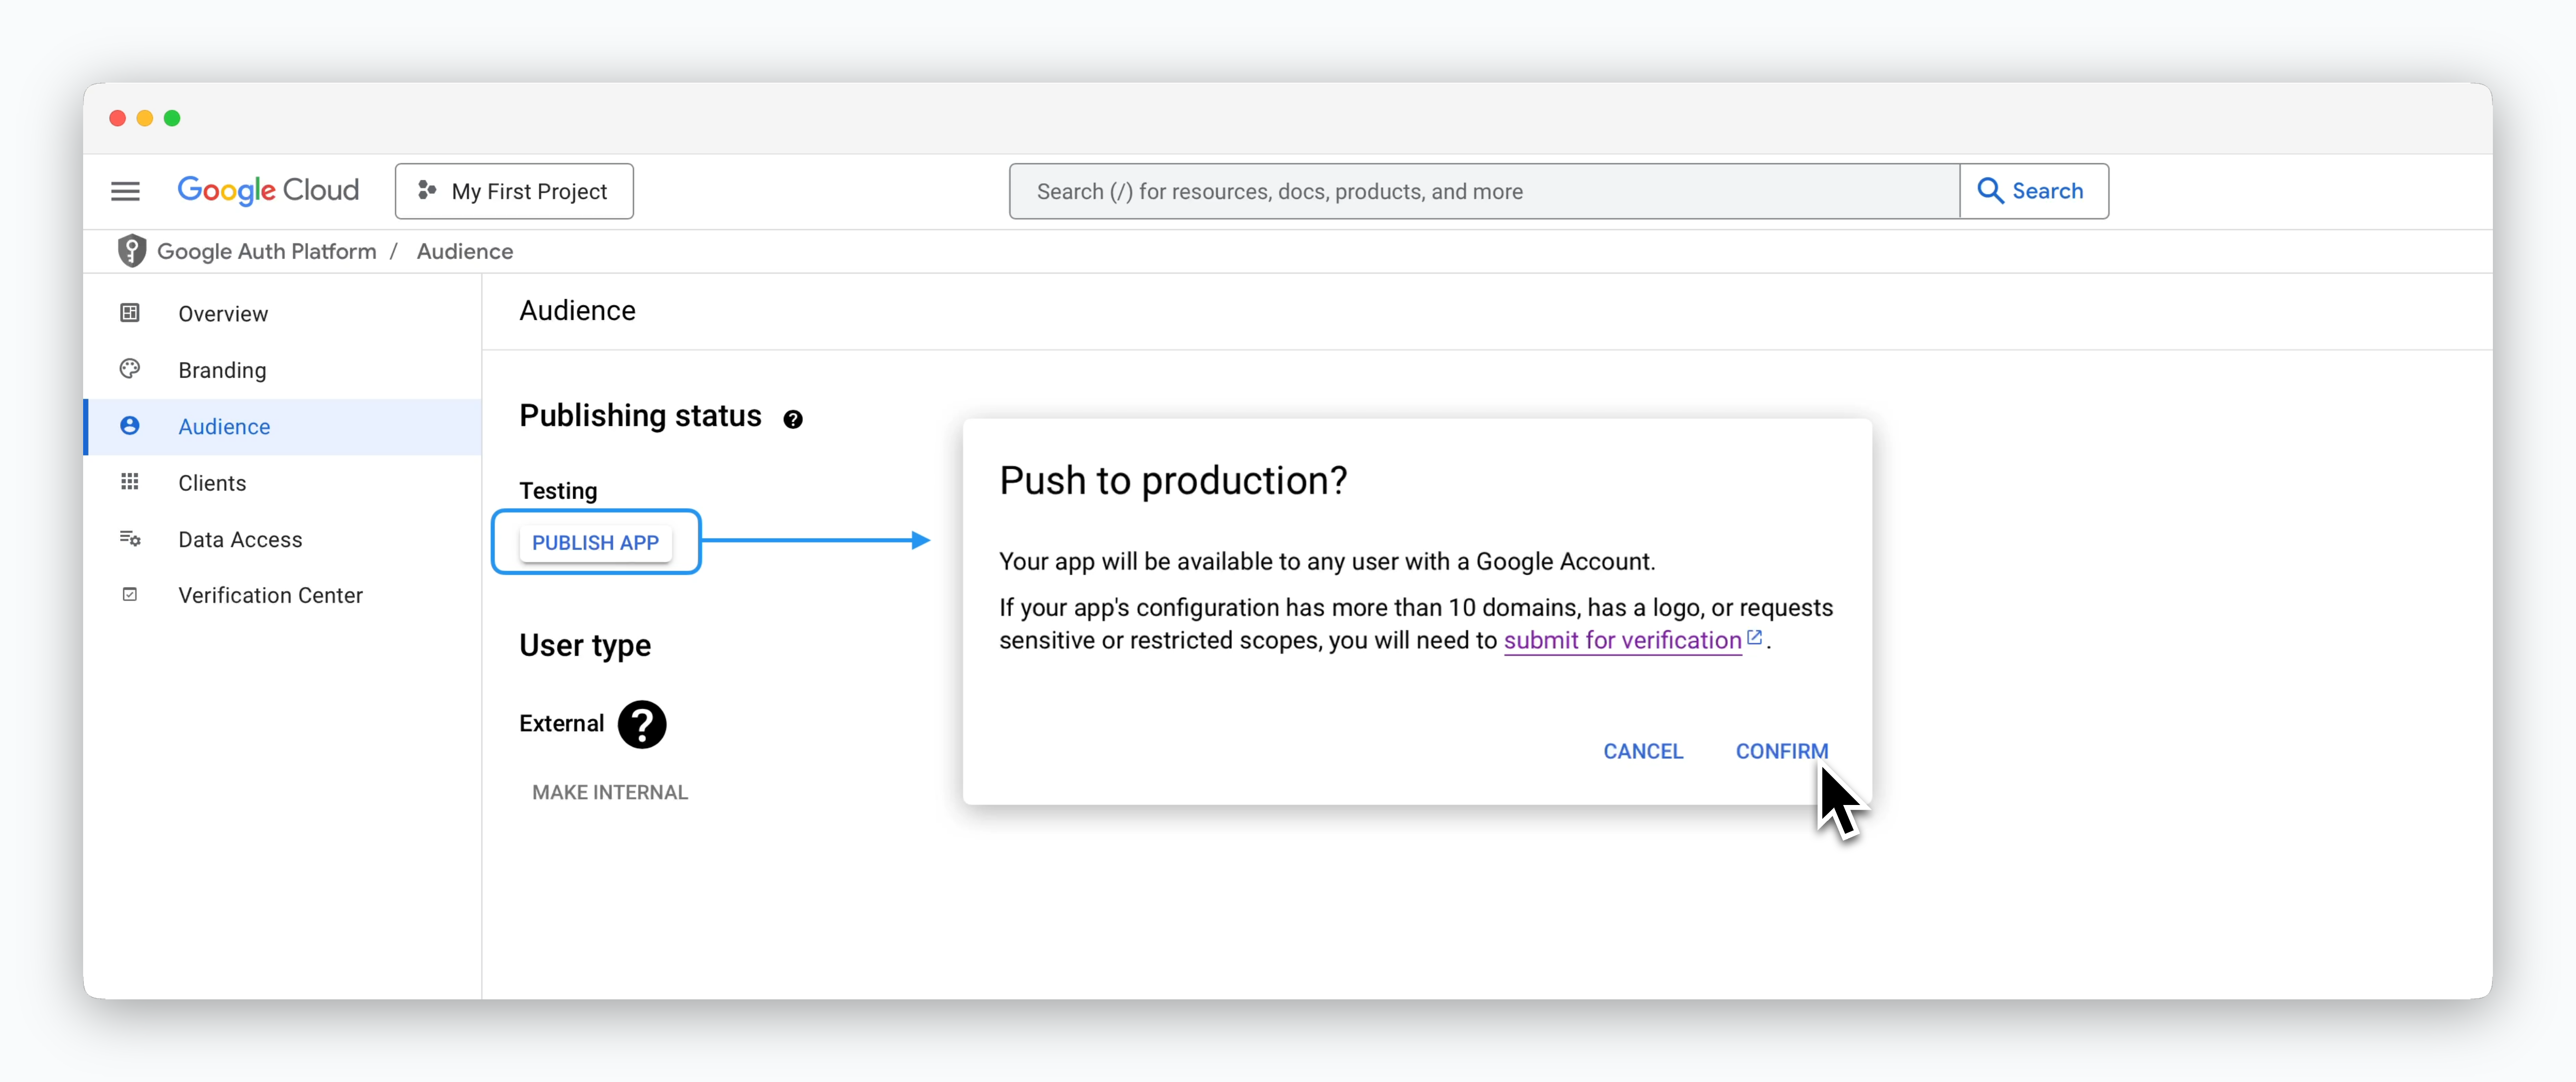 > Audience 페이지에서 `PUBLISH APP`을 클릭해서 앱을 사용할 수 있도록 설정하세요.
## Client
> Audience 페이지에서 `PUBLISH APP`을 클릭해서 앱을 사용할 수 있도록 설정하세요.
## Client
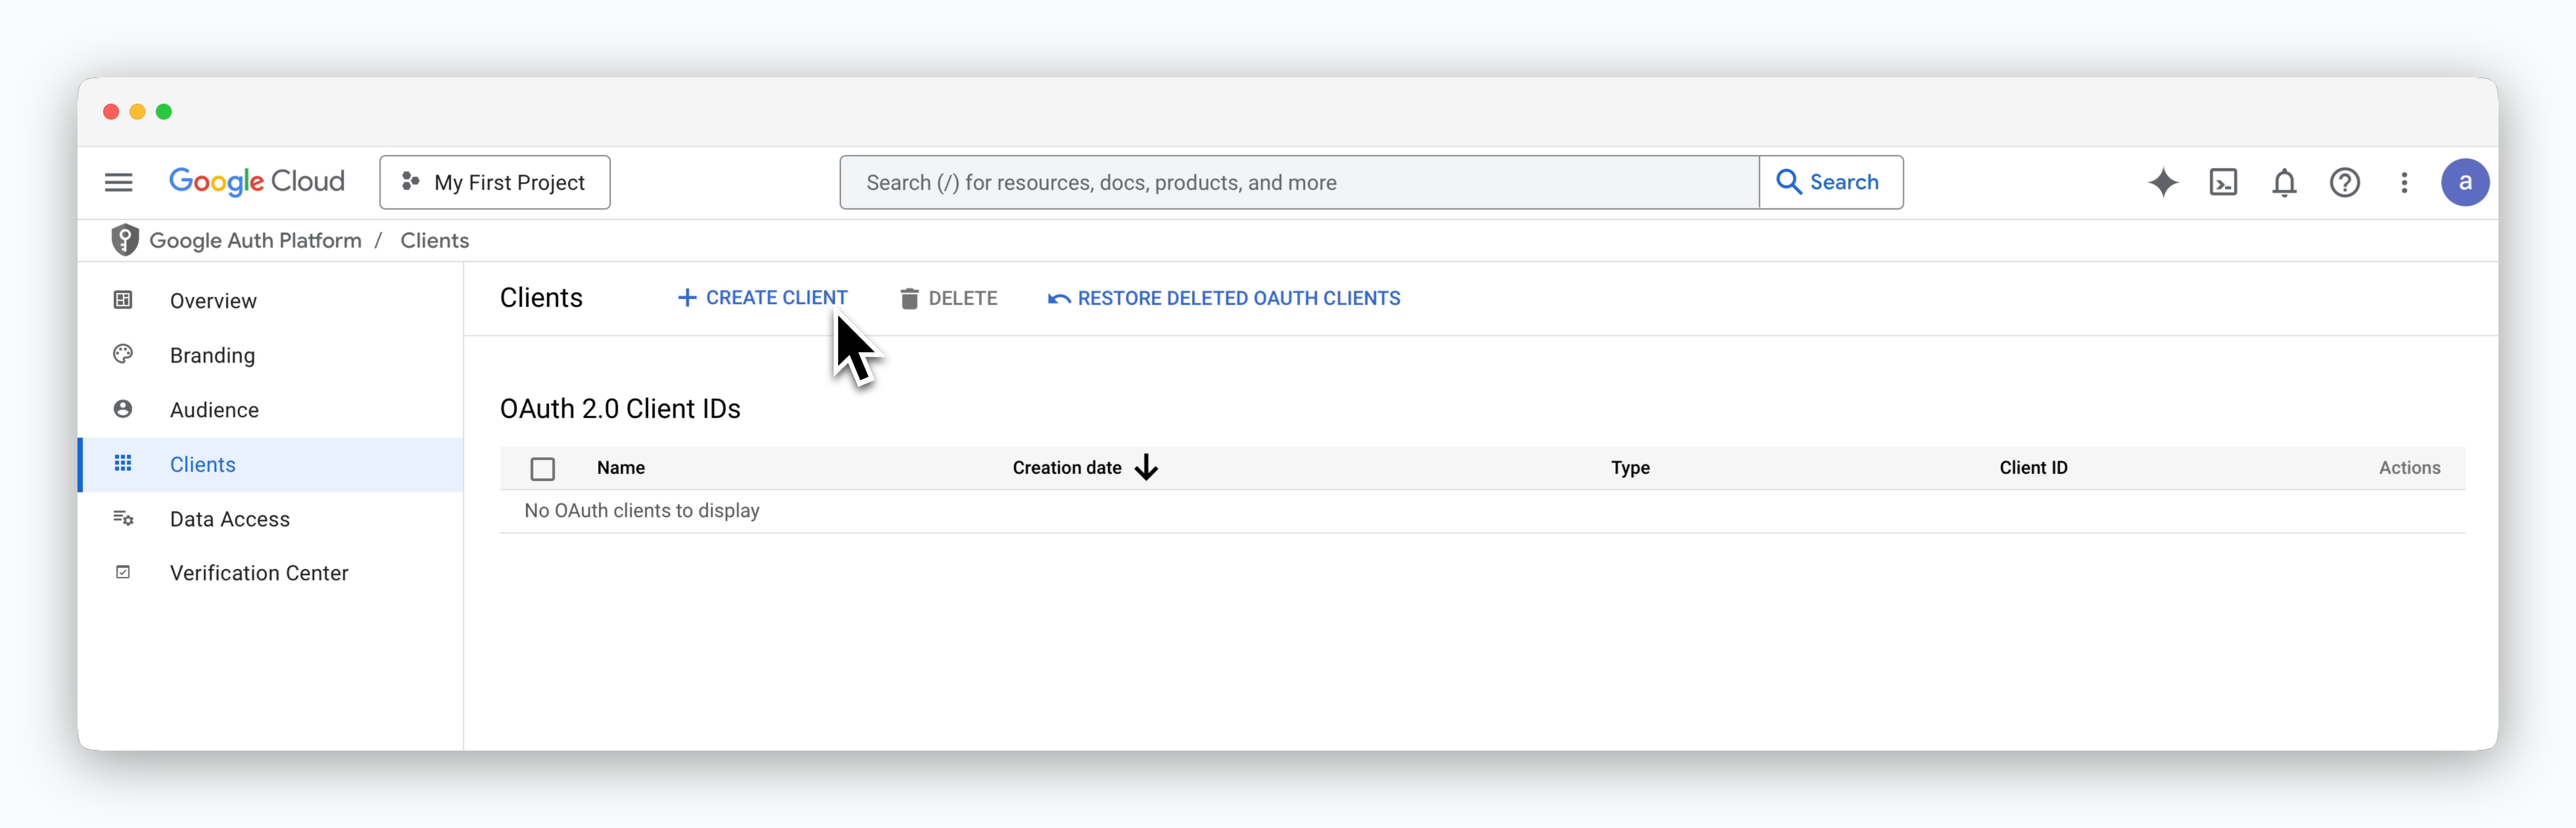 > Client 페이지에서 `CREATE CLIENT`를 클릭하고 아래와 같은 설정으로 OAuth Client ID를 생성하세요.
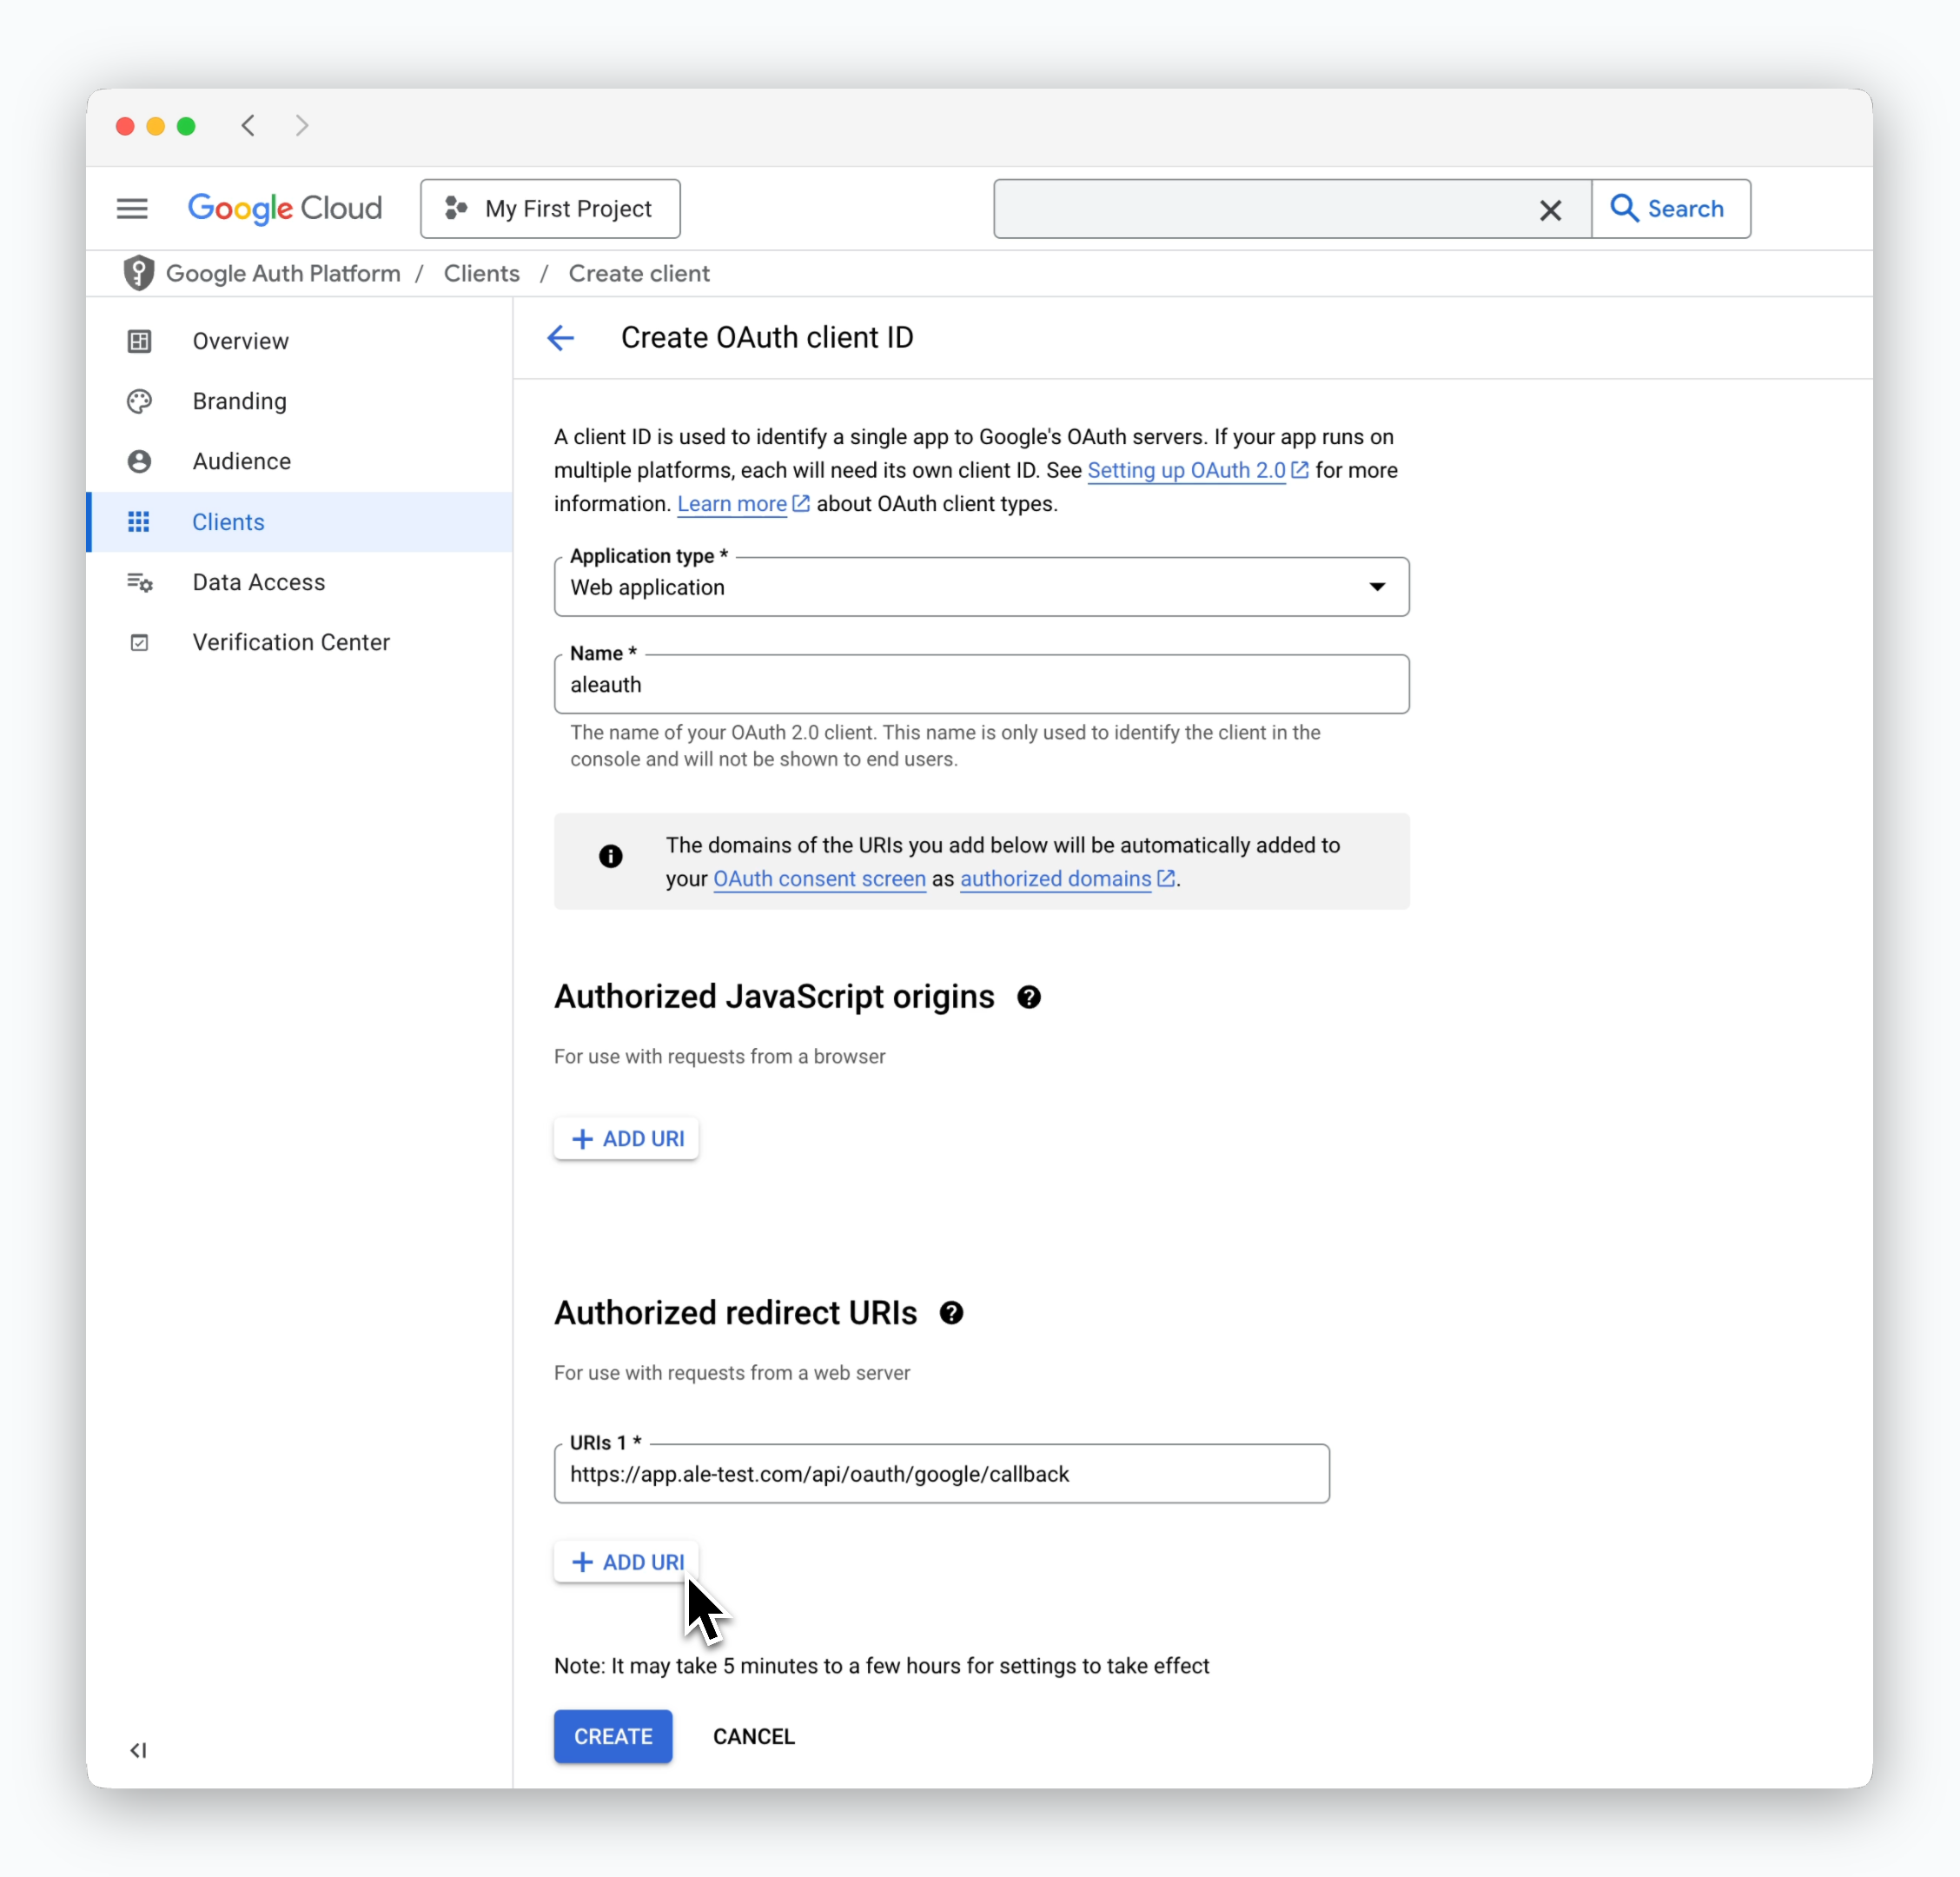 * **Application type:** Web application
* **Authorized redirect URIs:** `https://app.[도메인]/api/oauth/google/callback`
## Data Access
* **Application type:** Web application
* **Authorized redirect URIs:** `https://app.[도메인]/api/oauth/google/callback`
## Data Access
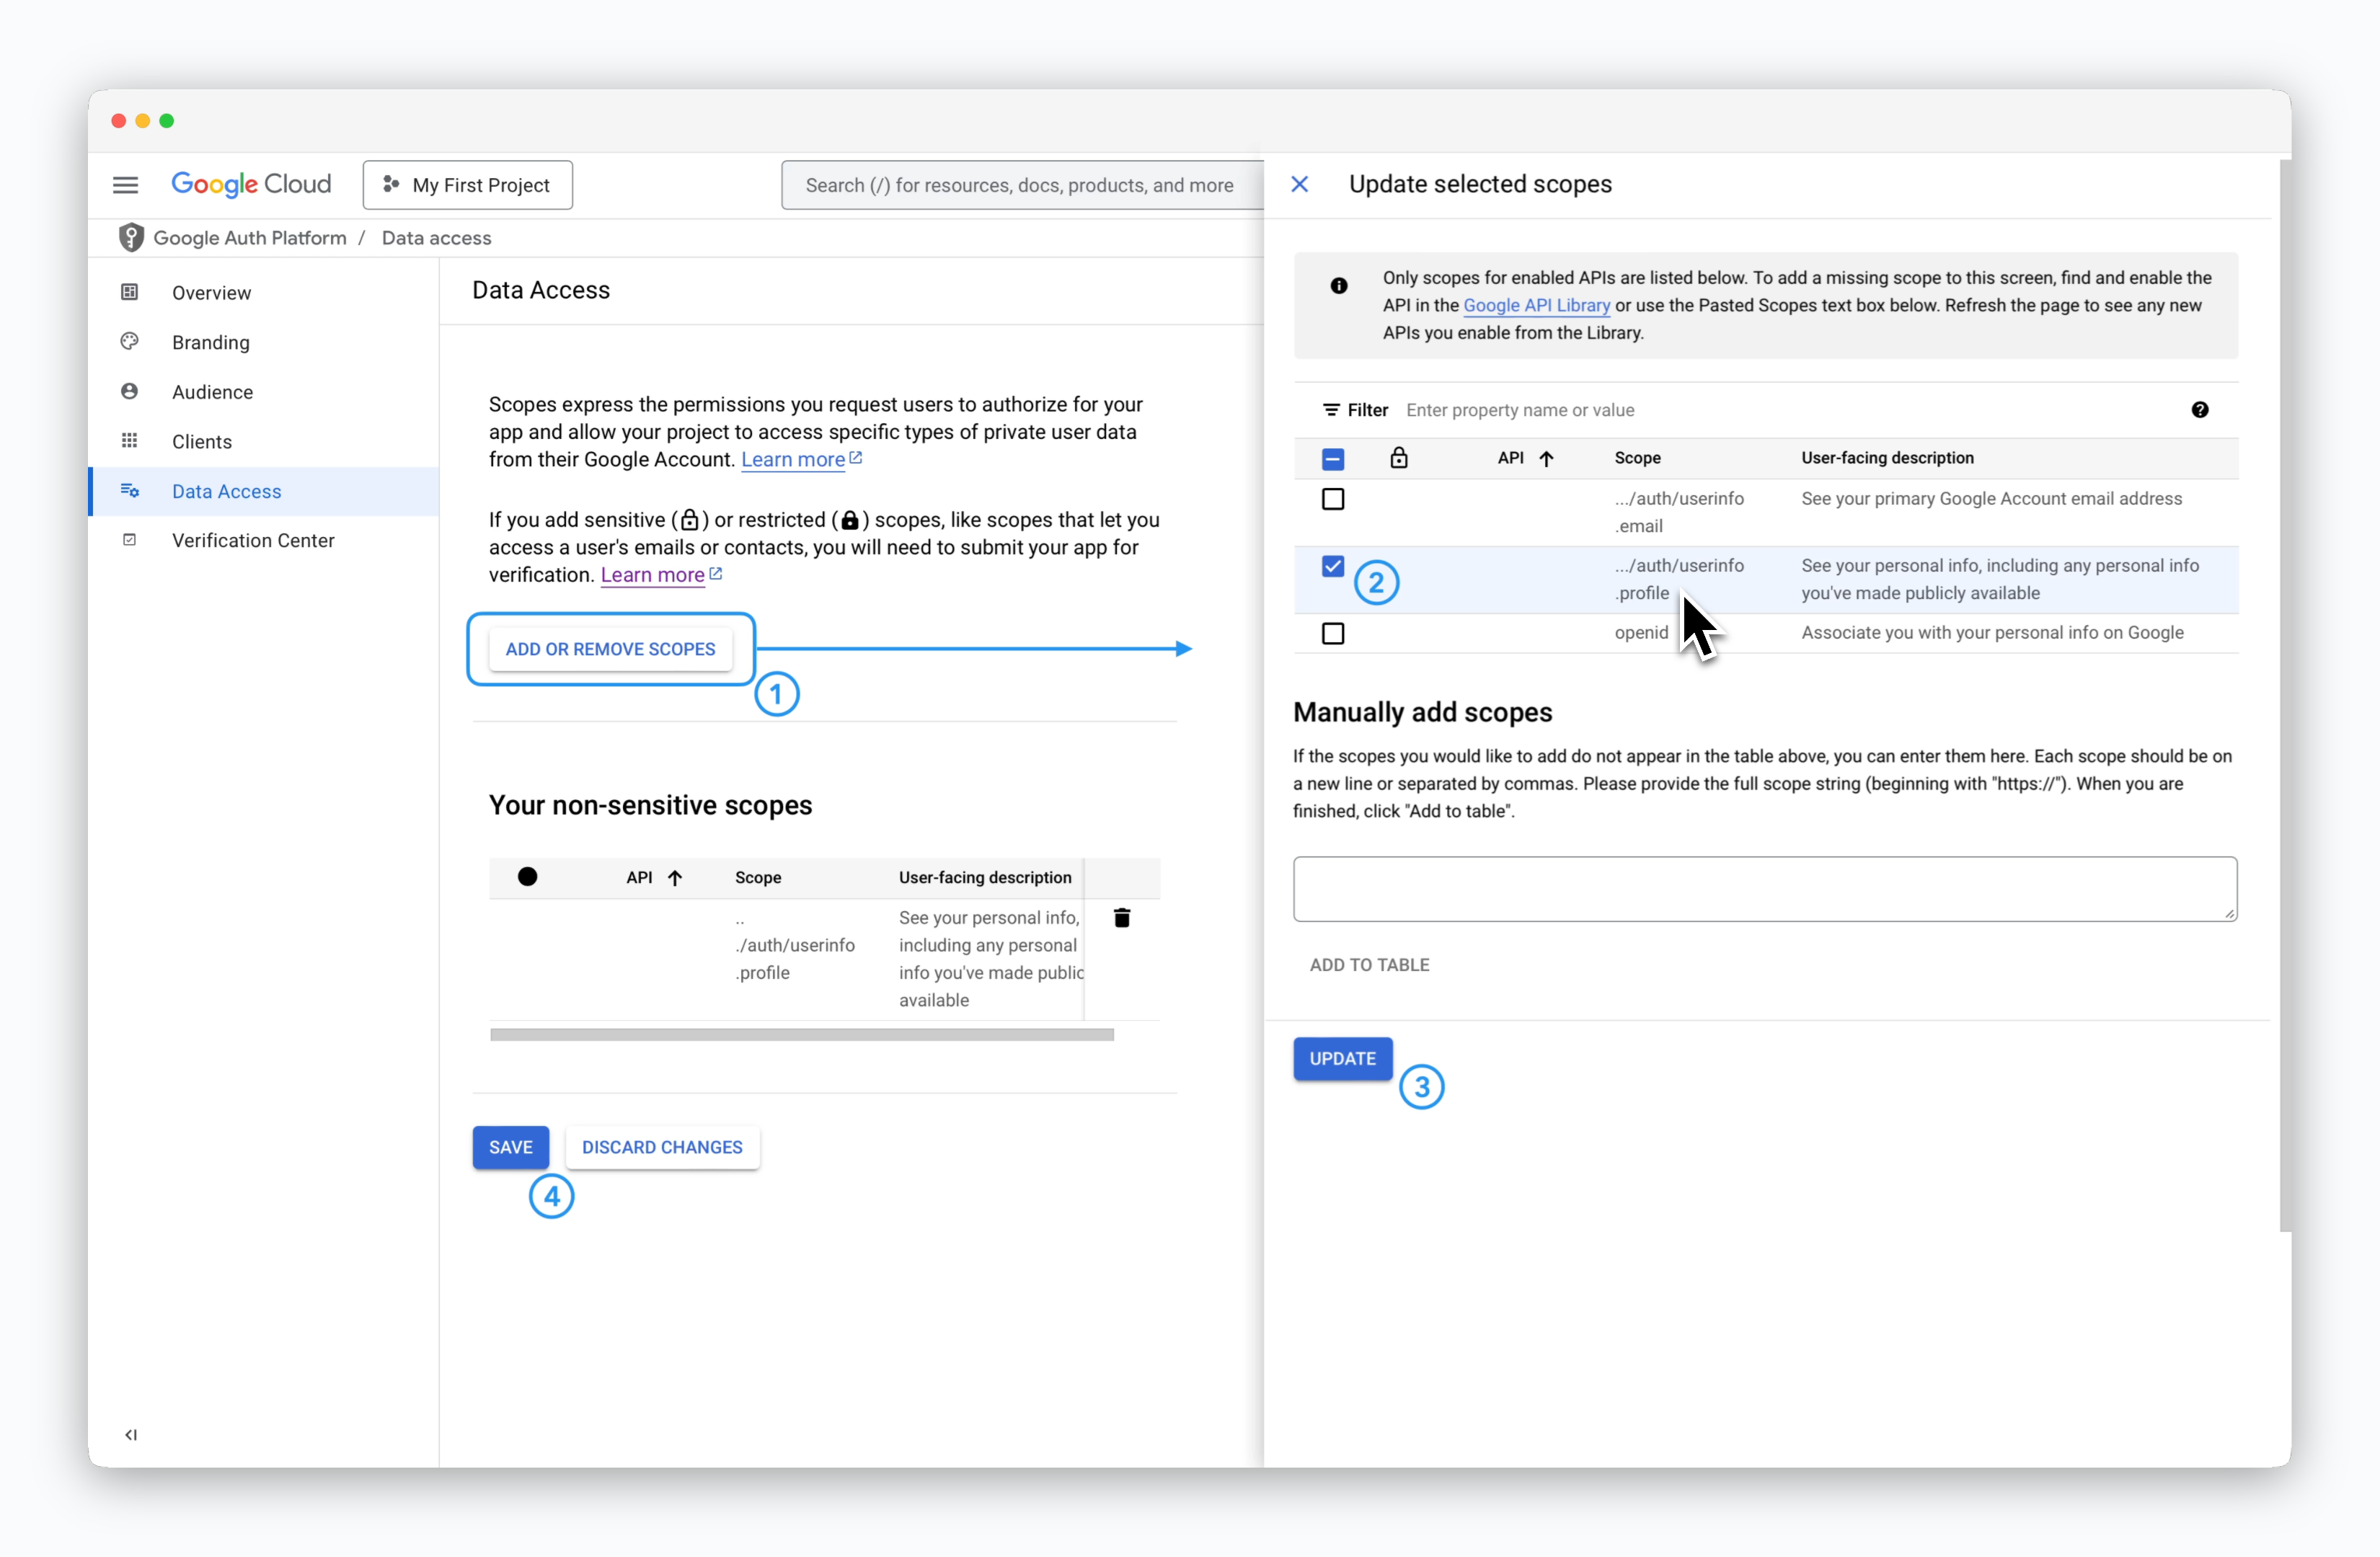 > Data Access 페이지에서 위의 스크린샷의 순서대로 scope를 추가하세요.
추가할 scope는 `.../auth/userinfo.profile` 입니다.
## Client ID, Client Secret 조회
> Data Access 페이지에서 위의 스크린샷의 순서대로 scope를 추가하세요.
추가할 scope는 `.../auth/userinfo.profile` 입니다.
## Client ID, Client Secret 조회
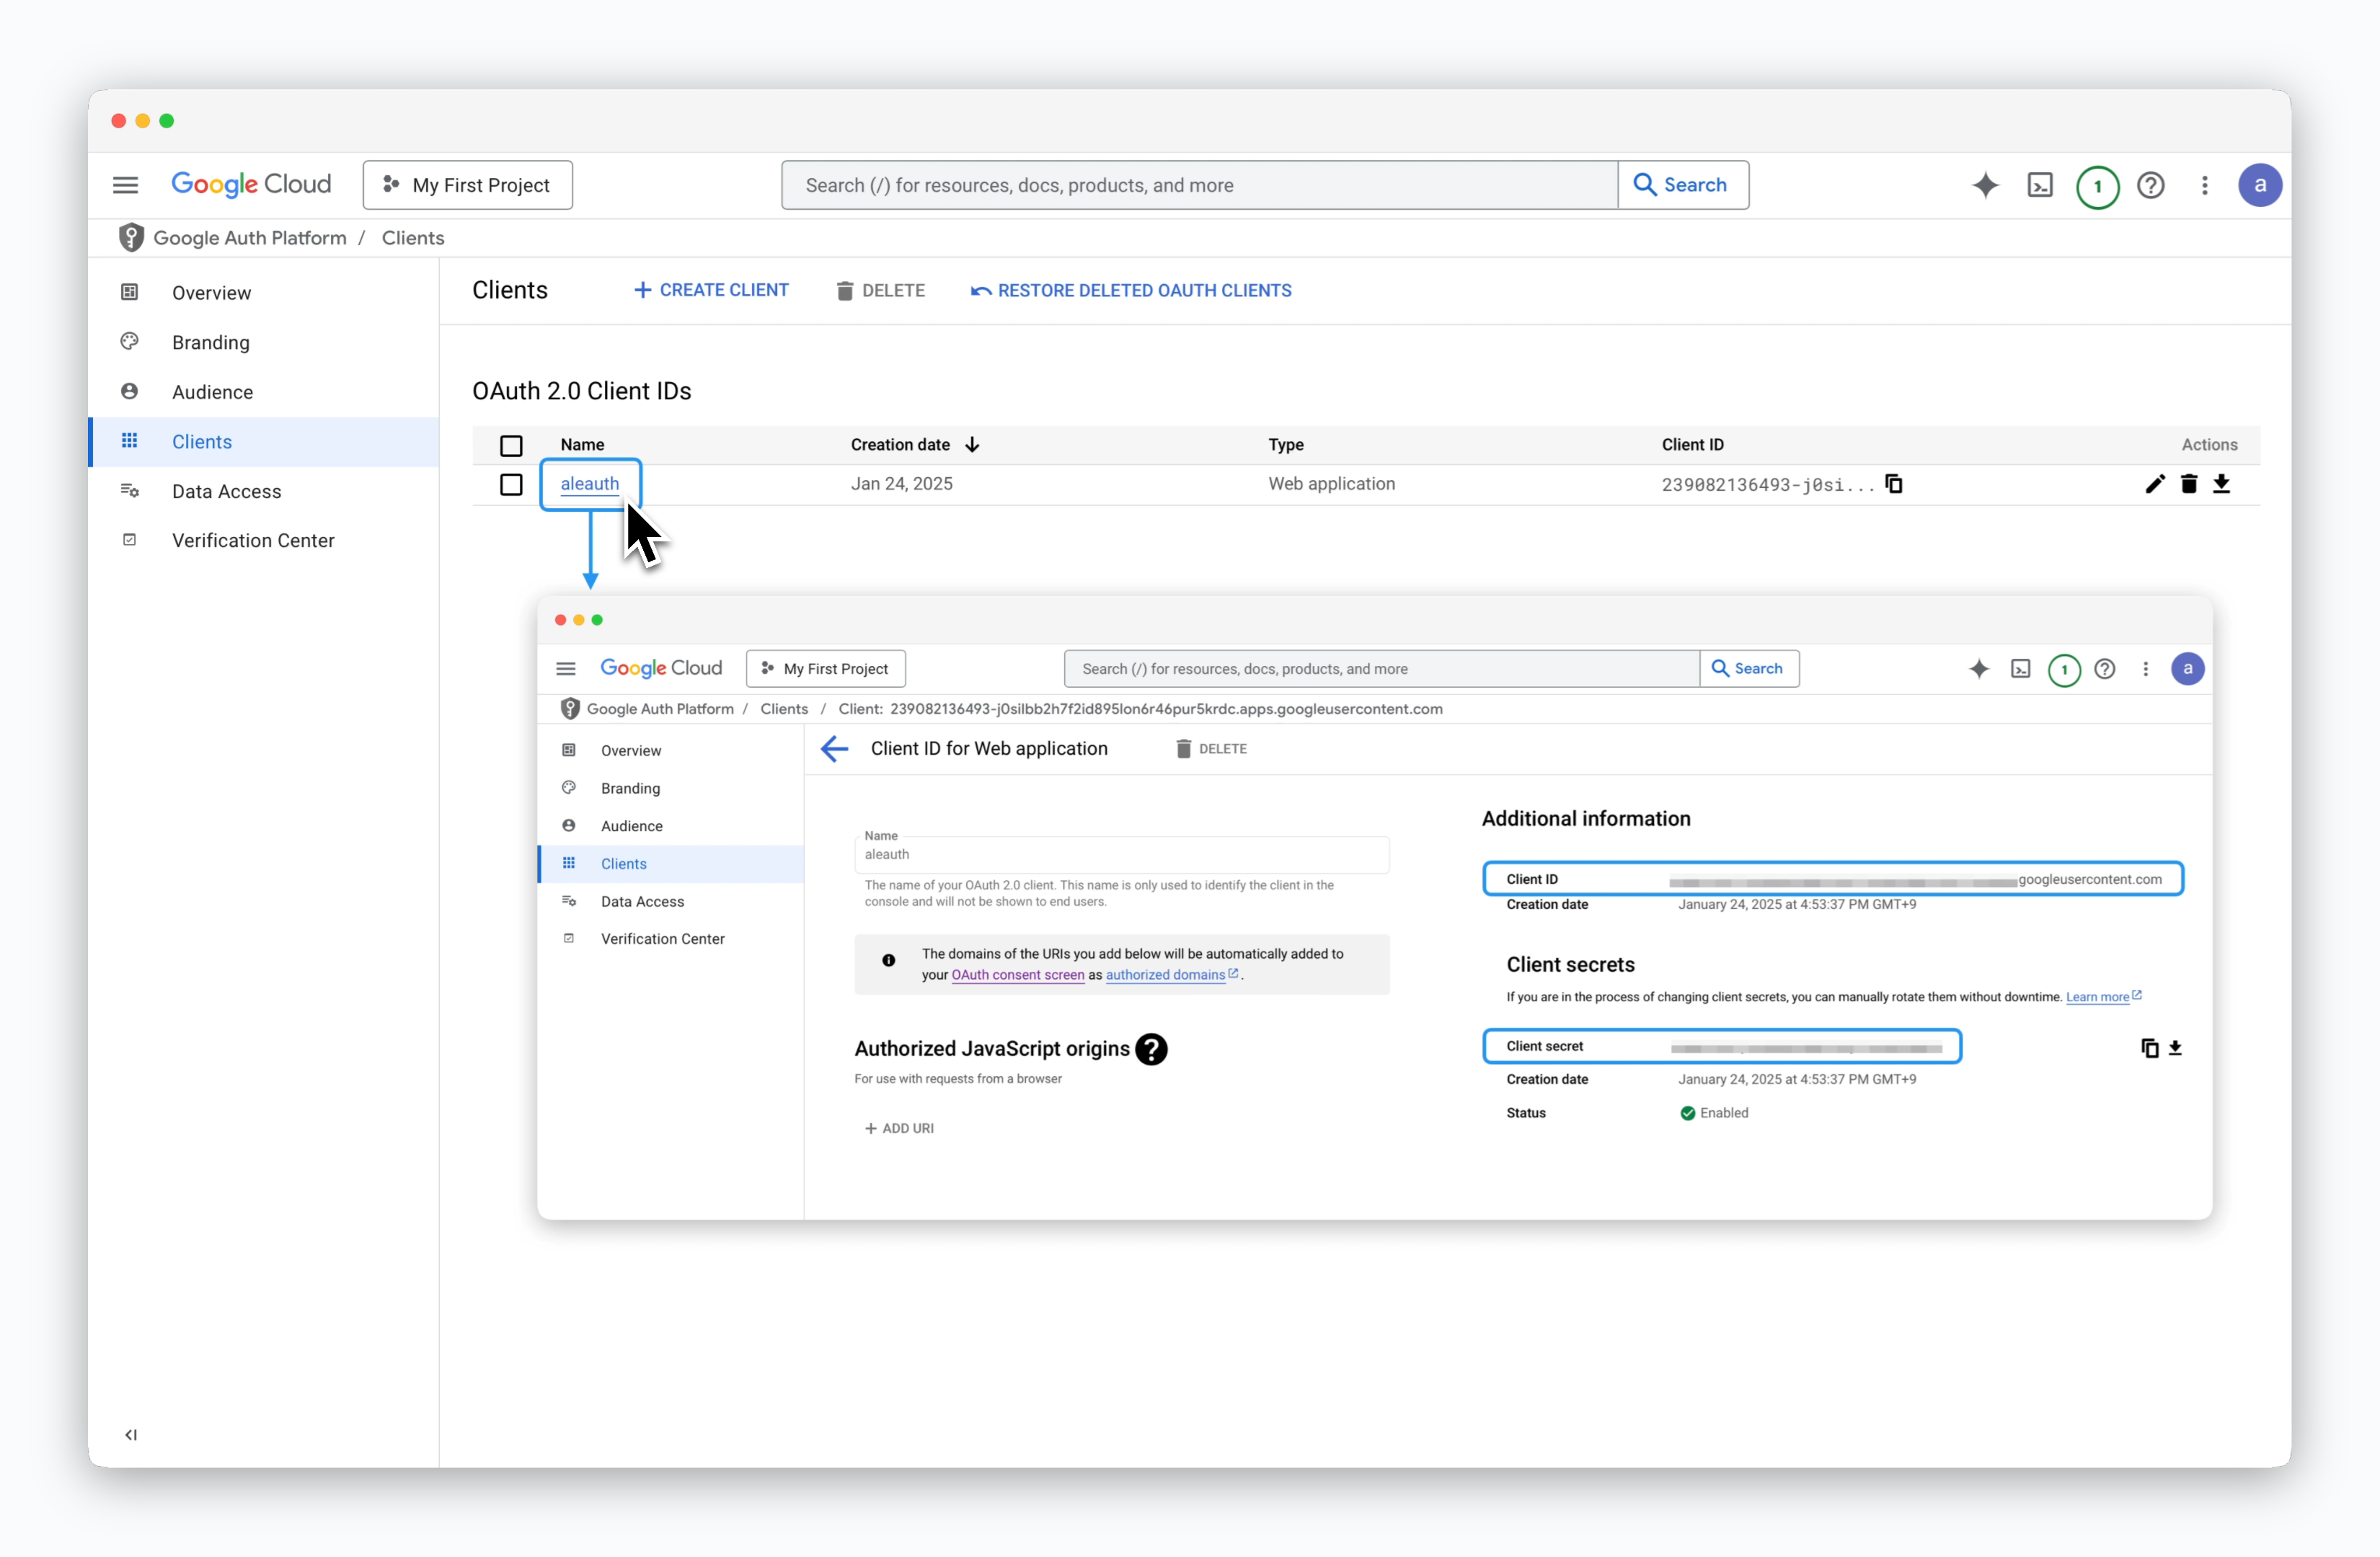 > 좌측 사이드바의 Client페이지에서, 생성된 Client 이름을 클릭하면 **Client ID**와 **Client Secret**을 조회할 수 있습니다.
***
## ale 운영 시스템에 등록
> 좌측 사이드바의 Client페이지에서, 생성된 Client 이름을 클릭하면 **Client ID**와 **Client Secret**을 조회할 수 있습니다.
***
## ale 운영 시스템에 등록
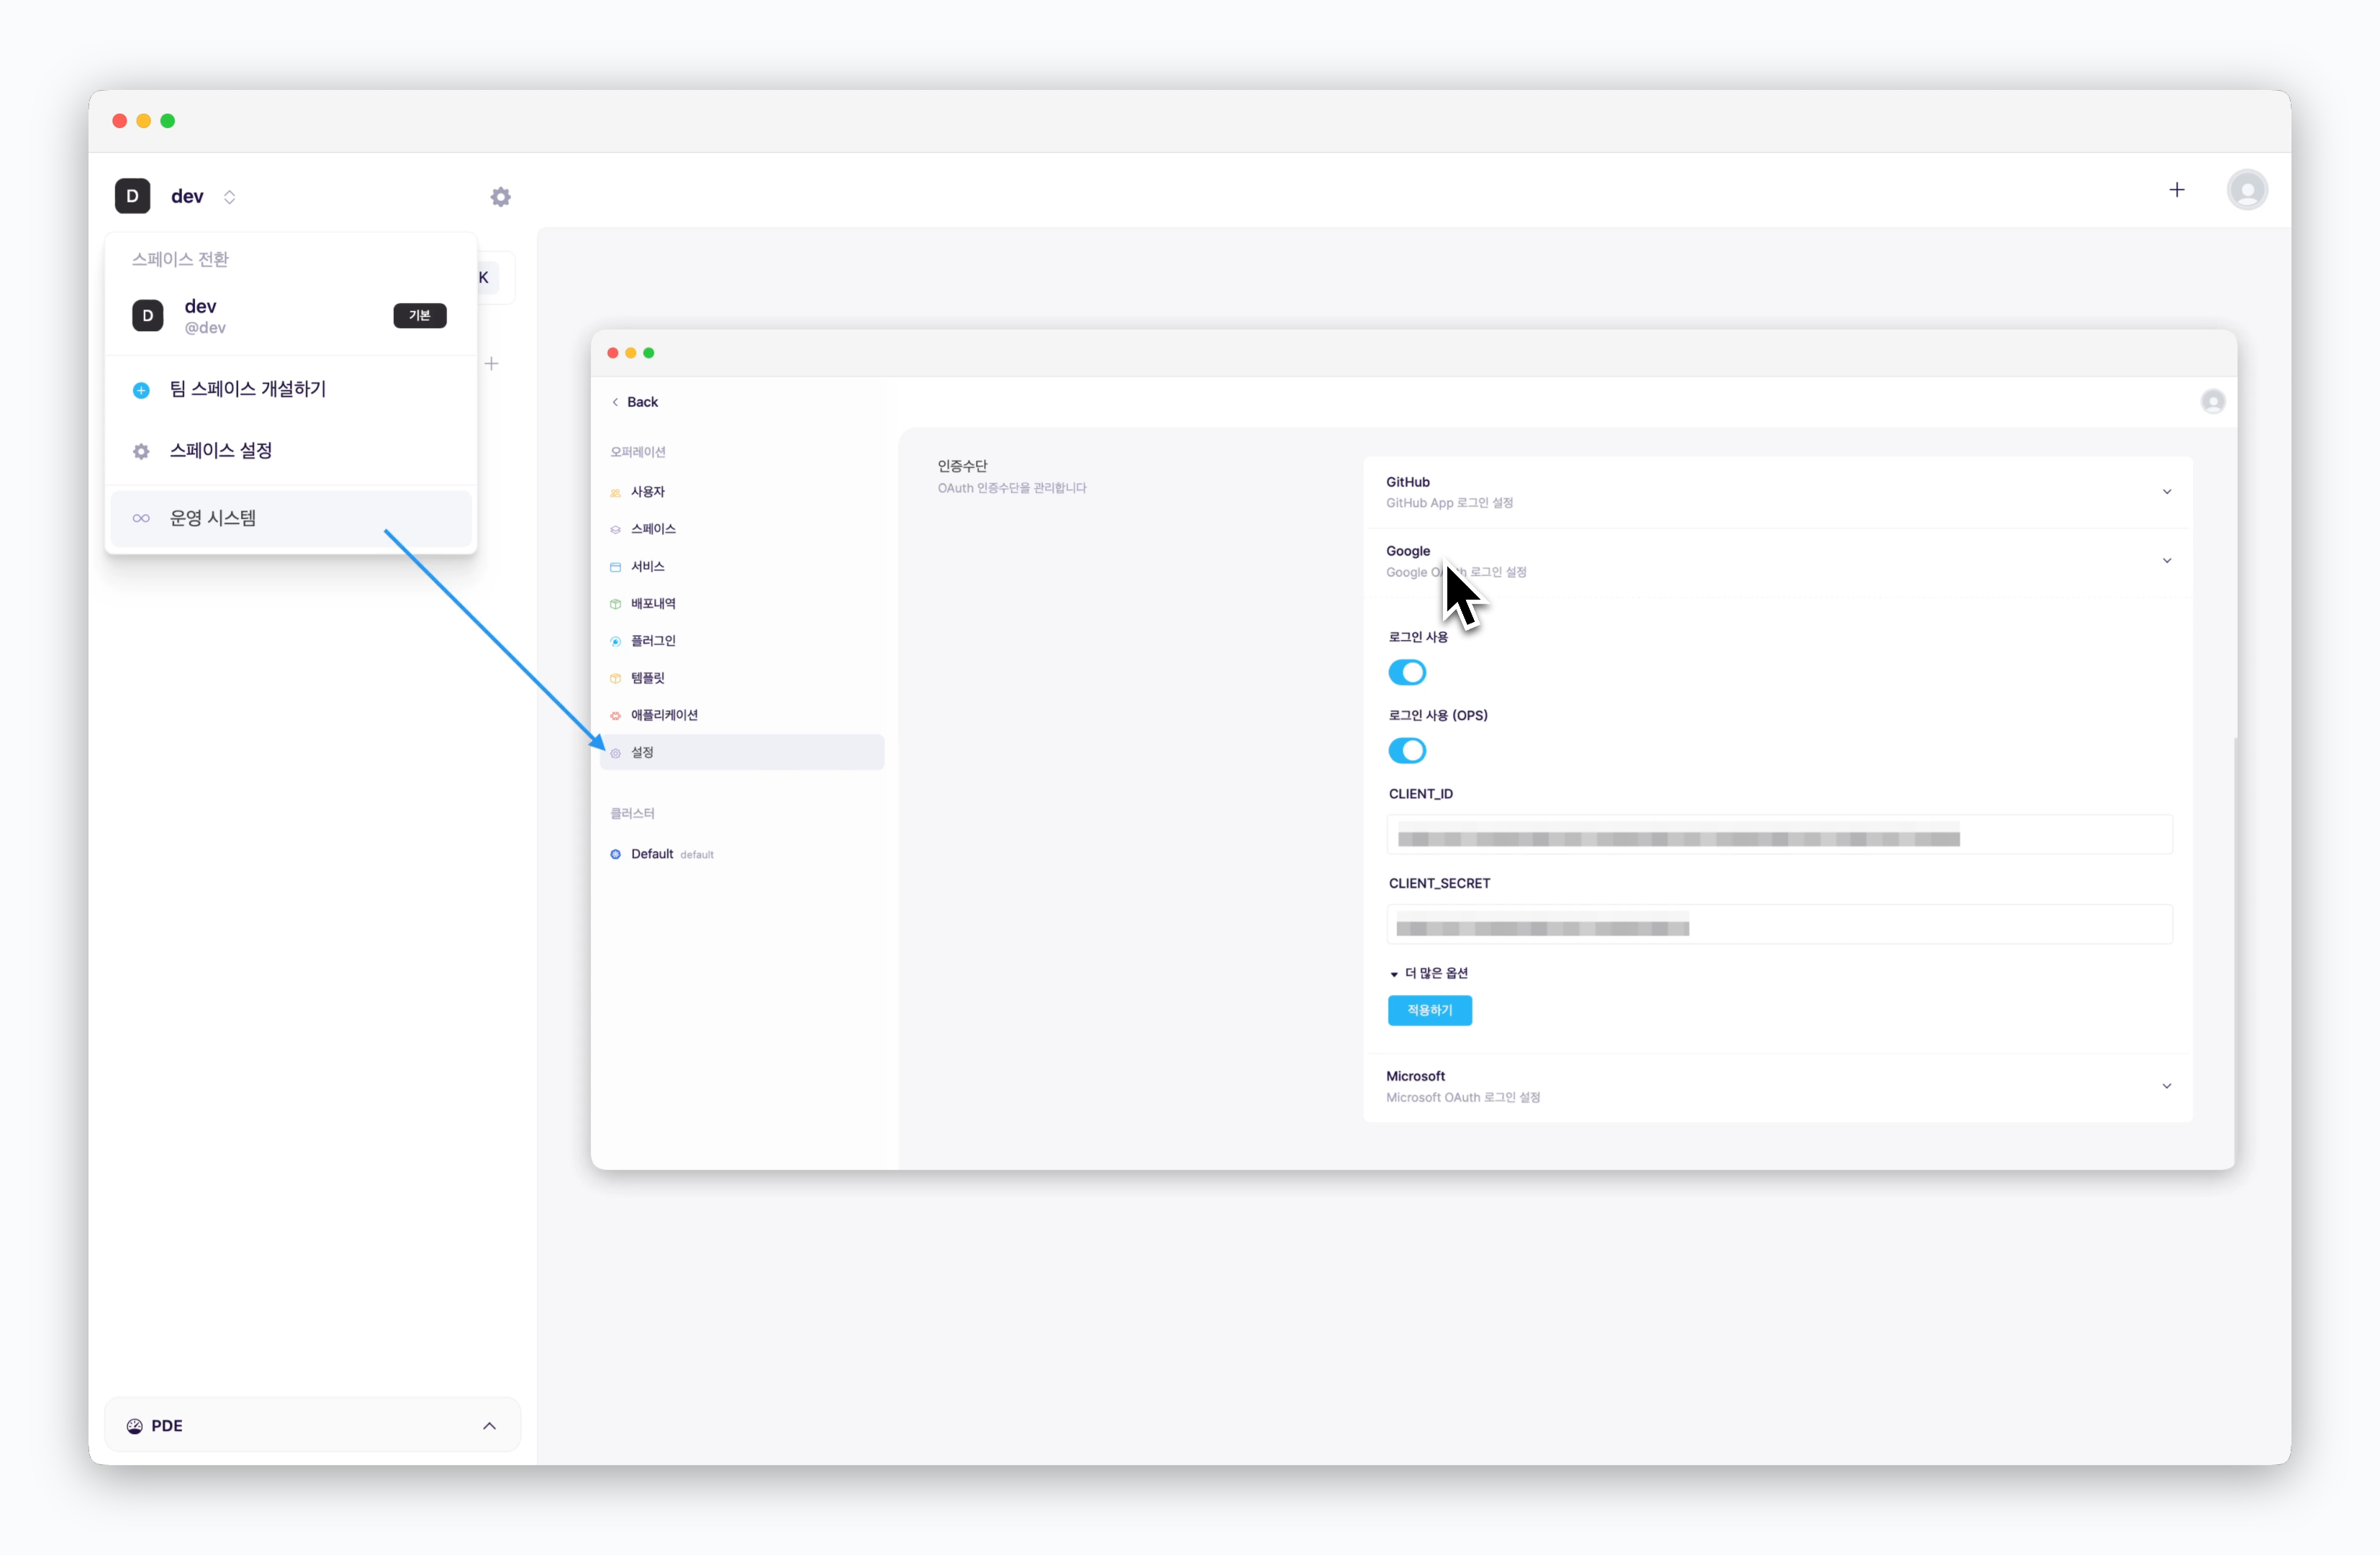 > 운영 시스템에 접속해 **설정 > 인증수단 > Google 드롭다운**을 클릭한 후, 앞 단계에서 조회한 값들을 각 필드에 입력하고 `적용하기`를 클릭하세요.
**로그인 사용** 항목을 비활성화하면, Google login이 비활성화됩니다.
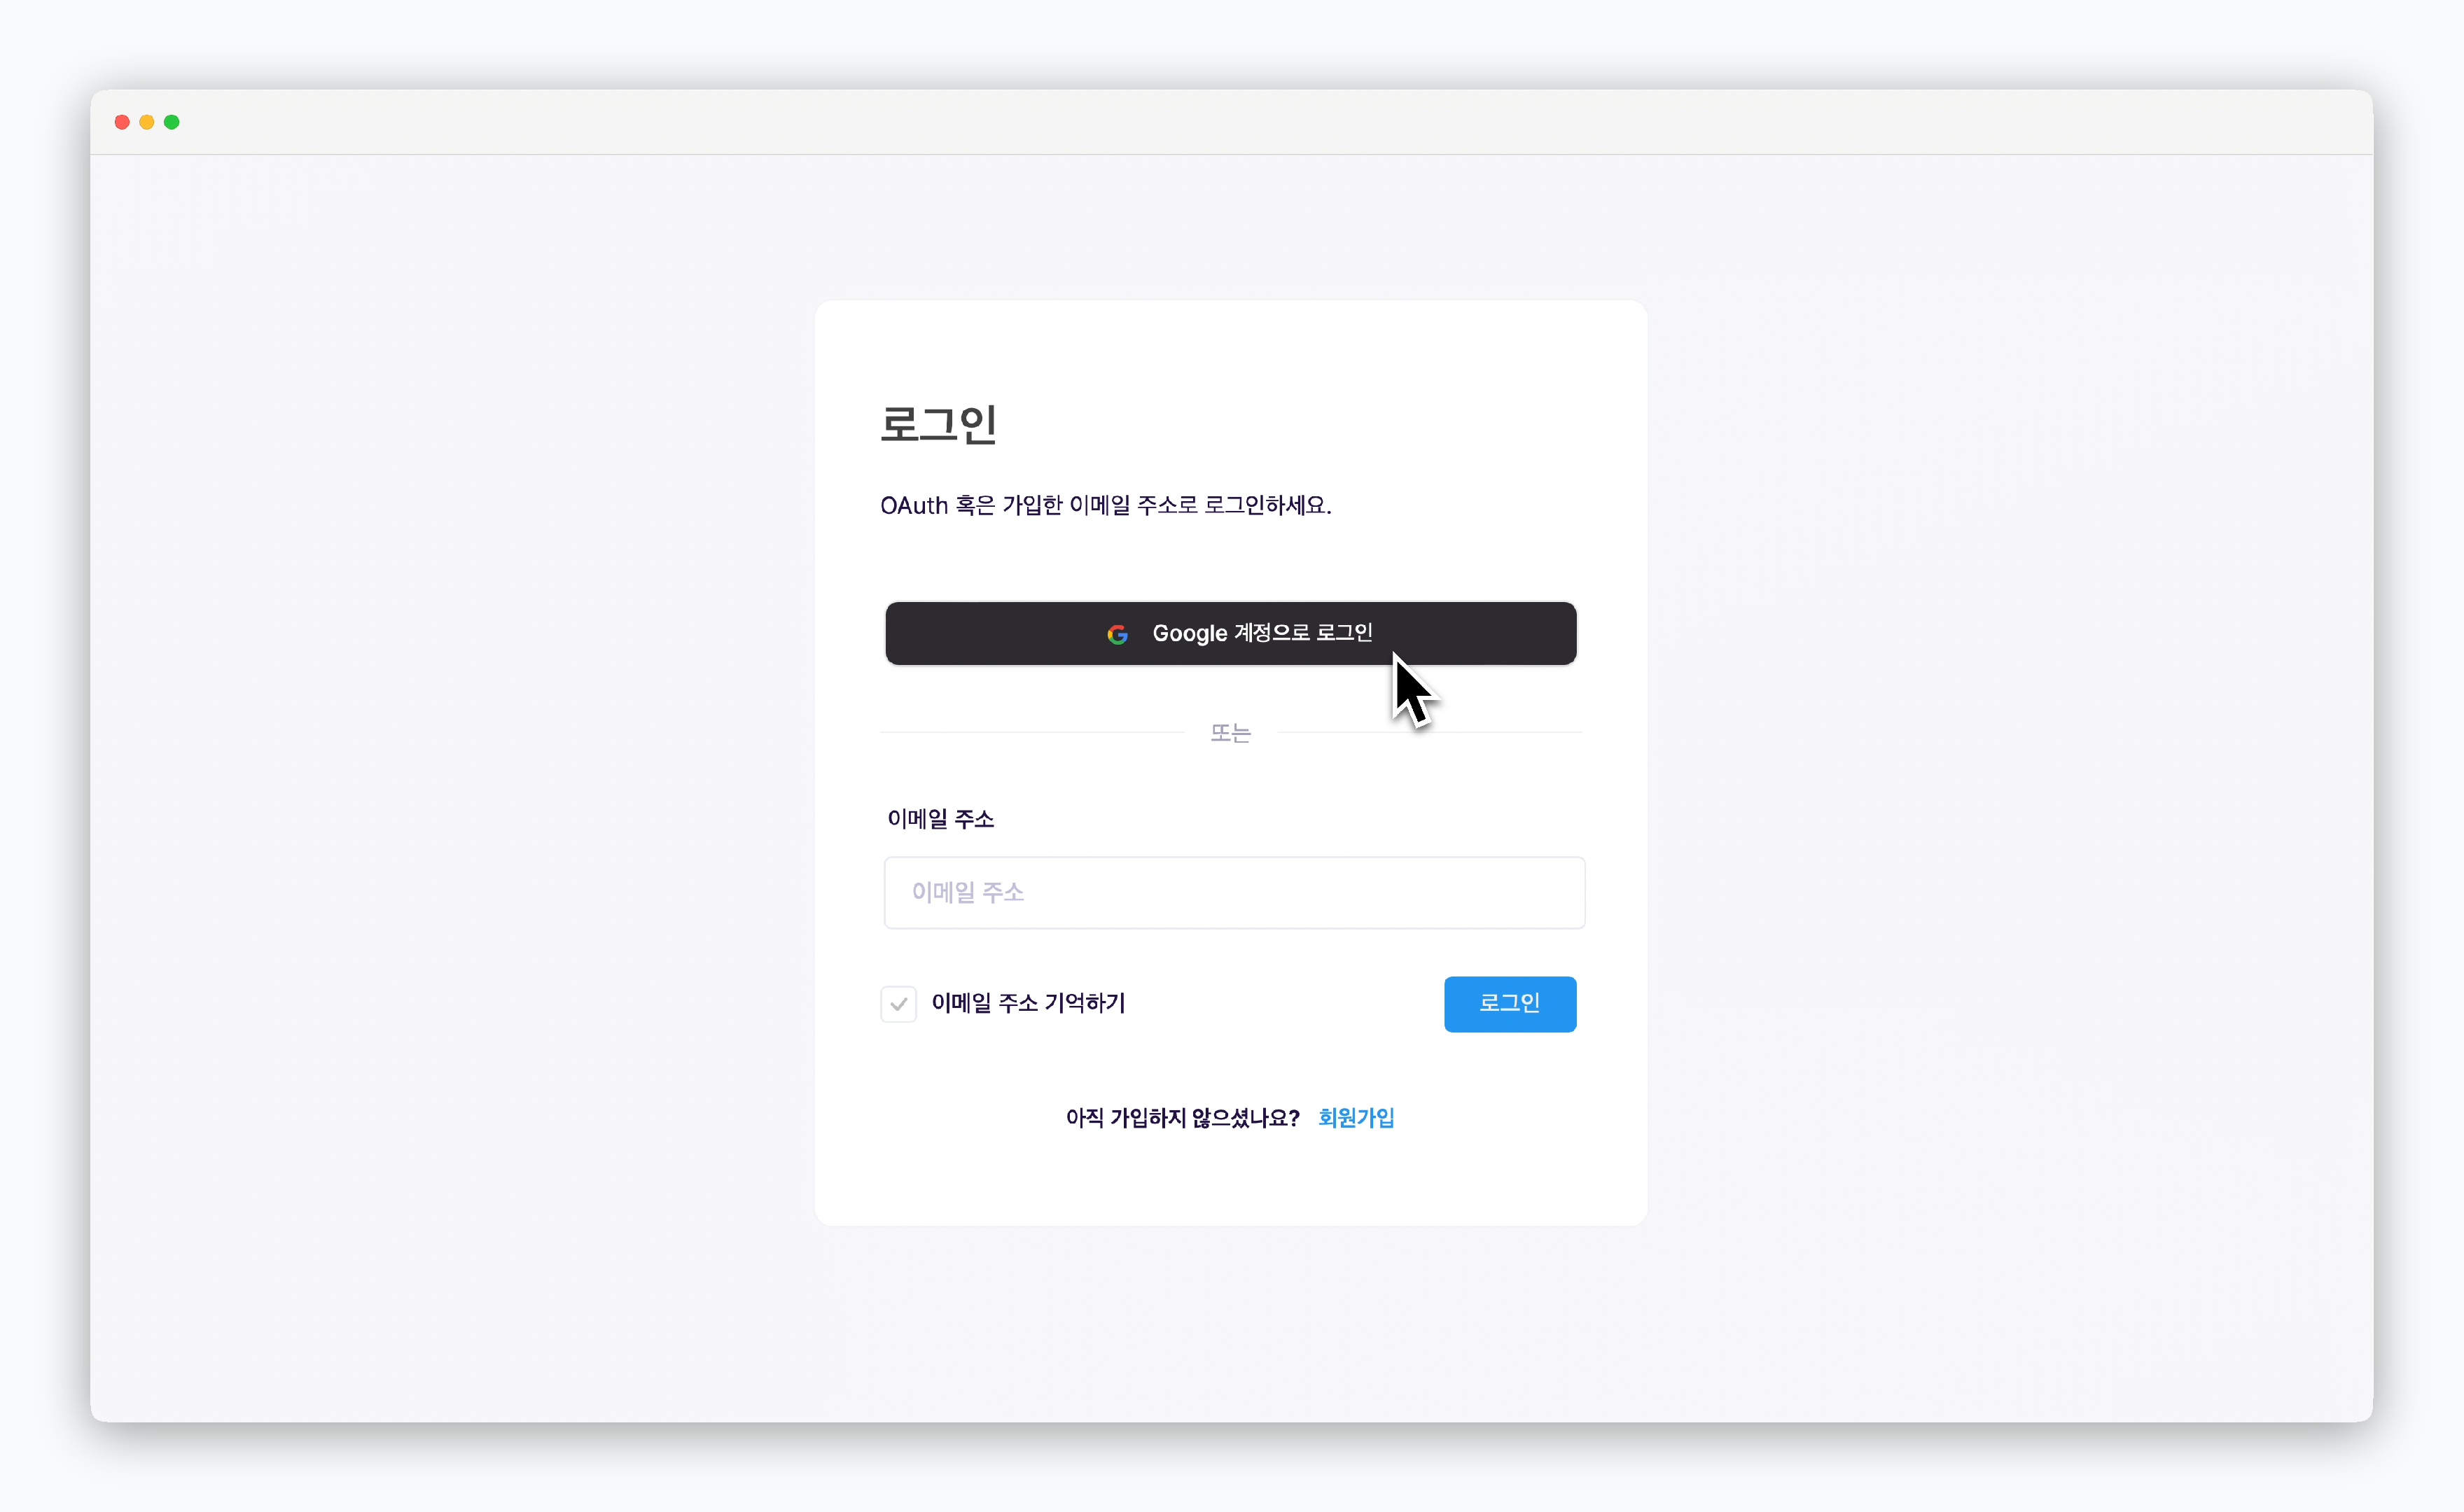
적용 완료 후 대시보드 페이지에 접속하면 다음과 같이 **Google 계정으로 로그인** 버튼이 표시됩니다.
> 운영 시스템에 접속해 **설정 > 인증수단 > Google 드롭다운**을 클릭한 후, 앞 단계에서 조회한 값들을 각 필드에 입력하고 `적용하기`를 클릭하세요.
**로그인 사용** 항목을 비활성화하면, Google login이 비활성화됩니다.
적용 완료 후 대시보드 페이지에 접속하면 다음과 같이 **Google 계정으로 로그인** 버튼이 표시됩니다.
 ## Google 계정으로 로그인
### Sign up
## Google 계정으로 로그인
### Sign up
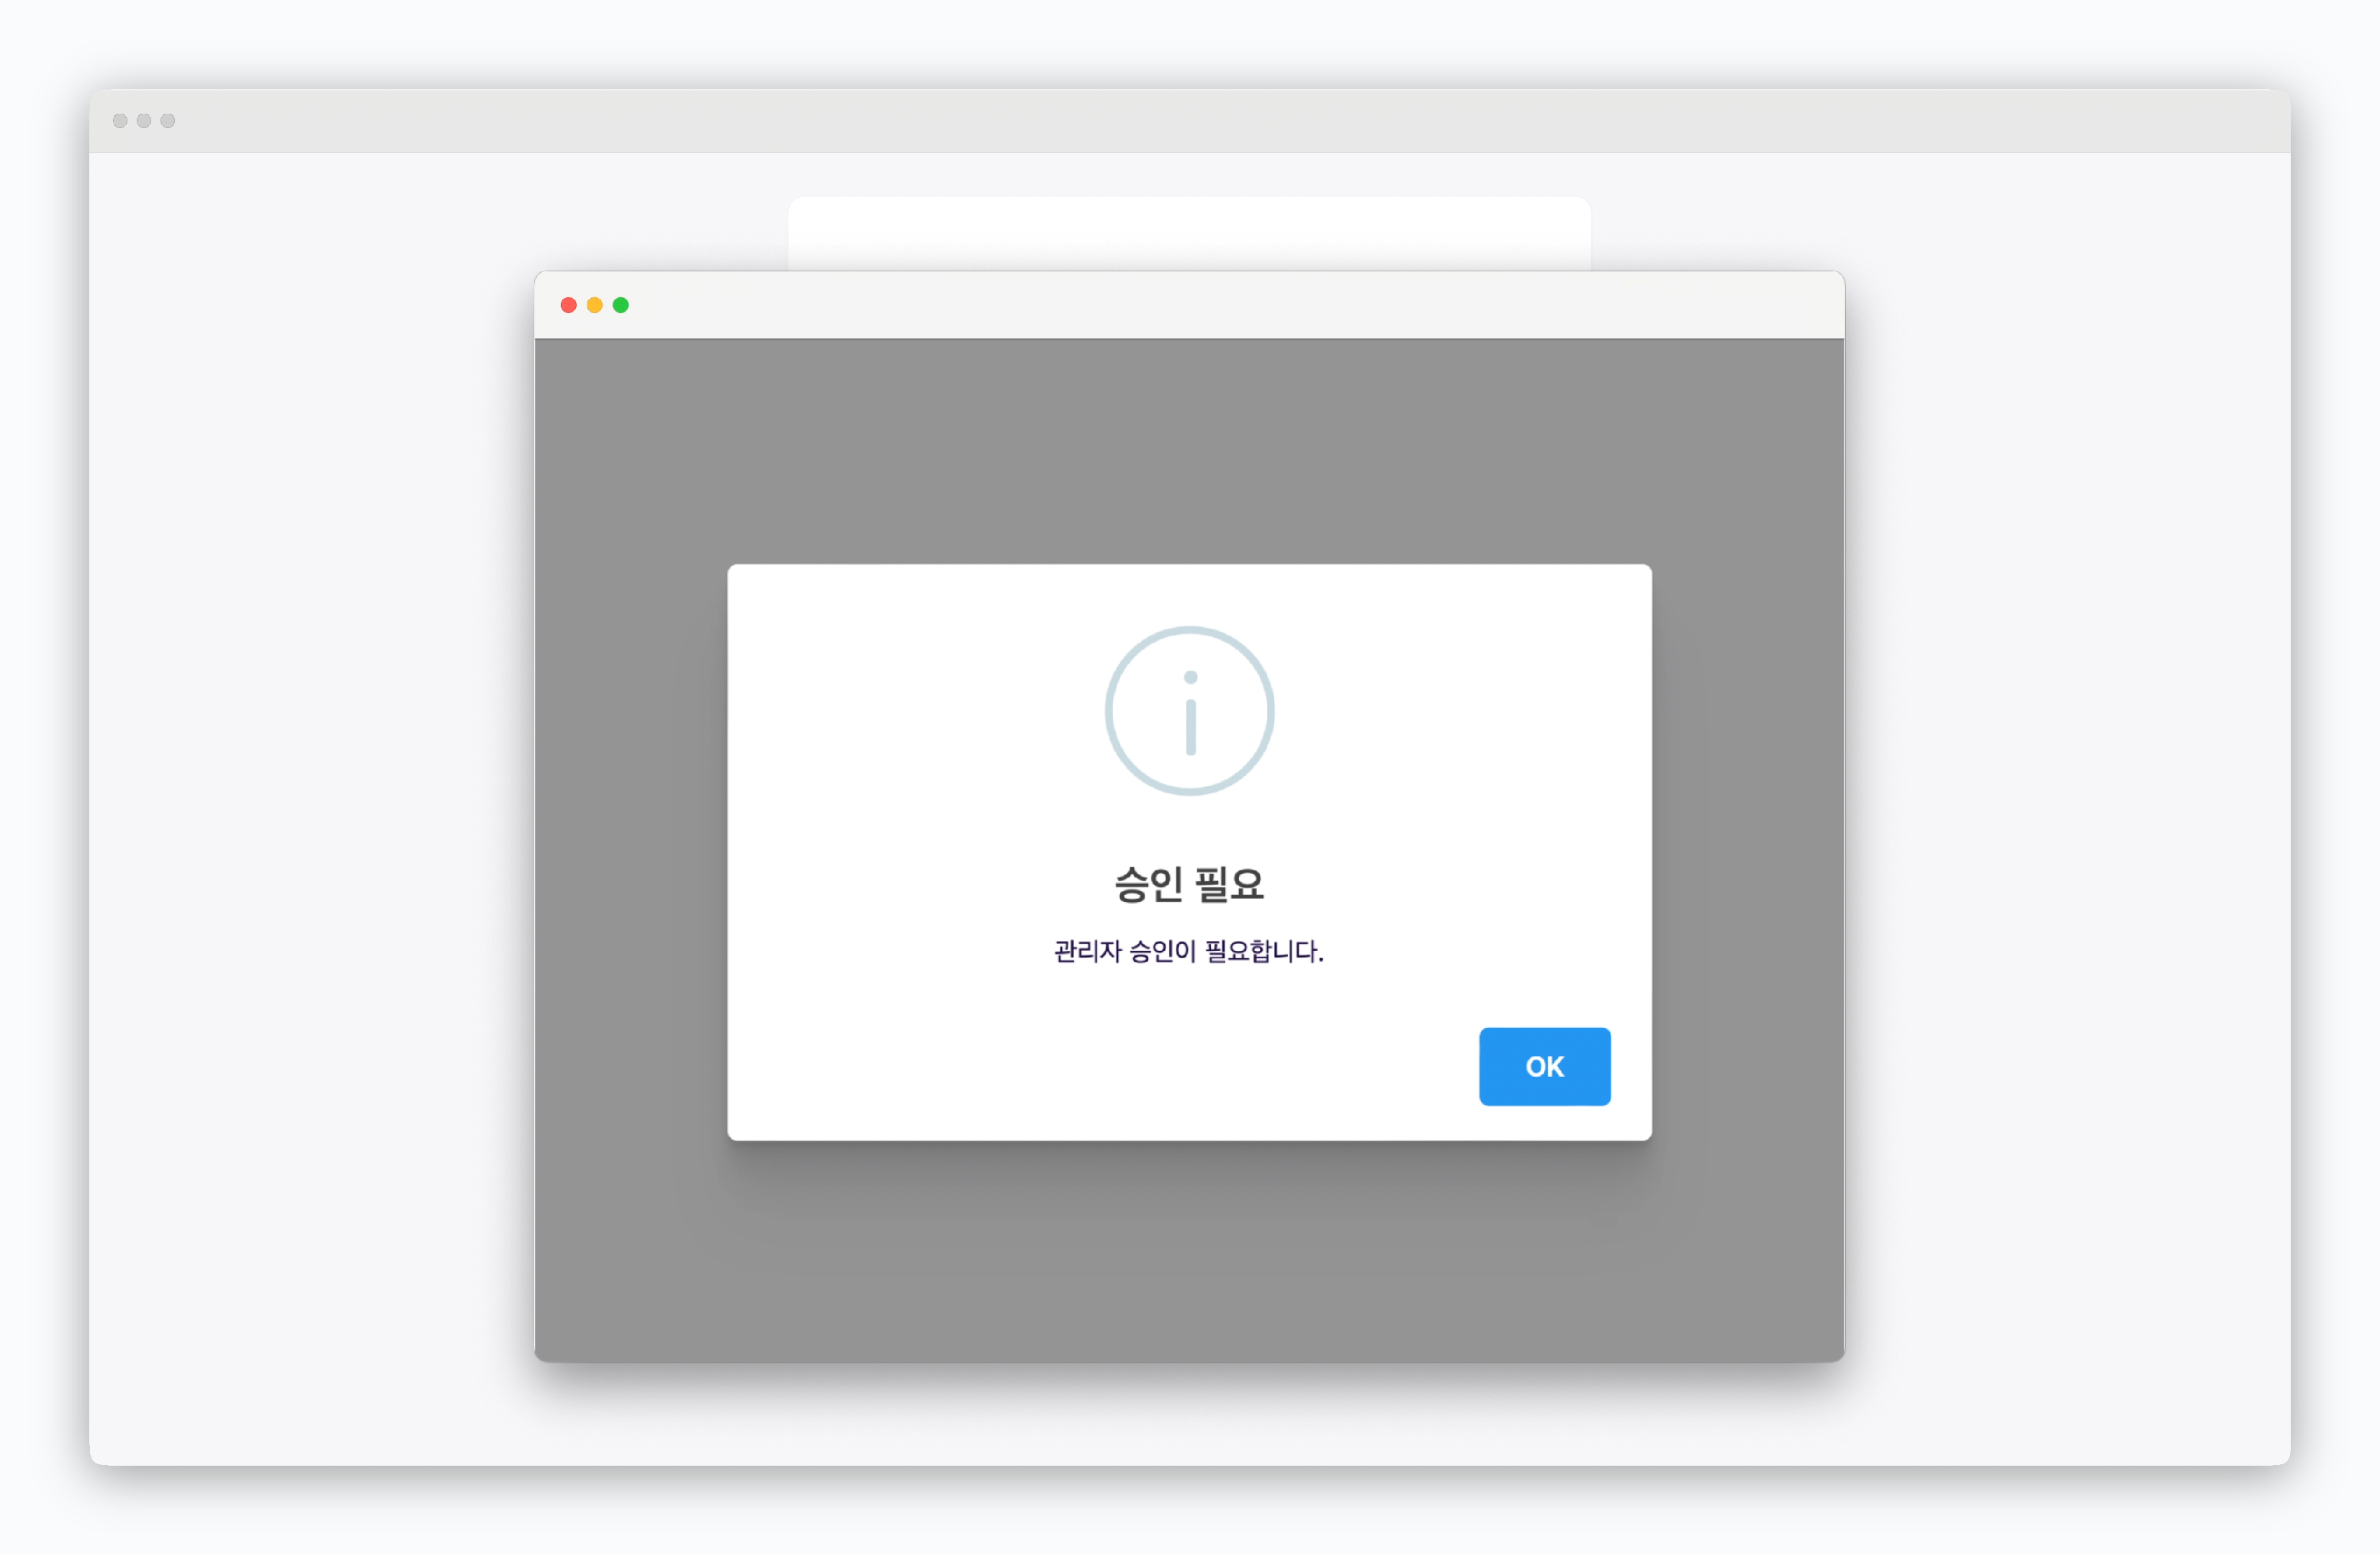 > Google login 과정을 거치면 가입 신청이 된 상태이며 관리자 승인 관련 메세지가 표시됩니다. 관리자의 승인이 완료되면 `ale`에 로그인 할 수 있습니다.
가입 신청한 사용자의 승인(활성화)는 [사용자 관리 페이지](/ko/operations/user-management#%EC%82%AC%EC%9A%A9%EC%9E%90-%ED%99%9C%EC%84%B1%ED%99%94)를 참고하세요.
### Sign in
> Google login 과정을 거치면 가입 신청이 된 상태이며 관리자 승인 관련 메세지가 표시됩니다. 관리자의 승인이 완료되면 `ale`에 로그인 할 수 있습니다.
가입 신청한 사용자의 승인(활성화)는 [사용자 관리 페이지](/ko/operations/user-management#%EC%82%AC%EC%9A%A9%EC%9E%90-%ED%99%9C%EC%84%B1%ED%99%94)를 참고하세요.
### Sign in
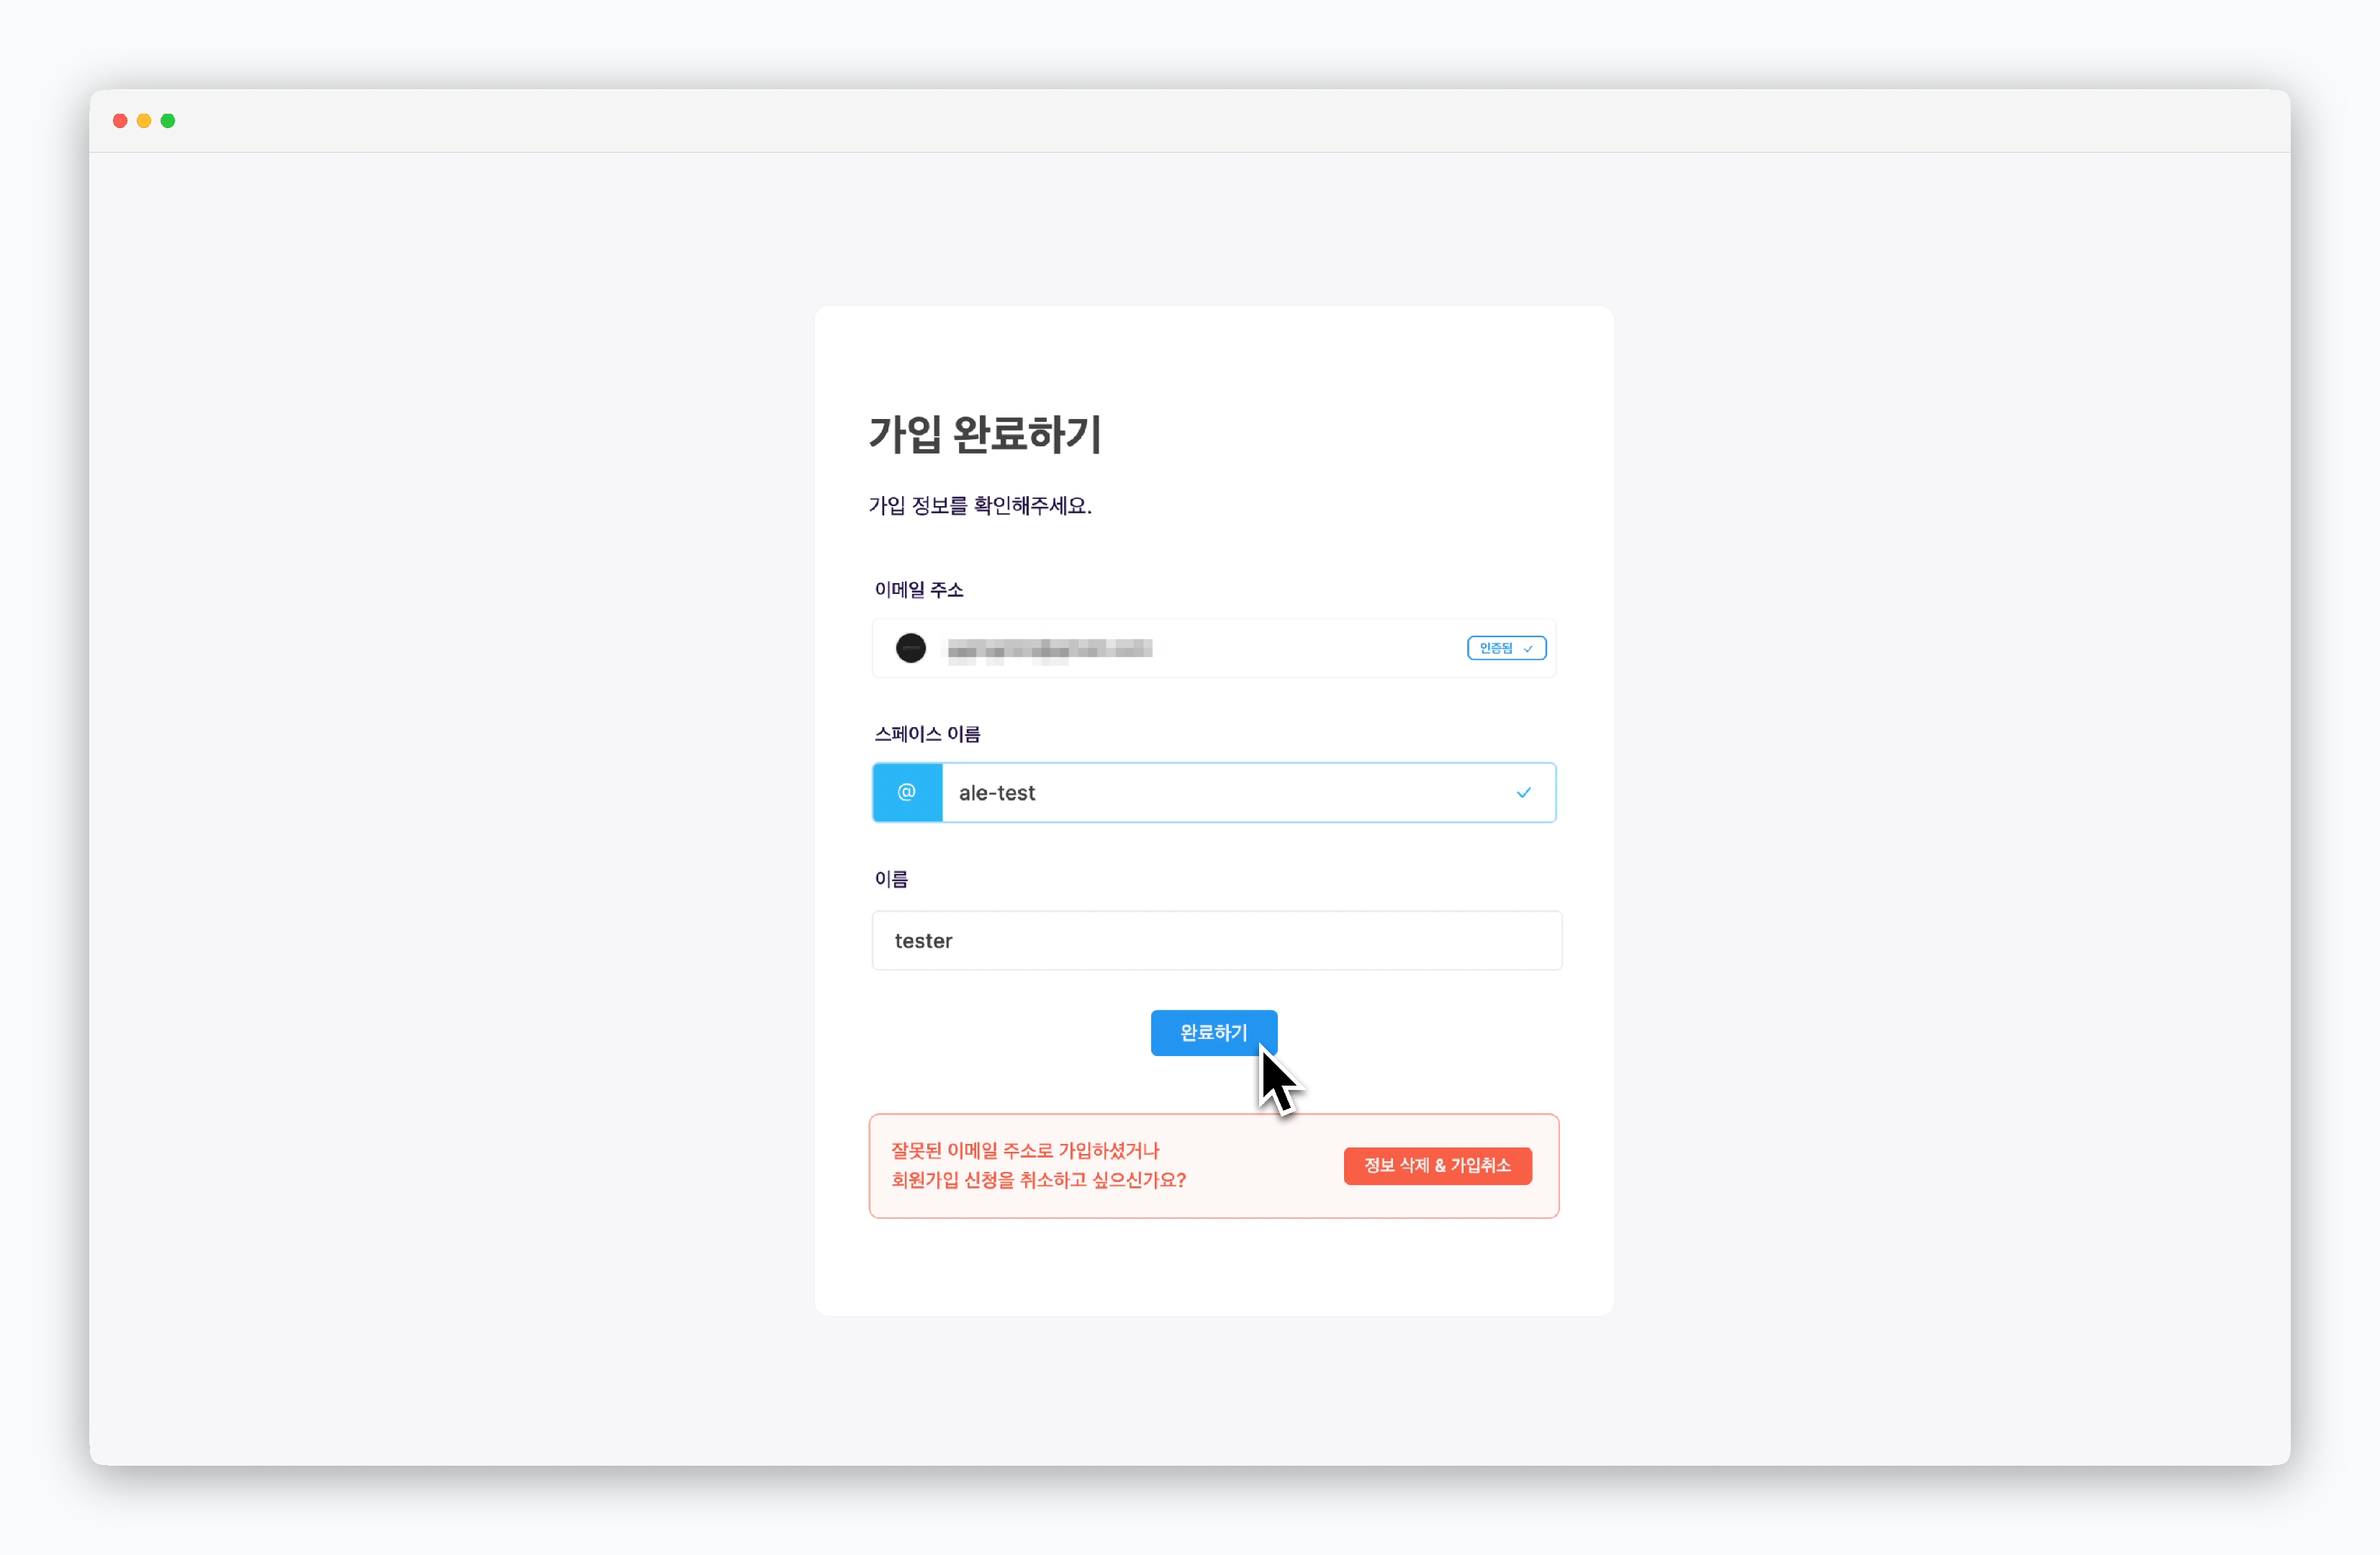 > 관리자 승인 이후 Google login을 시도하면 **가입 완료하기** 페이지가 표시됩니다.
> 스페이스 및 이름을 적절하게 작성하고 `완료하기`를 클릭하세요.
대시보드 접속과 함께 지정한 이름의 스페이스가 생성되며, [운영 시스템에서 미리 정한 Default 값의 리소스](/ko/operations/settings#%EB%A6%AC%EC%86%8C%EC%8A%A4-%ED%94%84%EB%A1%9C%ED%8C%8C%EC%9D%BC-%EA%B4%80%EB%A6%AC)가 부여됩니다.
사용자 등록 및 관리에 관한 내용은 [사용자 관리 페이지](/ko/operations/user-management)를 참고하세요.
> 관리자 승인 이후 Google login을 시도하면 **가입 완료하기** 페이지가 표시됩니다.
> 스페이스 및 이름을 적절하게 작성하고 `완료하기`를 클릭하세요.
대시보드 접속과 함께 지정한 이름의 스페이스가 생성되며, [운영 시스템에서 미리 정한 Default 값의 리소스](/ko/operations/settings#%EB%A6%AC%EC%86%8C%EC%8A%A4-%ED%94%84%EB%A1%9C%ED%8C%8C%EC%9D%BC-%EA%B4%80%EB%A6%AC)가 부여됩니다.
사용자 등록 및 관리에 관한 내용은 [사용자 관리 페이지](/ko/operations/user-management)를 참고하세요.