> ## Documentation Index
> Fetch the complete documentation index at: https://docs.ale.run/llms.txt
> Use this file to discover all available pages before exploring further.
# 빠른 시작
> ale을 로컬에 설치하고, 로컬 환경의 K8s 클러스터에 애플리케이션을 배포하는 가이드입니다.
`ale`을 사용하기 위해서는 20 이상의 Node.js가 설치되어 있어야 합니다.
***
## 클러스터 세팅
* [도커 데스크탑](https://www.docker.com/products/docker-desktop/) 웹 사이트에 접속하여 OS 및 아키텍처에 맞는 설치 파일을 다운로드하세요.
이를 실행하여 설치를 완료한 후 터미널에서 다음의 명령을 입력하여 정상적으로 도커가 설치가 되었는지 확인합니다.
```bash theme={null}
docker version
```
**Kubernetes 클러스터 세팅**
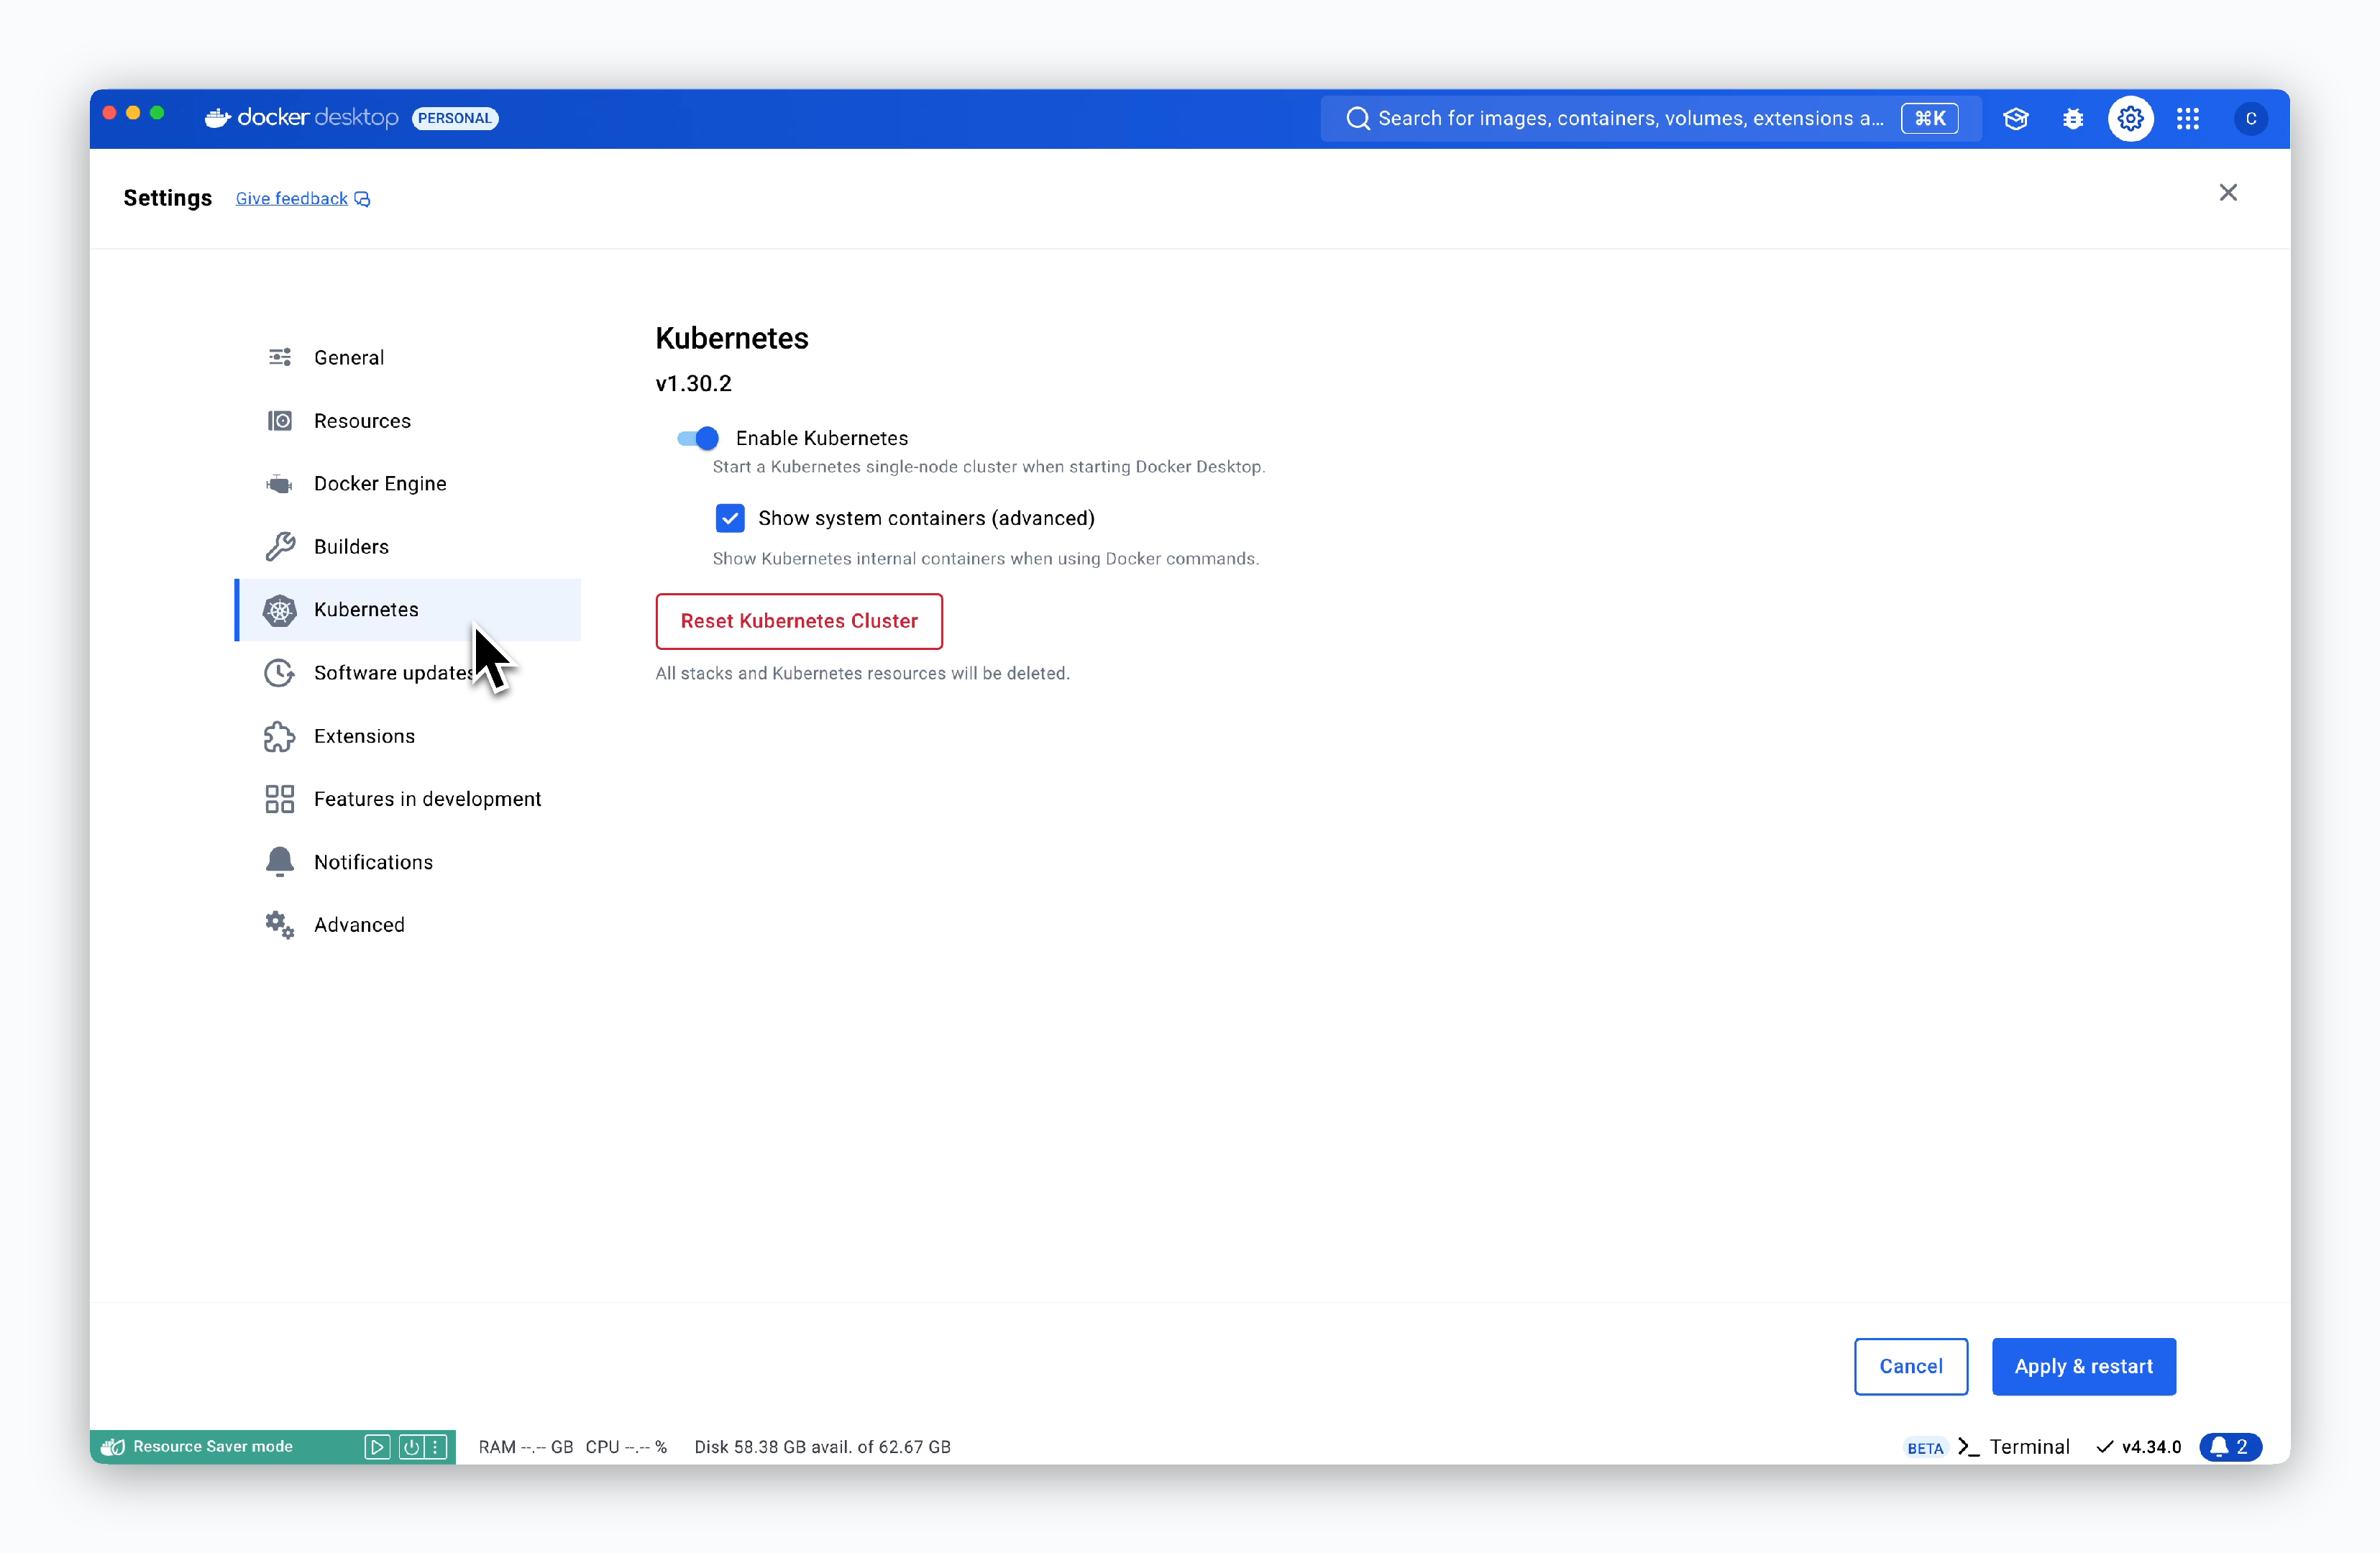
**1.** 도커 데스크톱의 설정 창으로 진입한 후 좌측 메뉴에서 **Kubernetes**를 선택합니다.
이어서 **Enable Kubernetes**에 체크하고 하단의 `Apply & restart`를 클릭하세요.
 **2.** kubectl 명령이 도커 데스크톱을 통해 생성된 Kubernetes 클러스터에 적용되도록 다음의 명령어를 실행하세요.
```bash theme={null}
kubectl config use-context docker-desktop
```
```plain theme={null}
Switched to context "docker-desktop".
```
**3.** 터미널에서 다음의 명령어를 실행하여 정상적으로 클러스터가 구동되었는지 확인하세요.
**STATUS**가 **Ready**가 아니거나 아래의 내용이 출력되지 않는 경우 정상적으로 Kubernetes 클러스터를 사용할 수 없는 상태이므로 컨텍스트 및 도커 데스크톱의 상태를 확인해야 합니다.
```bash theme={null}
kubectl get node
```
```plain theme={null}
NAME STATUS ROLES AGE VERSION
docker-desktop Ready control-plane 37m v1.30.2
```
* [HomeBrew](https://brew.sh/)가 설치된 macOS에서 다음의 명령어를 실행하세요.
```bash theme={null}
brew install orbstack
```
**Kubernetes 클러스터 세팅**
**1.** OrbStack의 설정 창으로 진입한 후 **Kubernetes** 탭을 선택합니다.
이어서 **Enable Kubernetes cluster**, **Expose services to local network devices** 에 체크하고 하단의 `Apply`를 클릭하세요.
**2.** kubectl 명령이 도커 데스크톱을 통해 생성된 Kubernetes 클러스터에 적용되도록 다음의 명령어를 실행하세요.
```bash theme={null}
kubectl config use-context docker-desktop
```
```plain theme={null}
Switched to context "docker-desktop".
```
**3.** 터미널에서 다음의 명령어를 실행하여 정상적으로 클러스터가 구동되었는지 확인하세요.
**STATUS**가 **Ready**가 아니거나 아래의 내용이 출력되지 않는 경우 정상적으로 Kubernetes 클러스터를 사용할 수 없는 상태이므로 컨텍스트 및 도커 데스크톱의 상태를 확인해야 합니다.
```bash theme={null}
kubectl get node
```
```plain theme={null}
NAME STATUS ROLES AGE VERSION
docker-desktop Ready control-plane 37m v1.30.2
```
* [HomeBrew](https://brew.sh/)가 설치된 macOS에서 다음의 명령어를 실행하세요.
```bash theme={null}
brew install orbstack
```
**Kubernetes 클러스터 세팅**
**1.** OrbStack의 설정 창으로 진입한 후 **Kubernetes** 탭을 선택합니다.
이어서 **Enable Kubernetes cluster**, **Expose services to local network devices** 에 체크하고 하단의 `Apply`를 클릭하세요.
 **2.** kubectl 명령이 OrbStack을 통해 생성된 Kubernetes 클러스터에 적용되도록 다음의 명령어를 실행하세요.
```bash theme={null}
kubectl config use-context orbstack
```
```plain theme={null}
Switched to context "orbstack".
```
**3.** 터미널에서 다음의 명령어를 실행하여 정상적으로 클러스터가 구동되었는지 확인하세요.
**STATUS**가 **Ready**가 아니거나 아래의 내용이 출력되지 않는 경우 정상적으로 Kubernetes 클러스터를 사용할 수 없는 상태이므로 컨텍스트 및 OrbStack의 상태를 확인해야 합니다.
```bash theme={null}
kubectl get node
```
```plain theme={null}
NAME STATUS ROLES AGE VERSION
orbstack Ready control-plane,master 7m14s v1.29.3+orb1
```
kind를 활용하기 위해서는 v1.16 이상의 go가 설치되어 있어야 합니다.
[이 페이지](https://go.dev/dl/)에서 운영체제에 맞는 파일을 다운로드 받아 설치 후 다음의 명령어를 입력하여 쉘에 go의 경로를 등록합니다.
```bash zsh theme={null}
echo 'export PATH=$PATH:$HOME/go/bin' >> ~/.zshrc && source ~/.zshrc
```
```bash bash theme={null}
echo 'export PATH=$PATH:$HOME/go/bin' >> ~/.bashrc && source ~/.bashrc
```
* 터미널에서 다음의 명령어를 실행하세요.
```bash theme={null}
go install sigs.k8s.io/kind@v0.25.0
```
**Kubernetes 클러스터 세팅**
**1.** 터미널에 다음의 명령어를 입력합니다.
```bash theme={null}
cat < 19m v1.31.2
kind-worker2 Ready 19m v1.31.2
```
## ale 설치 및 실행
```bash theme={null}
mkdir ale-run
cd ale-run
```
```bash theme={null}
npm i @ale-run/runtime@latest
```
```bash theme={null}
kubectl apply -f https://raw.githubusercontent.com/kubernetes/ingress-nginx/controller-v1.11.2/deploy/static/provider/cloud/deploy.yaml
```
```bash theme={null}
kubectl delete -A ValidatingWebhookConfiguration ingress-nginx-admission
```
```bash theme={null}
kubectl patch ingressclass nginx --type='merge' -p '{"metadata": {"annotations": {"ingressclass.kubernetes.io/is-default-class": "true"}}}'
```
```bash theme={null}
kubectl apply -f https://github.com/kubernetes-sigs/metrics-server/releases/latest/download/components.yaml
```
```bash theme={null}
npx aled dev
```
```bash theme={null}
? Select the k8s cluster to use. › Select the k8s cluster to use.
No Cluster
orbstack
❯ docker-desktop
```
다음과 같이 로그가 표시되면 실행이 완료된 것입니다.
```bash theme={null}
...
[INFO] [plugin:cloudtype-apps] plugin @cloudtype/apps is installed {}
[INFO] [plugin:cloudtype-apps] plugin @cloudtype/apps is activate {}
[INFO] [pde:init] plugin "@cloudtype/apps" loaded!
[INFO] [k8s] KubernetesClusterType initialized with agent {"connection":{"context":"docker-desktop","namespace":"ale-pde"},"stat":{"db":{"url":"mongodb://127.0.0.1:64000/","dbName":"ale-pde"}}}
[INFO] [k8s] ConfigContext initialized with {"connection":{"context":"docker-desktop","namespace":"ale-pde"},"stat":{"db":{"url":"mongodb://127.0.0.1:64000/","dbName":"ale-pde"}}}
[INFO] [k8s] connect k8s to "docker-desktop"
[INFO] [k8s] [agent] cluster agent initialized
[WARN] [k8s] ConfigMap.get ale-pde agent-config
[INFO] [pde:agent] Ale Agent is initialized with config
[INFO] [pde:init] Ale Agent httpsd is listening at 127.0.0.1:9801
[INFO] [k8s] config loaded from cluster from "ale-pde/agent-config"
[INFO] [stat] stat controller init {"collector":{"prefix":"ale"},"db":{"url":"mongodb://127.0.0.1:64000/","dbName":"ale-pde"},"connection":{"context":"docker-desktop","namespace":"ale-pde"}}
[INFO] [stat] connect k8s to "docker-desktop"
[INFO] [stat] stat watcher started
```
실행 중 데이터베이스 충돌이 발생하는 경우, 다음의 명령을 입력하여 기존에 생성된 ale 데이터를 삭제 후 재실행하세요.
```bash theme={null}
rm -r ~/.ale-dev
```
로컬환경과 GitHub을 연동하면 GitHub 저장소의 소스코드를 배포할 수 있습니다.
**1. GitHub Apps 생성**
**2.** kubectl 명령이 OrbStack을 통해 생성된 Kubernetes 클러스터에 적용되도록 다음의 명령어를 실행하세요.
```bash theme={null}
kubectl config use-context orbstack
```
```plain theme={null}
Switched to context "orbstack".
```
**3.** 터미널에서 다음의 명령어를 실행하여 정상적으로 클러스터가 구동되었는지 확인하세요.
**STATUS**가 **Ready**가 아니거나 아래의 내용이 출력되지 않는 경우 정상적으로 Kubernetes 클러스터를 사용할 수 없는 상태이므로 컨텍스트 및 OrbStack의 상태를 확인해야 합니다.
```bash theme={null}
kubectl get node
```
```plain theme={null}
NAME STATUS ROLES AGE VERSION
orbstack Ready control-plane,master 7m14s v1.29.3+orb1
```
kind를 활용하기 위해서는 v1.16 이상의 go가 설치되어 있어야 합니다.
[이 페이지](https://go.dev/dl/)에서 운영체제에 맞는 파일을 다운로드 받아 설치 후 다음의 명령어를 입력하여 쉘에 go의 경로를 등록합니다.
```bash zsh theme={null}
echo 'export PATH=$PATH:$HOME/go/bin' >> ~/.zshrc && source ~/.zshrc
```
```bash bash theme={null}
echo 'export PATH=$PATH:$HOME/go/bin' >> ~/.bashrc && source ~/.bashrc
```
* 터미널에서 다음의 명령어를 실행하세요.
```bash theme={null}
go install sigs.k8s.io/kind@v0.25.0
```
**Kubernetes 클러스터 세팅**
**1.** 터미널에 다음의 명령어를 입력합니다.
```bash theme={null}
cat < 19m v1.31.2
kind-worker2 Ready 19m v1.31.2
```
## ale 설치 및 실행
```bash theme={null}
mkdir ale-run
cd ale-run
```
```bash theme={null}
npm i @ale-run/runtime@latest
```
```bash theme={null}
kubectl apply -f https://raw.githubusercontent.com/kubernetes/ingress-nginx/controller-v1.11.2/deploy/static/provider/cloud/deploy.yaml
```
```bash theme={null}
kubectl delete -A ValidatingWebhookConfiguration ingress-nginx-admission
```
```bash theme={null}
kubectl patch ingressclass nginx --type='merge' -p '{"metadata": {"annotations": {"ingressclass.kubernetes.io/is-default-class": "true"}}}'
```
```bash theme={null}
kubectl apply -f https://github.com/kubernetes-sigs/metrics-server/releases/latest/download/components.yaml
```
```bash theme={null}
npx aled dev
```
```bash theme={null}
? Select the k8s cluster to use. › Select the k8s cluster to use.
No Cluster
orbstack
❯ docker-desktop
```
다음과 같이 로그가 표시되면 실행이 완료된 것입니다.
```bash theme={null}
...
[INFO] [plugin:cloudtype-apps] plugin @cloudtype/apps is installed {}
[INFO] [plugin:cloudtype-apps] plugin @cloudtype/apps is activate {}
[INFO] [pde:init] plugin "@cloudtype/apps" loaded!
[INFO] [k8s] KubernetesClusterType initialized with agent {"connection":{"context":"docker-desktop","namespace":"ale-pde"},"stat":{"db":{"url":"mongodb://127.0.0.1:64000/","dbName":"ale-pde"}}}
[INFO] [k8s] ConfigContext initialized with {"connection":{"context":"docker-desktop","namespace":"ale-pde"},"stat":{"db":{"url":"mongodb://127.0.0.1:64000/","dbName":"ale-pde"}}}
[INFO] [k8s] connect k8s to "docker-desktop"
[INFO] [k8s] [agent] cluster agent initialized
[WARN] [k8s] ConfigMap.get ale-pde agent-config
[INFO] [pde:agent] Ale Agent is initialized with config
[INFO] [pde:init] Ale Agent httpsd is listening at 127.0.0.1:9801
[INFO] [k8s] config loaded from cluster from "ale-pde/agent-config"
[INFO] [stat] stat controller init {"collector":{"prefix":"ale"},"db":{"url":"mongodb://127.0.0.1:64000/","dbName":"ale-pde"},"connection":{"context":"docker-desktop","namespace":"ale-pde"}}
[INFO] [stat] connect k8s to "docker-desktop"
[INFO] [stat] stat watcher started
```
실행 중 데이터베이스 충돌이 발생하는 경우, 다음의 명령을 입력하여 기존에 생성된 ale 데이터를 삭제 후 재실행하세요.
```bash theme={null}
rm -r ~/.ale-dev
```
로컬환경과 GitHub을 연동하면 GitHub 저장소의 소스코드를 배포할 수 있습니다.
**1. GitHub Apps 생성**
 > GitHub에 로그인 후, **Settings > Developer Settings > GitHub Apps** 페이지에서 [New GitHub App](https://github.com/settings/apps/new)을 클릭하면, GitHub App 생성 과정이 시작됩니다.
**1-1. 기본정보 입력**
> GitHub에 로그인 후, **Settings > Developer Settings > GitHub Apps** 페이지에서 [New GitHub App](https://github.com/settings/apps/new)을 클릭하면, GitHub App 생성 과정이 시작됩니다.
**1-1. 기본정보 입력**
 > GitHub App을 생성하기 위한 정보를 아래와 같이 입력하세요.
* **GitHub App name** : GitHub App 이름
* **Homepage URL**
* GitHub OAuth를 적용할 URL
* 로컬 접속주소인 `http://localhost:9001`
* **Callback URL(`Add Callbak URL`로 항목 추가)**
* `http://localhost:9009/oauth/github/callback`
* `http://localhost:9009/oauth/github/connect/callback`
이 화면에서 입력한 **GitHub App name**은 `ale` 에 GitHub OAuth 등록시 사용됩니다.
로컬환경이기 때문에 https 가 아닌 `http` 로 입력해야하며, `localhost:9009`는 `ale`의 API엔드포인트 주소입니다.
**1-2. Webhook 비활성화**
> GitHub App을 생성하기 위한 정보를 아래와 같이 입력하세요.
* **GitHub App name** : GitHub App 이름
* **Homepage URL**
* GitHub OAuth를 적용할 URL
* 로컬 접속주소인 `http://localhost:9001`
* **Callback URL(`Add Callbak URL`로 항목 추가)**
* `http://localhost:9009/oauth/github/callback`
* `http://localhost:9009/oauth/github/connect/callback`
이 화면에서 입력한 **GitHub App name**은 `ale` 에 GitHub OAuth 등록시 사용됩니다.
로컬환경이기 때문에 https 가 아닌 `http` 로 입력해야하며, `localhost:9009`는 `ale`의 API엔드포인트 주소입니다.
**1-2. Webhook 비활성화**
 > Webhook 항목의 Active 체크를 해제하여 비활성화하세요.
**1-3. 권한 부여 및 APP 생성**
> Webhook 항목의 Active 체크를 해제하여 비활성화하세요.
**1-3. 권한 부여 및 APP 생성**
 > Permission 항목에서 아래의 권한을 부여하고, `Create GitHub App` 버튼으로 APP을 생성하세요.
* **Read and Write**
* Actions
* Administration
* Commit statuses
* Contents
* Deployments
* Issues
* Pull requests
* Workflows
* **Read-only**
* Metadata
* **Read and Write**
* Administration
* **Read-only**
* Members
* **Read-only**
* Email addresses
**2. GitHub App 정보 조회**
> `ale` 에 GitHub OAuth를 추가하기 위해 GitHub App Name 이외에 **4개의 ID, Key 값이 필요합니다.**
* **App ID**
* **Client ID**
* **Cleint Secret**
* **Private Key**
**2-1. App ID, Client ID 조회**
> Permission 항목에서 아래의 권한을 부여하고, `Create GitHub App` 버튼으로 APP을 생성하세요.
* **Read and Write**
* Actions
* Administration
* Commit statuses
* Contents
* Deployments
* Issues
* Pull requests
* Workflows
* **Read-only**
* Metadata
* **Read and Write**
* Administration
* **Read-only**
* Members
* **Read-only**
* Email addresses
**2. GitHub App 정보 조회**
> `ale` 에 GitHub OAuth를 추가하기 위해 GitHub App Name 이외에 **4개의 ID, Key 값이 필요합니다.**
* **App ID**
* **Client ID**
* **Cleint Secret**
* **Private Key**
**2-1. App ID, Client ID 조회**
 > 권한 부여 후 App이 생성되면, **App ID 와 Client ID**를 조회할 수 있습니다.
**2-2. Client Secret 조회**
> 권한 부여 후 App이 생성되면, **App ID 와 Client ID**를 조회할 수 있습니다.
**2-2. Client Secret 조회**
 > 같은 화면에서 `Generate a new client secret`을 클릭해 **Client Secret**을 생성하고 조회하세요.
**2-3. Private Key 조회**
> 같은 화면에서 `Generate a new client secret`을 클릭해 **Client Secret**을 생성하고 조회하세요.
**2-3. Private Key 조회**
 > 화면 하단부의 `Generate a private key`를 클릭하면 pem 파일이 다운로드 됩니다.
**3. ale 운영시스템에 등록**
> 화면 하단부의 `Generate a private key`를 클릭하면 pem 파일이 다운로드 됩니다.
**3. ale 운영시스템에 등록**
 > 브라우저의 주소 창에 `http://localhost:9001`을 입력해 운영시스템에 접속한 후 **설정 > 인증수단 > GitHub** 드롭다운을 클릭한 후, 앞 단계에서 조회한 값들을 각 필드에 입력하고 `적용하기`를 클릭하세요.
* **APP\_NAME** : GitHub App 이름
* **APP\_ID** : App ID
* **CLIENT\_ID** : Client ID
* **CLIENT\_SECRET** : Client secret
* **APP\_PRIVATE\_KEY**: Private ket pem 파일 값
## 대시보드 접속
> 브라우저의 주소 창에 `http://localhost:9001`을 입력해 운영시스템에 접속한 후 **설정 > 인증수단 > GitHub** 드롭다운을 클릭한 후, 앞 단계에서 조회한 값들을 각 필드에 입력하고 `적용하기`를 클릭하세요.
* **APP\_NAME** : GitHub App 이름
* **APP\_ID** : App ID
* **CLIENT\_ID** : Client ID
* **CLIENT\_SECRET** : Client secret
* **APP\_PRIVATE\_KEY**: Private ket pem 파일 값
## 대시보드 접속
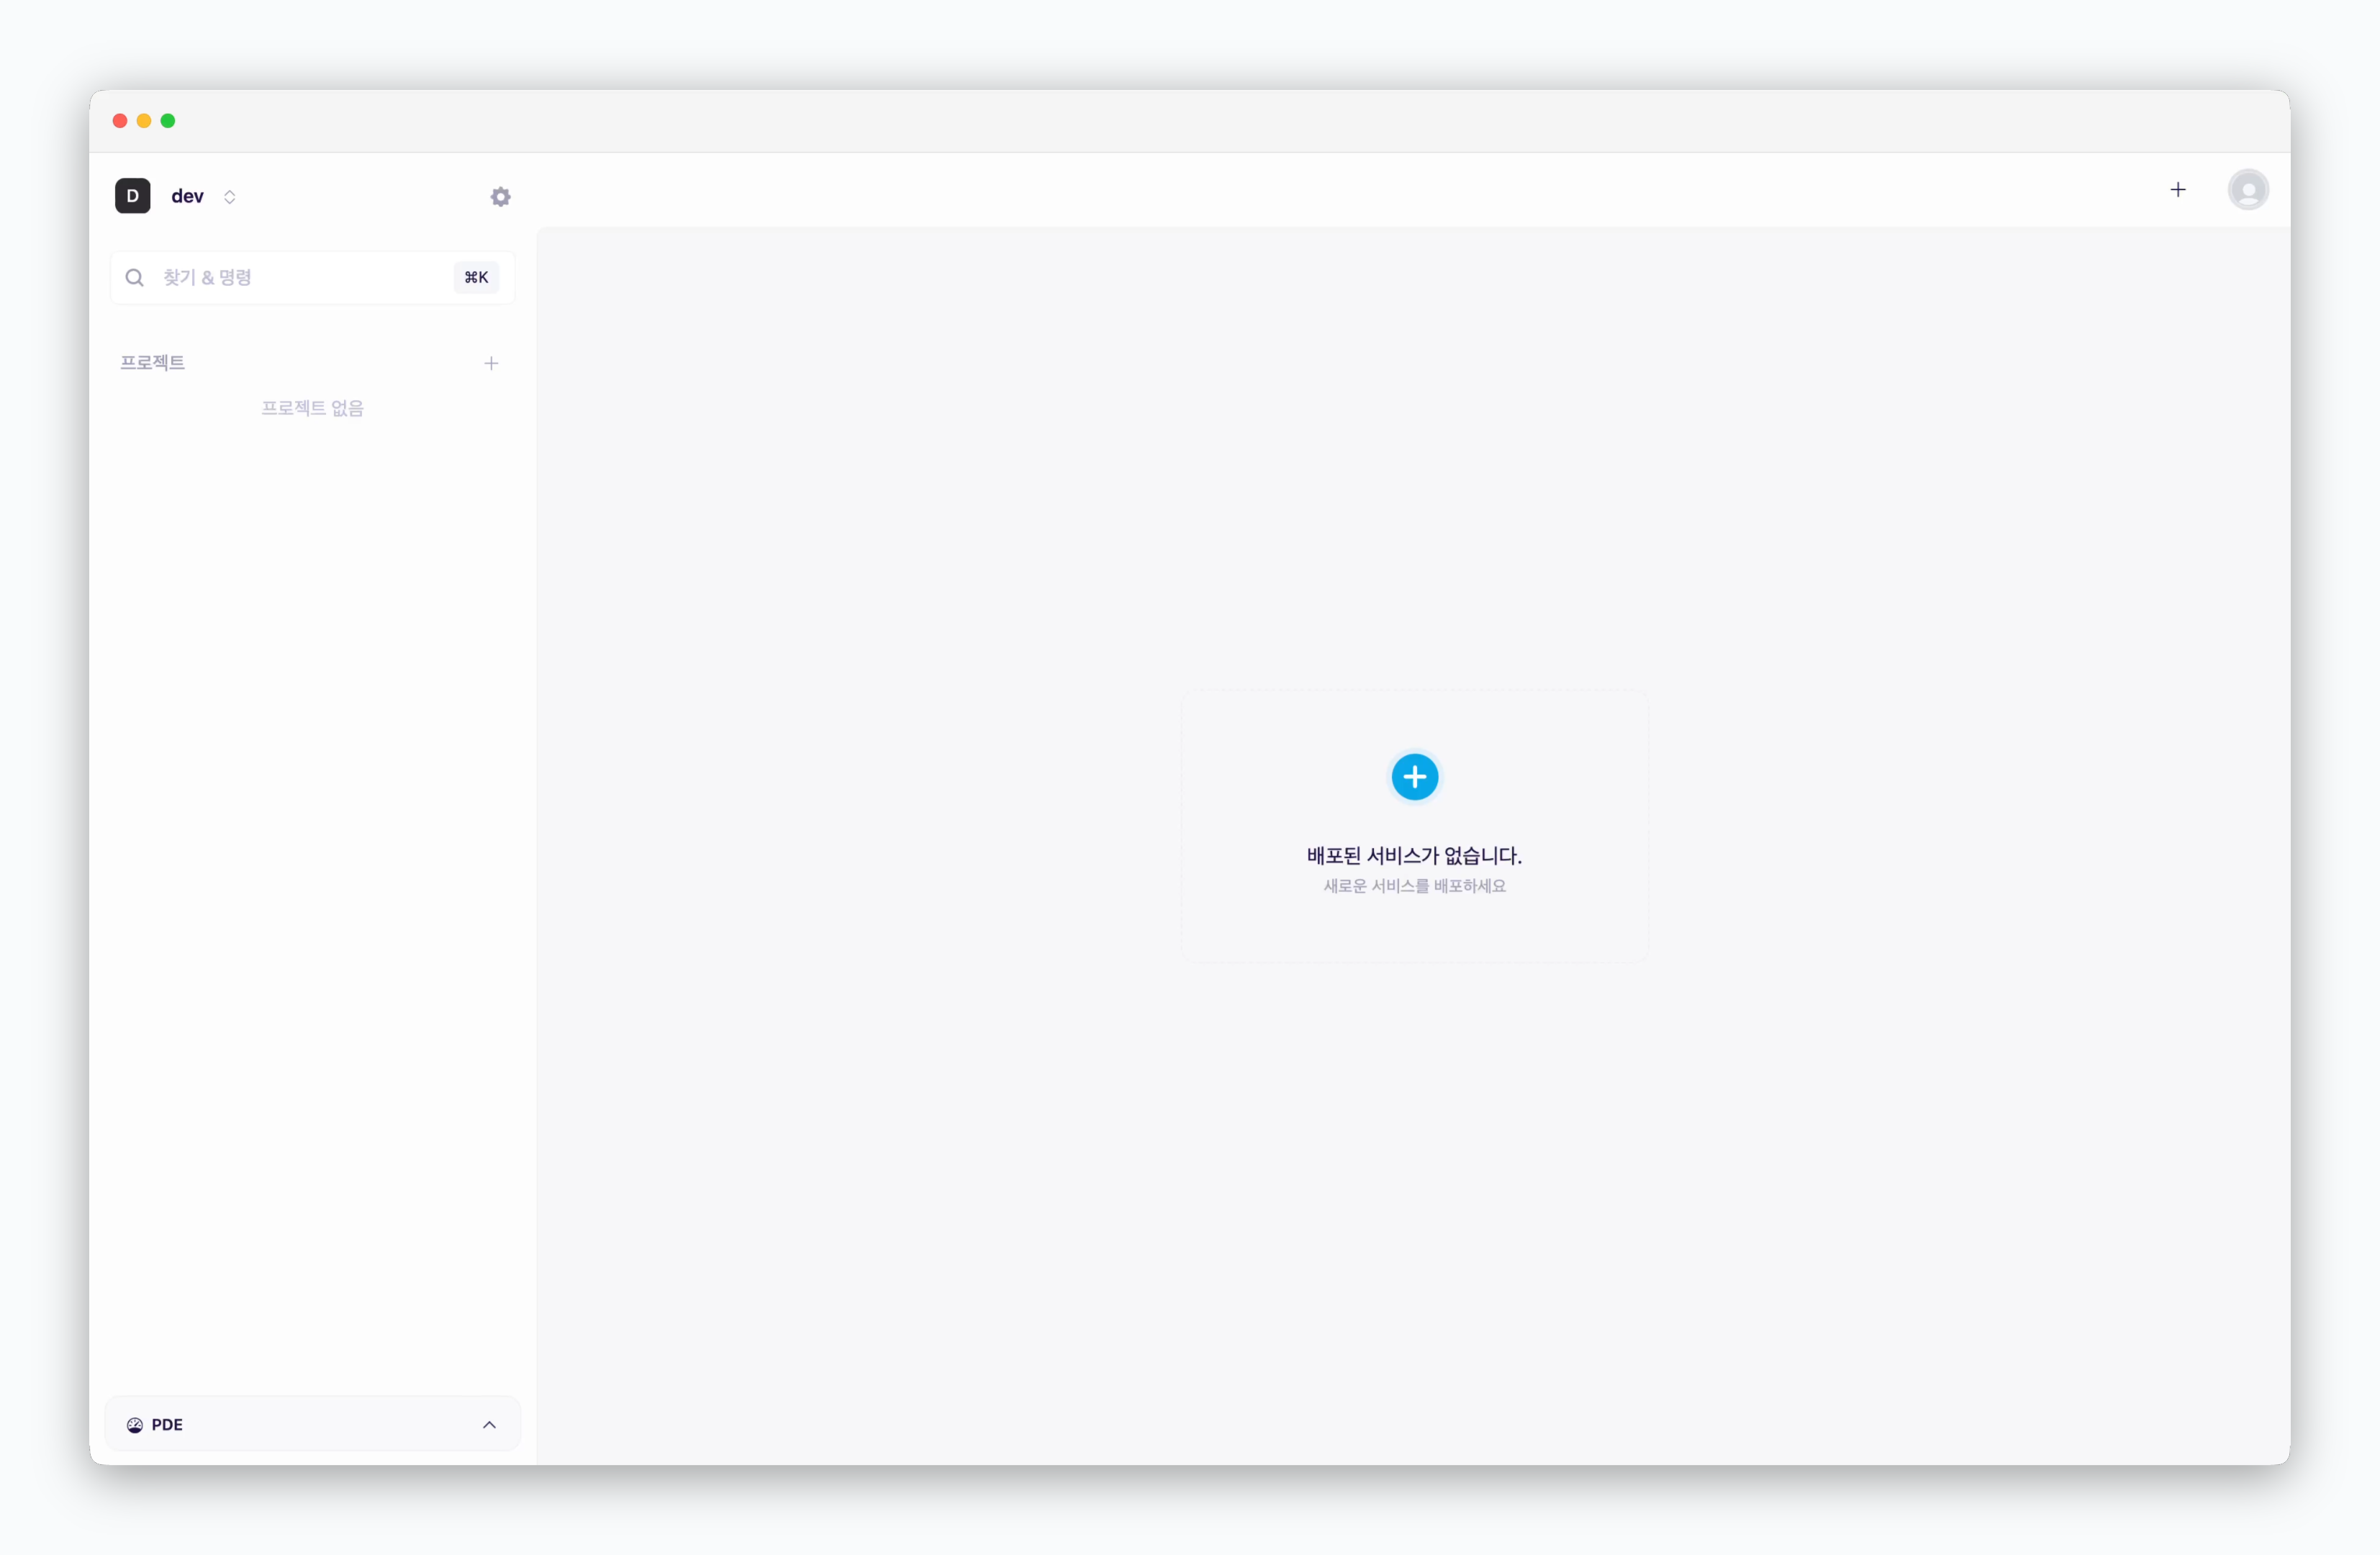 > 브라우저의 주소 창에 `http://localhost:9001`를 입력하면 `ale` 대시보드에 접속할 수 있습니다. 최초 접속 시, 기본 생성되는 `@dev` 스페이스로 접속됩니다.
 > 대시보드 좌측 상단의 스페이스 이름을 클릭한 후 운영시스템을 선택하면 운영시스템에 접속할 수 있습니다.
## 배포
> 대시보드 좌측 상단의 스페이스 이름을 클릭한 후 운영시스템을 선택하면 운영시스템에 접속할 수 있습니다.
## 배포
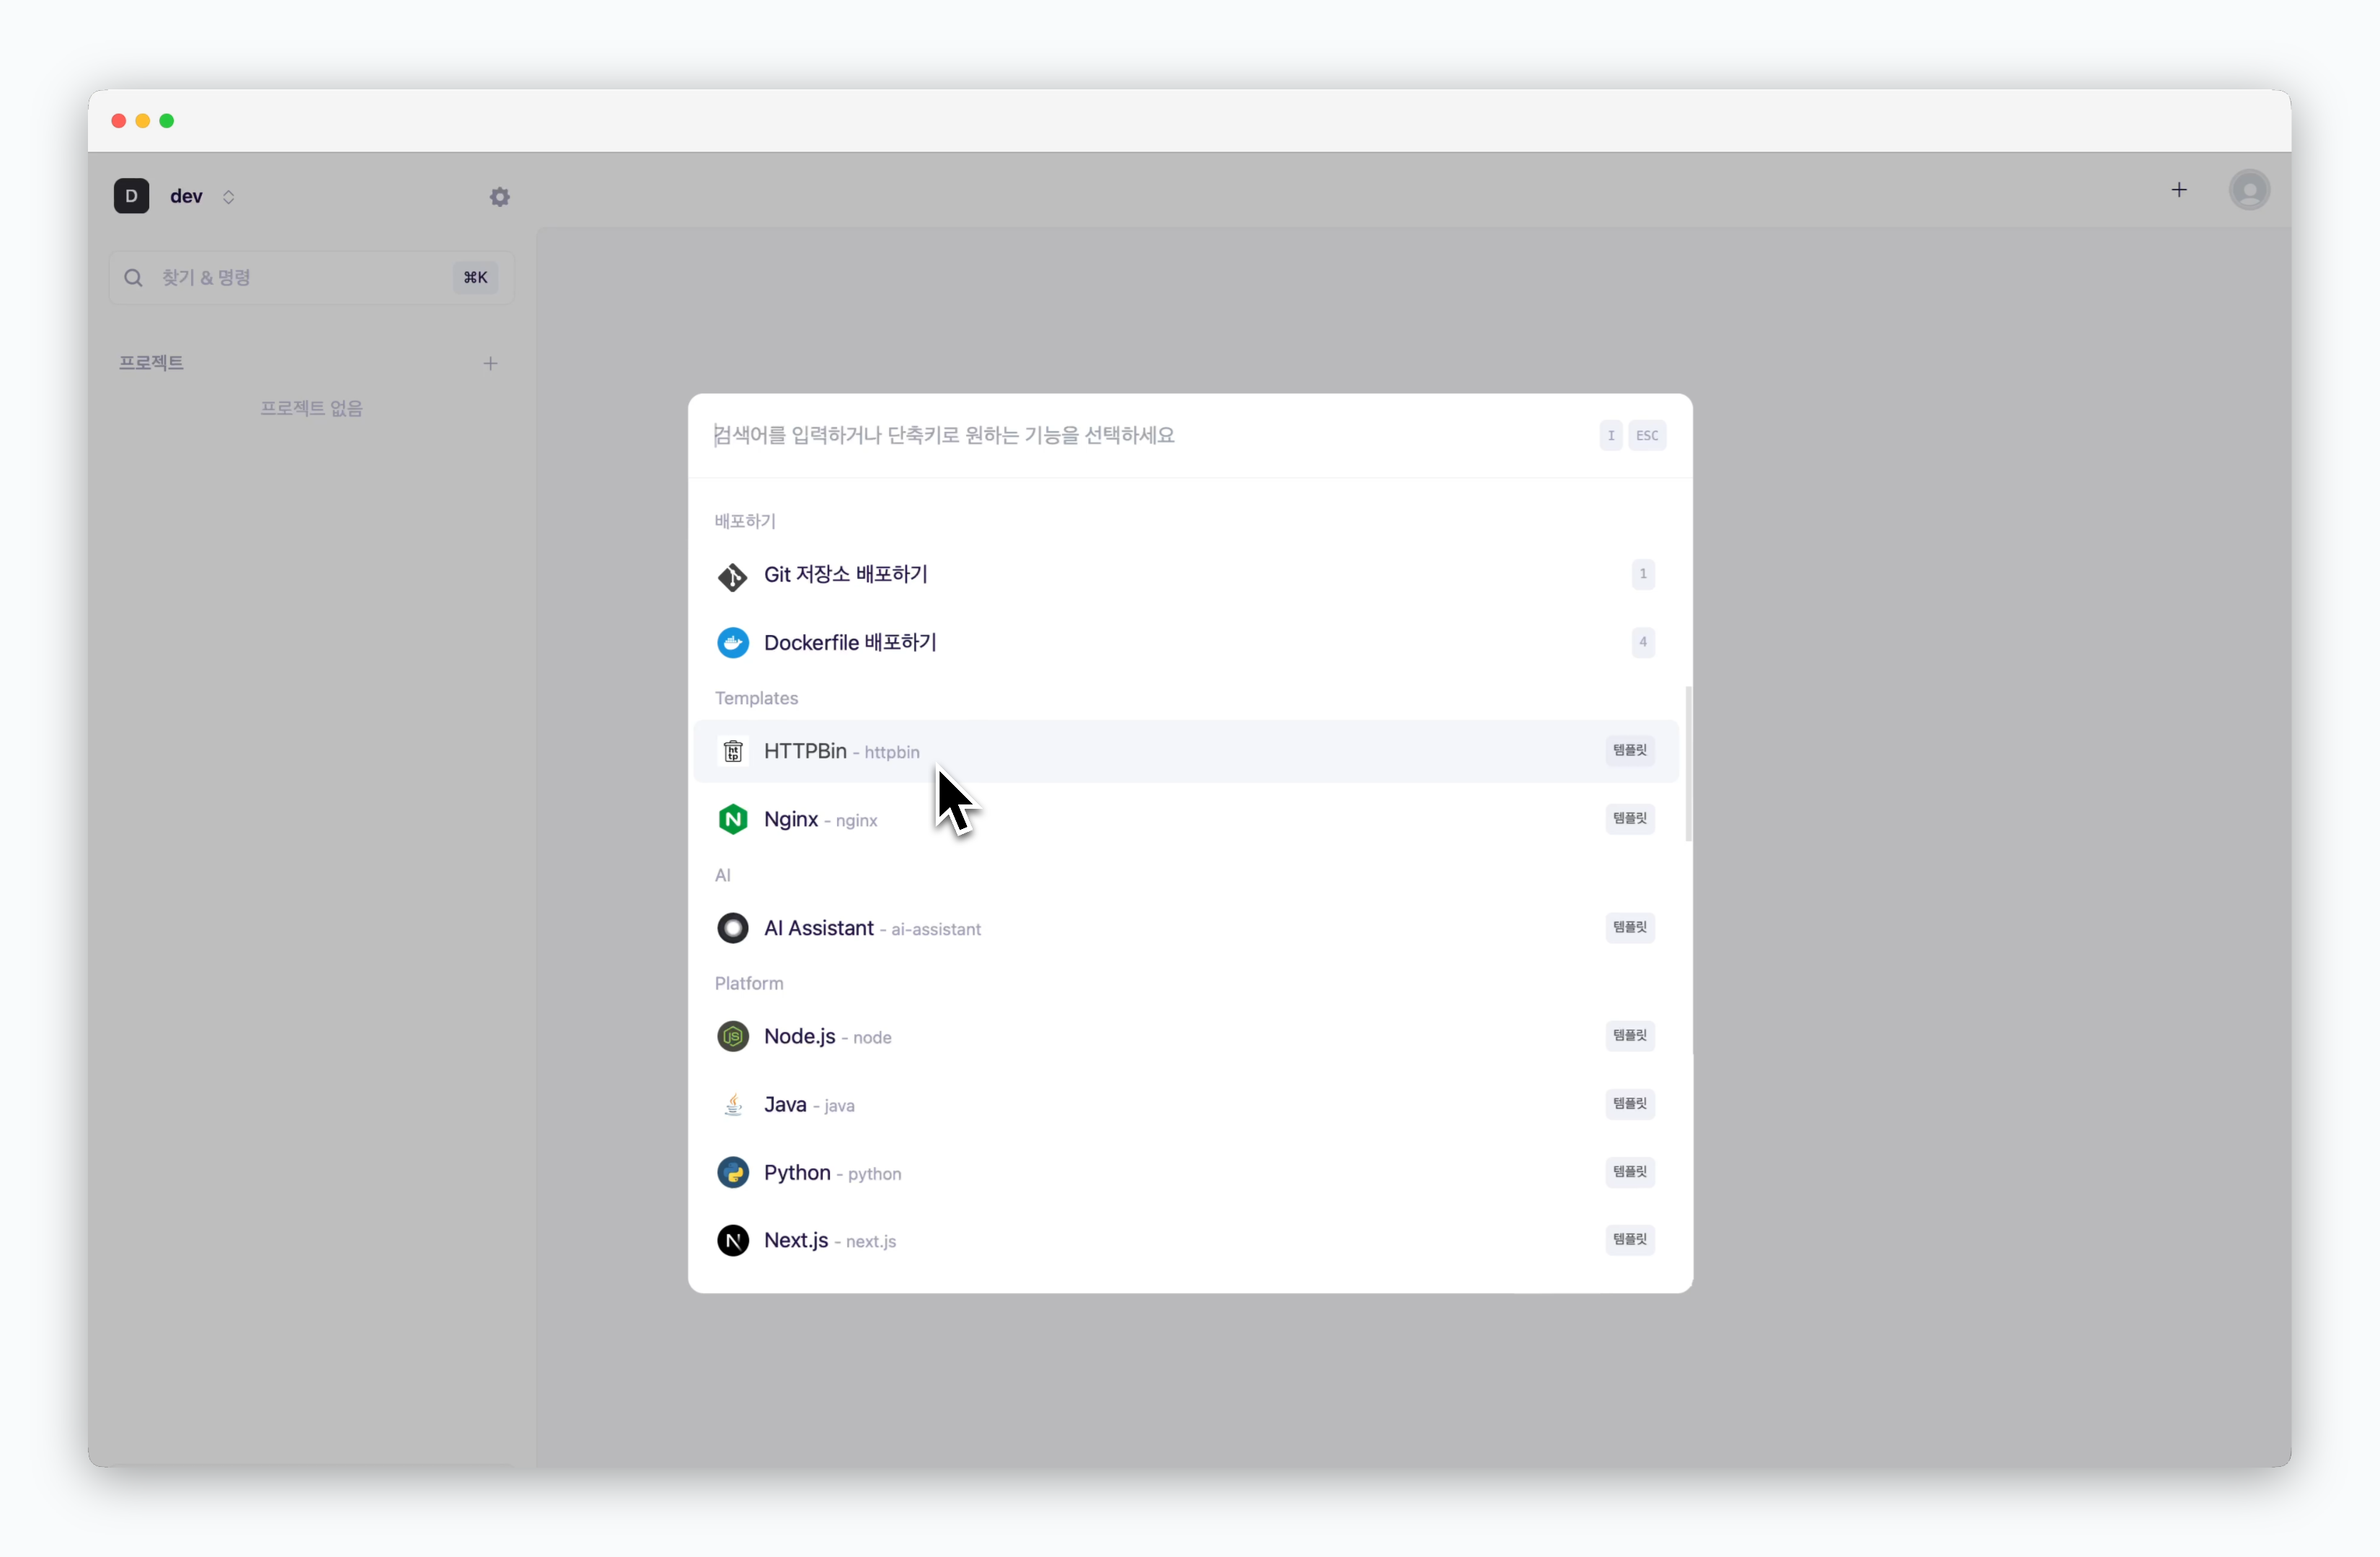 > 대시보드의 또는 `⌘ + K` 로 생성되는 배포창에서 HTTPBin을 선택하세요.
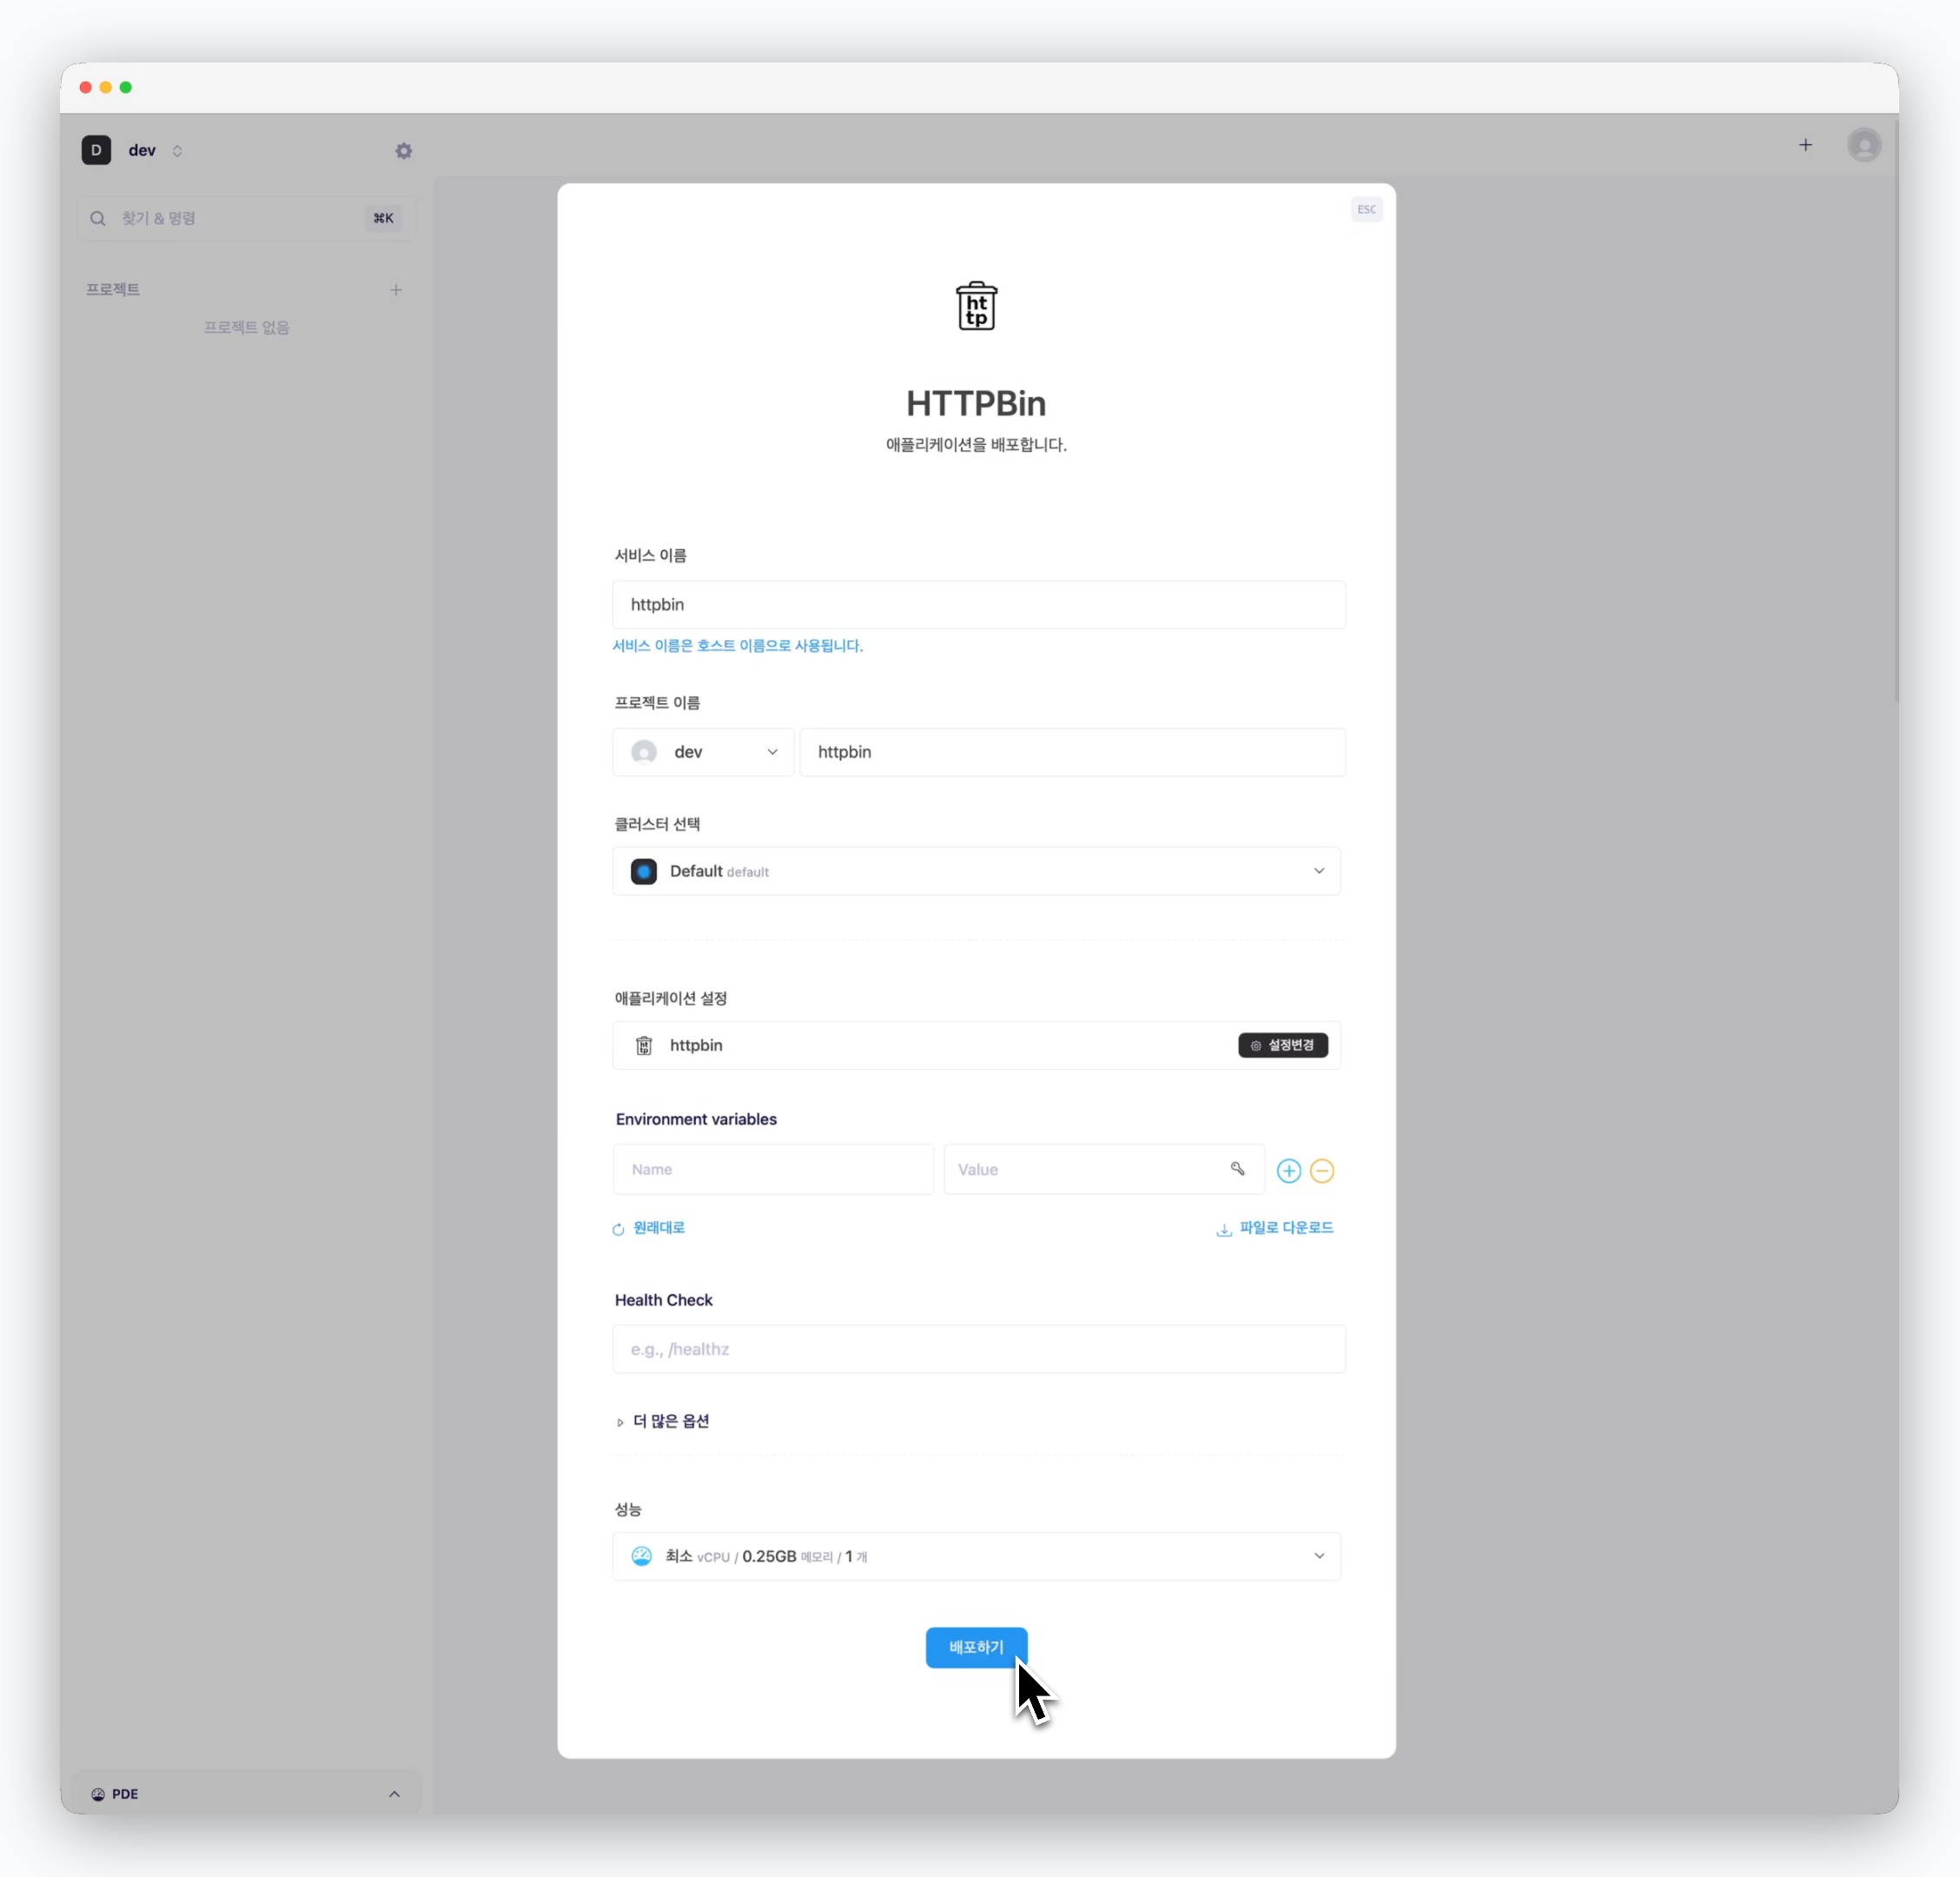 > 별도의 설정 변경 없이, 배포 설정 창 하단의 `배포하기`를 클릭하세요.
 > 서비스의 구동이 완료되면 이미지와 같이 **실행 중**으로 상태가 변경됩니다.
> `접속하기`를 클릭하면 구동된 서비스에 접속할 수 있습니다.
로컬 환경과 GitHub을 연동해 GitHub 저장소를 배포하거나 SSH 인증을 사용하여 비공개 저장소를 배포할 수 있습니다. 일반적인 배포에 관한 가이드는 [ale에서 배포하기 페이지](/ko/developers/deploy)를 참고하세요.
> 서비스의 구동이 완료되면 이미지와 같이 **실행 중**으로 상태가 변경됩니다.
> `접속하기`를 클릭하면 구동된 서비스에 접속할 수 있습니다.
로컬 환경과 GitHub을 연동해 GitHub 저장소를 배포하거나 SSH 인증을 사용하여 비공개 저장소를 배포할 수 있습니다. 일반적인 배포에 관한 가이드는 [ale에서 배포하기 페이지](/ko/developers/deploy)를 참고하세요.