> ## Documentation Index
> Fetch the complete documentation index at: https://docs.ale.run/llms.txt
> Use this file to discover all available pages before exploring further.
# 설정
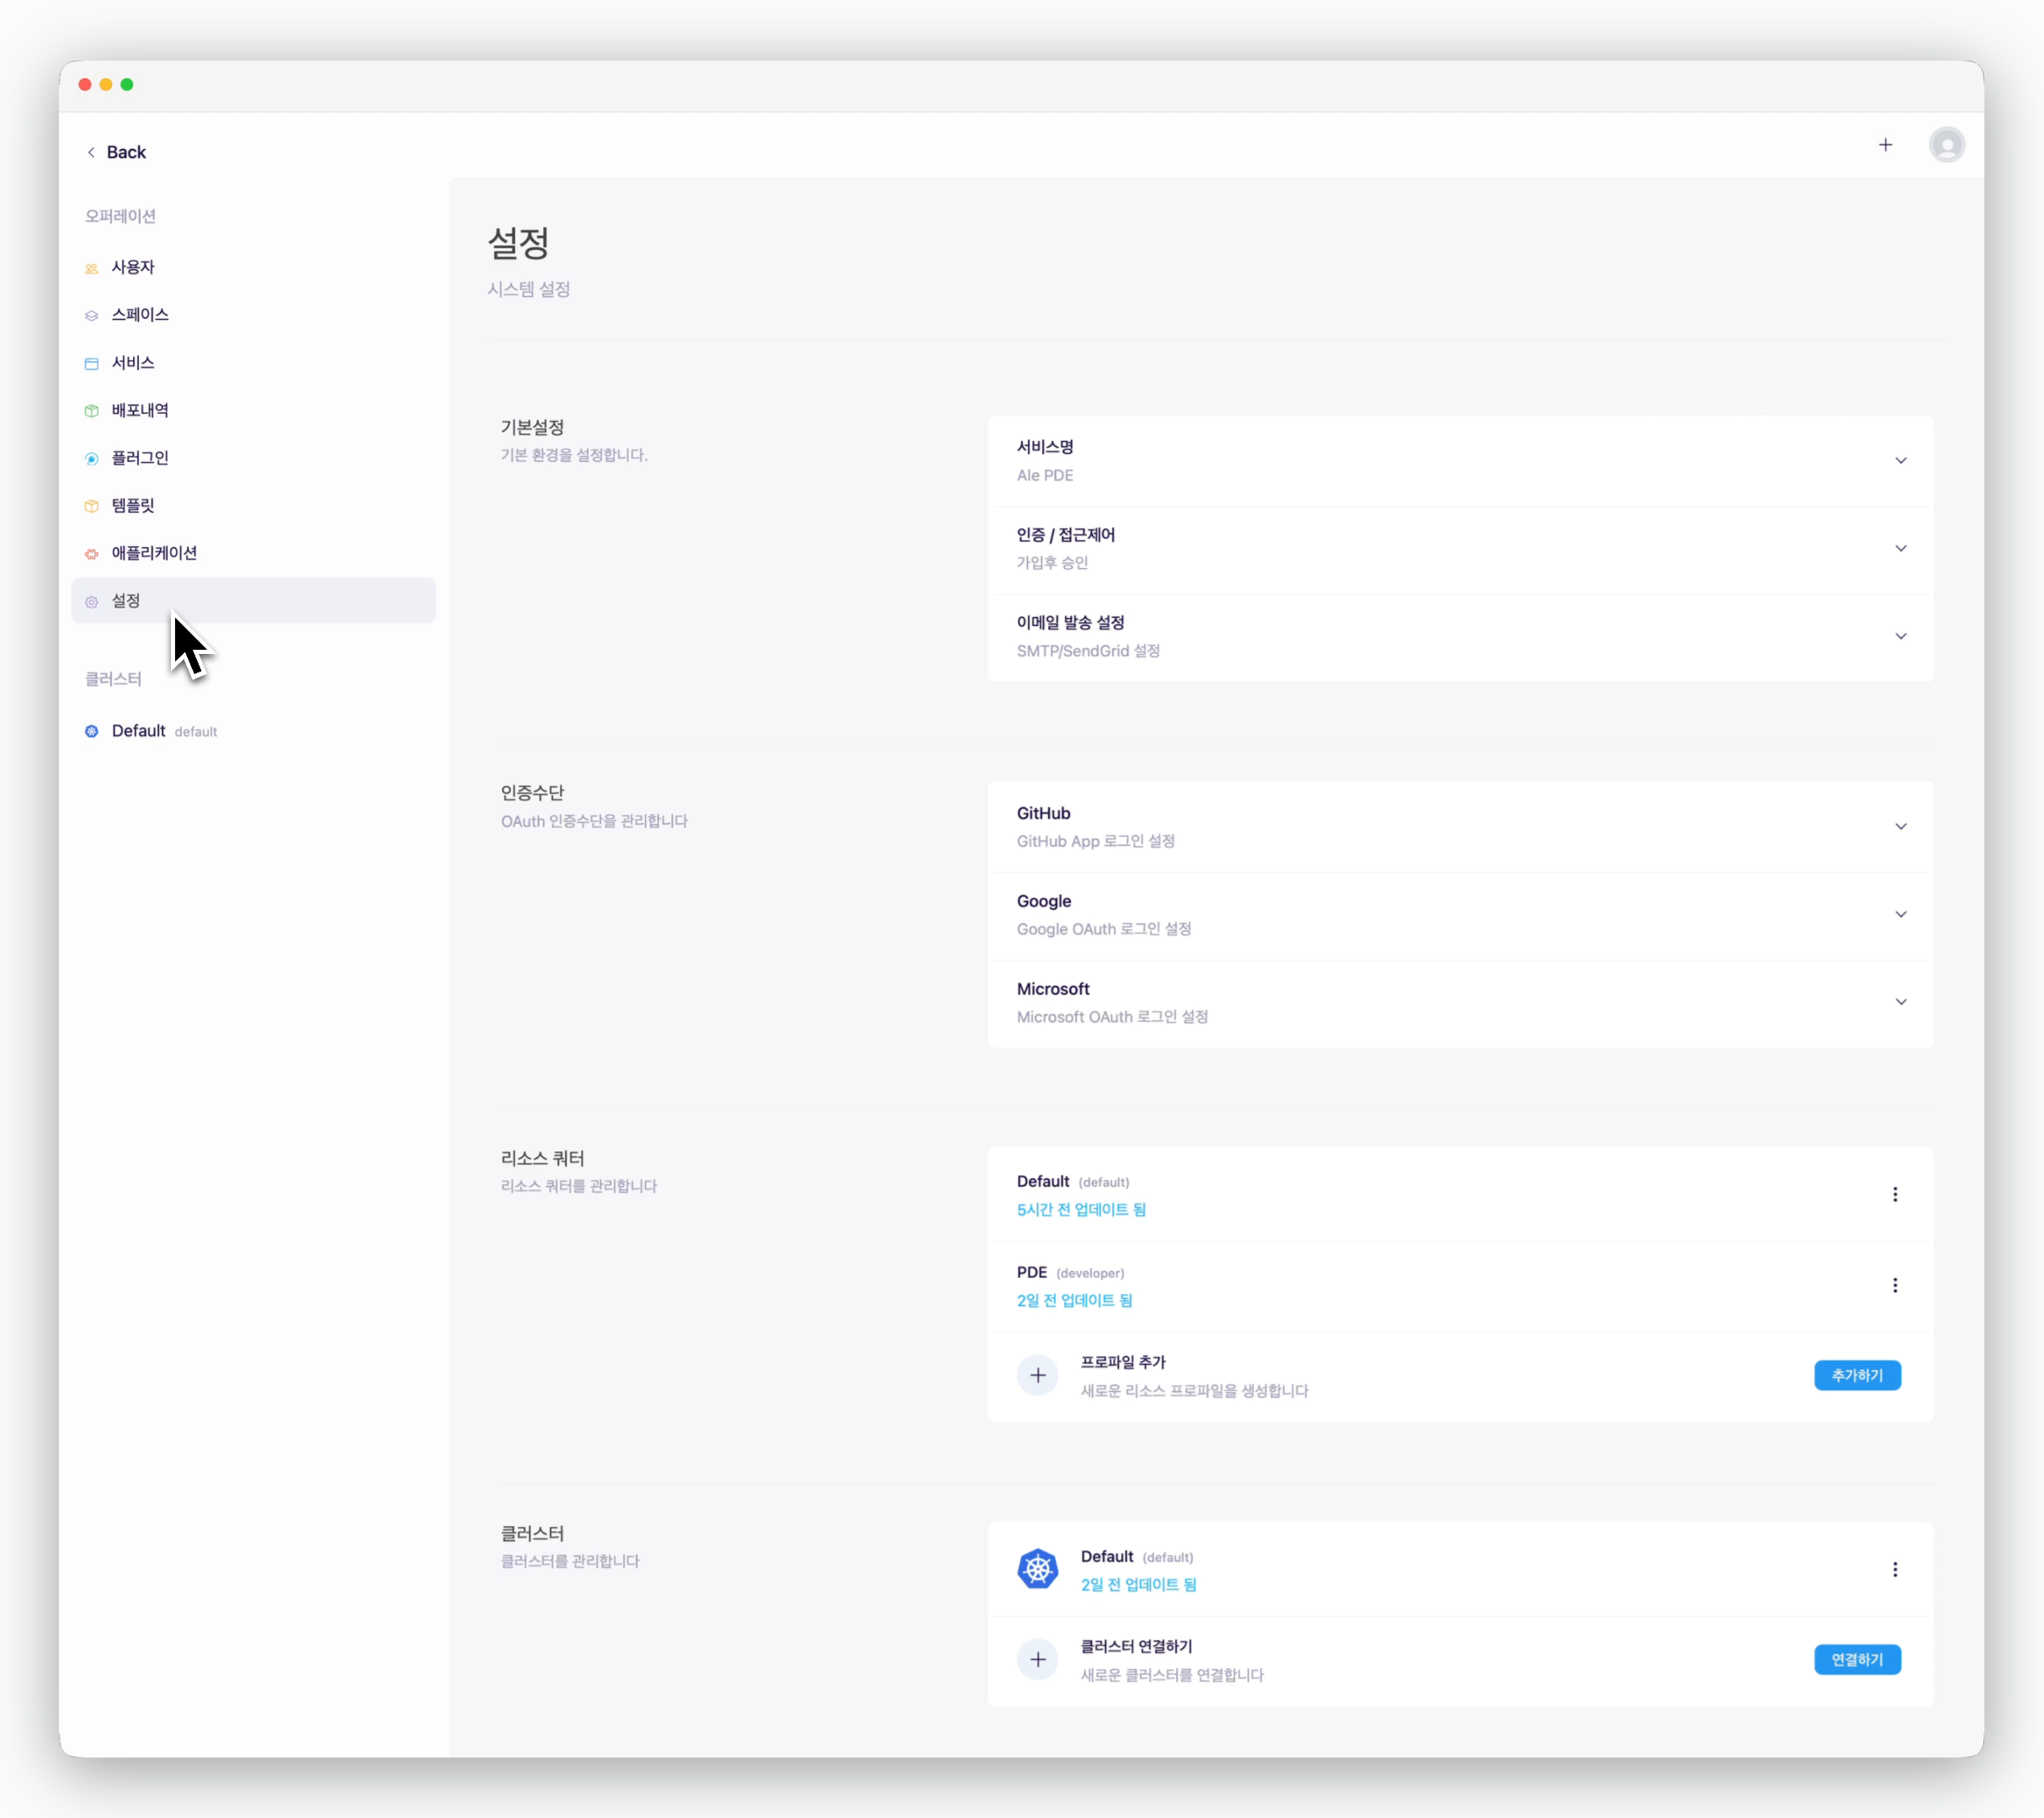
> 운영 시스템의 다양한 설정 사항을 조회 및 관리할 수 있는 페이지입니다.
 ***
## 기본설정
### 인증 / 접근 제어
***
## 기본설정
### 인증 / 접근 제어
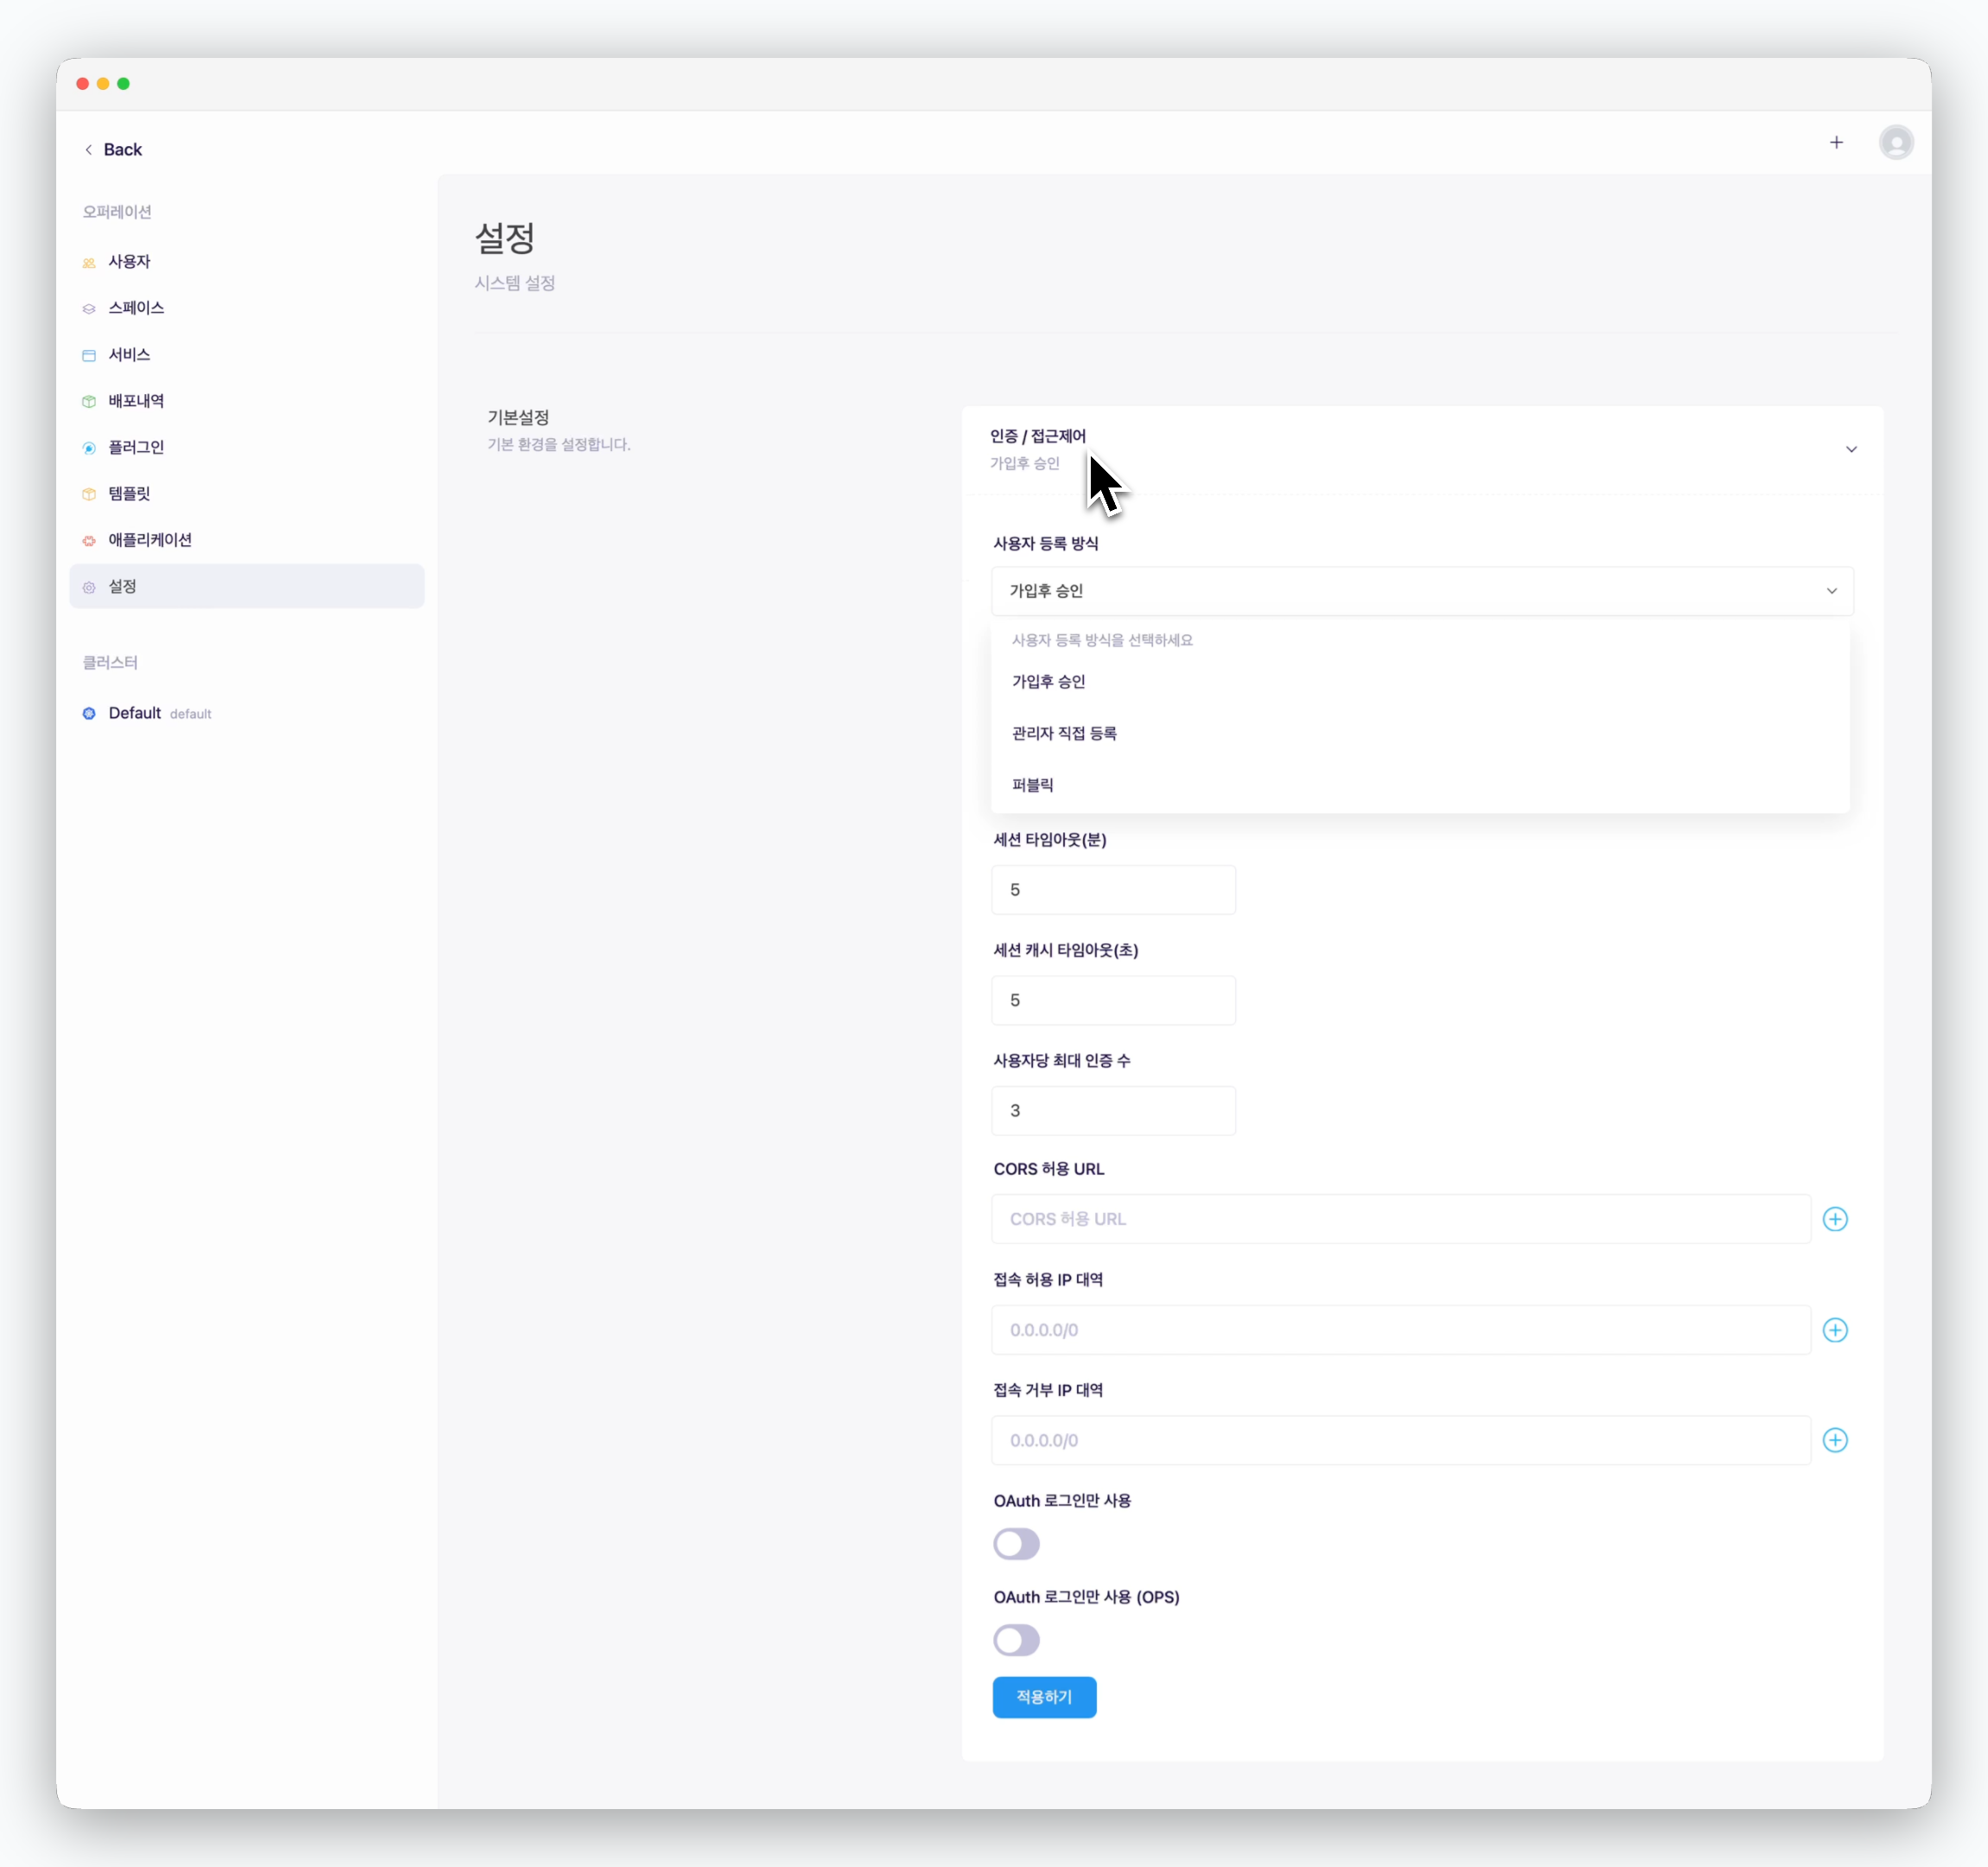 > 기본 설정의 인증 / 접근 제어 항목에서 사용자 등록 방식, 세선 타임아웃 시간 설정, 시스템 접속 허용 IP 대역 등록 등 인증 / 접근에 대한 설정을 할 수 있습니다.
| 사용자 등록 및 온보딩 옵션 | 가입 및 승인 방식 |
| --------------- | ------------------------------------------------------------------------------------------------------------------------------------- |
| 가입 후 승인 | 대시보드를 통한 가입이 가능하고, [승인(활성화)](/ko/operations/user-management#%EC%82%AC%EC%9A%A9%EC%9E%90-%ED%99%9C%EC%84%B1%ED%99%94) 후 사용 가능(Default) |
| 관리자 직접 등록 | 대시보드를 통한 가입이 불가하며, [운영 시스템에서 등록된 사용자](/ko/operations/user-management#%EC%82%AC%EC%9A%A9%EC%9E%90-%EB%93%B1%EB%A1%9D)만 사용 가능 |
| 퍼블릭 | 대시보드를 통해 가입한 사용자는 승인없이 사용 가능 |
### 메일러 설정
> 기본 설정의 인증 / 접근 제어 항목에서 사용자 등록 방식, 세선 타임아웃 시간 설정, 시스템 접속 허용 IP 대역 등록 등 인증 / 접근에 대한 설정을 할 수 있습니다.
| 사용자 등록 및 온보딩 옵션 | 가입 및 승인 방식 |
| --------------- | ------------------------------------------------------------------------------------------------------------------------------------- |
| 가입 후 승인 | 대시보드를 통한 가입이 가능하고, [승인(활성화)](/ko/operations/user-management#%EC%82%AC%EC%9A%A9%EC%9E%90-%ED%99%9C%EC%84%B1%ED%99%94) 후 사용 가능(Default) |
| 관리자 직접 등록 | 대시보드를 통한 가입이 불가하며, [운영 시스템에서 등록된 사용자](/ko/operations/user-management#%EC%82%AC%EC%9A%A9%EC%9E%90-%EB%93%B1%EB%A1%9D)만 사용 가능 |
| 퍼블릭 | 대시보드를 통해 가입한 사용자는 승인없이 사용 가능 |
### 메일러 설정
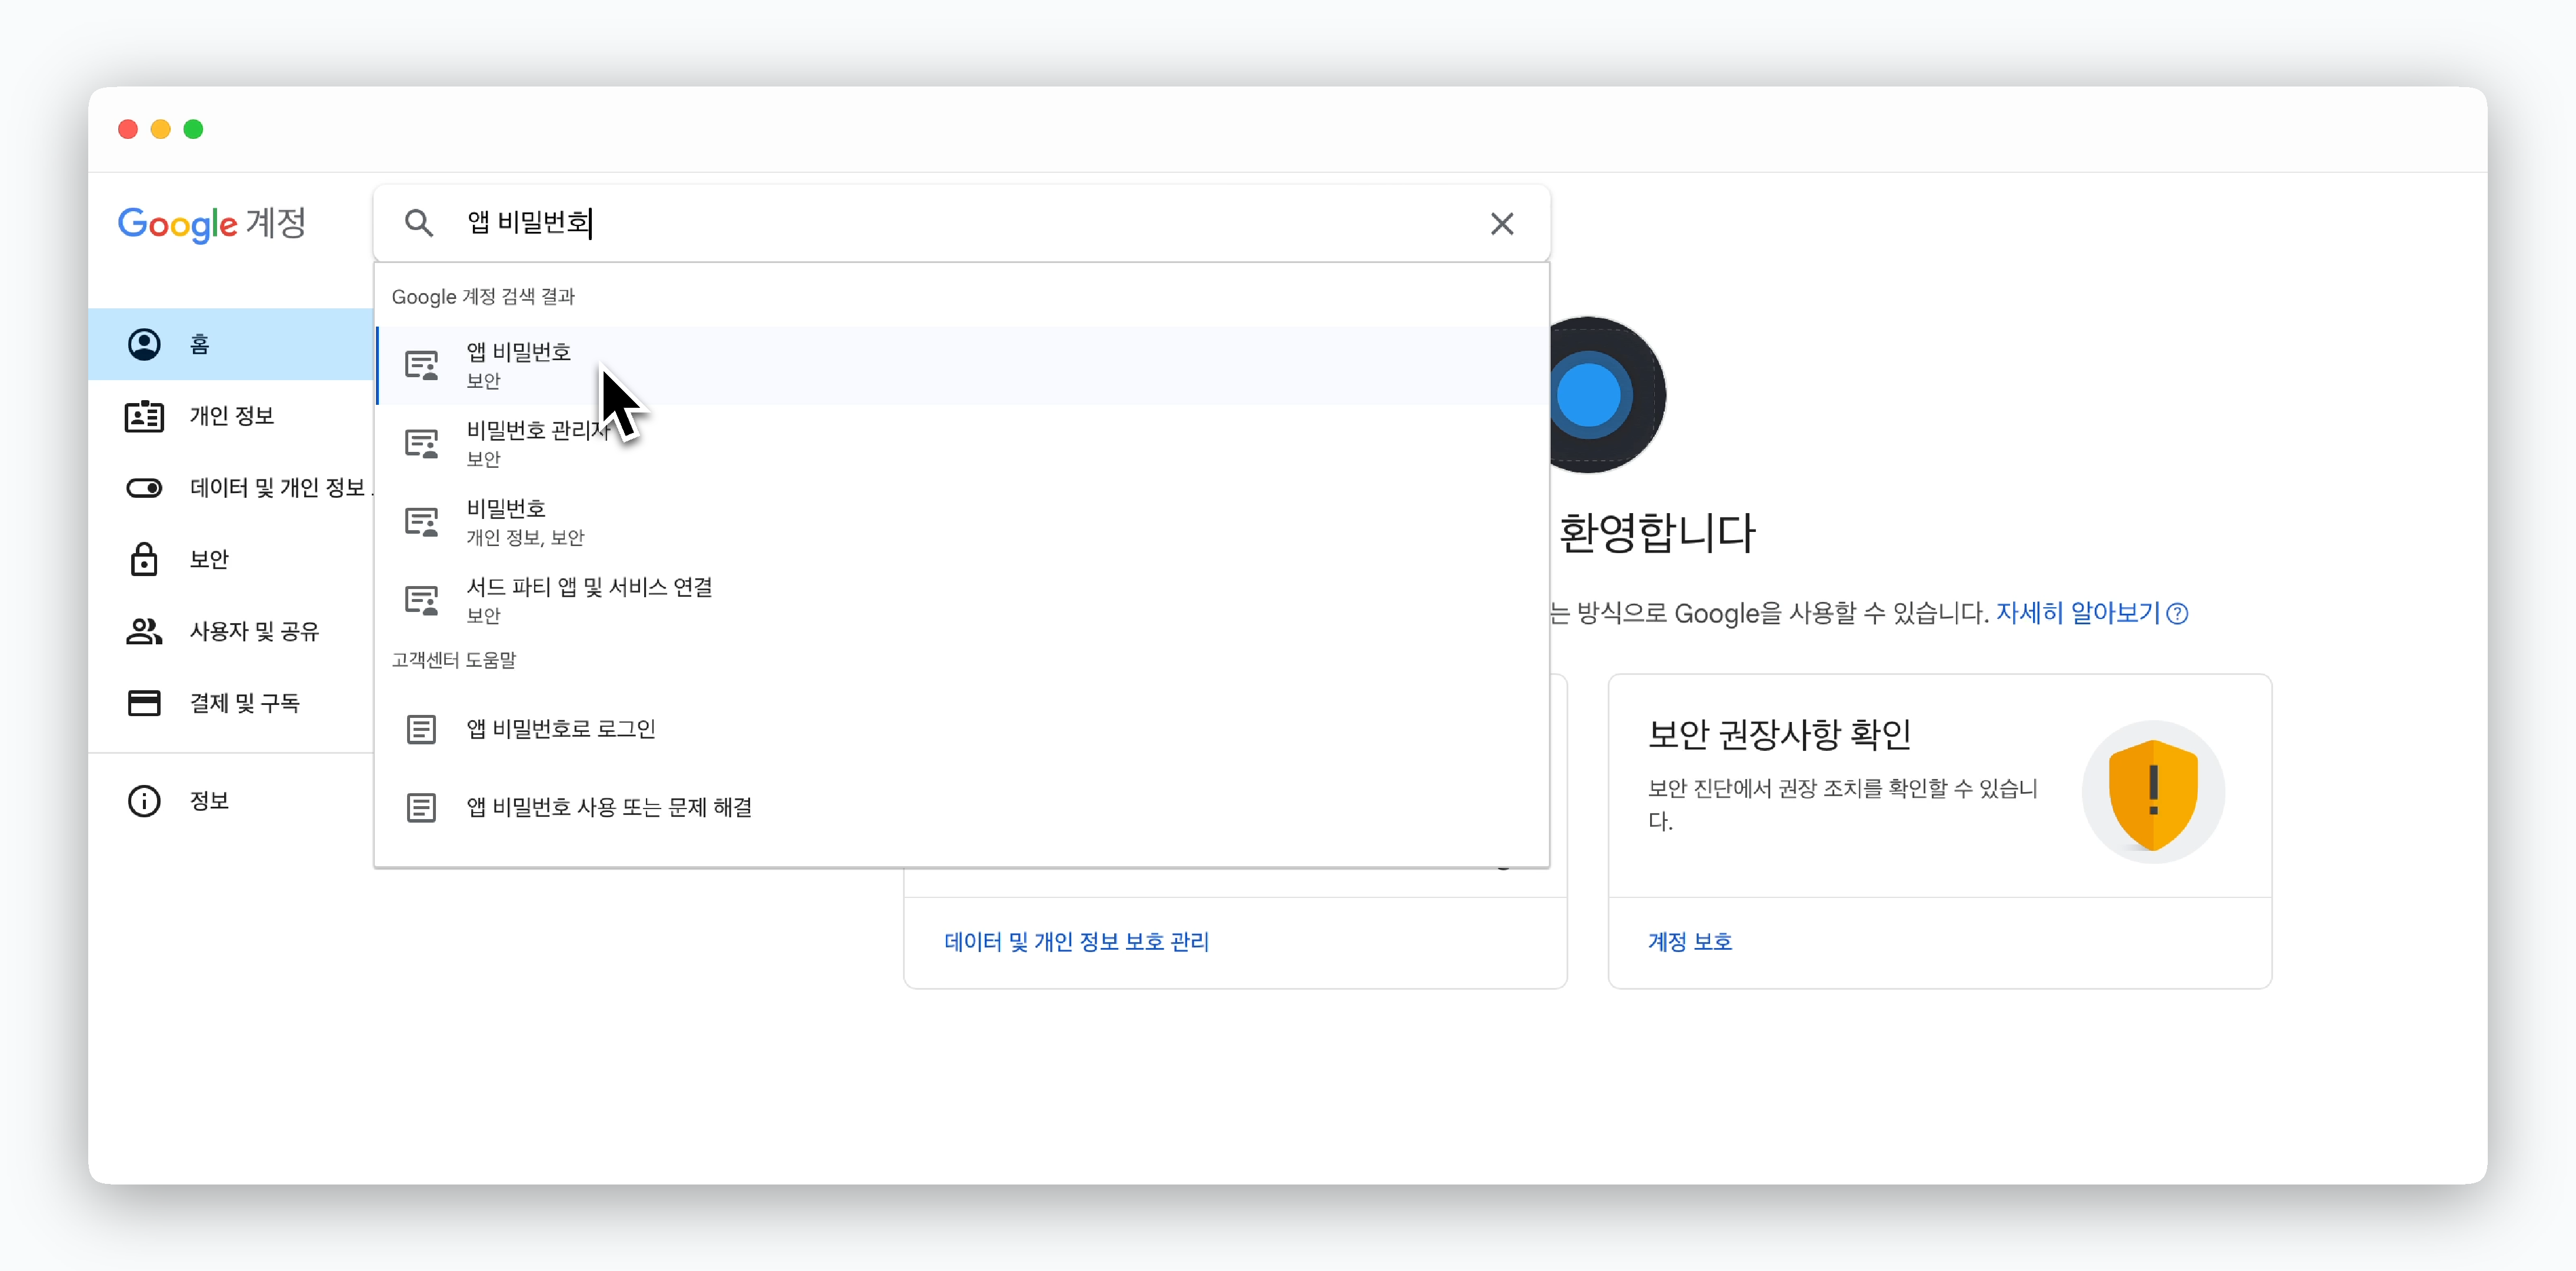
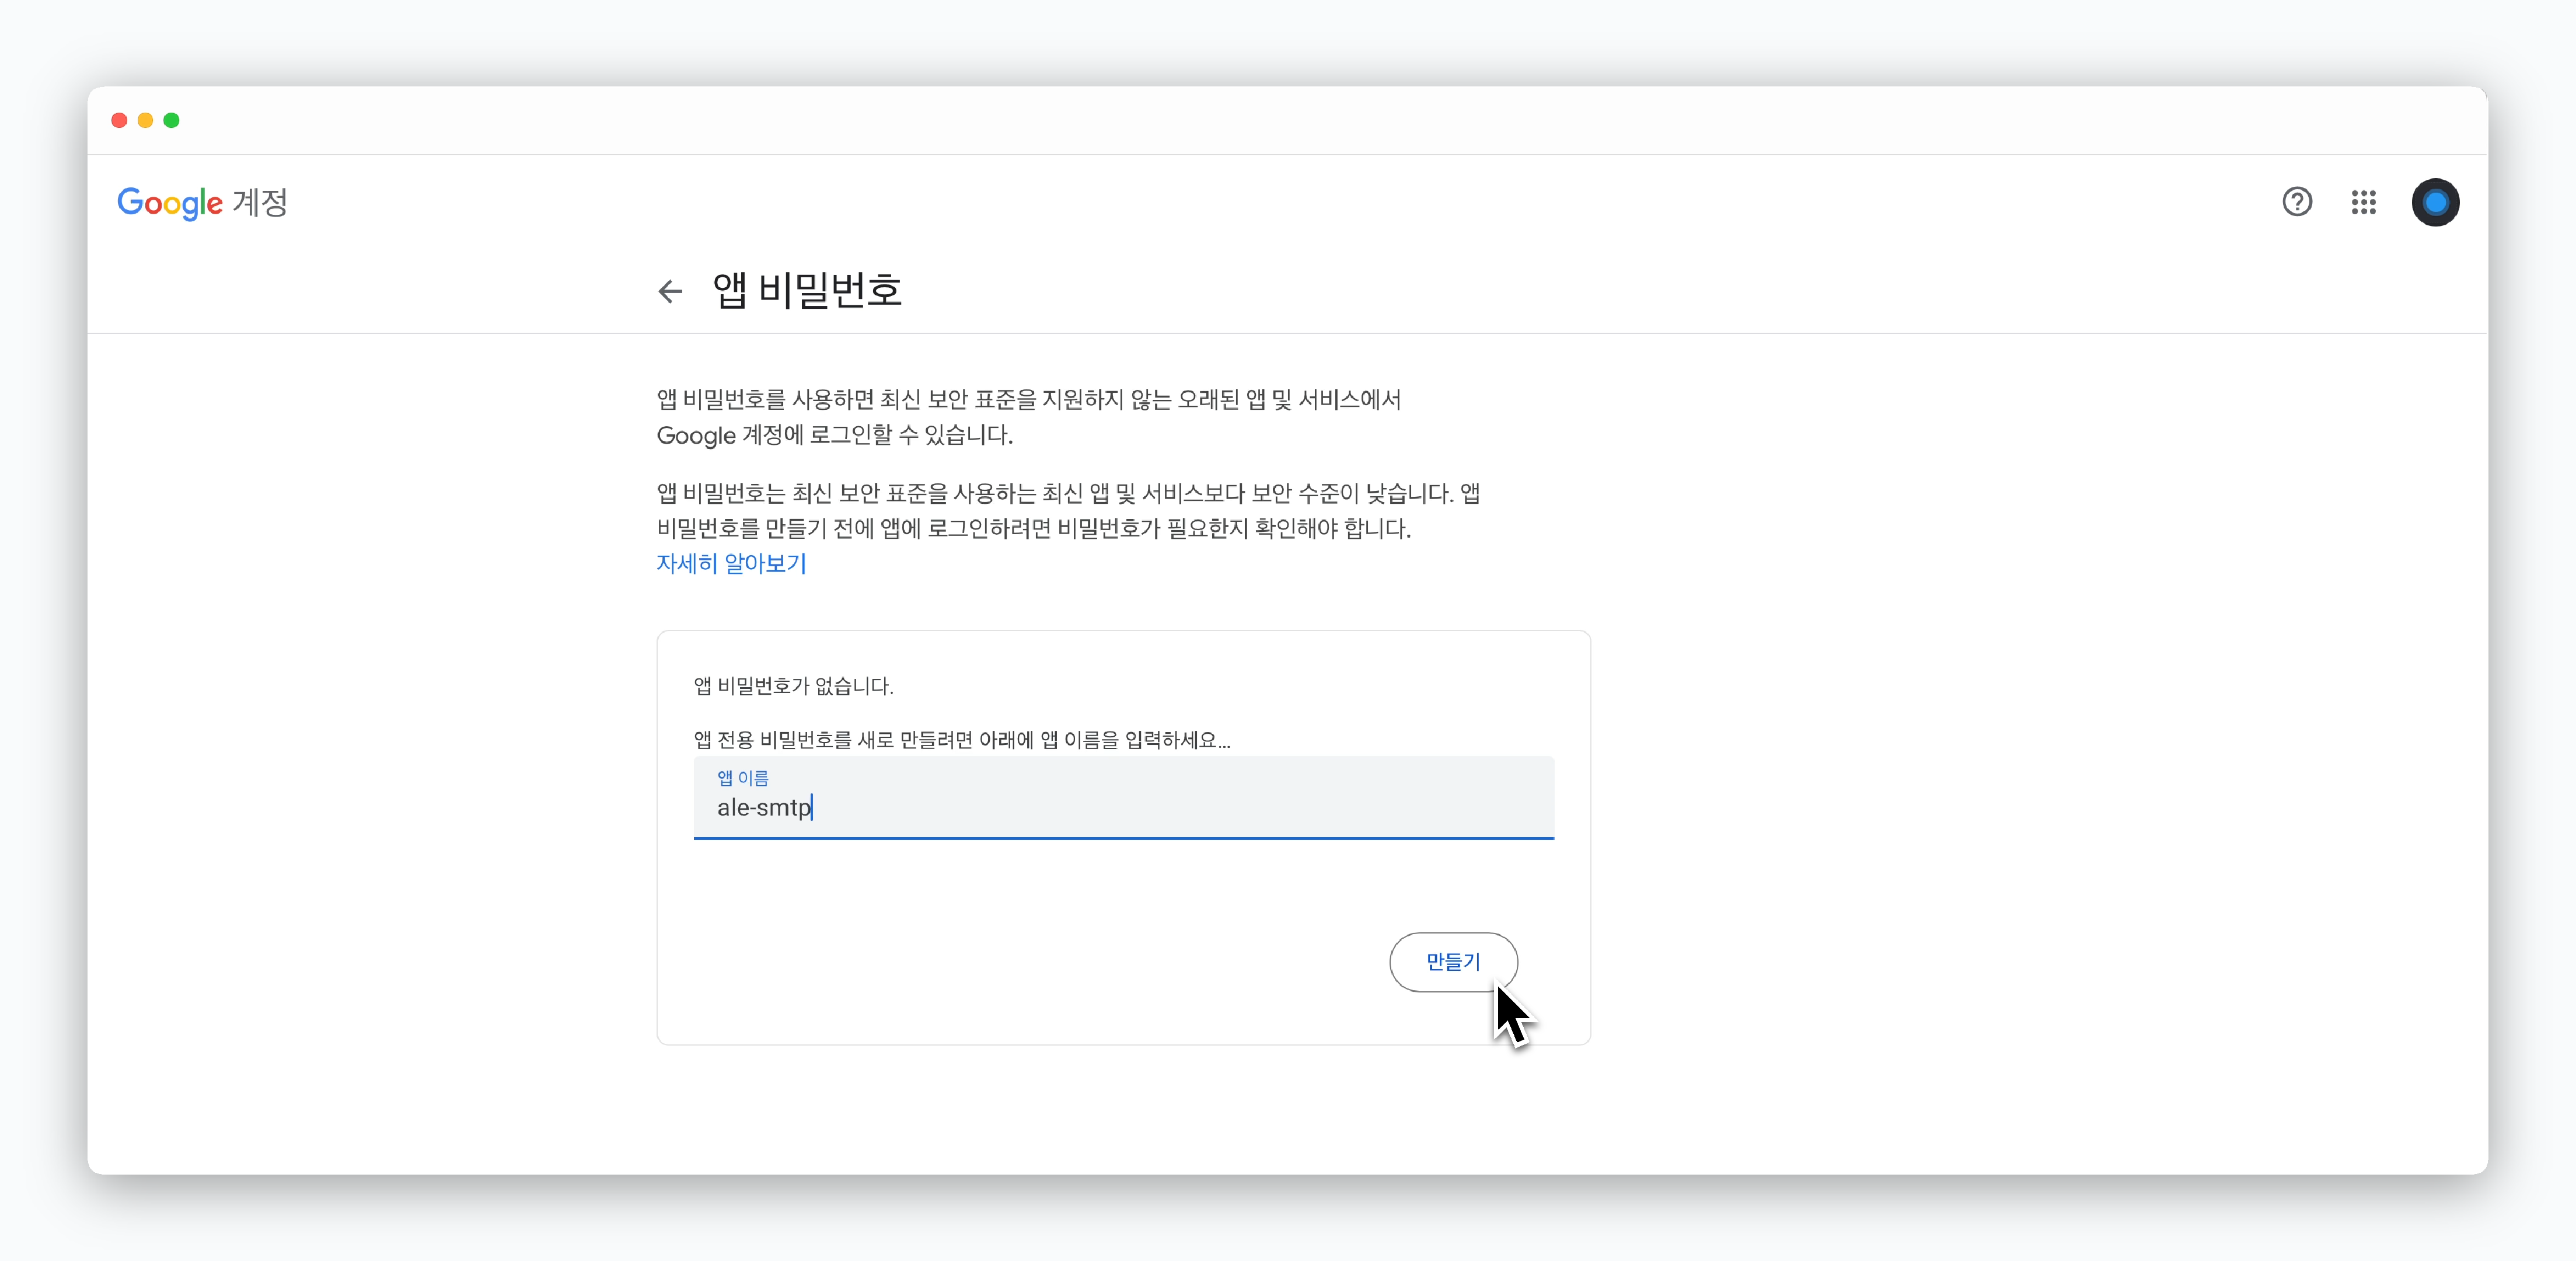
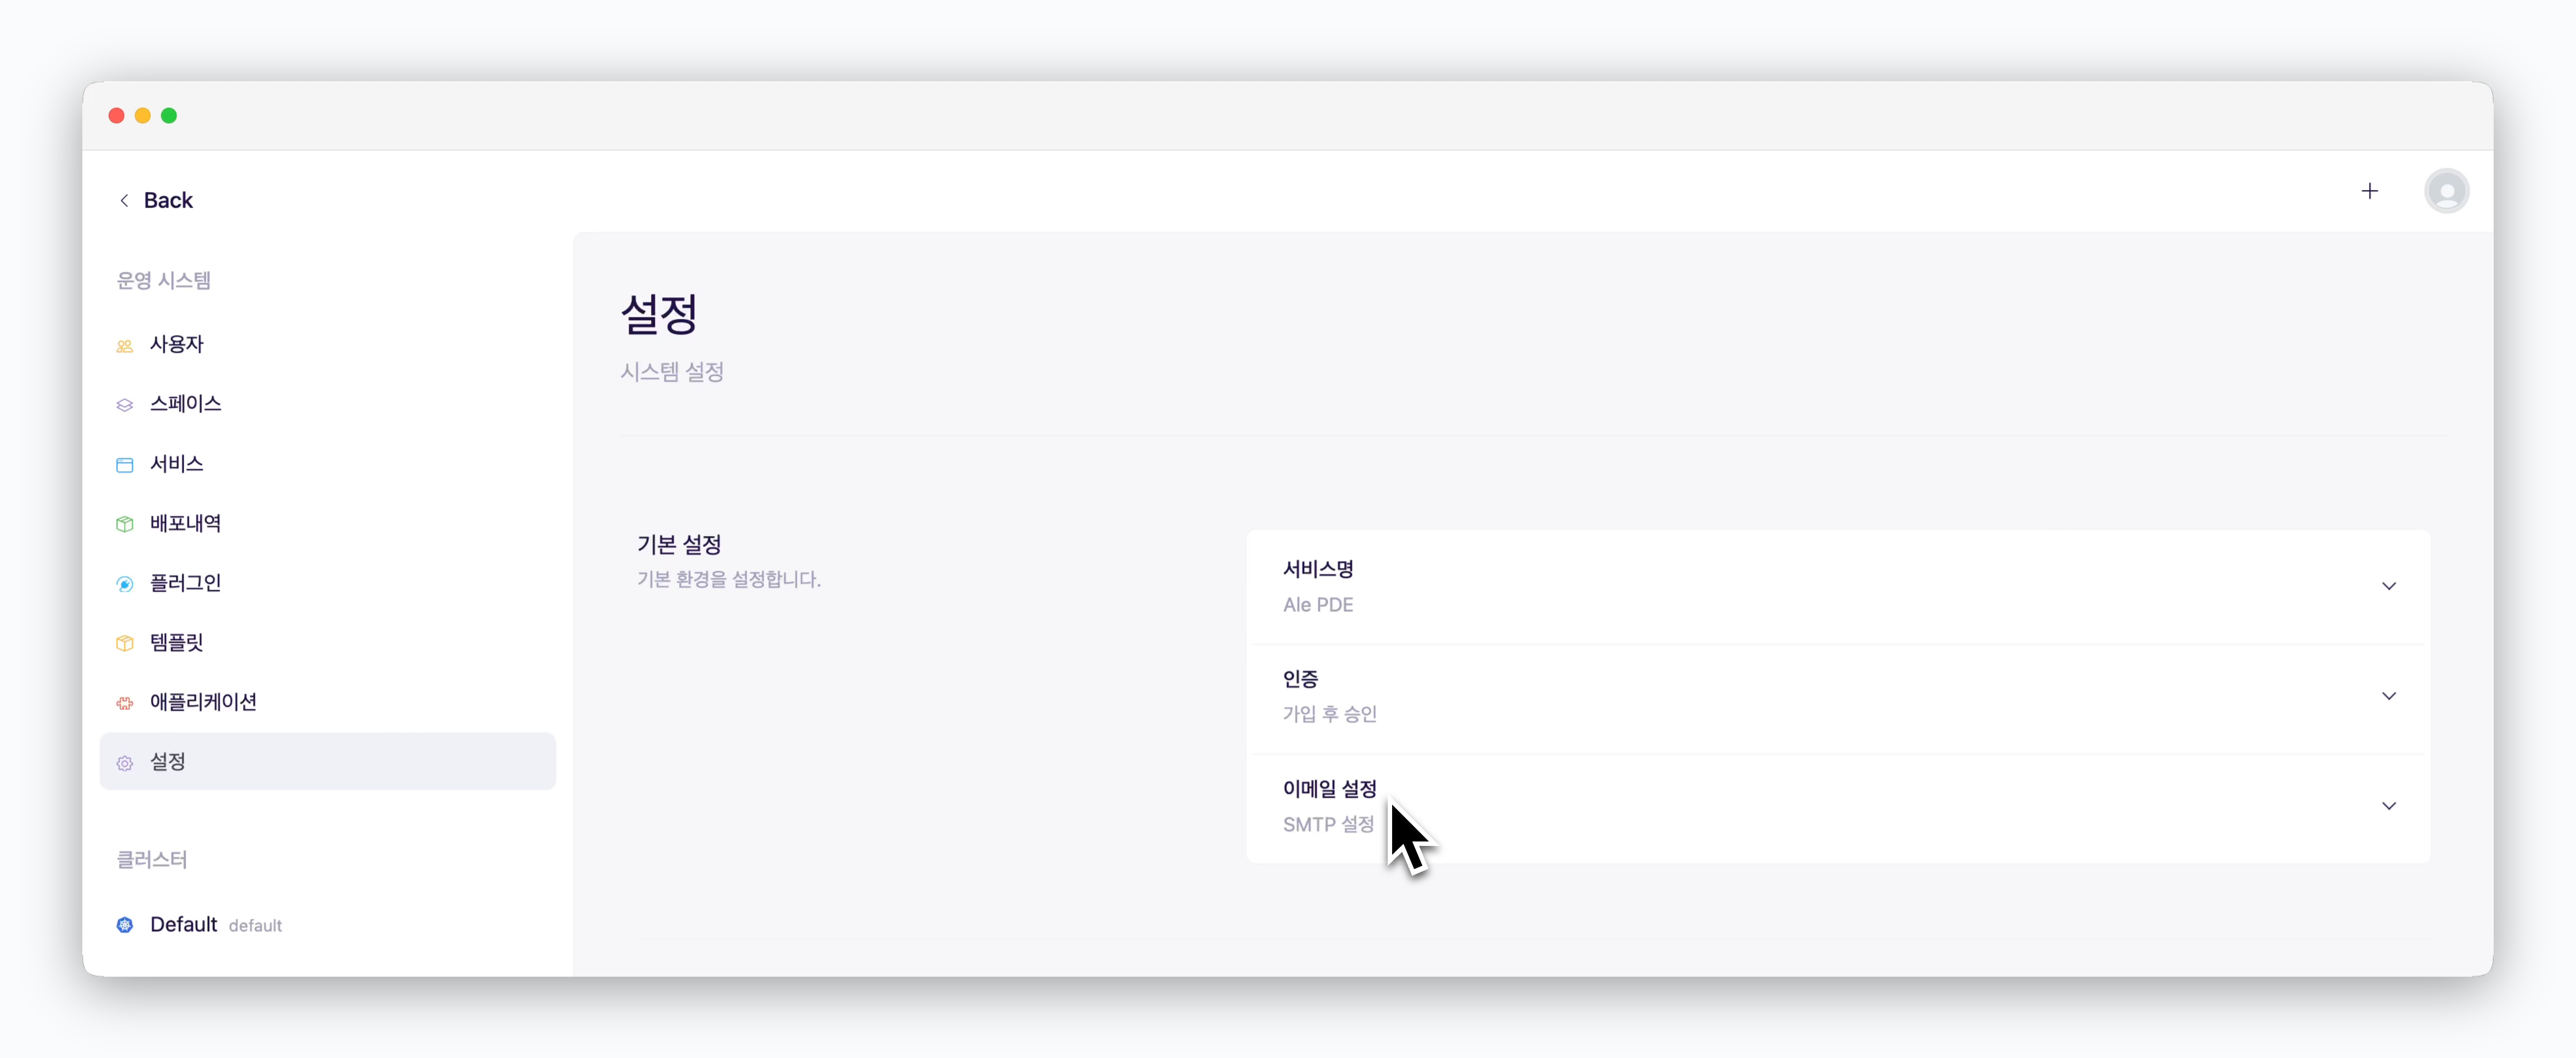 > 메일러 유형으로 SMTP 또는 Sendgrid를 선택할 수 있으며, Gmail 계정을 SMTP 서버로 활용하려면 아래의 가이드를 따라 설정하세요.
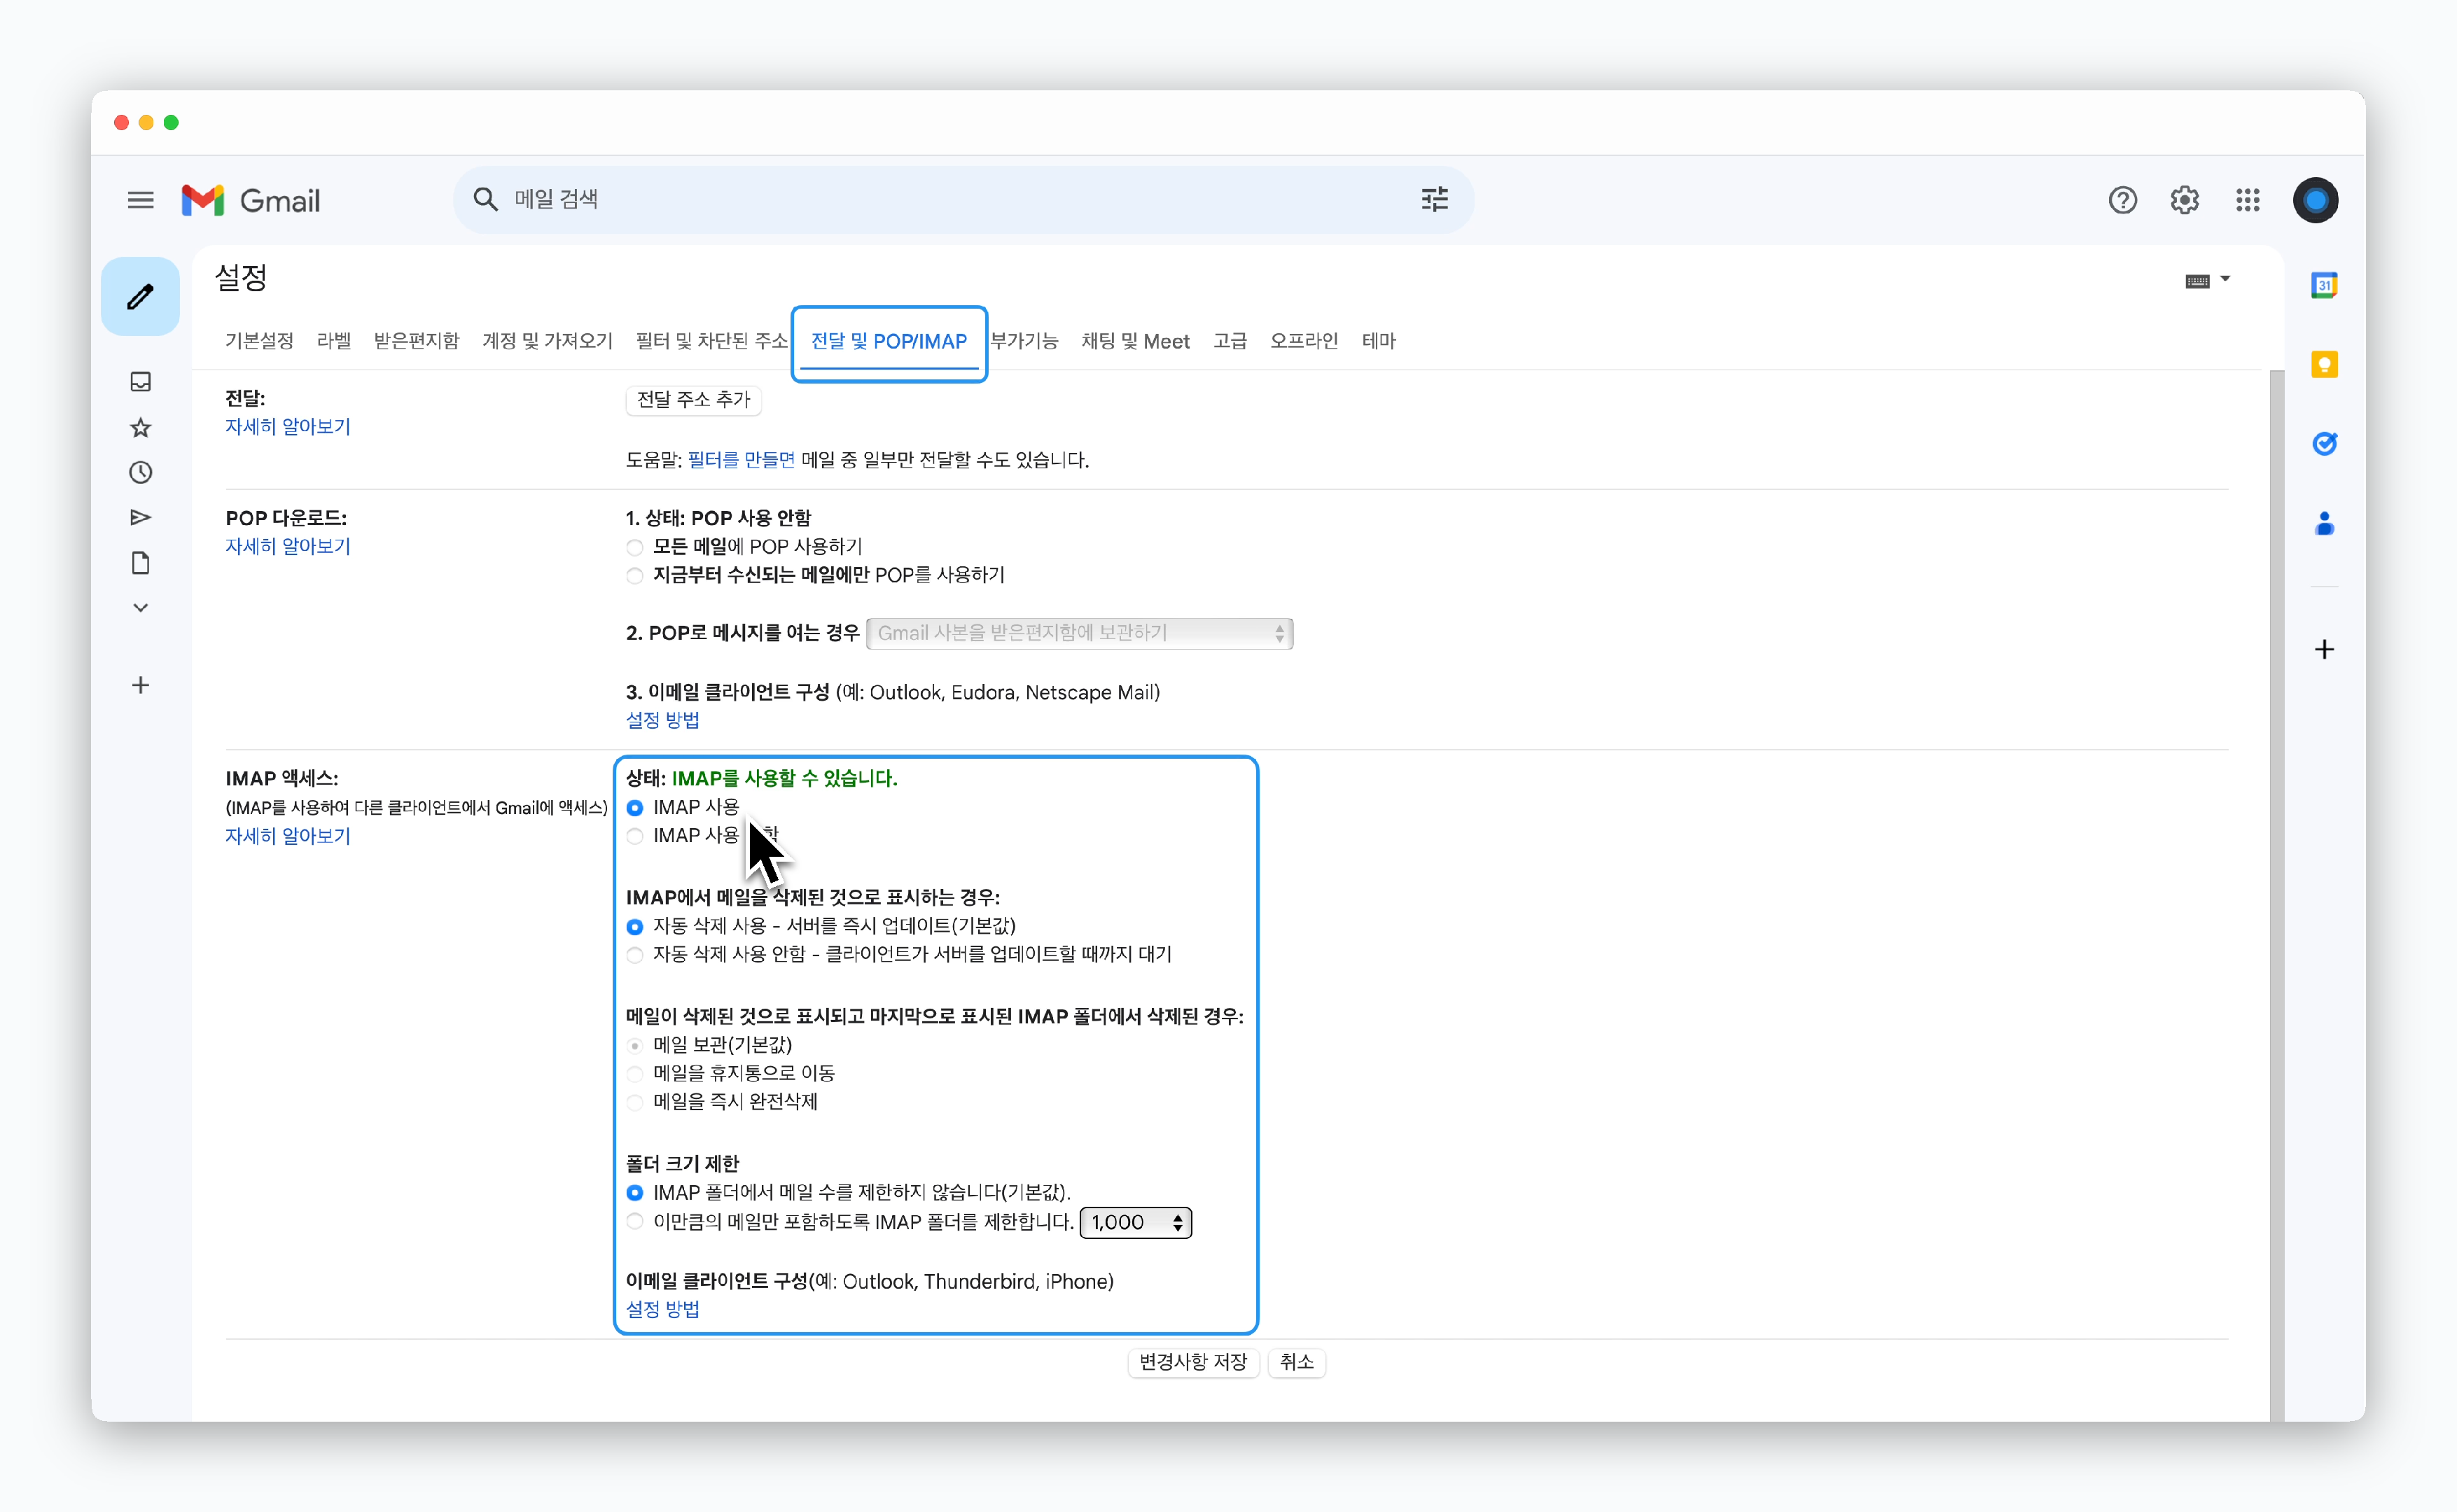
Gmail 계정을 SMTP 서버로 활용하기 위해서는 다음의 설정이 필요합니다.
* 2단계 인증(2-Step Verification) 활성화
* 조직 계정의 관리자가 보안 정책상 App Passwords 기능을 비활성화한 경우, 관리자에게 활성화 요청
> 메일러 유형으로 SMTP 또는 Sendgrid를 선택할 수 있으며, Gmail 계정을 SMTP 서버로 활용하려면 아래의 가이드를 따라 설정하세요.
Gmail 계정을 SMTP 서버로 활용하기 위해서는 다음의 설정이 필요합니다.
* 2단계 인증(2-Step Verification) 활성화
* 조직 계정의 관리자가 보안 정책상 App Passwords 기능을 비활성화한 경우, 관리자에게 활성화 요청
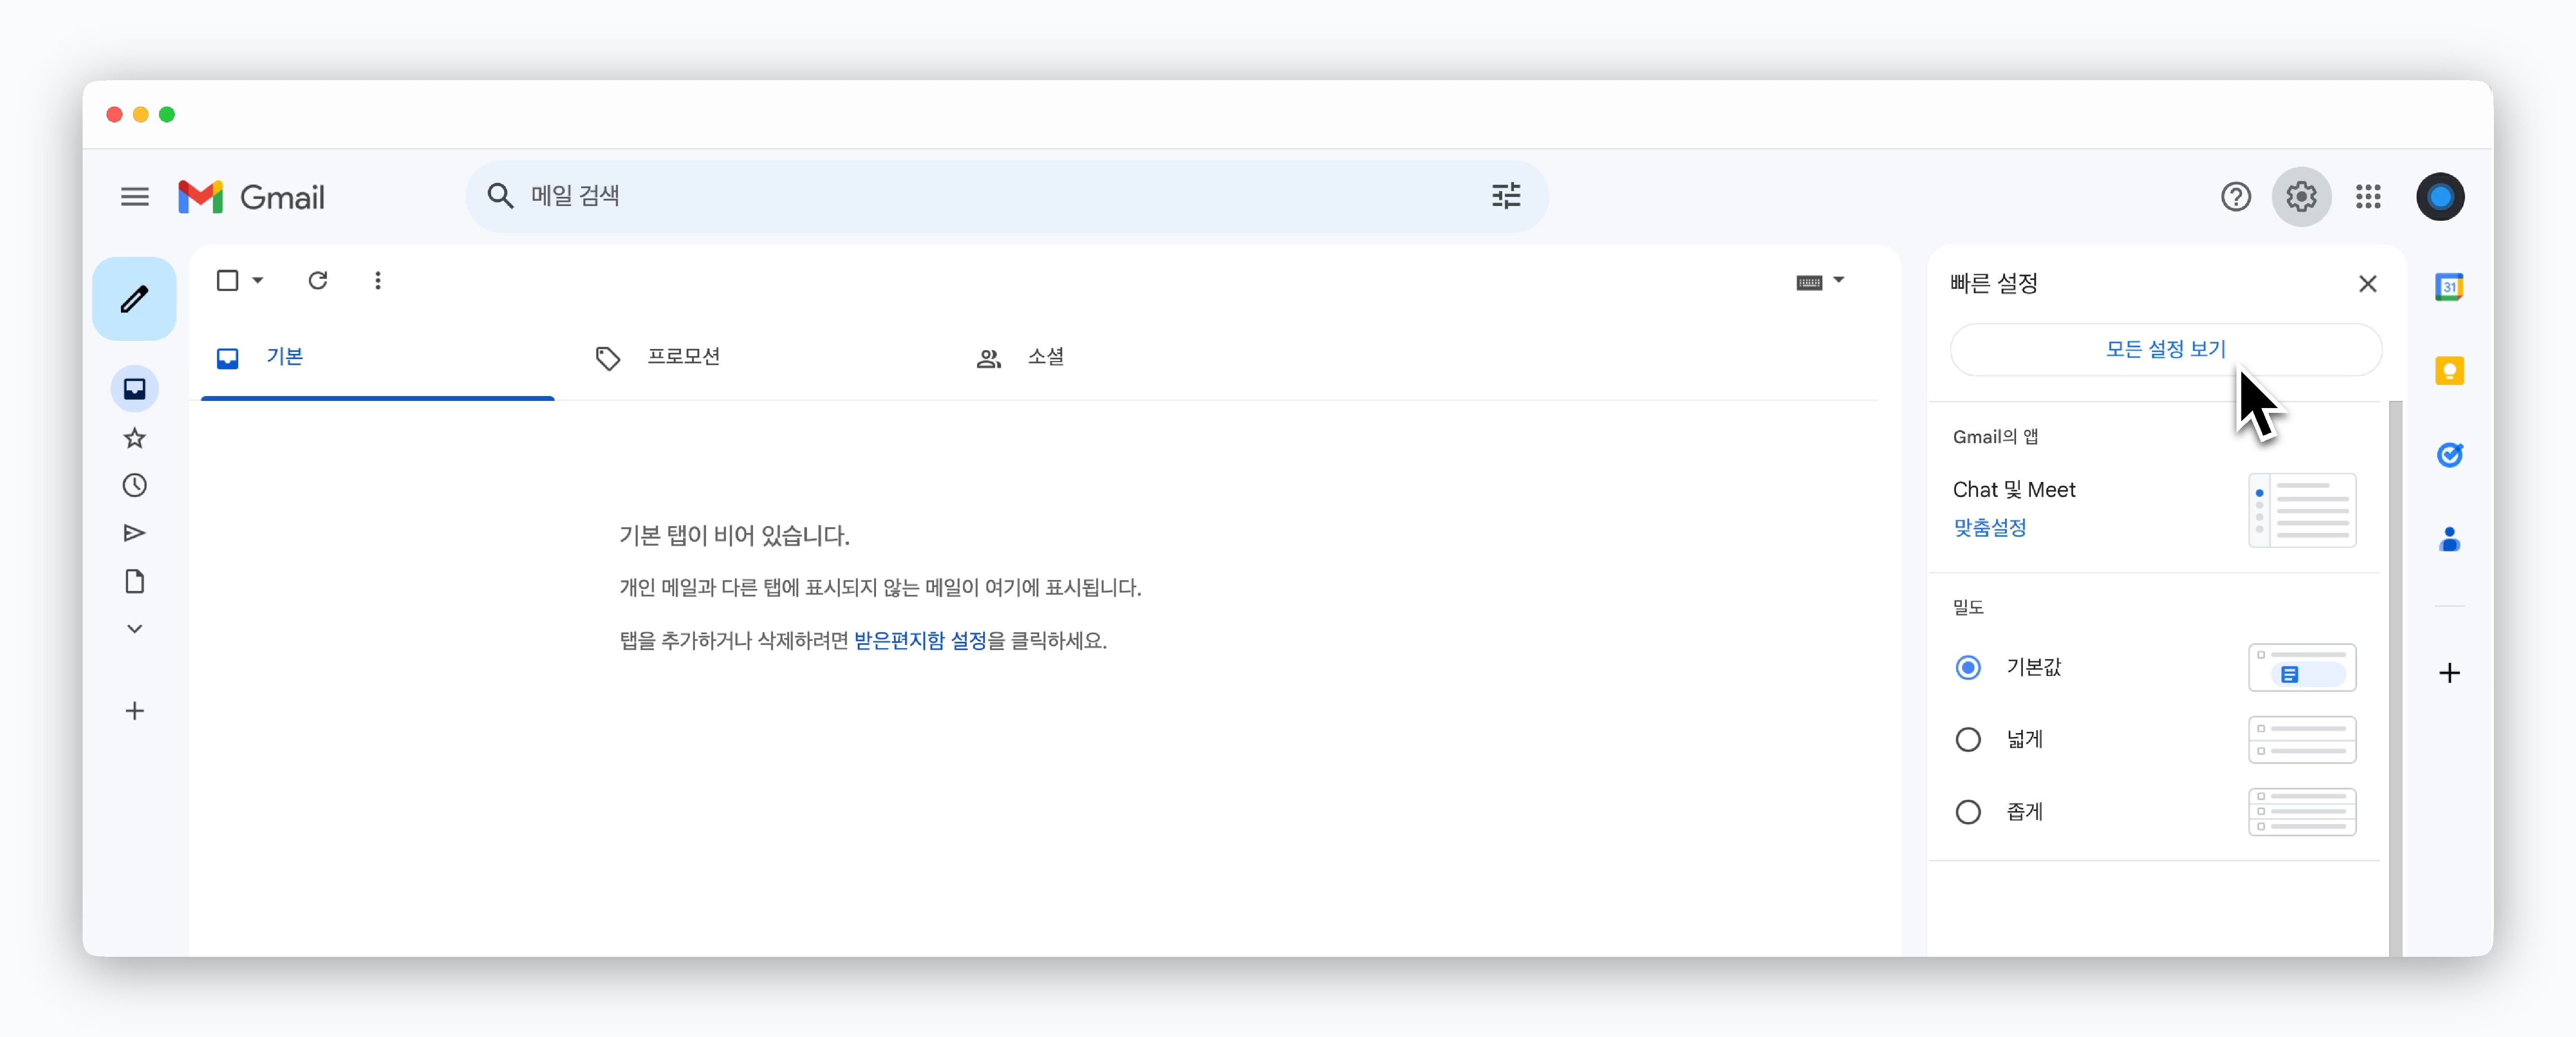
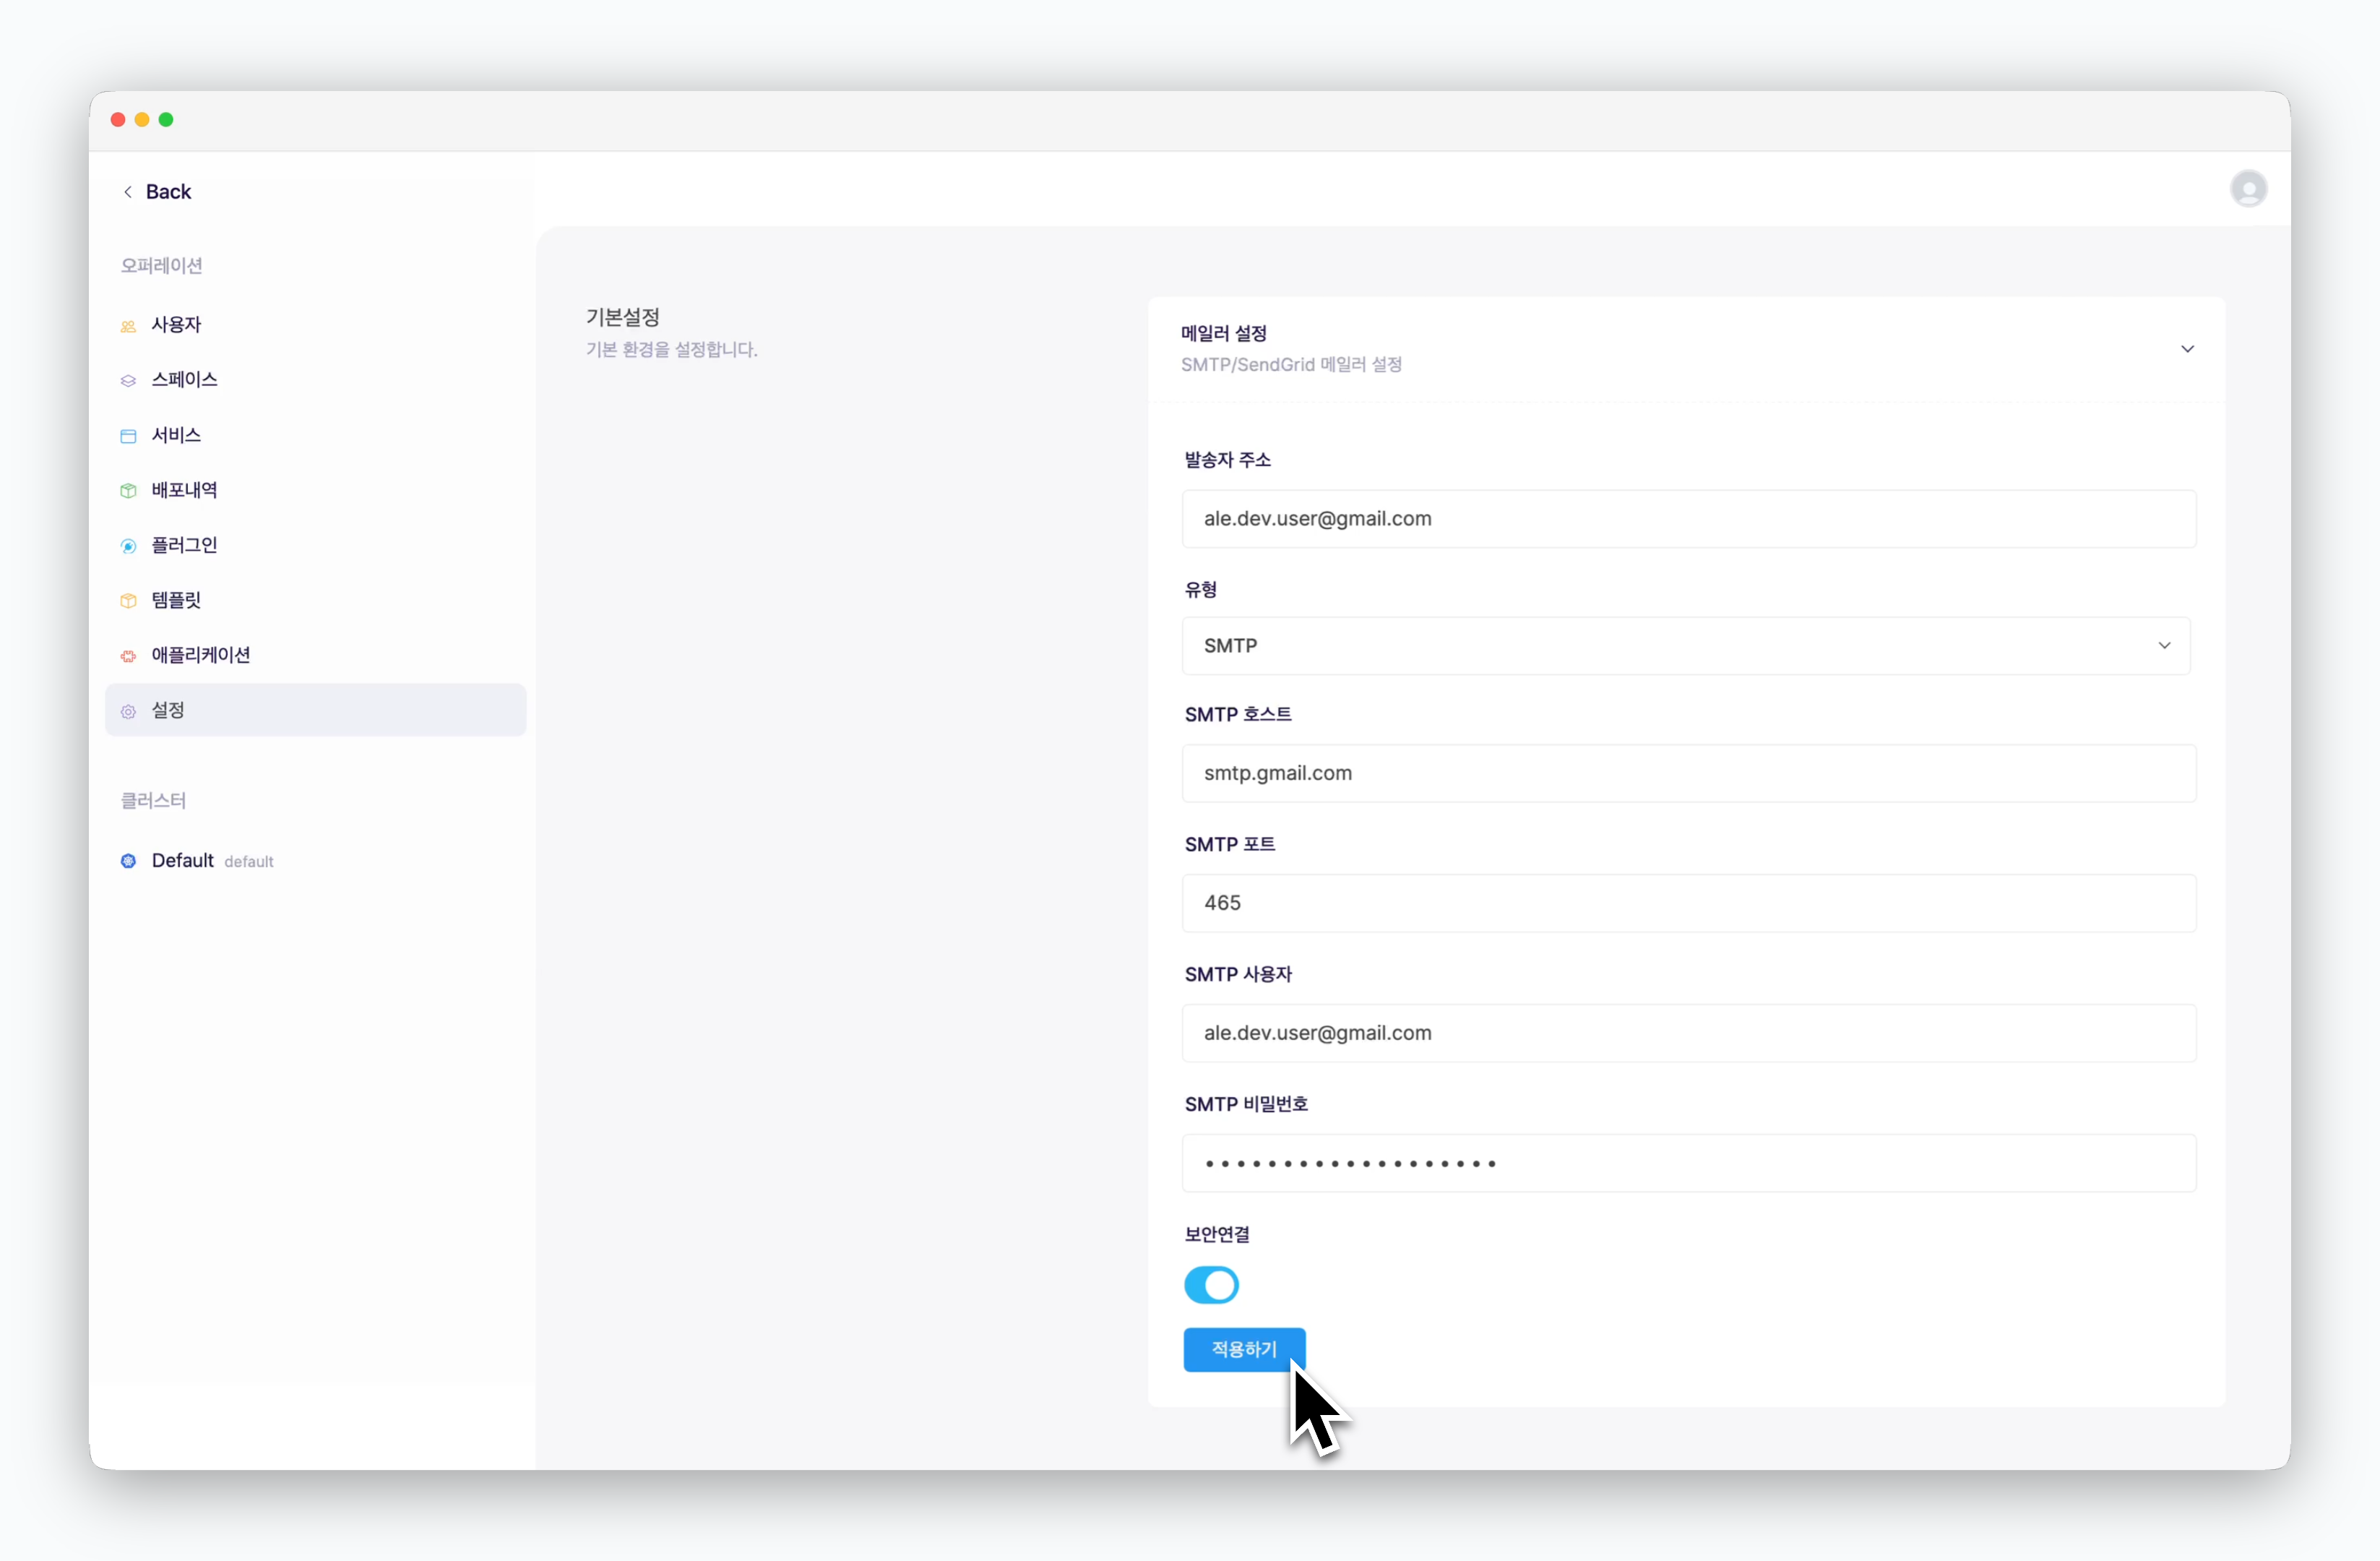 * **발송자 주소**: 송신자 메일 주소
* **유형**: SMTP
* **SMTP 호스트**: smtp.gmail.com
* **SMTP 포트**: 465
* **SMTP 사용자**: SMTP 설정 Gmail 주소
* **SMTP 비밀번호**: 앱 비밀번호
* **보안연결**: 활성화
## OAuth 설정
* **발송자 주소**: 송신자 메일 주소
* **유형**: SMTP
* **SMTP 호스트**: smtp.gmail.com
* **SMTP 포트**: 465
* **SMTP 사용자**: SMTP 설정 Gmail 주소
* **SMTP 비밀번호**: 앱 비밀번호
* **보안연결**: 활성화
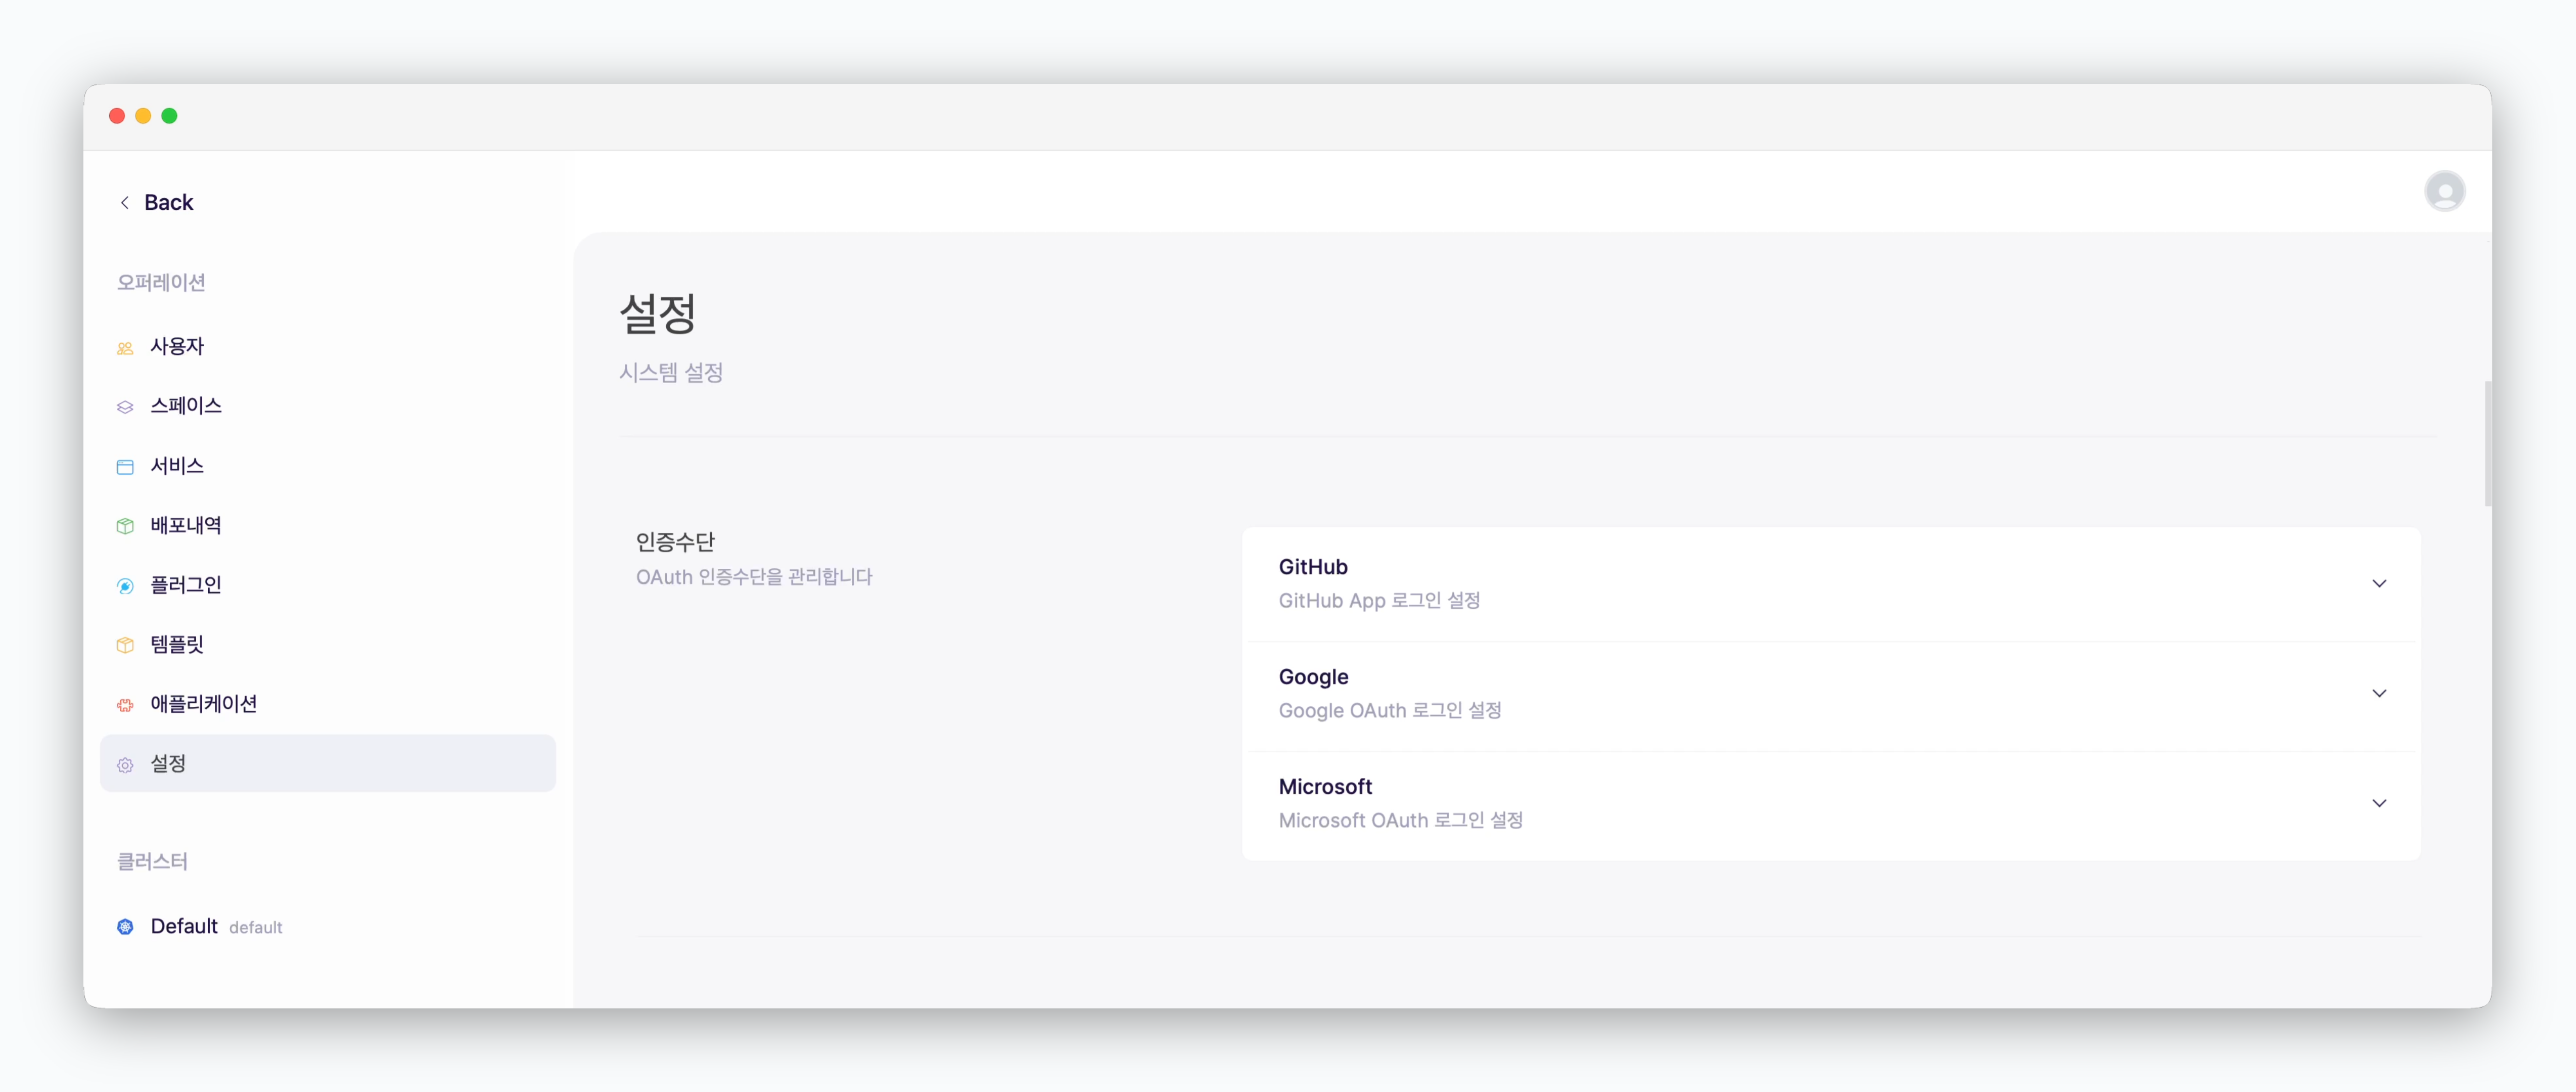
## OAuth 설정
 ## 리소스 프로파일 관리
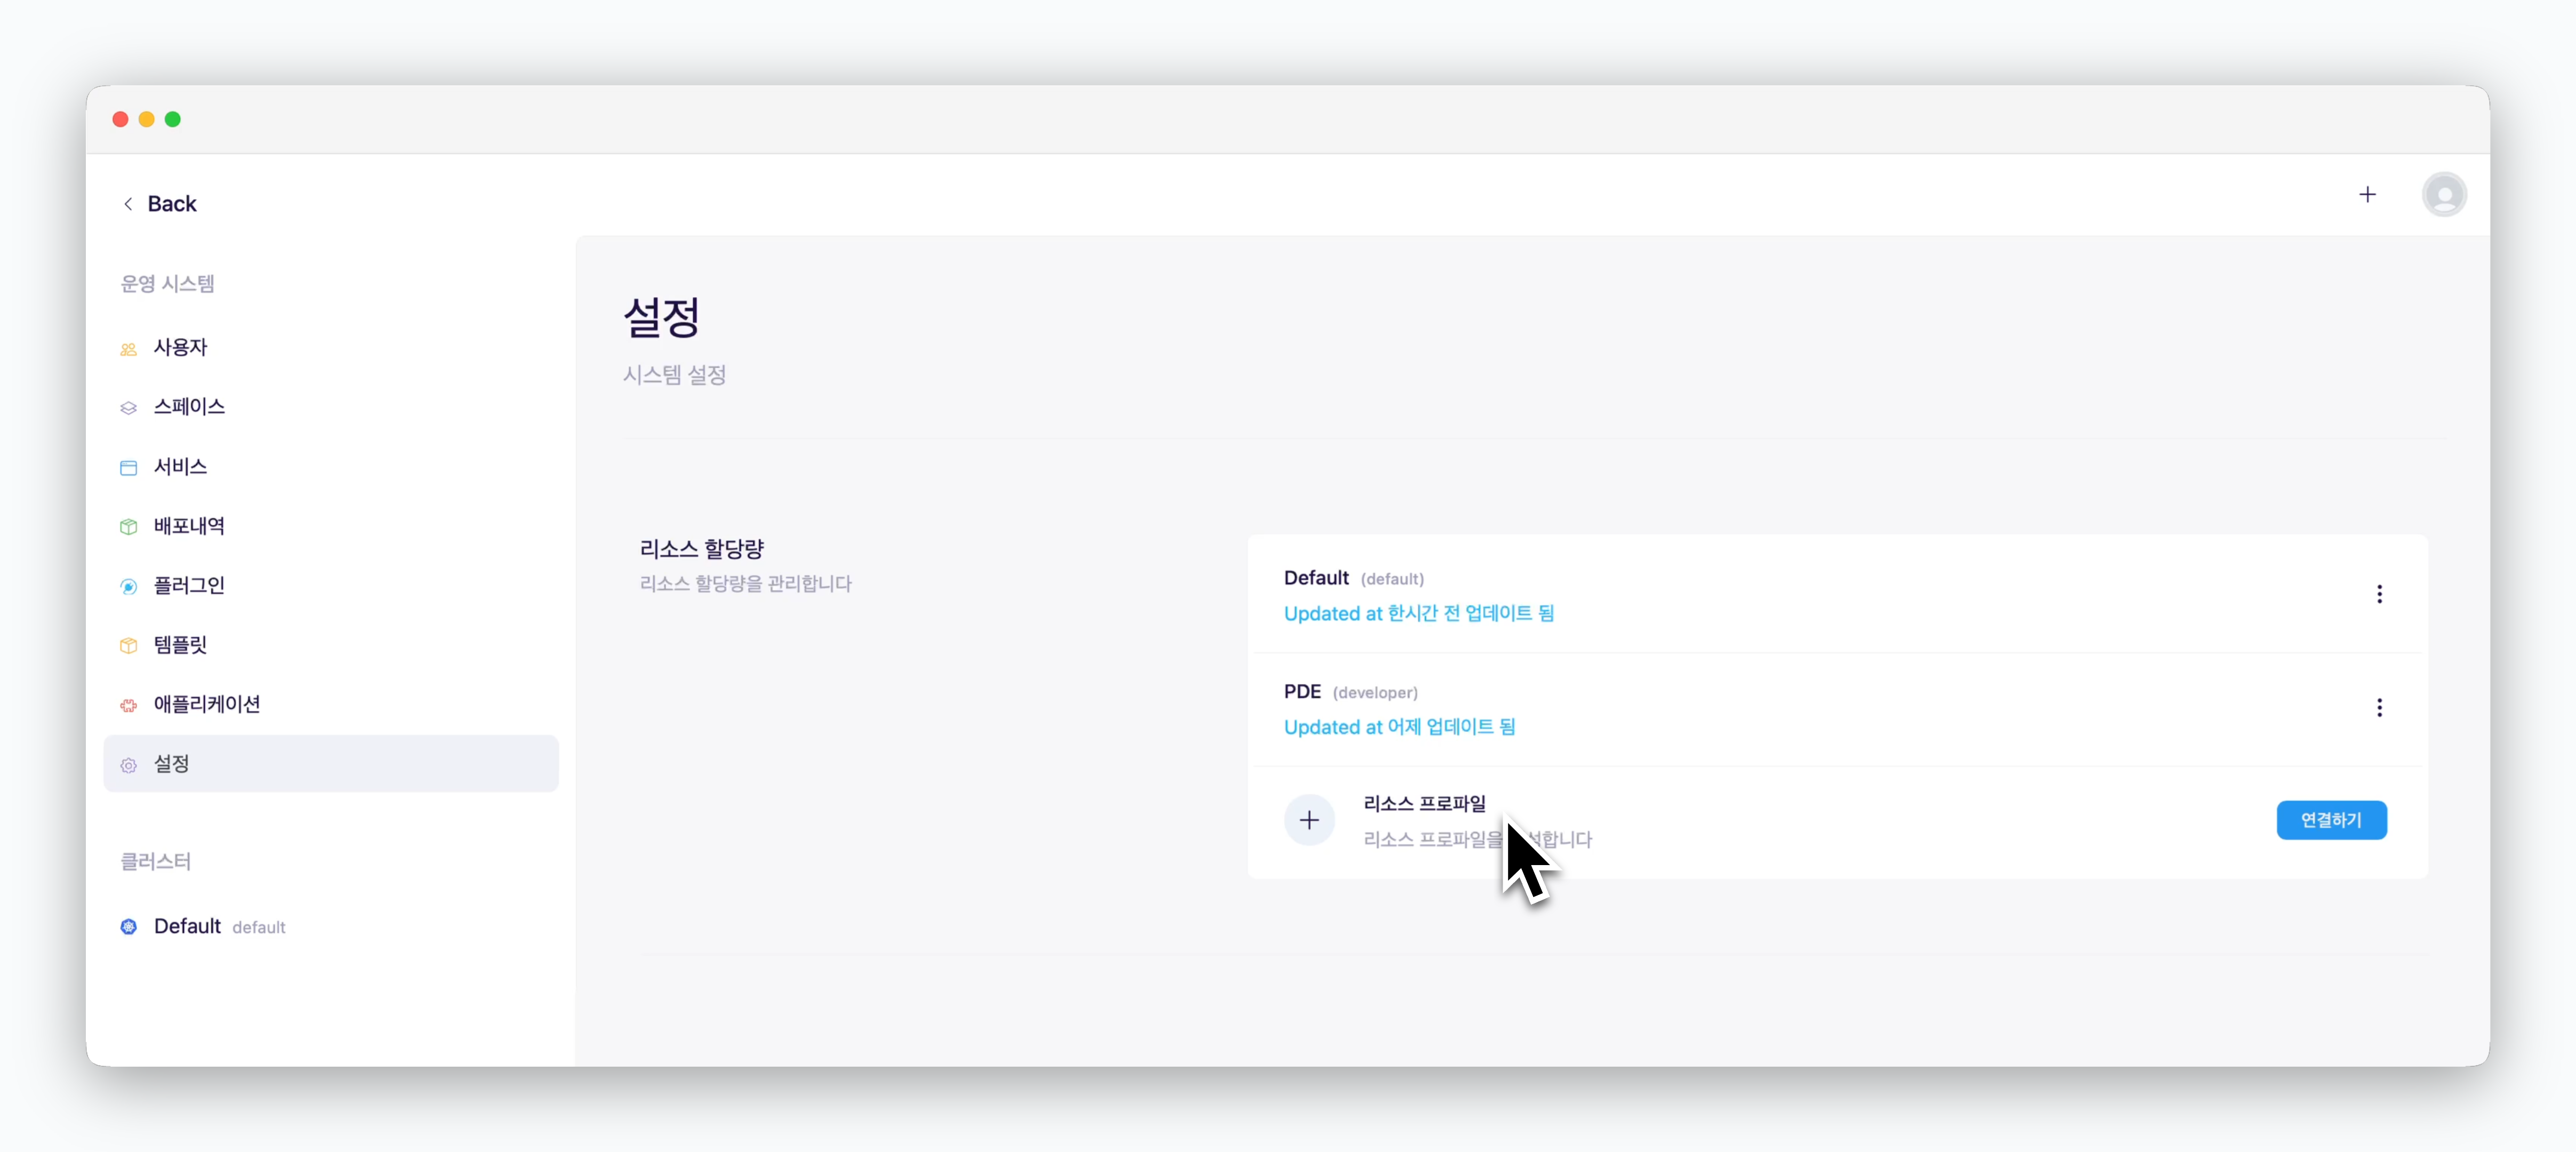 > 미리 정한 리소스 세트를 대시보드 사용자의 스페이스에 할당할 수 있습니다. 아래를 참고해 리소스 프로파일을 설정하고 [스페이스에 리소스 프로파일을 적용](/ko/operations/spaces#%ED%94%84%EB%A1%9C%ED%8C%8C%EC%9D%BC%EB%A1%9C-%EB%B6%80%EC%97%AC)하는 방식으로 간편하게 리소스를 부여할 수 있습니다.
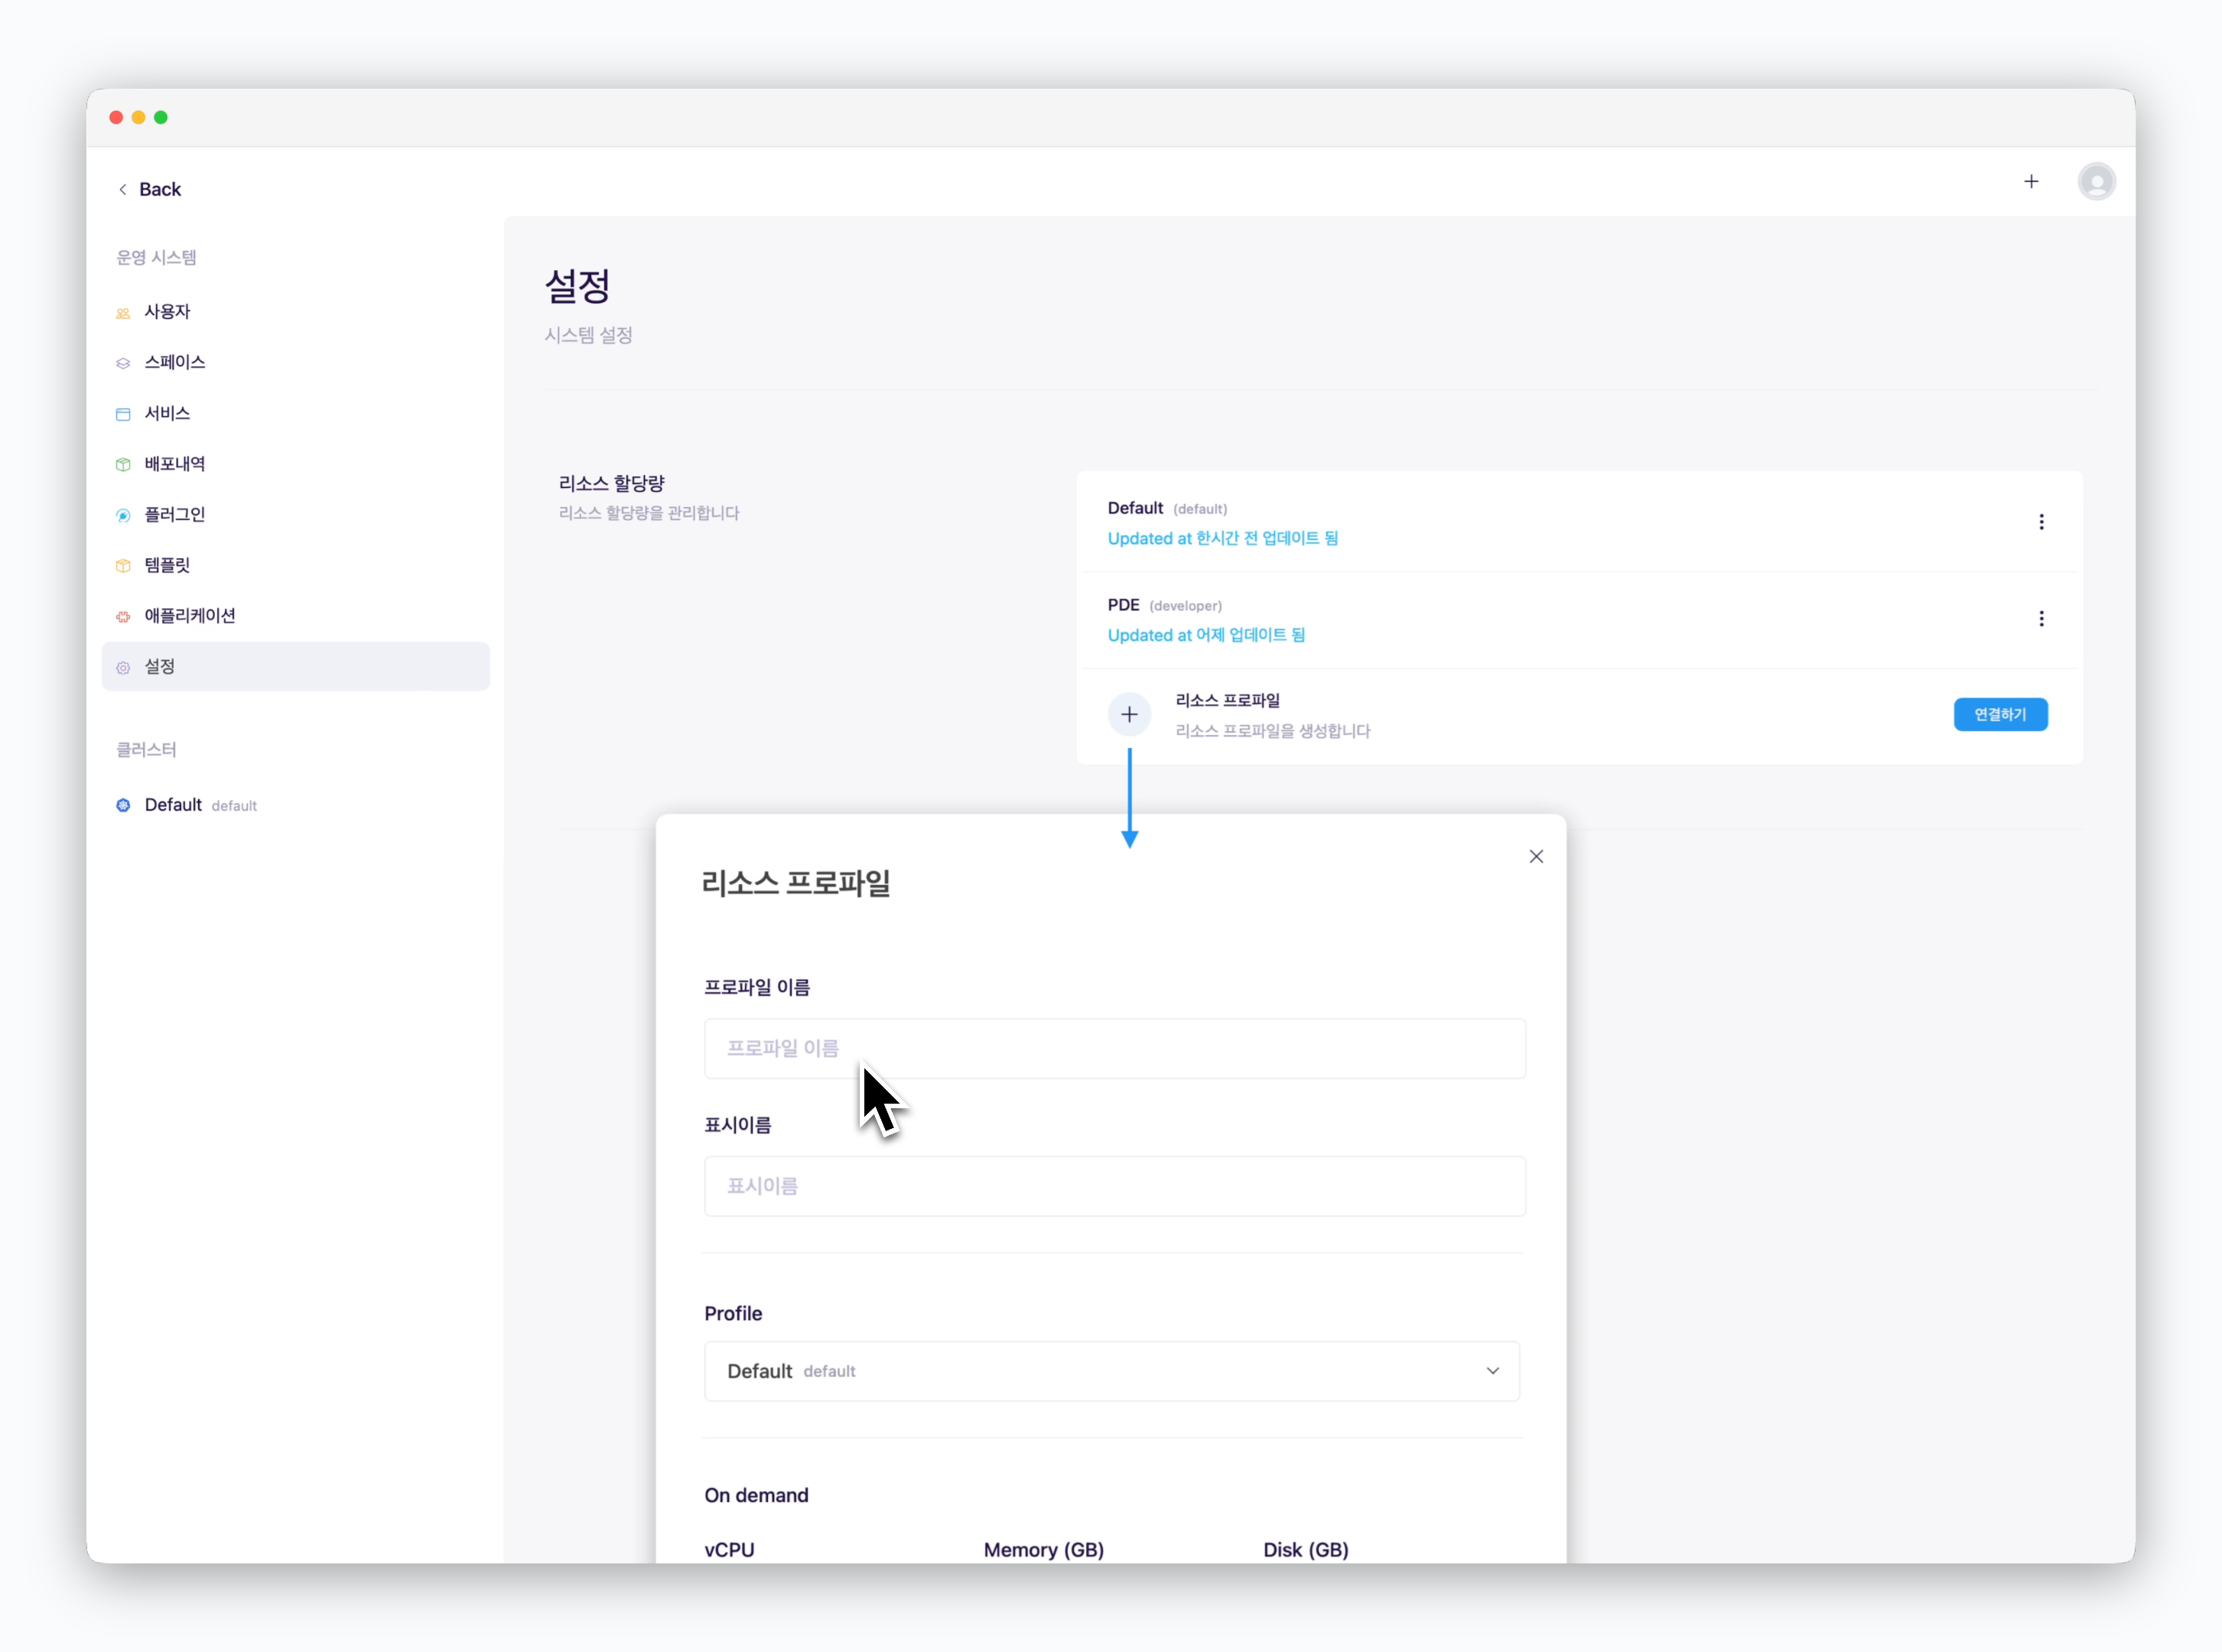 운영 시스템 **설정**페이지의 **리소스 쿼터** 항목에서 리소스 프로파일 `추가하기` 버튼을 클릭하면, 적용할 리소스셋을 미리 설정한 리소스 프로파일을 추가할 수 있습니다. 먼저 프로파일 이름과, 사용자에게 표시될 표시명을 입력해주세요
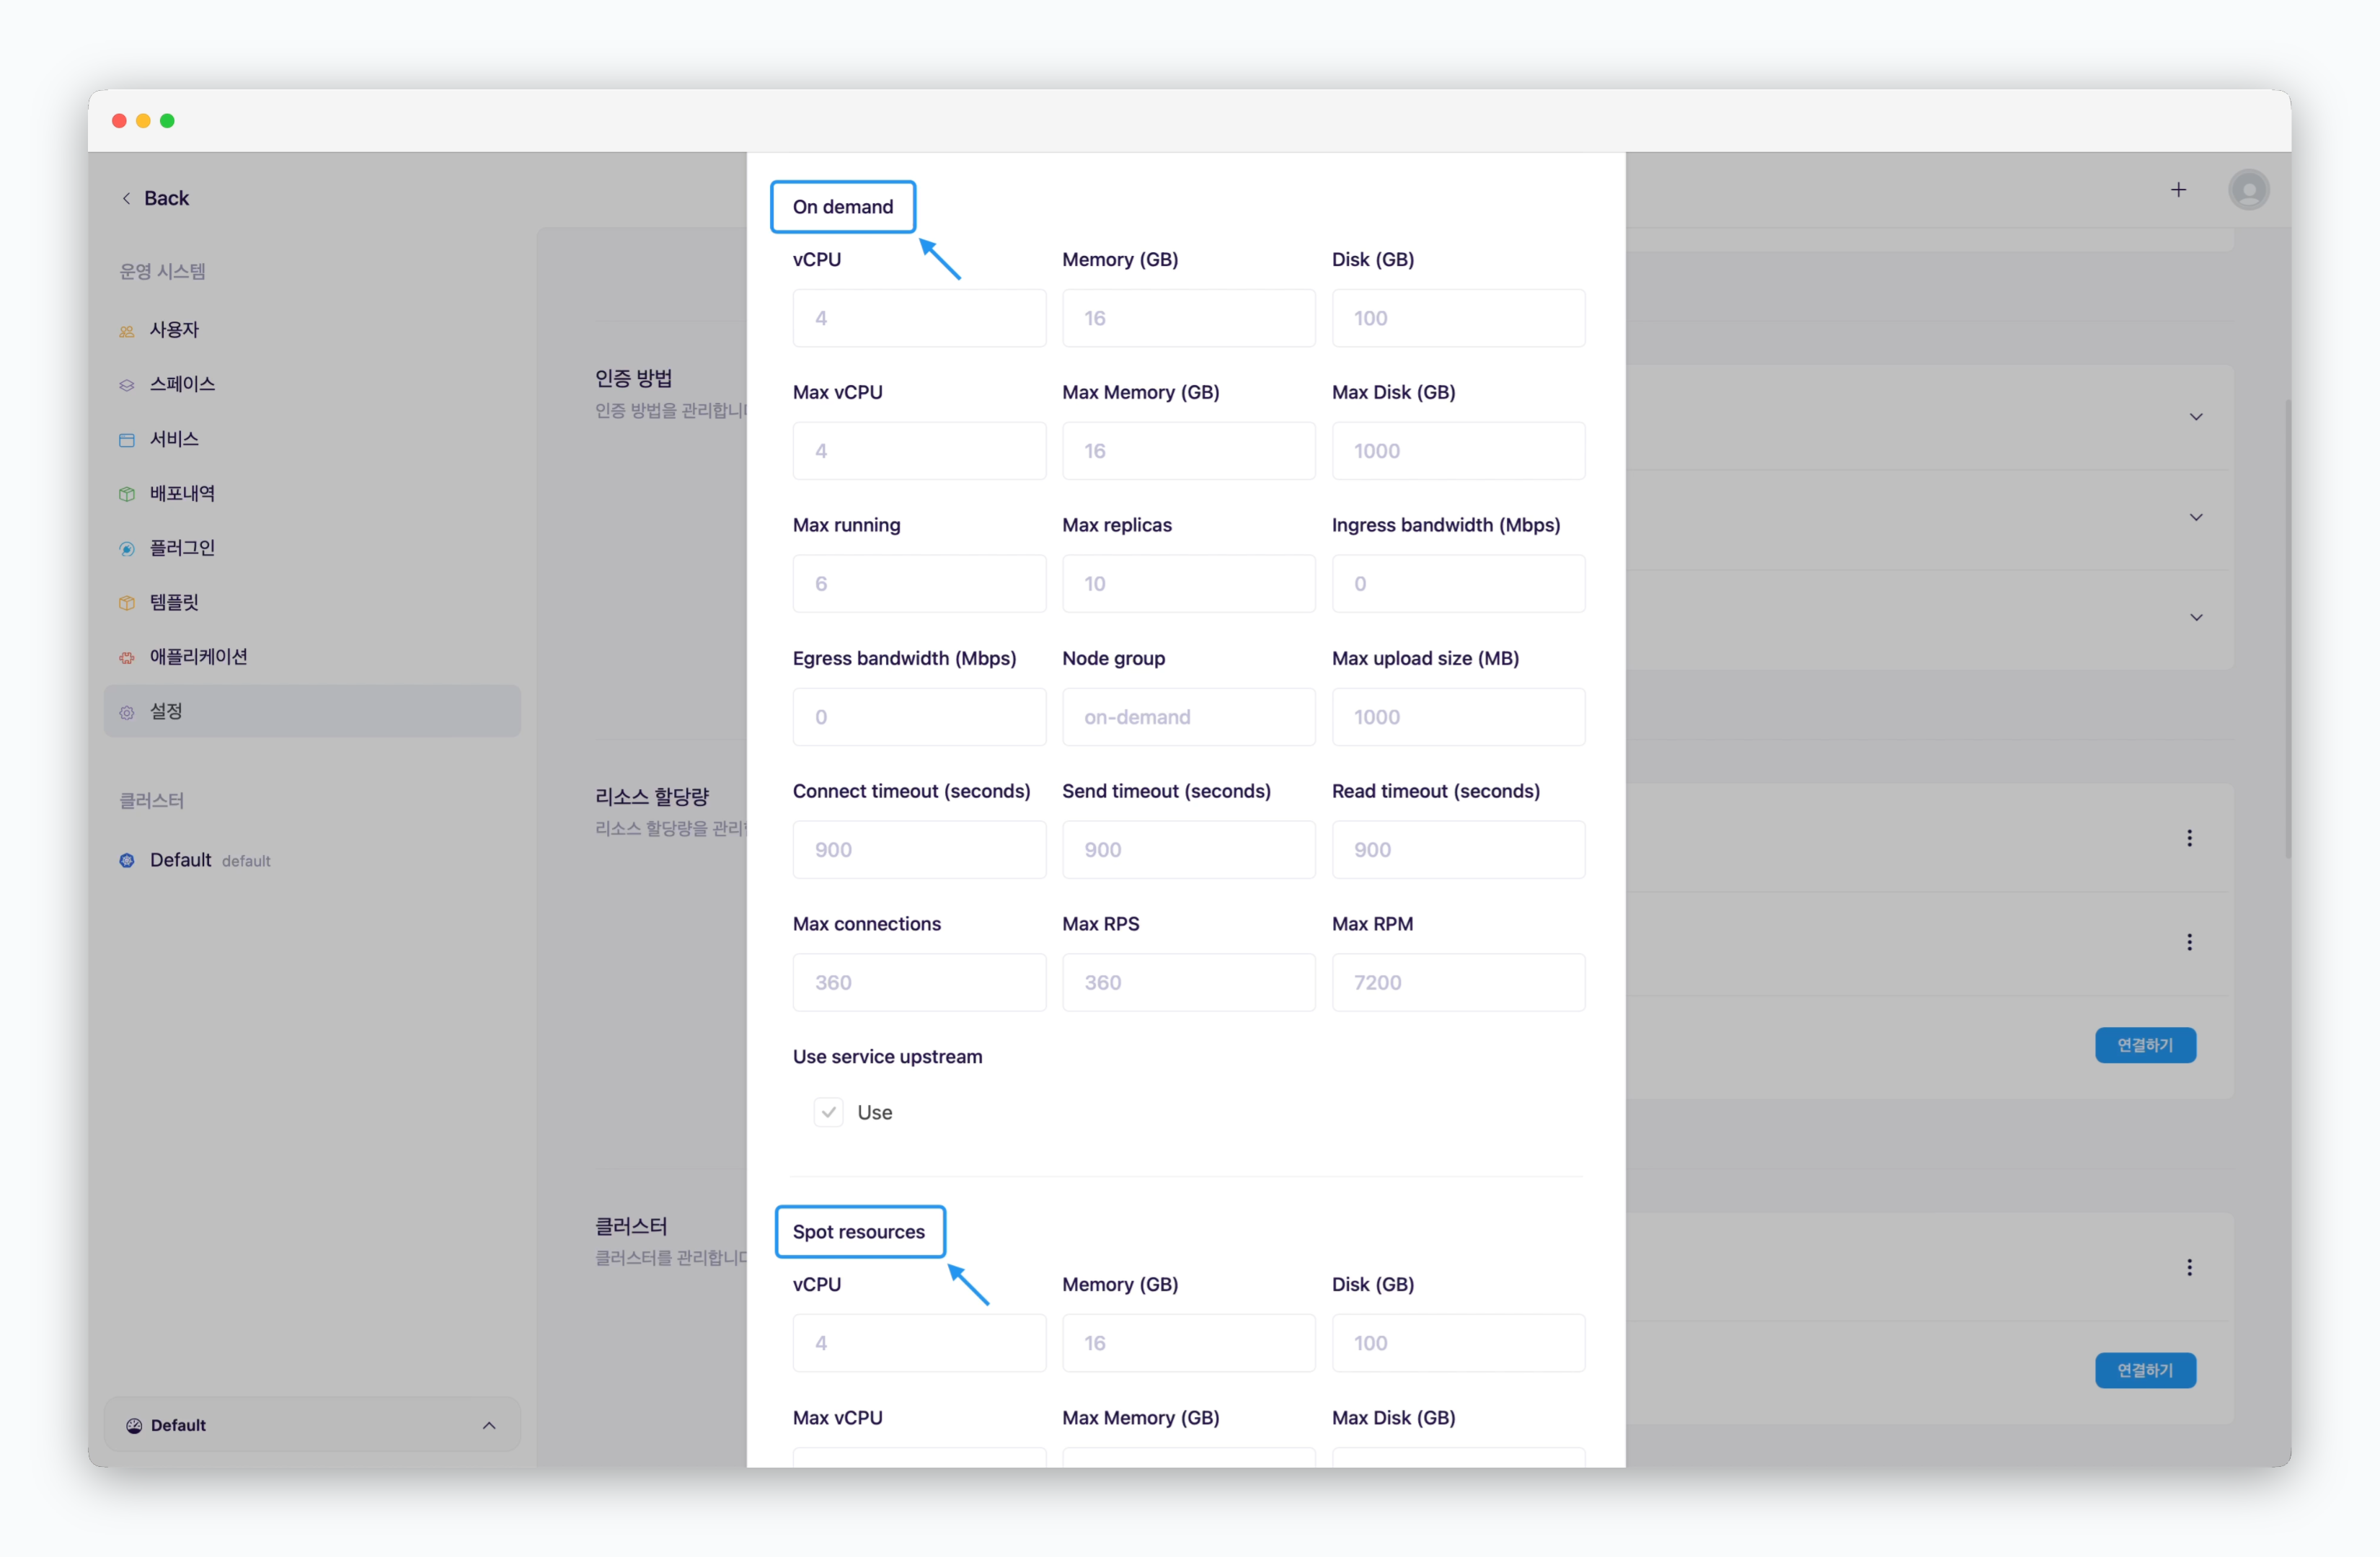 리소스 타입별 리소스 값을 설정하세요. 설정에 따라 한 가지 리소스 타입만 사용하거나 두 가지의 타입을 혼용할 수 있습니다. **값을 입력하지 않은 항목은 placeholder 값이 적용**되며, 주요 항목의 의미는 아래와 같습니다.
* **vCPU / Memory / Disk** : 스페이스 전체에 부여하는 리소스 값
* **Max vCPU / Memory / Disk** : 개별 서비스에 부여할 수 있는 리소스 상한
* **Max running** : 개설할 수 있는 서비스의 수
* **Max replica** : 개별 서비스에 부여할 수 있는 레플리카 수의 상한
* **Node group** :`on-demand` 또는 `spot`입력. 자세한 설명은 아래를 참고하세요.
> `ale`은 효율적인 리소스 운용을 위해 워커 노드의 인스턴스 타입에 따른 리소스 할당을 지원합니다. 리소스 설정 시 Node group 필드에 `on-demand` 또는 `spot` 을 입력하면, 입력값에 따른 인스턴스를 사용합니다.
클러스터의 워커 노드를 on-demand 인스턴스로만 구성하거나 spot 인스턴스의 리소스가 부족해도, ale에서 spot 리소스를 사용하도록 설정할 수 있습니다. 이 경우 ale에서 spot 리소스로 배포한 서비스는 `spot` 표시만 적용되며, 실제로는 on-demand 인스턴스에서 작동하게 됩니다.
Spot 리소스로 배포된 서비스는 [스팟 리소스 일괄 제거](/ko/operations/spaces#%EB%A6%AC%EC%86%8C%EC%8A%A4-%EC%9D%BC%EA%B4%84-%EC%A0%9C%EA%B1%B0)기능으로 한번에 모두 중지 및 제거할 수 있습니다. 테스트 등을 위해 일시적으로 운영하는 서비스에 스팟 리소스를 적용해 배포하면, **스팟 리소스 제거 기능**을 활용해 클라우드 자원을 효율적으로 관리할 수 있습니다.
리소스 타입별 리소스 값을 설정하세요. 설정에 따라 한 가지 리소스 타입만 사용하거나 두 가지의 타입을 혼용할 수 있습니다. **값을 입력하지 않은 항목은 placeholder 값이 적용**되며, 주요 항목의 의미는 아래와 같습니다.
* **vCPU / Memory / Disk** : 스페이스 전체에 부여하는 리소스 값
* **Max vCPU / Memory / Disk** : 개별 서비스에 부여할 수 있는 리소스 상한
* **Max running** : 개설할 수 있는 서비스의 수
* **Max replica** : 개별 서비스에 부여할 수 있는 레플리카 수의 상한
* **Node group** :`on-demand` 또는 `spot`입력. 자세한 설명은 아래를 참고하세요.
> `ale`은 효율적인 리소스 운용을 위해 워커 노드의 인스턴스 타입에 따른 리소스 할당을 지원합니다. 리소스 설정 시 Node group 필드에 `on-demand` 또는 `spot` 을 입력하면, 입력값에 따른 인스턴스를 사용합니다.
클러스터의 워커 노드를 on-demand 인스턴스로만 구성하거나 spot 인스턴스의 리소스가 부족해도, ale에서 spot 리소스를 사용하도록 설정할 수 있습니다. 이 경우 ale에서 spot 리소스로 배포한 서비스는 `spot` 표시만 적용되며, 실제로는 on-demand 인스턴스에서 작동하게 됩니다.
Spot 리소스로 배포된 서비스는 [스팟 리소스 일괄 제거](/ko/operations/spaces#%EB%A6%AC%EC%86%8C%EC%8A%A4-%EC%9D%BC%EA%B4%84-%EC%A0%9C%EA%B1%B0)기능으로 한번에 모두 중지 및 제거할 수 있습니다. 테스트 등을 위해 일시적으로 운영하는 서비스에 스팟 리소스를 적용해 배포하면, **스팟 리소스 제거 기능**을 활용해 클라우드 자원을 효율적으로 관리할 수 있습니다.
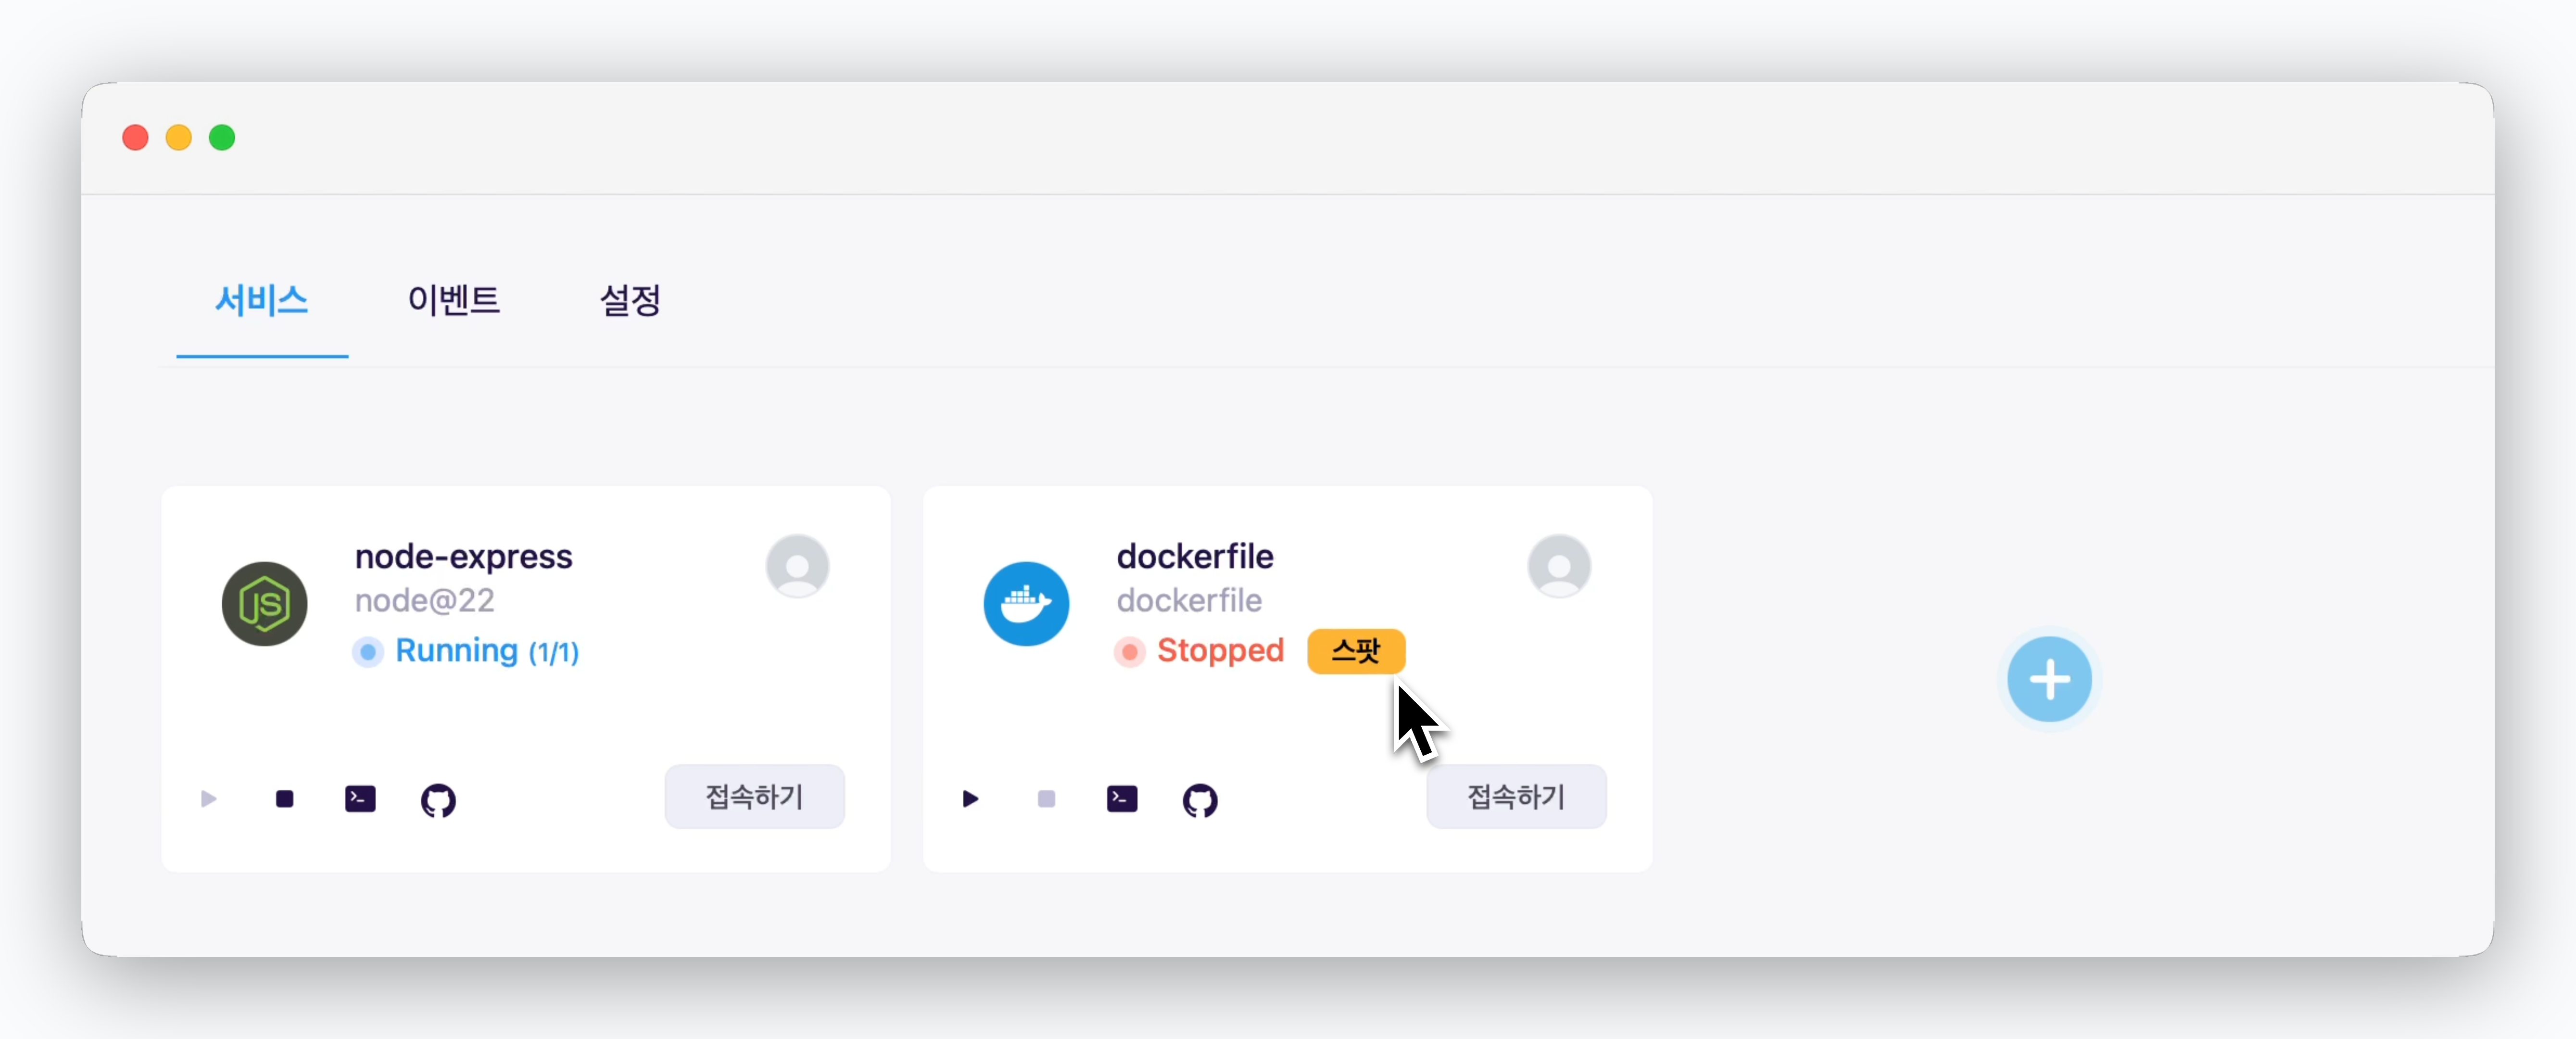 온디맨드/스팟 인스턴스의 가용성 관리 방식과 요금 부과 정책은 CSP별로 상이합니다. 다음의 링크를 참고하여 적절한 형태의 인스턴스를 선택하세요.
* [Amazon EC2 Spot](https://aws.amazon.com/ko/ec2/spot/details/)
* [GCP Spot VM](https://cloud.google.com/compute/docs/instances/spot?hl=ko)
* [Azure Spot VM](https://learn.microsoft.com/ko-kr/azure/virtual-machines/spot-vms)
온디맨드/스팟 인스턴스의 가용성 관리 방식과 요금 부과 정책은 CSP별로 상이합니다. 다음의 링크를 참고하여 적절한 형태의 인스턴스를 선택하세요.
* [Amazon EC2 Spot](https://aws.amazon.com/ko/ec2/spot/details/)
* [GCP Spot VM](https://cloud.google.com/compute/docs/instances/spot?hl=ko)
* [Azure Spot VM](https://learn.microsoft.com/ko-kr/azure/virtual-machines/spot-vms)
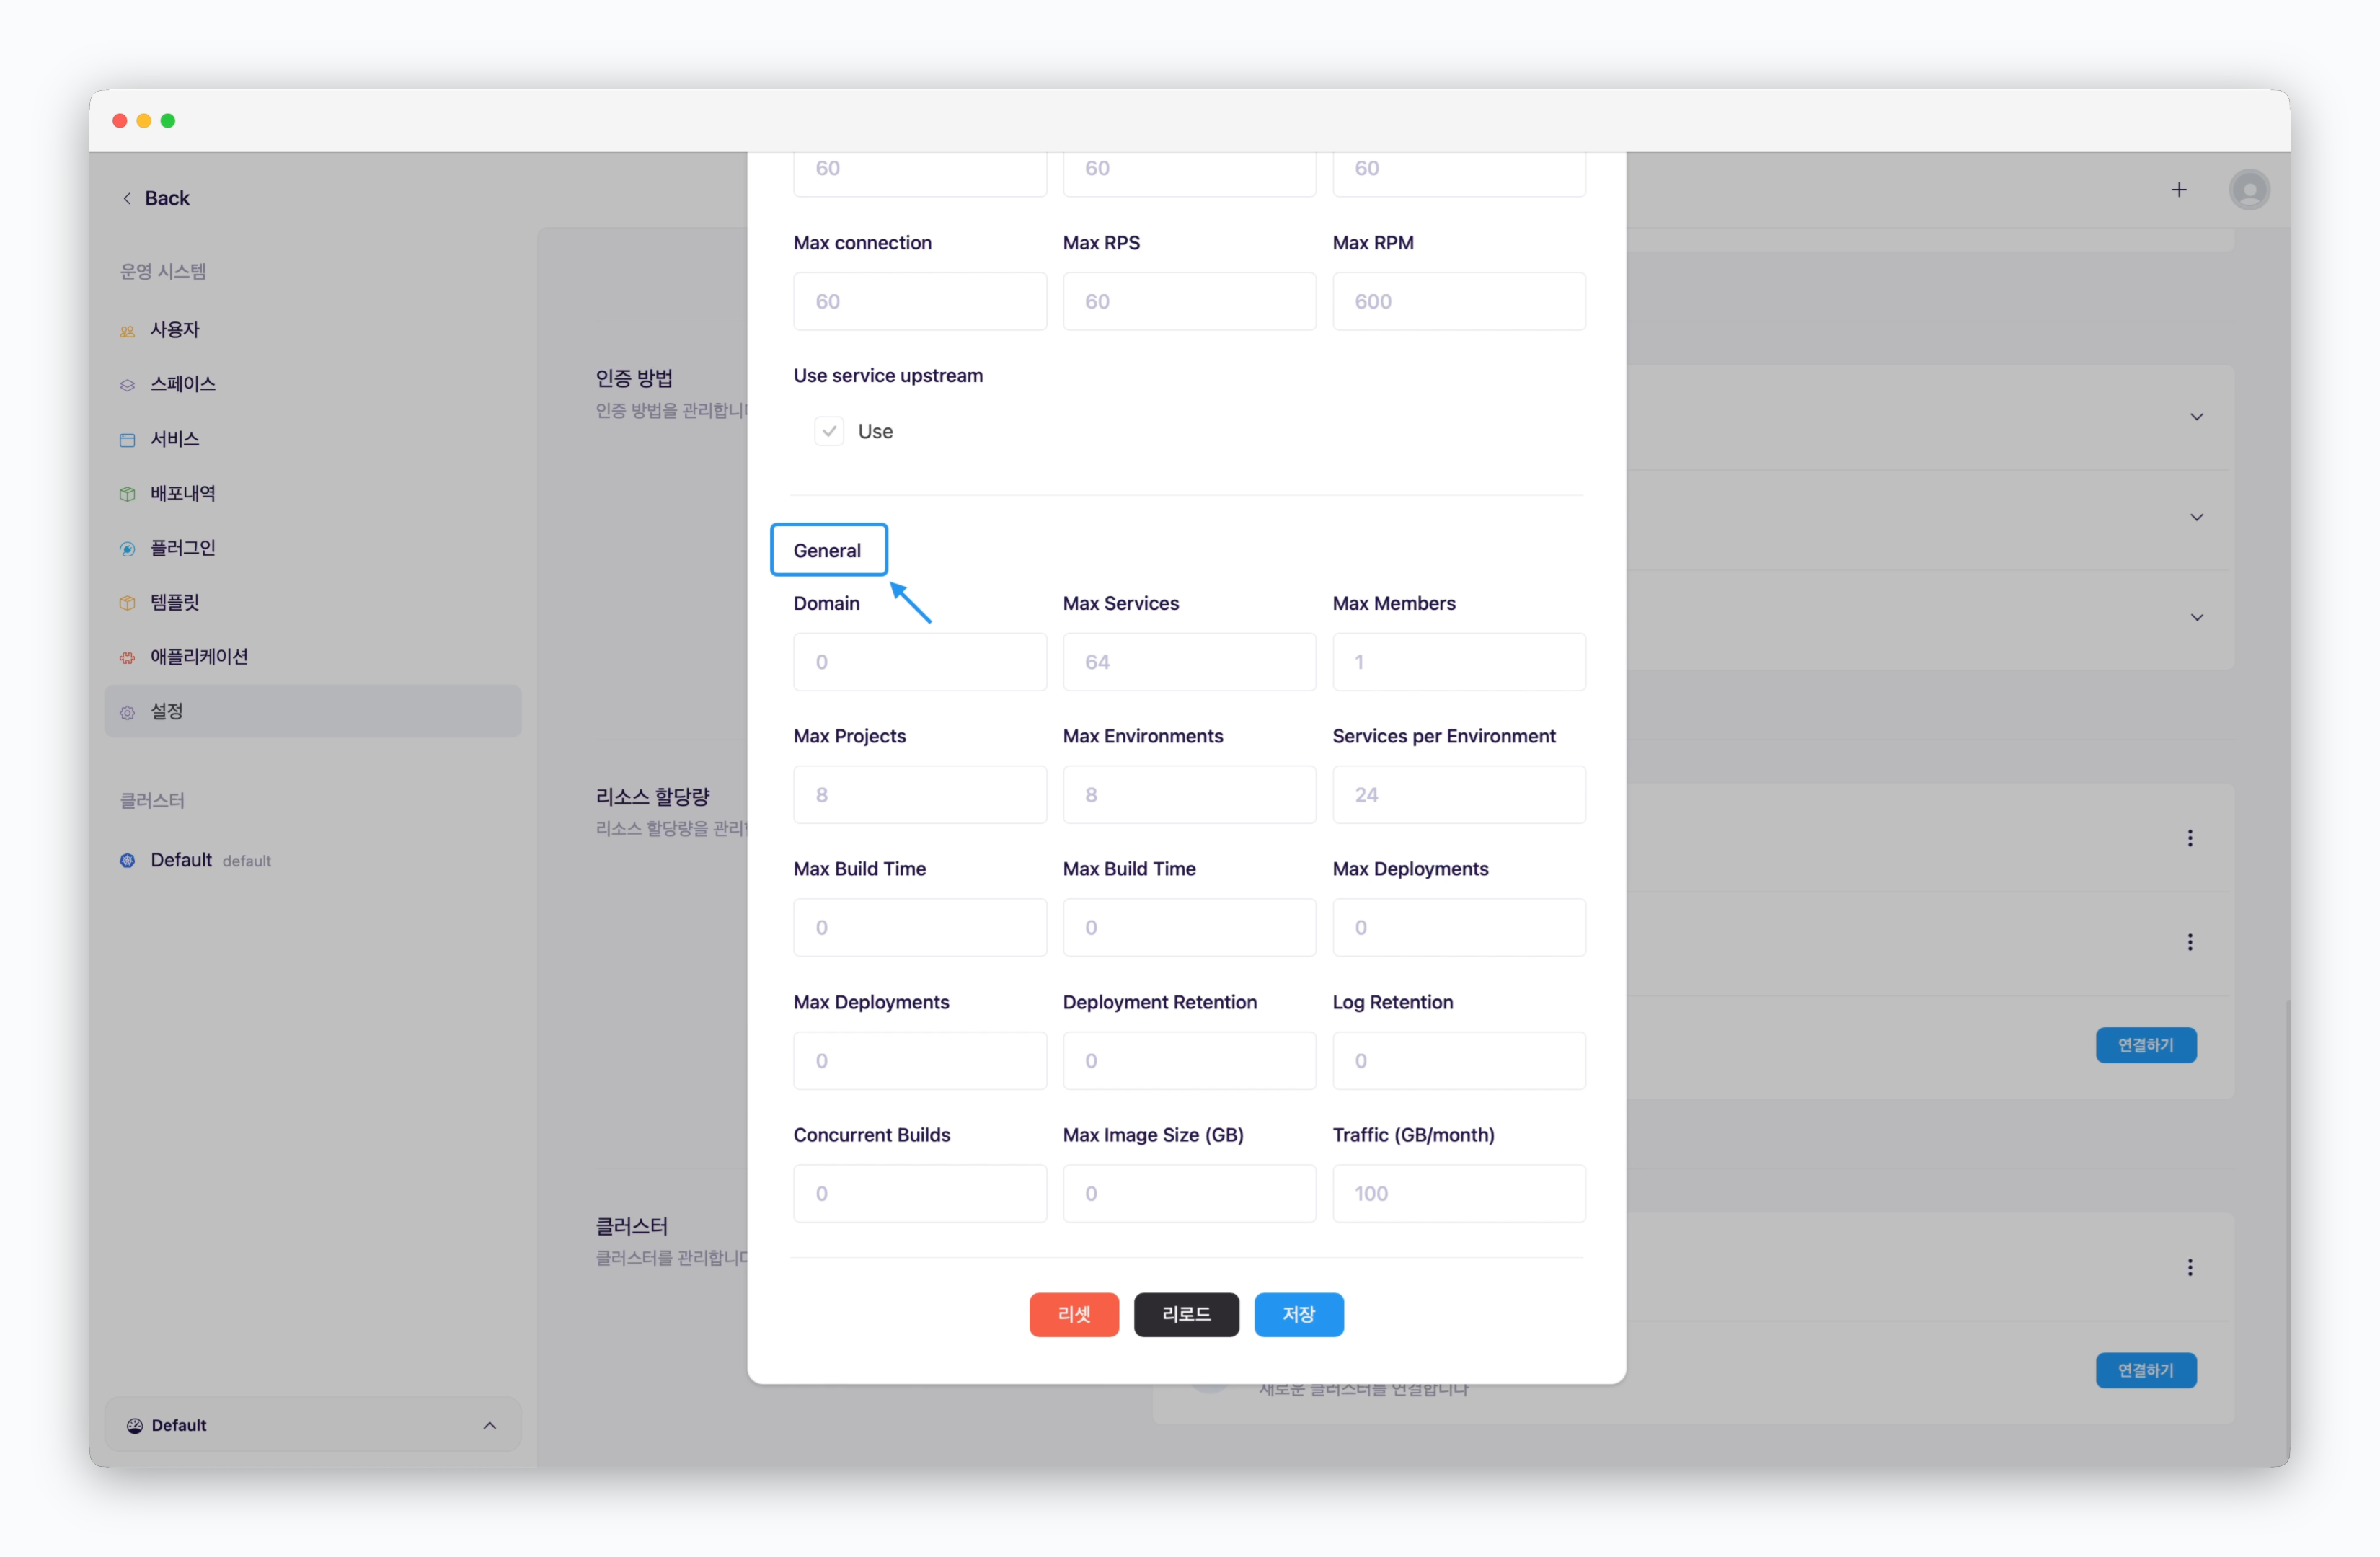 * **Domain** : 스페이스에서 연결할 수 있는 커스텀 도메인 수(0으로 설정 시, 도메인 연결 불가)
* **Max Services** : 스페이스에서 개설할 수 있는 최대 서비스 수(온디맨드/스팟 포함)
* **Max Members** : 스페이스에 초대할 수 있는 팀원의 수
* **Max Projects** : 스페이스에 개설할 수 있는 프로젝트의 수
* **Services per Environment** : 배포환경(Namespace) 당 개설 가능한 서비스 수
* **Others** : placeholder의 수가 0인 경우, 무제한으로 적용됩니다.
스페이스 생성 시 Default 프로파일의 리소스 세트가 적용됩니다.
## 클러스터 추가
* **Domain** : 스페이스에서 연결할 수 있는 커스텀 도메인 수(0으로 설정 시, 도메인 연결 불가)
* **Max Services** : 스페이스에서 개설할 수 있는 최대 서비스 수(온디맨드/스팟 포함)
* **Max Members** : 스페이스에 초대할 수 있는 팀원의 수
* **Max Projects** : 스페이스에 개설할 수 있는 프로젝트의 수
* **Services per Environment** : 배포환경(Namespace) 당 개설 가능한 서비스 수
* **Others** : placeholder의 수가 0인 경우, 무제한으로 적용됩니다.
스페이스 생성 시 Default 프로파일의 리소스 세트가 적용됩니다.
## 클러스터 추가
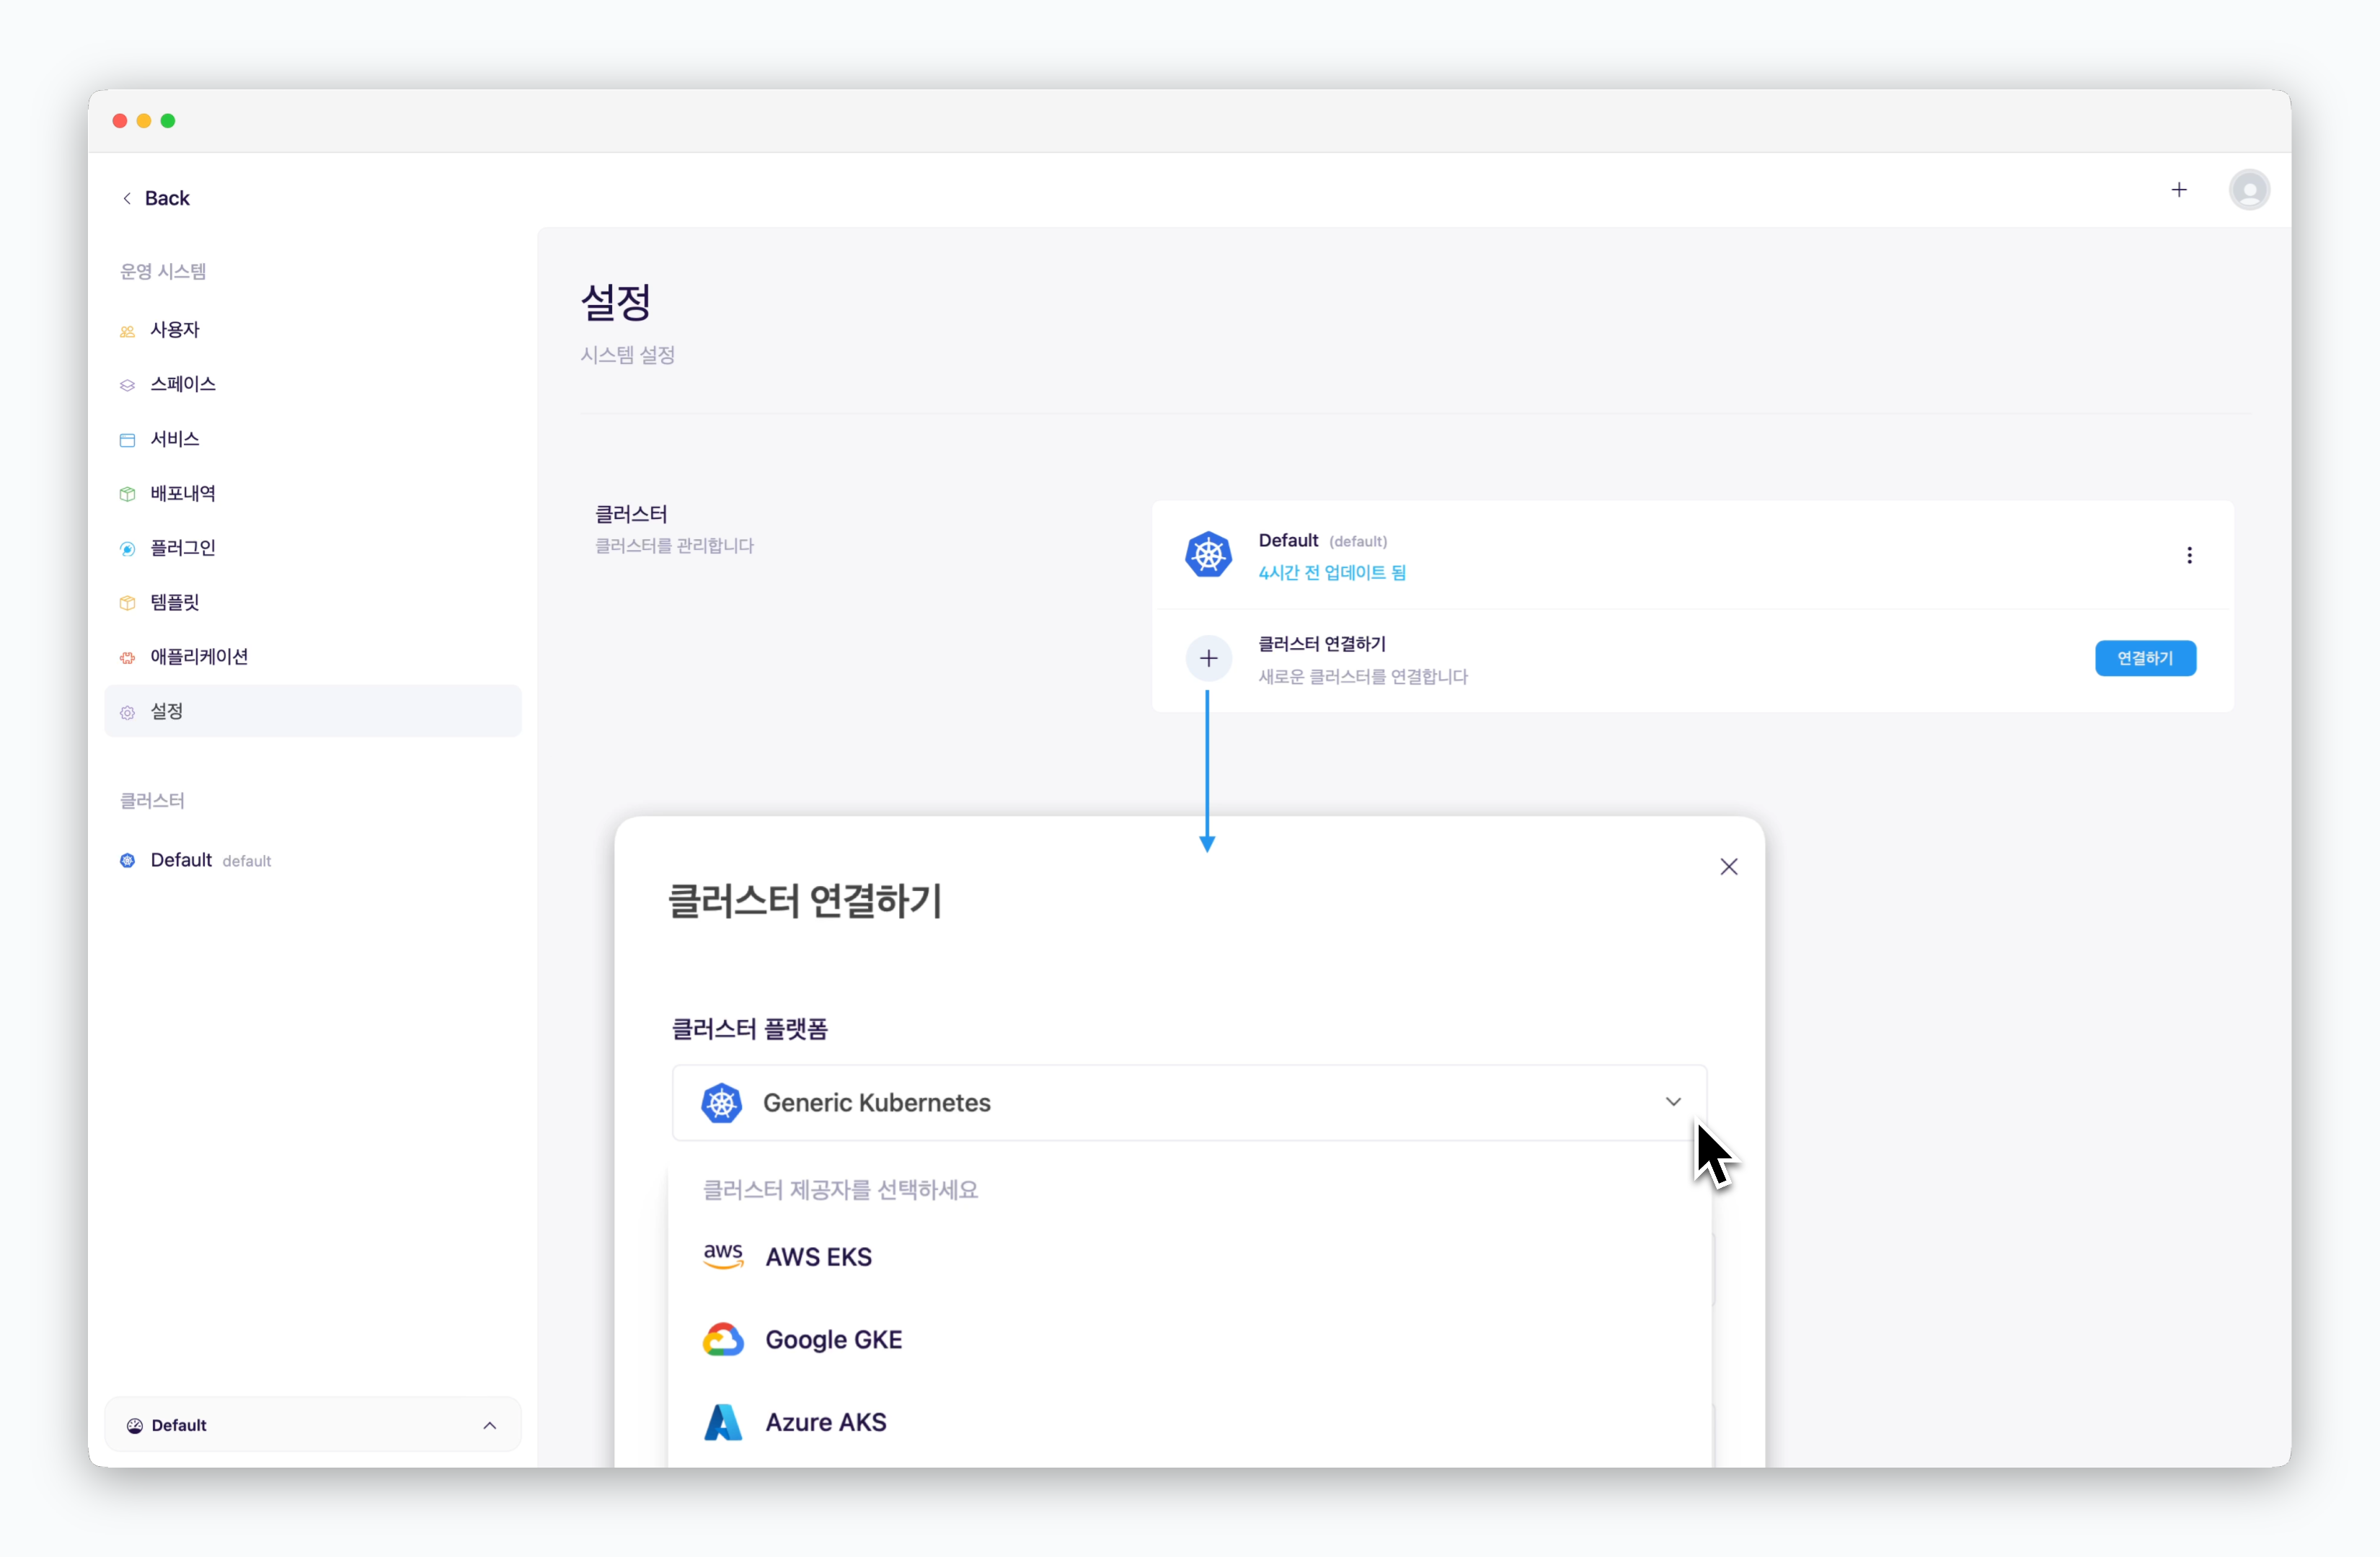 > `ale` 은 주요 CSP의 Kubernetes 클러스터 뿐만 아니라 Generic 형태의 클러스터 연결도 모두 지원합니다. 클러스터를 추가하는 것에 관한 기이드는 [멀티 클러스터 페이지](/ko/advanced/multi-cluster)를 참고하세요.