> ## Documentation Index
> Fetch the complete documentation index at: https://docs.ale.run/llms.txt
> Use this file to discover all available pages before exploring further.
# GCP Artifact Registry
> GCP Artifact Registry를 연결하는 가이드입니다.
> `ale` 에서 빌드된 이미지를 업로드할 저장소와 배포되는 과정에서 사용할 저장소를 **GCP Artifact Registry**로 설정할 수 있습니다.
***
## GCP Artifact Registry 생성
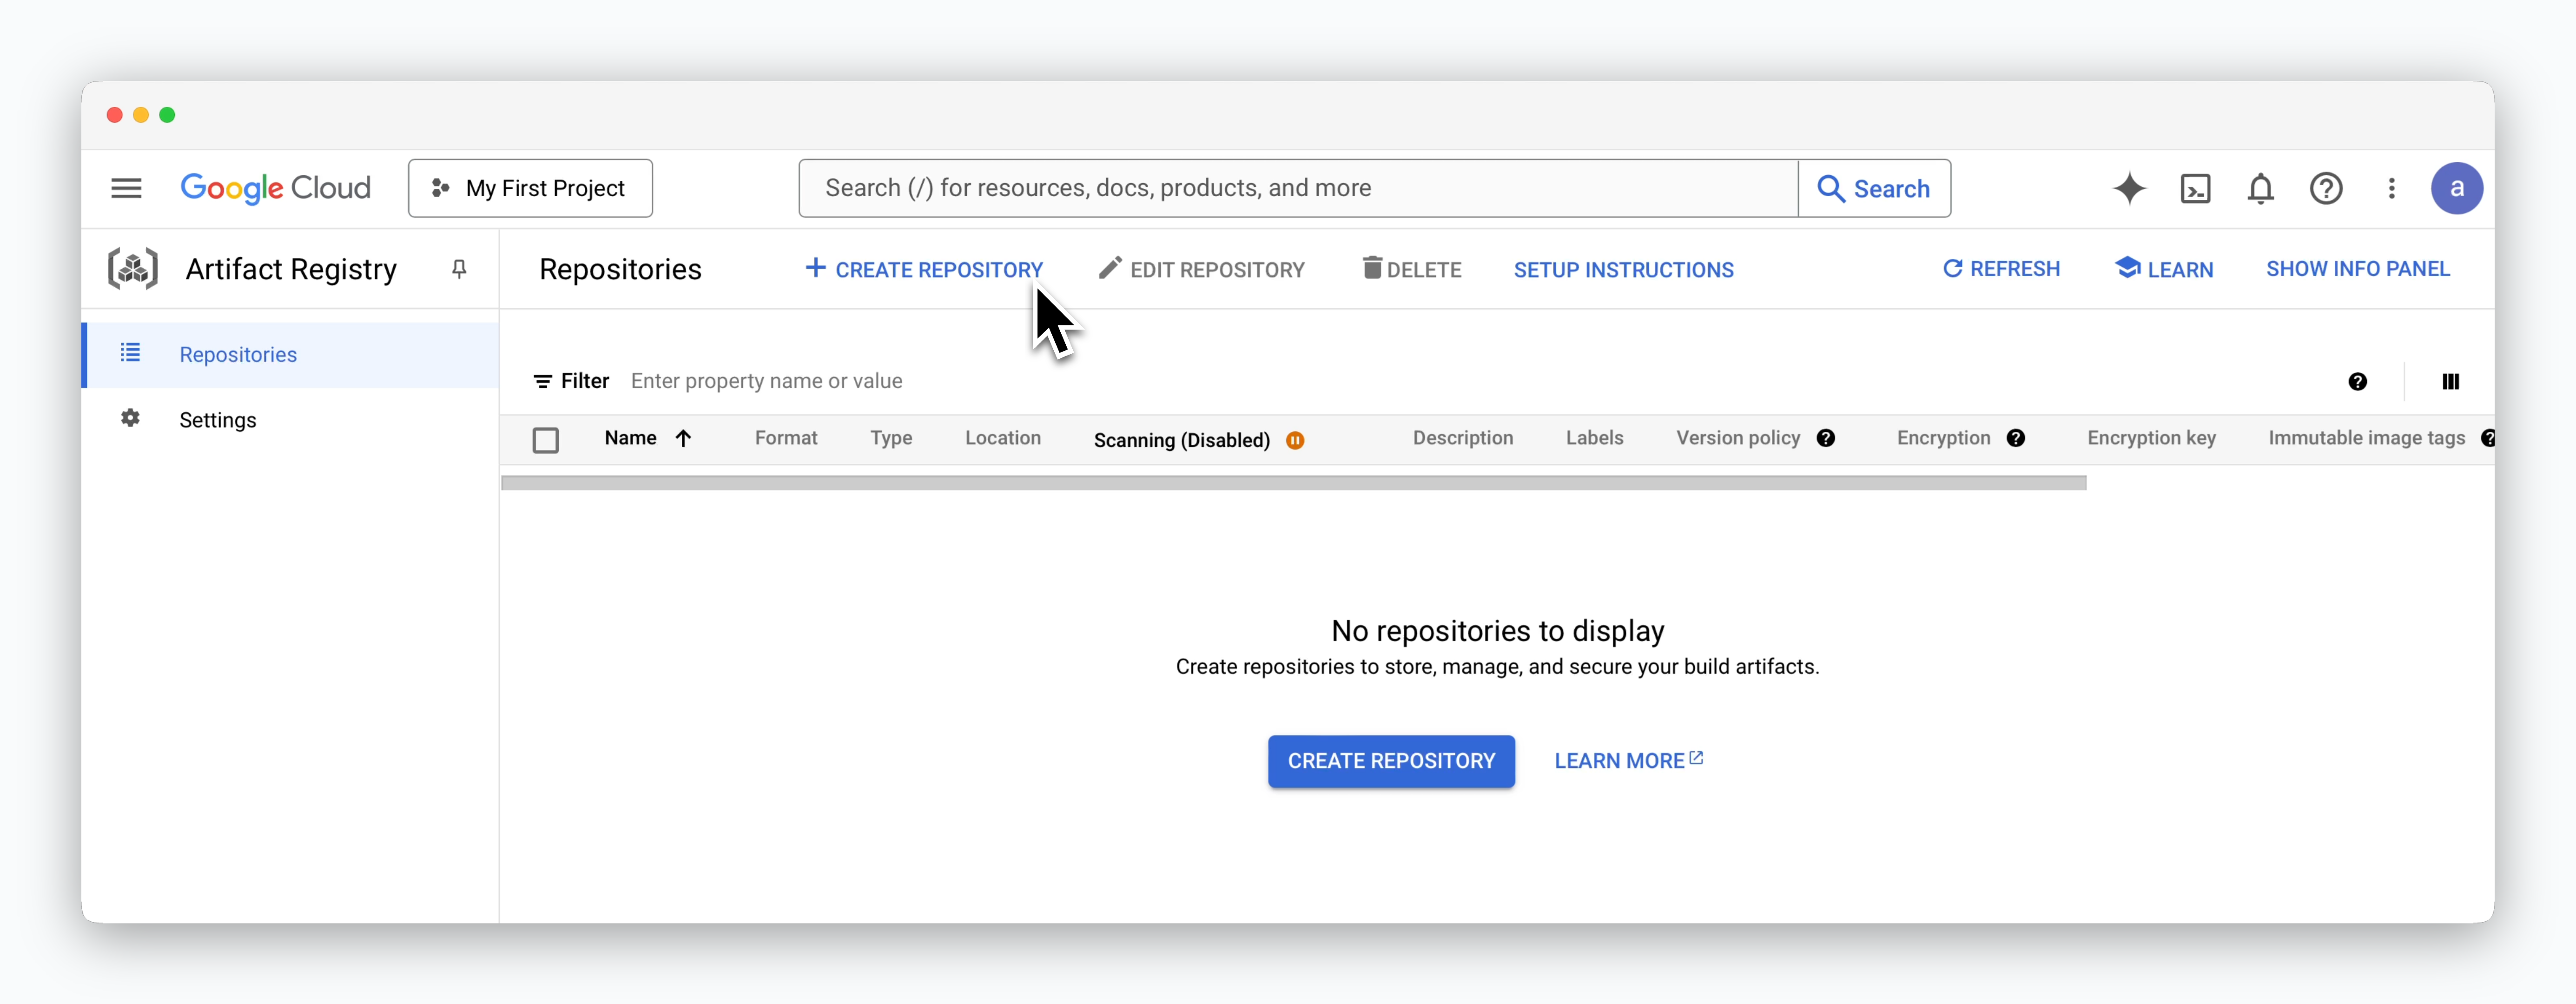 > Google Cloud 콘솔에서 **Artifact Registry** 서비스에 접속한 후 `CREATE REPOSITORY`를 클릭하세요.
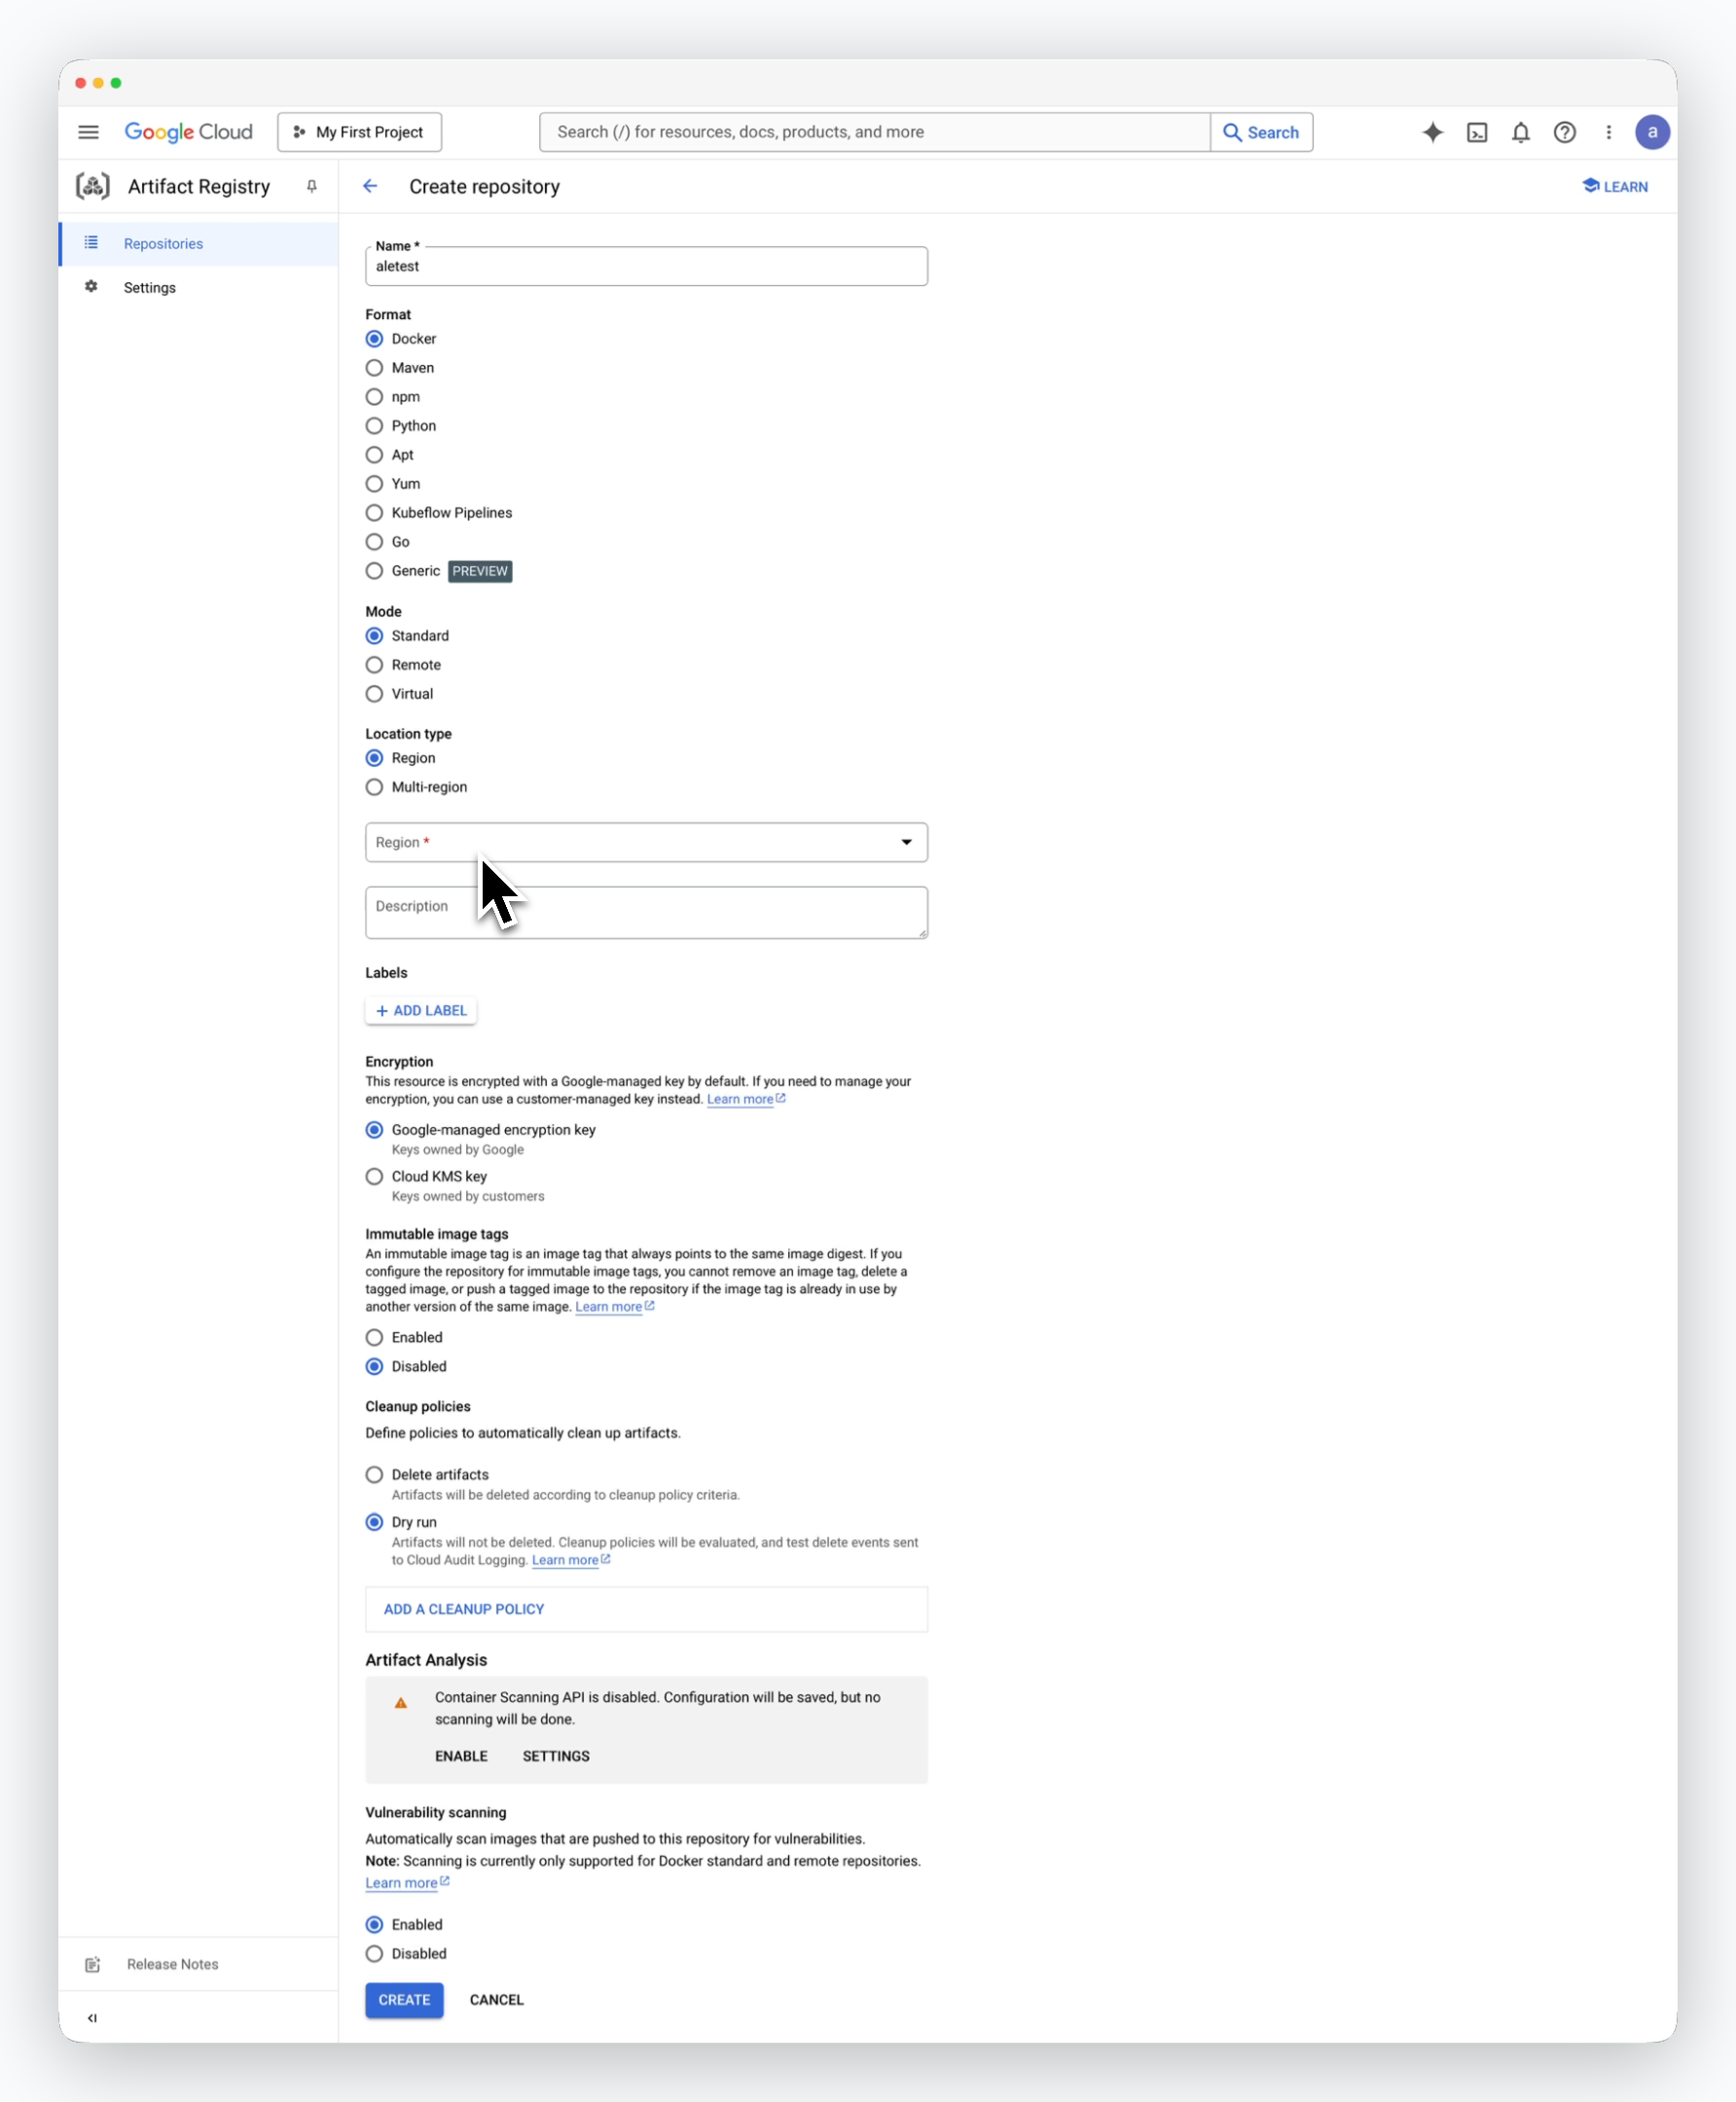 > 저장소의 이름을 적절히 정하고 아래의 값들을 입력한 후 `CREATE`를 클릭하면 저장소가 생성됩니다.
Region이외에는 기본값을 사용하세요.
* **Format** : Docker
* **Mode** : Standard
* **Location type** : Region
* **Region** : 사용자의 상황에 맞는 리전 선택
* **Encryption** : Google-managed encryption key
## 저장소 접속 주소 조회
> 저장소의 이름을 적절히 정하고 아래의 값들을 입력한 후 `CREATE`를 클릭하면 저장소가 생성됩니다.
Region이외에는 기본값을 사용하세요.
* **Format** : Docker
* **Mode** : Standard
* **Location type** : Region
* **Region** : 사용자의 상황에 맞는 리전 선택
* **Encryption** : Google-managed encryption key
## 저장소 접속 주소 조회
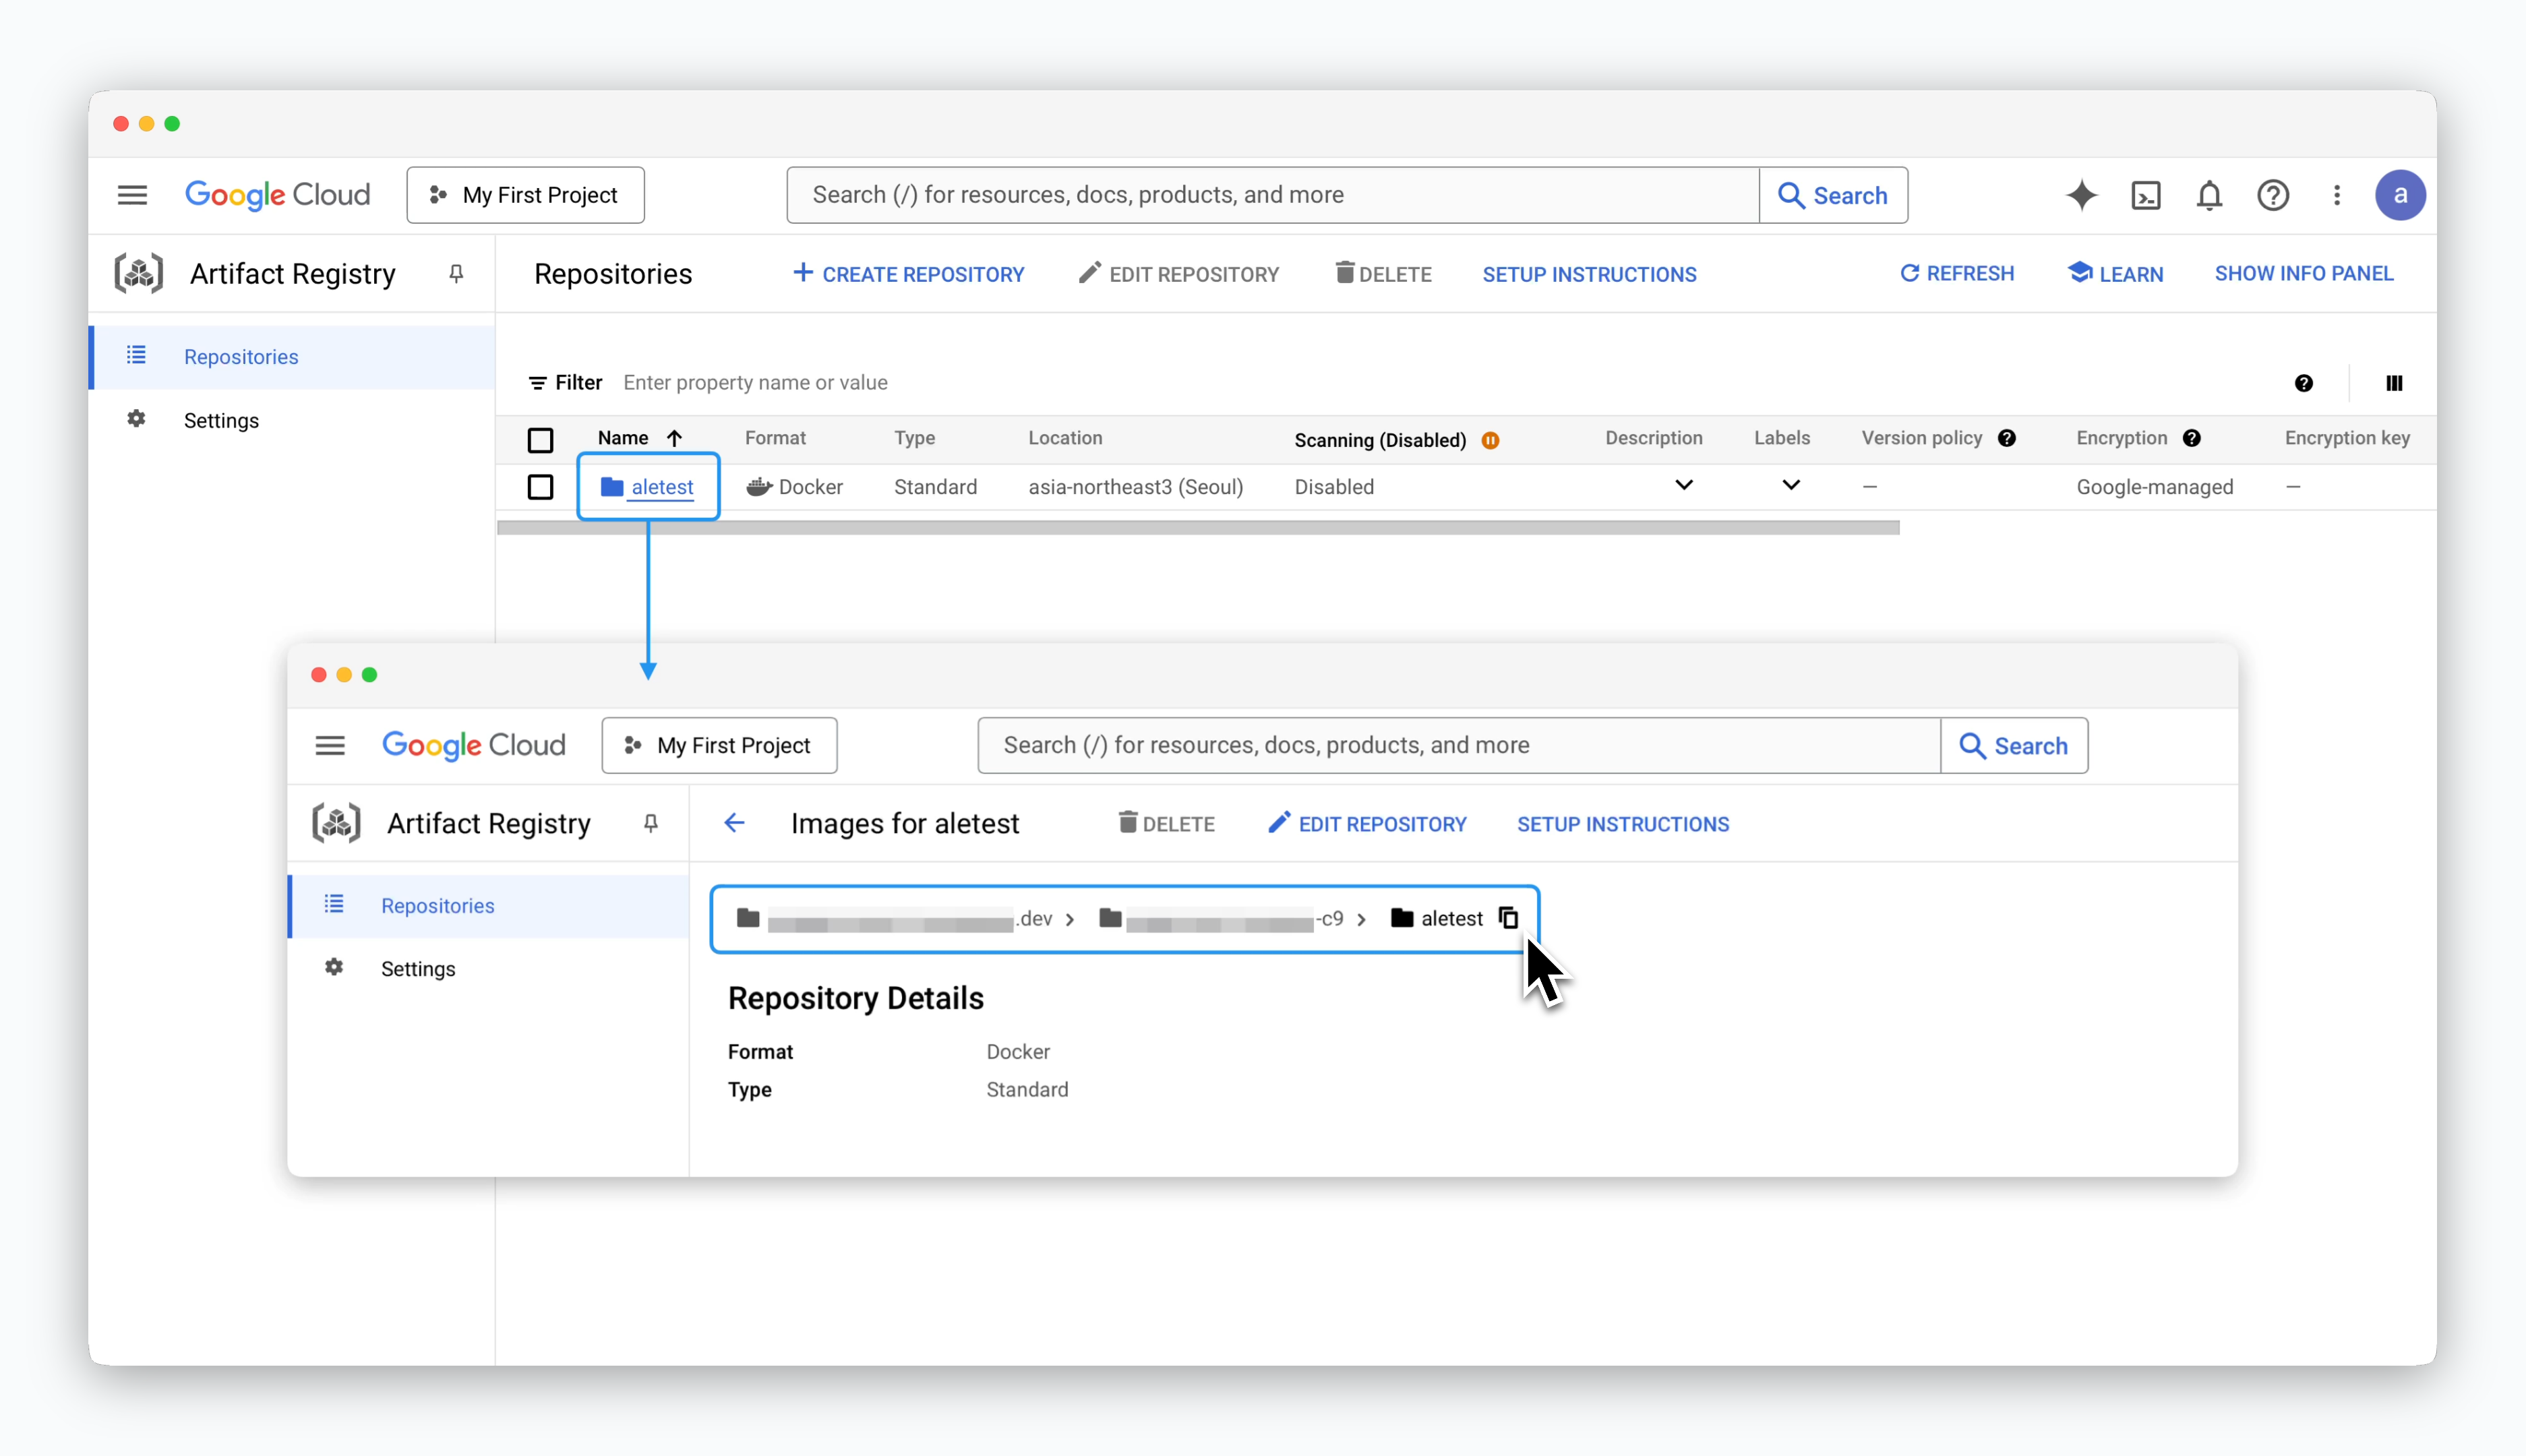 > 생성된 저장소를 클릭하면 `[리전]-docker.pkg.dev/[GCP 프로젝트 ID]/[저장소이름]` 형식의 접속 주소를 조회할 수 있습니다.
저장소 접속 주소는 `ale`에서 저장소를 연결할 때 사용됩니다.
## 서비스 계정 생성 및 권한 부여
> 생성된 저장소를 클릭하면 `[리전]-docker.pkg.dev/[GCP 프로젝트 ID]/[저장소이름]` 형식의 접속 주소를 조회할 수 있습니다.
저장소 접속 주소는 `ale`에서 저장소를 연결할 때 사용됩니다.
## 서비스 계정 생성 및 권한 부여
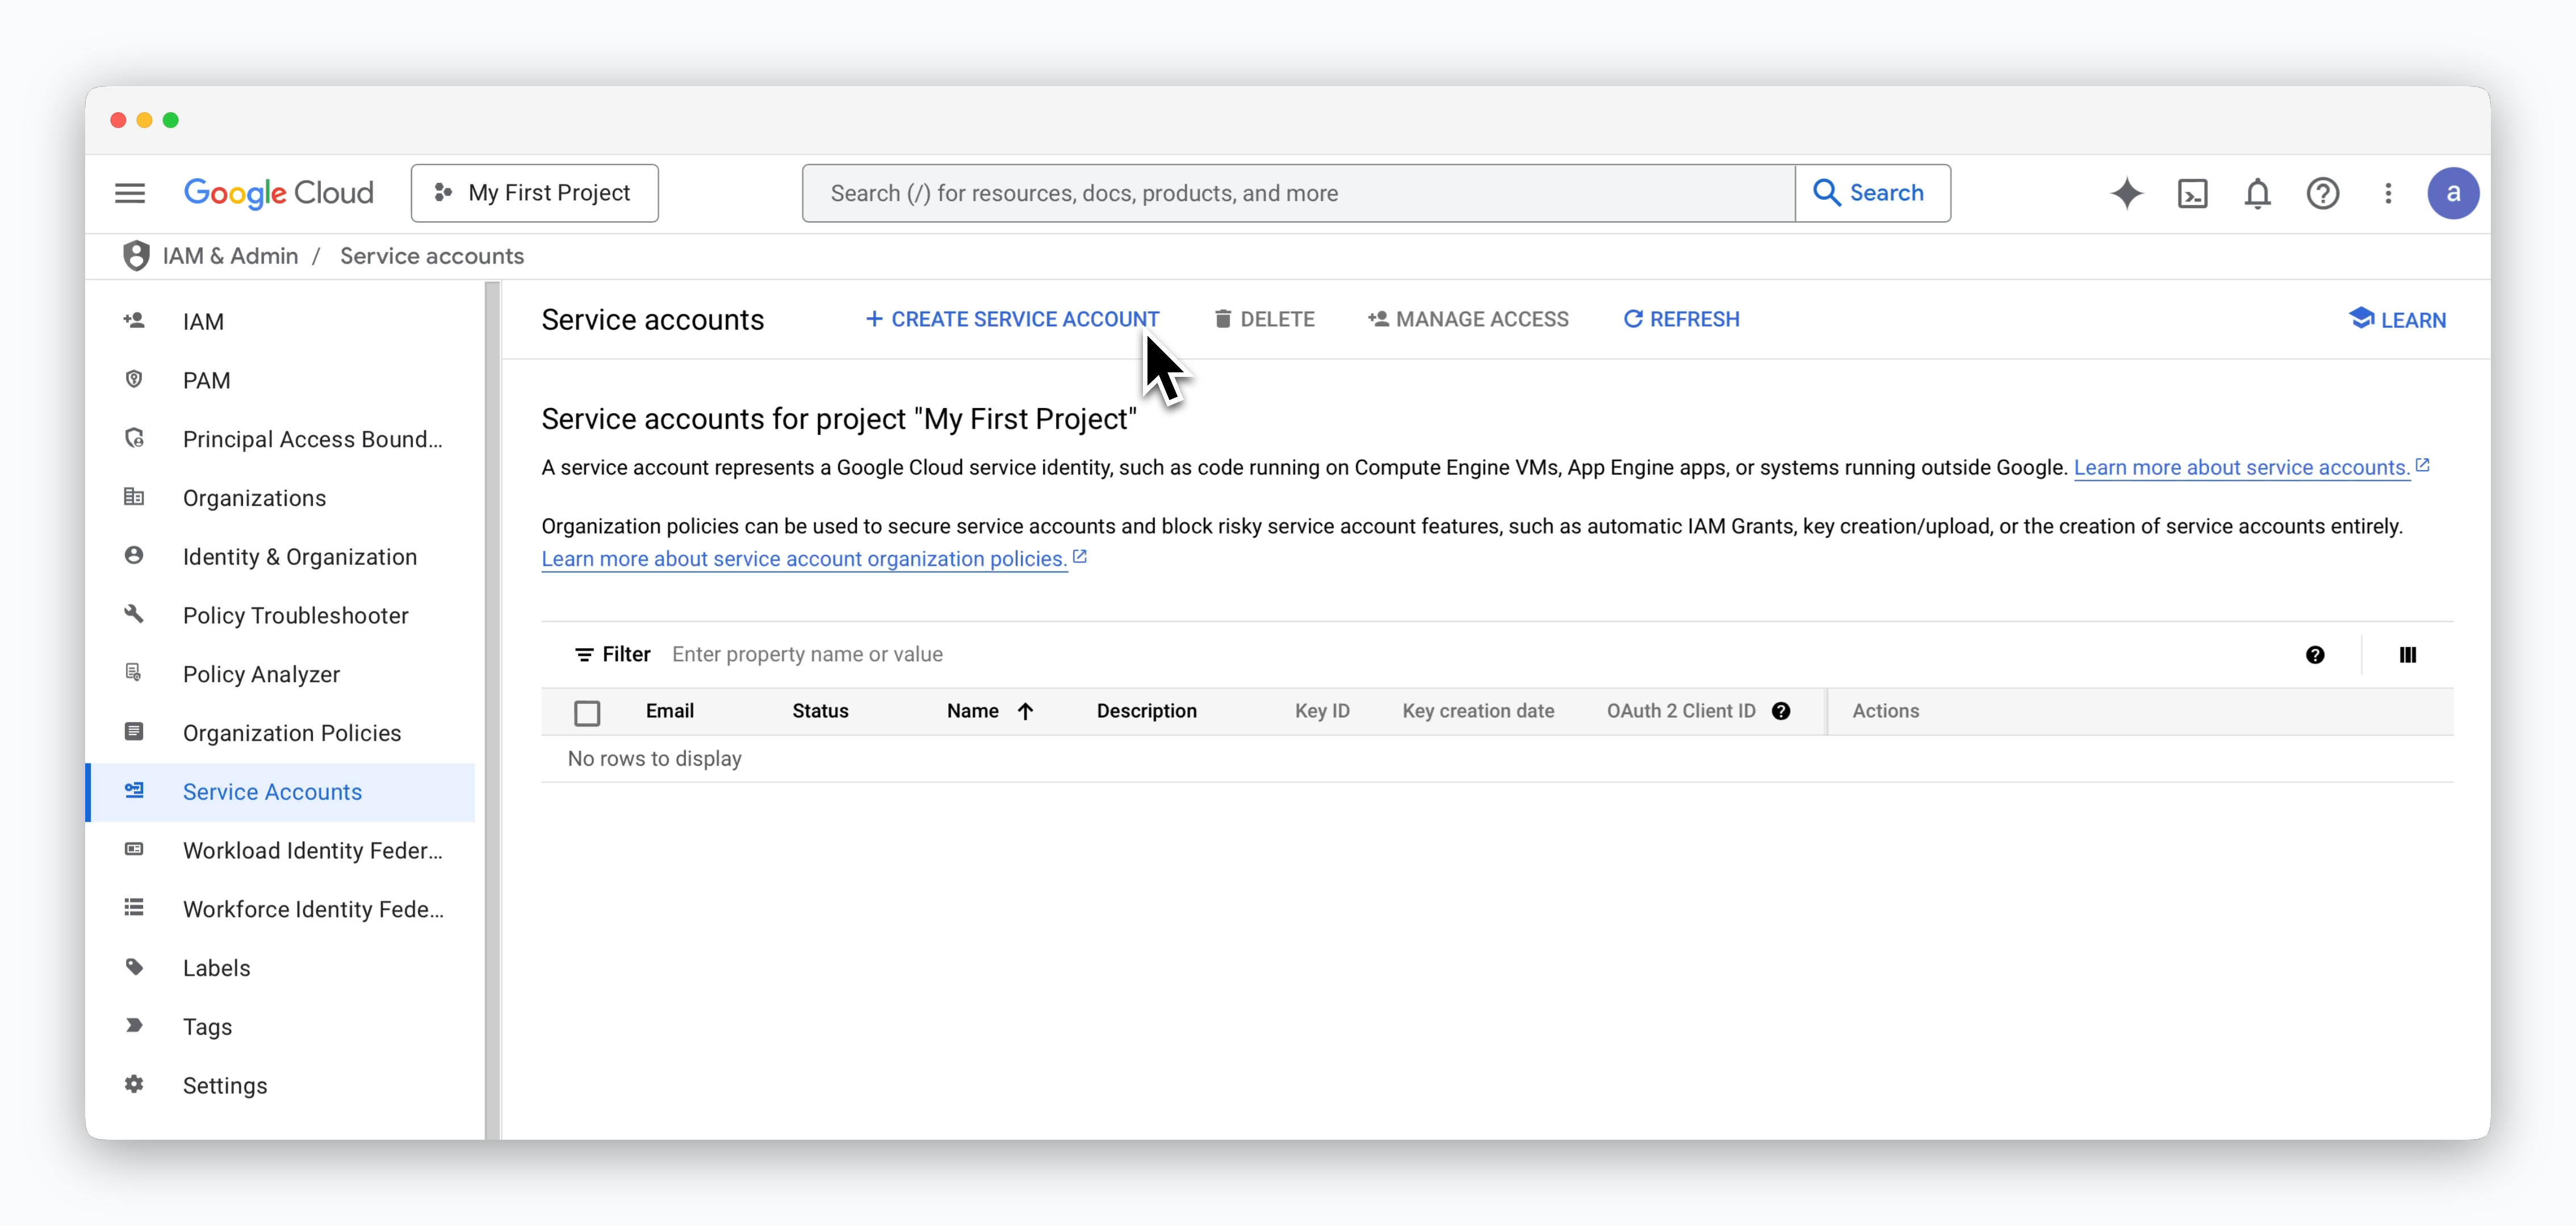 > Google Cloud 콘솔의 **IAM & Admin > Service Accounts** 페이지에서 `CREATE SERVICE ACCOUNT`를 클릭하세요.
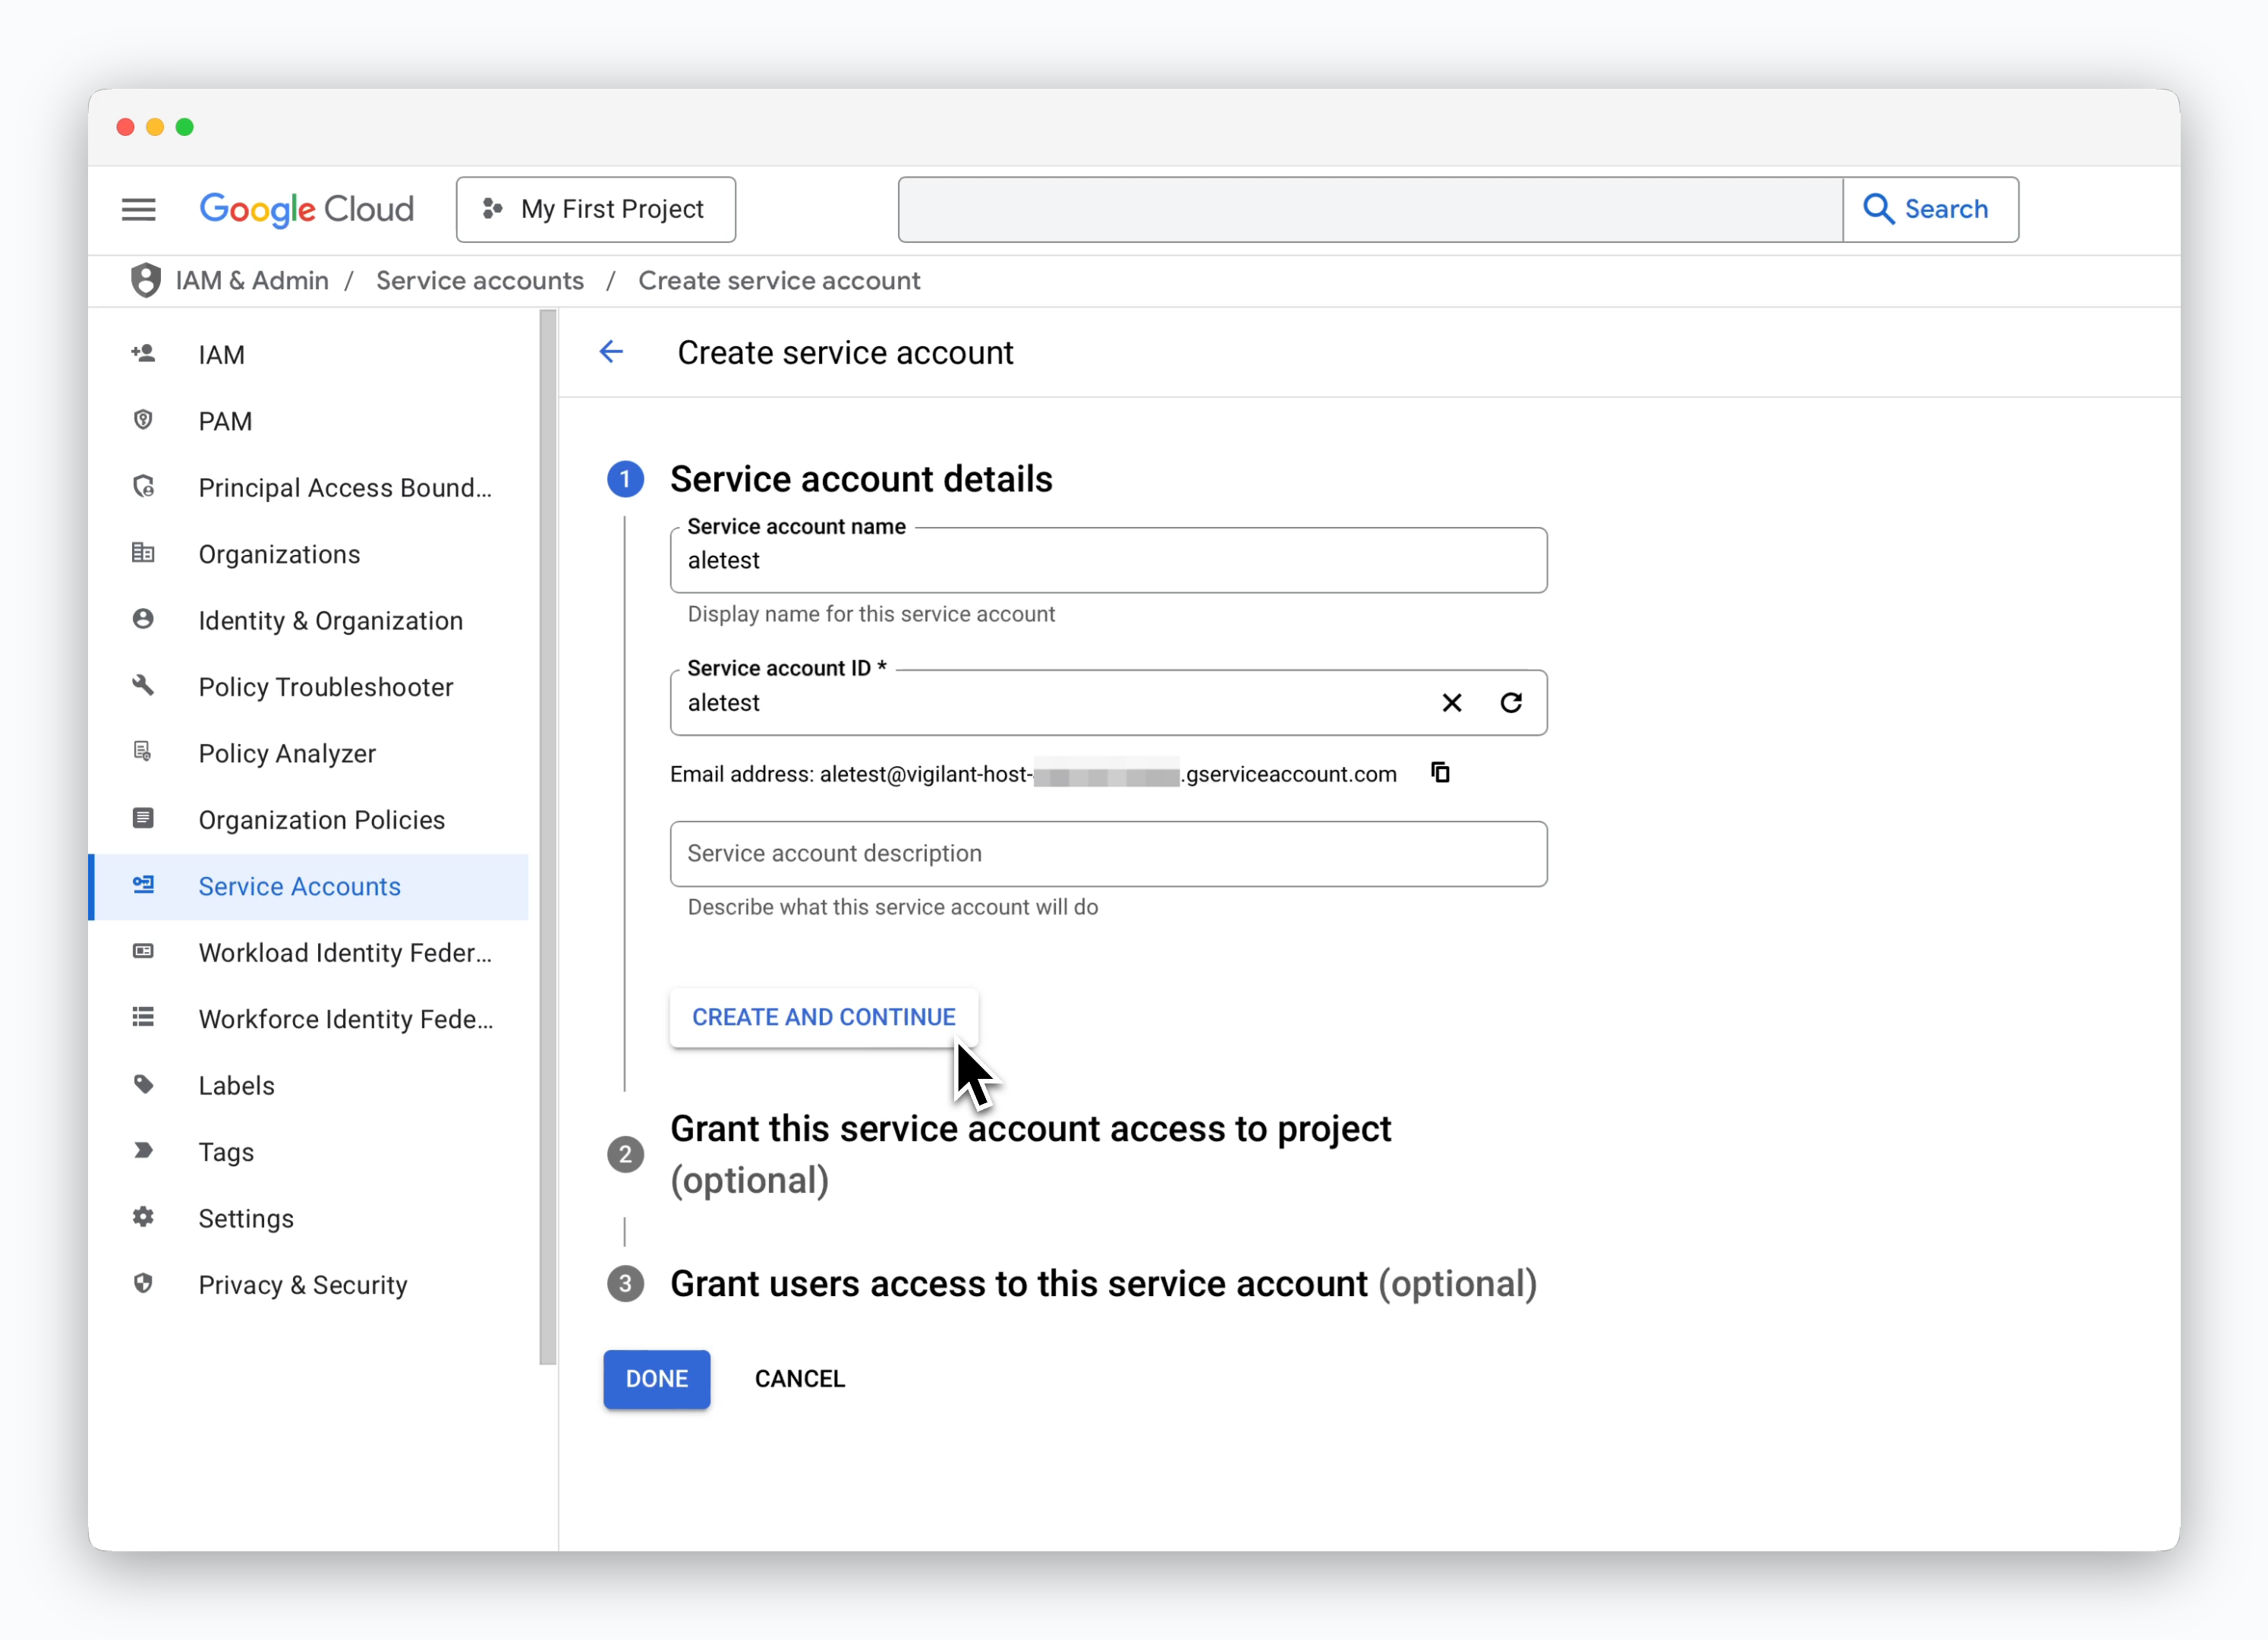 > 식별할 수 있는 **서비스 계정 이름**을 작성한 후 `CREATE AND CONTINUE`를 클릭합니다.
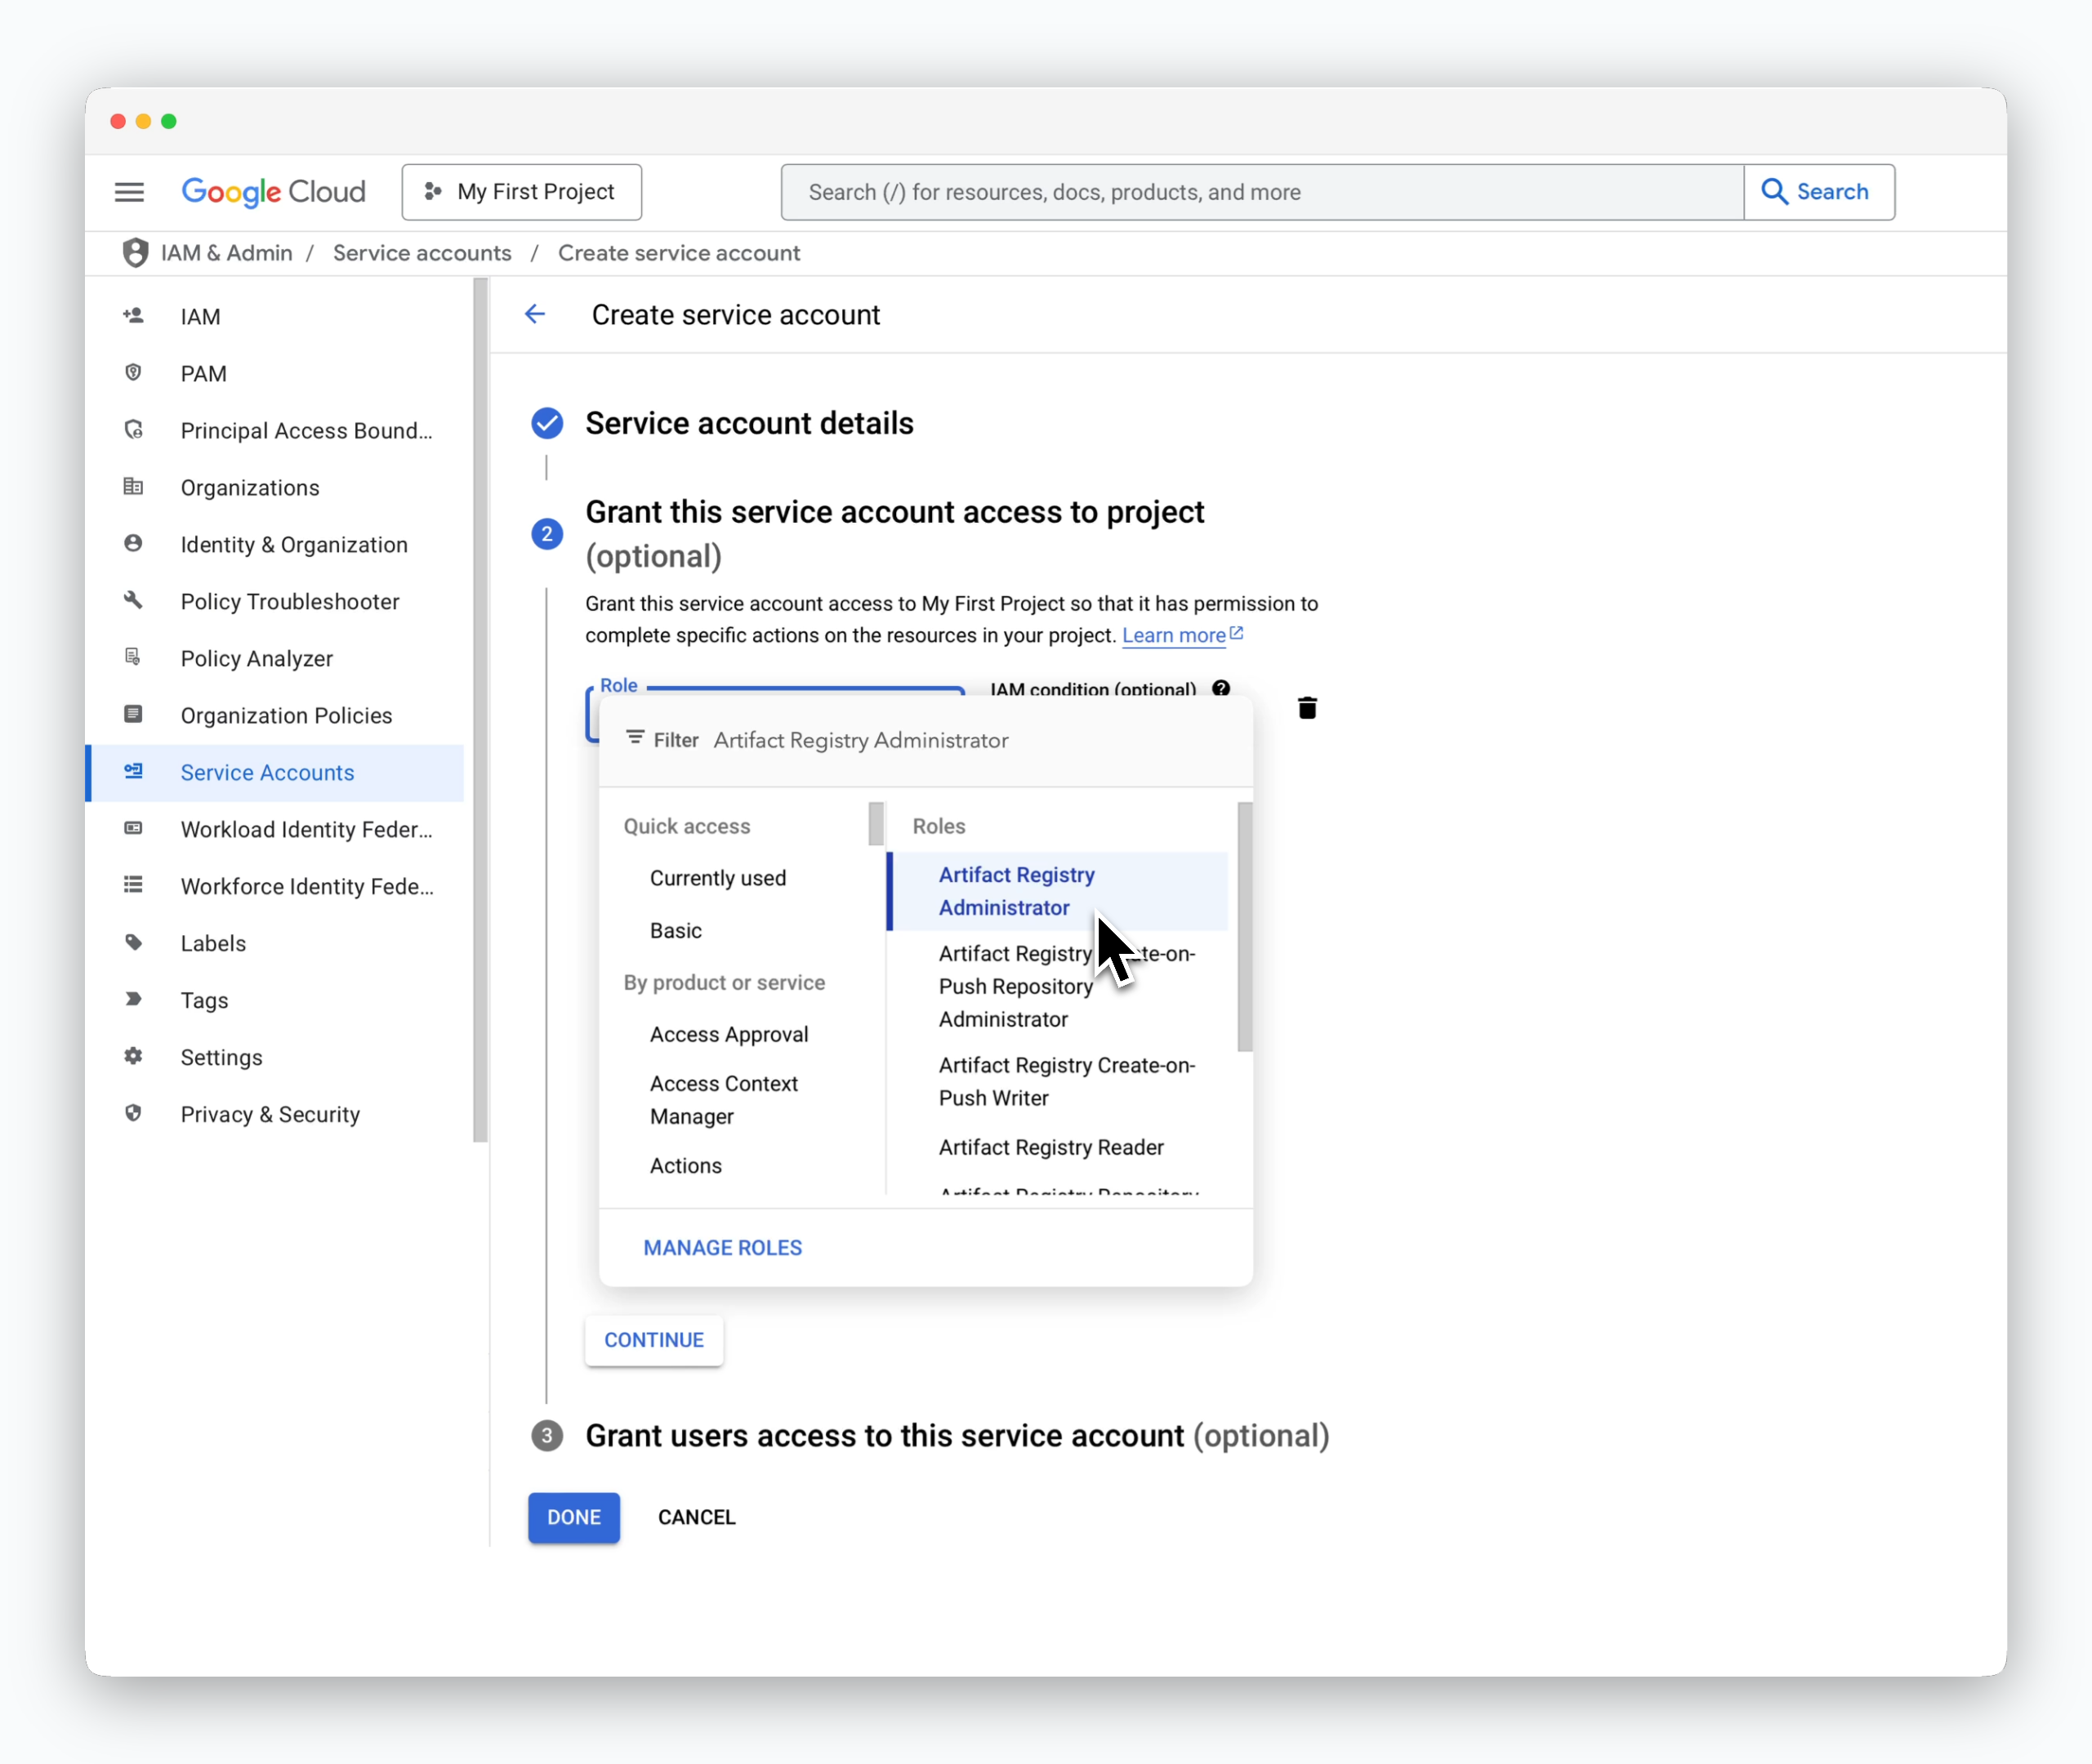 > 역할 선택 창에서 **Artifact Registry Administrator** 항목을 선택하고, `DONE`을 클릭하면 서비스 계정이 생성됩니다.
## JSON KEY 만들기
> 역할 선택 창에서 **Artifact Registry Administrator** 항목을 선택하고, `DONE`을 클릭하면 서비스 계정이 생성됩니다.
## JSON KEY 만들기
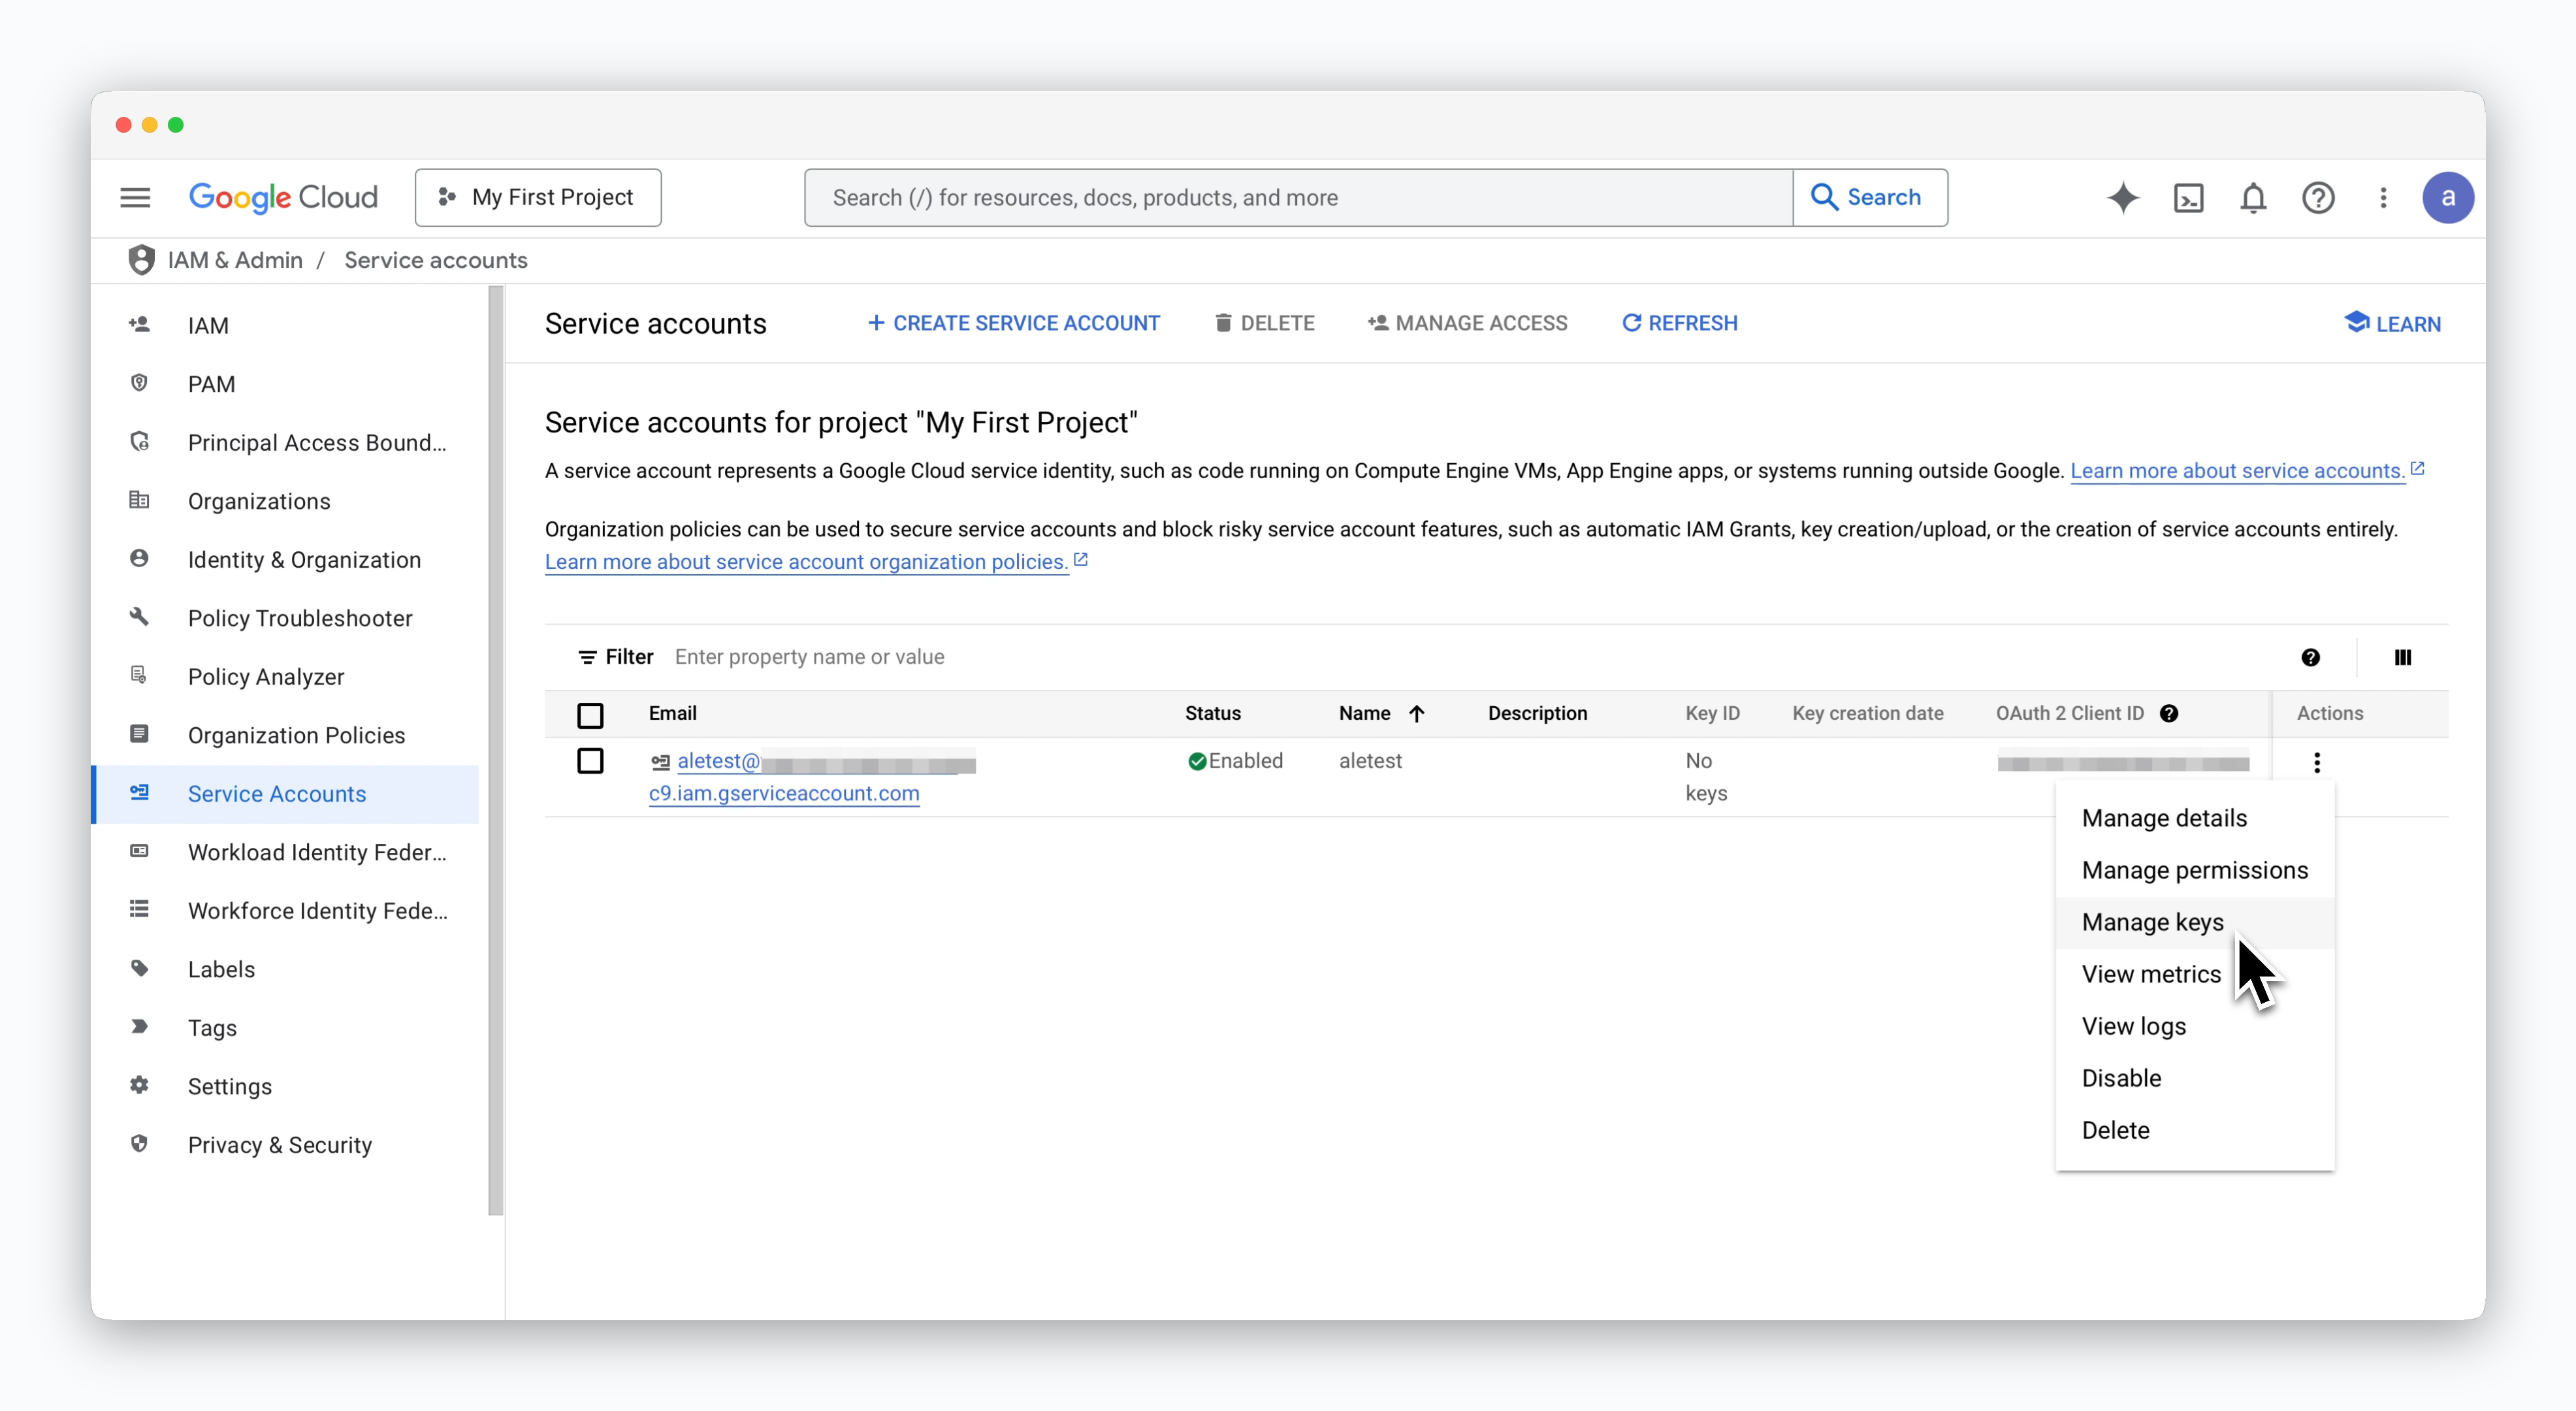 > 생성된 서비스 계정 우측의 아이콘을 클릭한 후 **Manage keys**를 선택하세요.
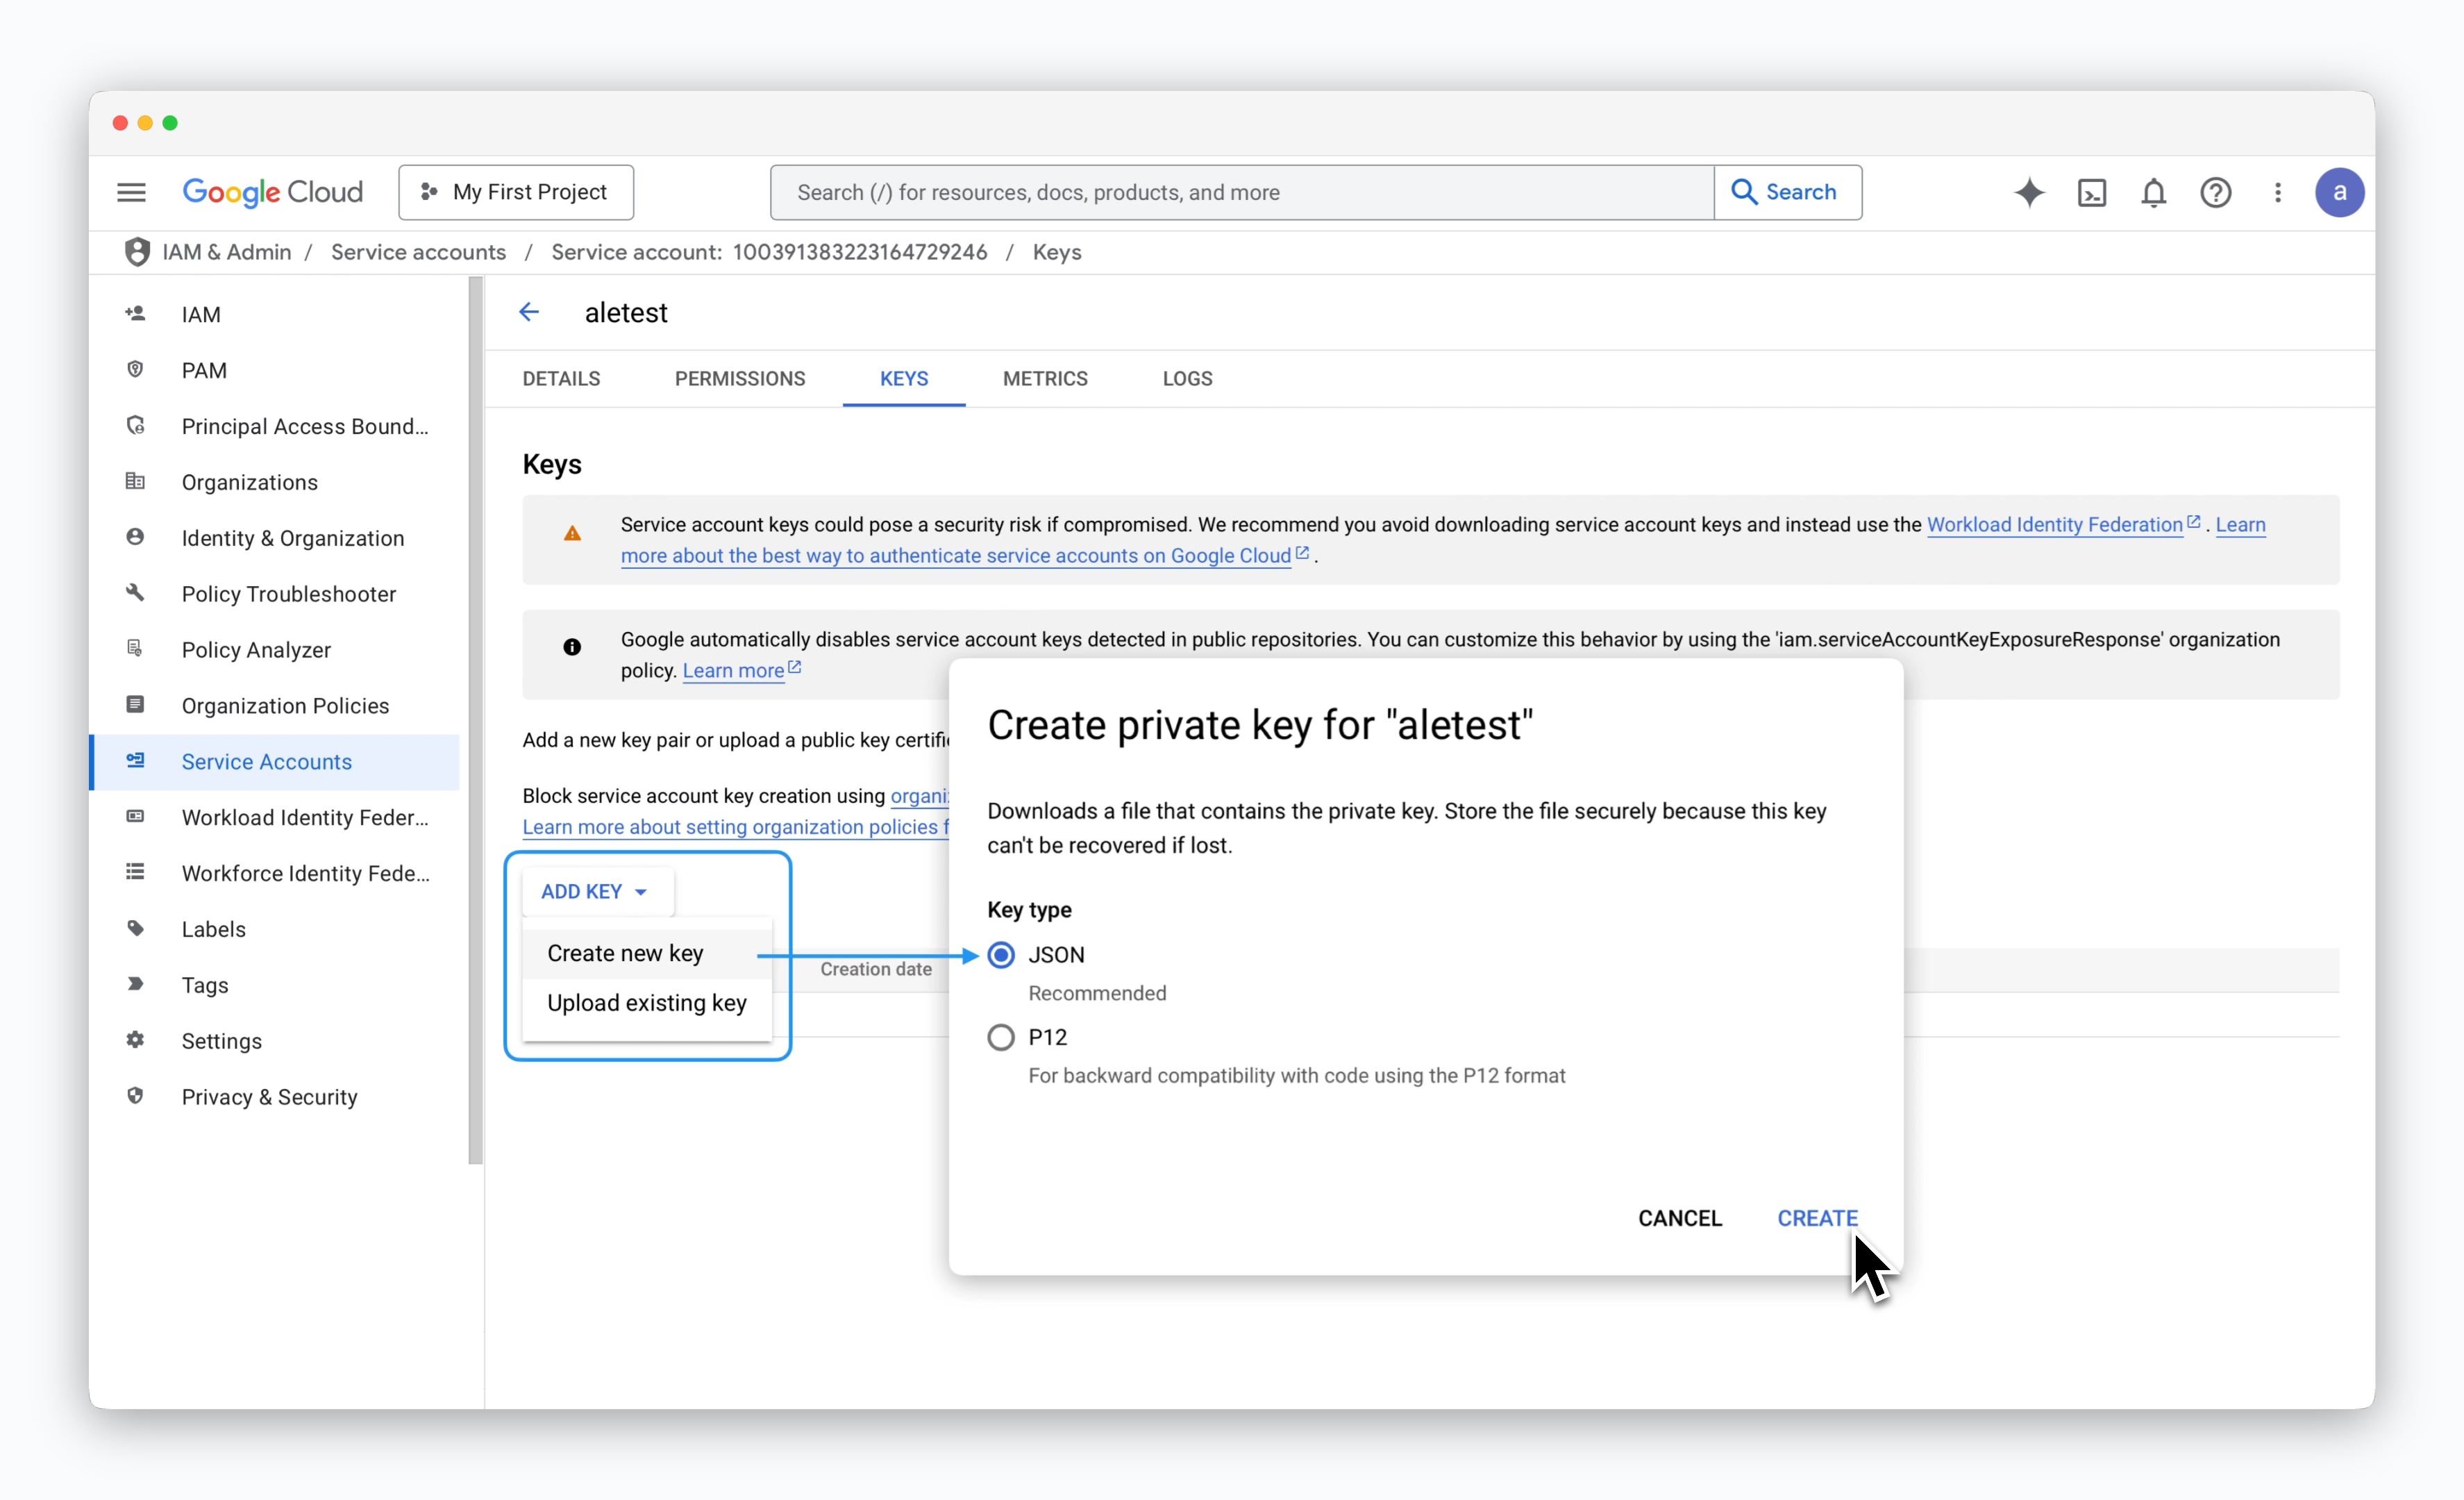 > 생성한 서비스 계정 키 관리 페이지의 **ADD KEY > Create new key**를 클릭하면 표시되는 **비공개 키 만들기** 창에서, 키 유형으로 **JSON**을 선택하고 `CREATE`를 클릭하면 JSON 키가 파일 형태로 다운로드 됩니다.
## ale에 연결
> 생성한 서비스 계정 키 관리 페이지의 **ADD KEY > Create new key**를 클릭하면 표시되는 **비공개 키 만들기** 창에서, 키 유형으로 **JSON**을 선택하고 `CREATE`를 클릭하면 JSON 키가 파일 형태로 다운로드 됩니다.
## ale에 연결
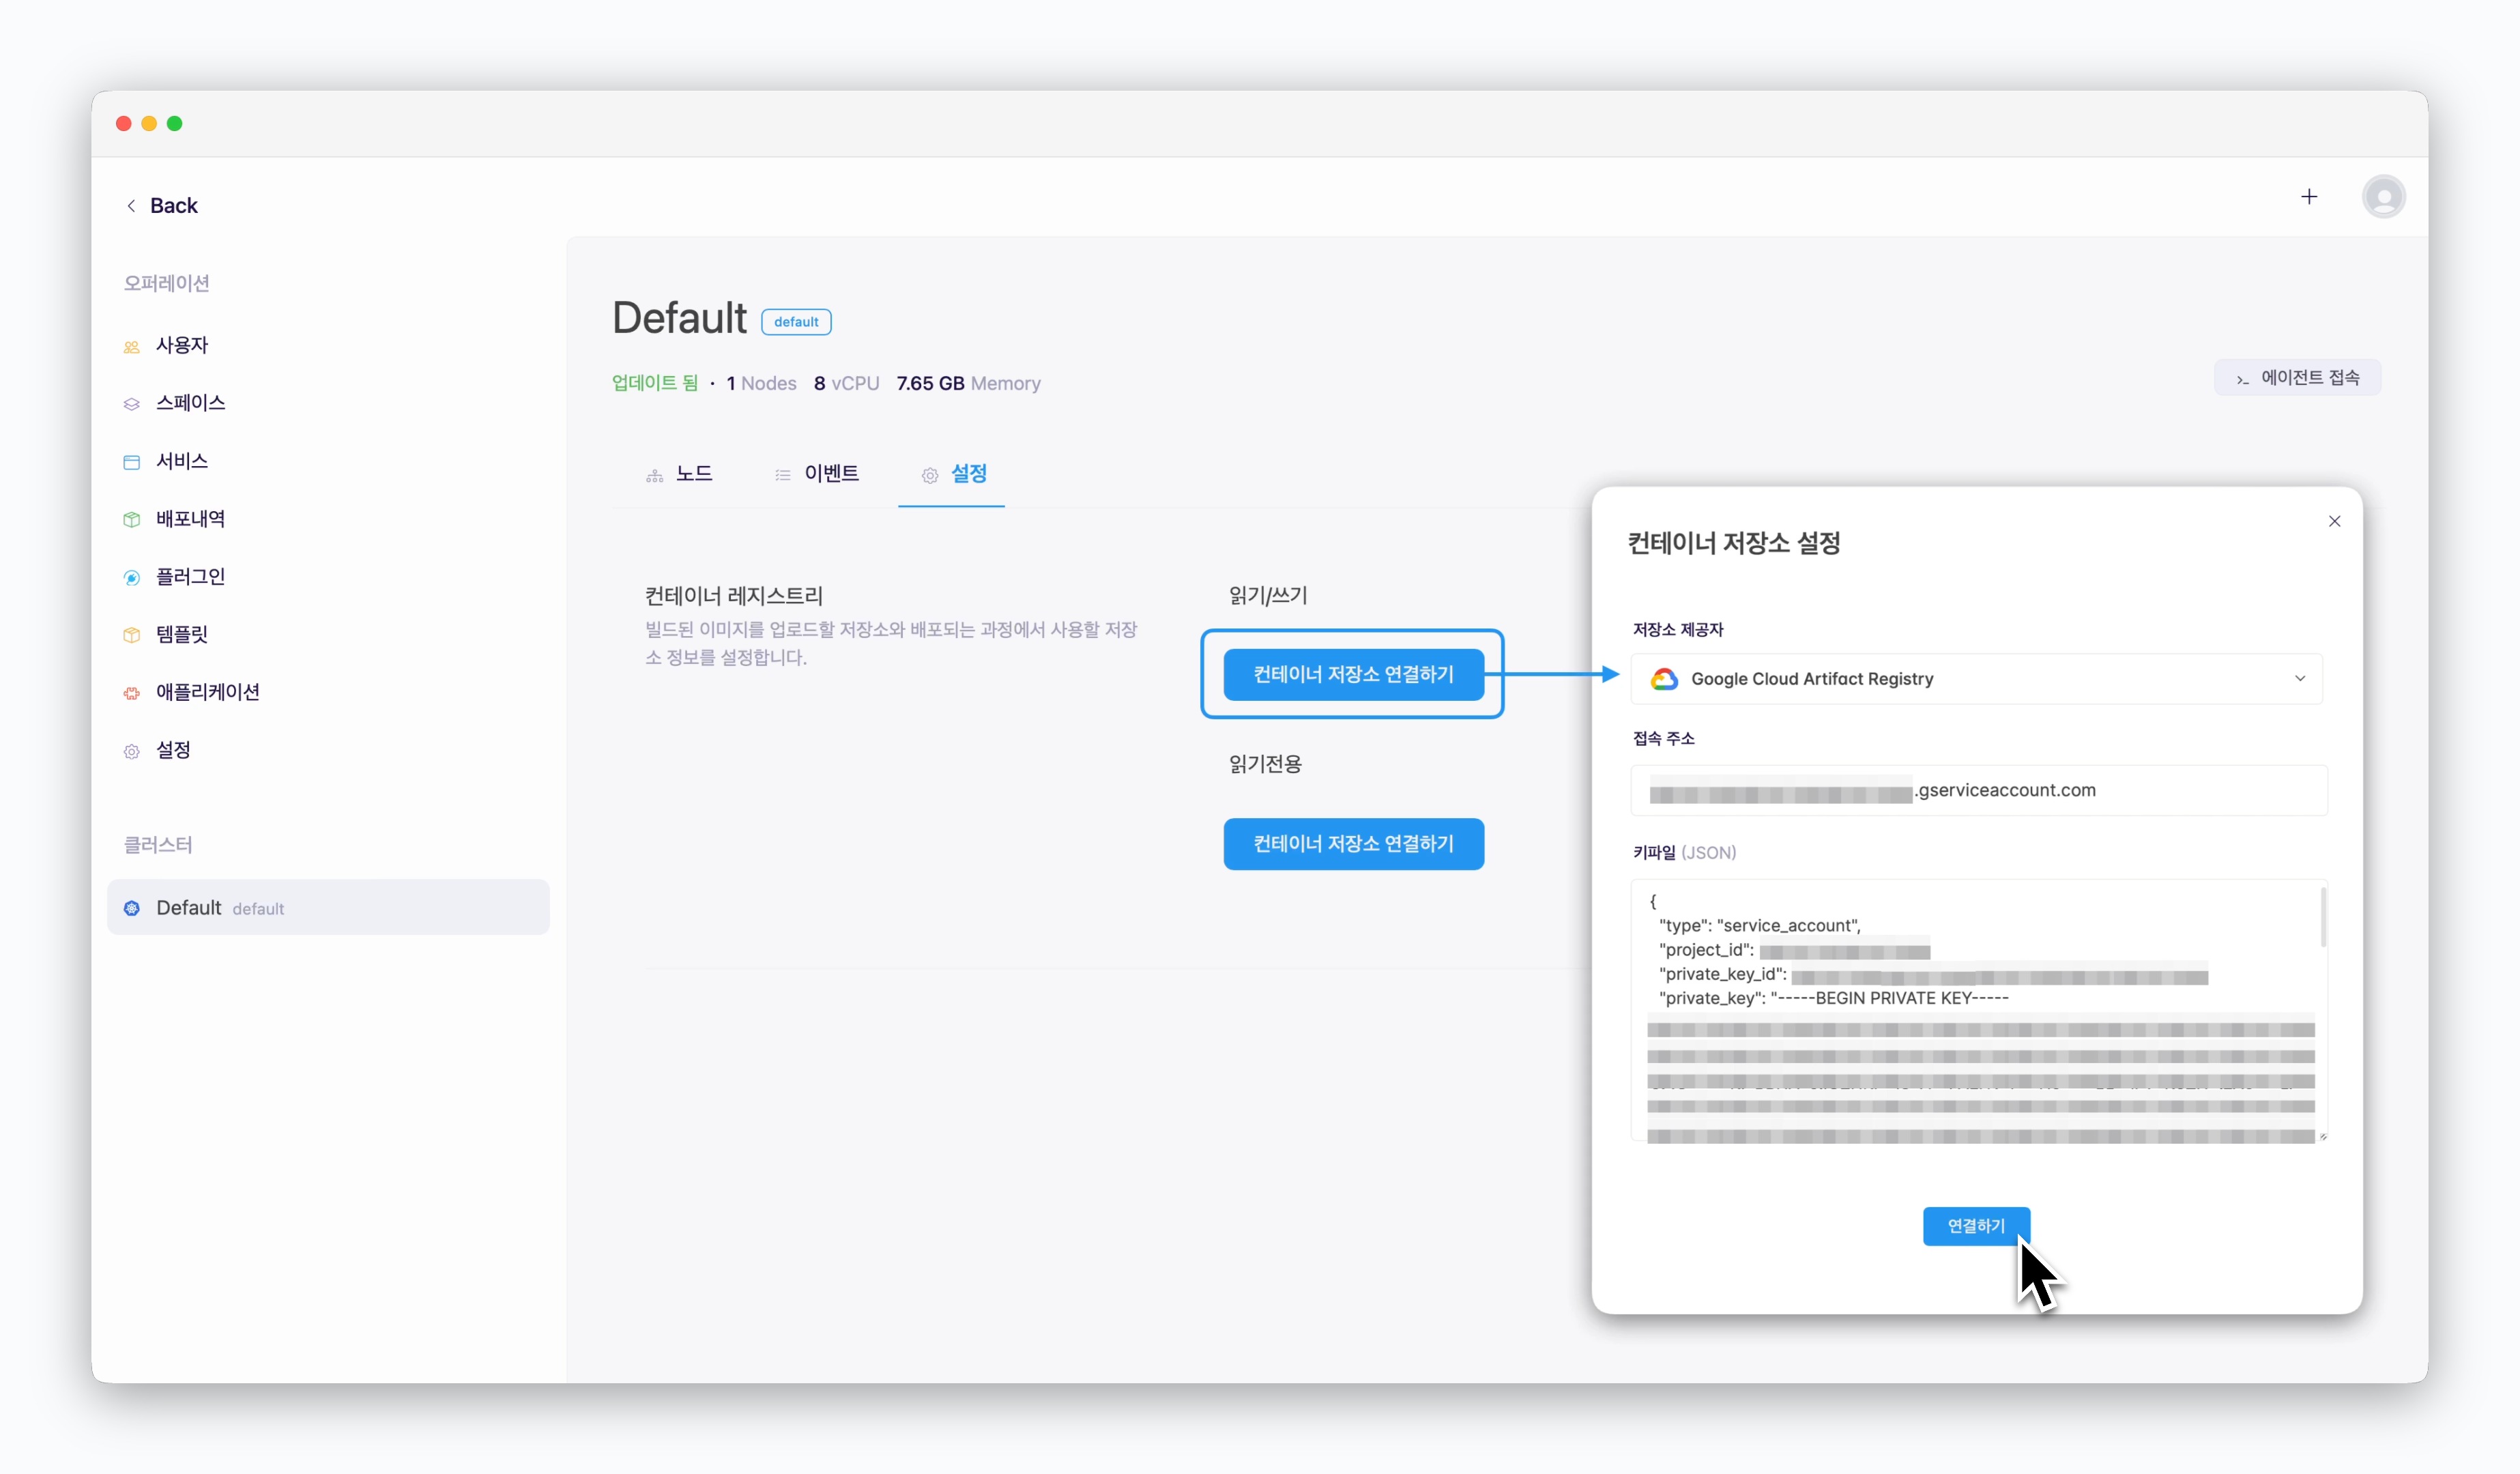 > `ale` 운영시스템의 **클러스터 > 설정 > 컨테이너 레지스트리** 항목의 `컨테이너 저장소 연결하기`를 클릭하면 표시되는 **컨테이너 저장소 설정** 창에서 아래의 값들을 입력한 후 `연결하기`를 클릭하면 **Google Cloud Artifact Registry**가 연결됩니다.
* **저장소 제공자** : Google Cloud Artifact Registry
* **접속 주소** : [저장소 생성 후 조회한 접속주소](/ko/registry/gcp-ar#%EC%A0%80%EC%9E%A5%EC%86%8C-%EC%A0%91%EC%86%8D-%EC%A3%BC%EC%86%8C-%EC%A1%B0%ED%9A%8C)
* **키파일(JSON)** : JSON 키 파일 내용
> `ale` 운영시스템의 **클러스터 > 설정 > 컨테이너 레지스트리** 항목의 `컨테이너 저장소 연결하기`를 클릭하면 표시되는 **컨테이너 저장소 설정** 창에서 아래의 값들을 입력한 후 `연결하기`를 클릭하면 **Google Cloud Artifact Registry**가 연결됩니다.
* **저장소 제공자** : Google Cloud Artifact Registry
* **접속 주소** : [저장소 생성 후 조회한 접속주소](/ko/registry/gcp-ar#%EC%A0%80%EC%9E%A5%EC%86%8C-%EC%A0%91%EC%86%8D-%EC%A3%BC%EC%86%8C-%EC%A1%B0%ED%9A%8C)
* **키파일(JSON)** : JSON 키 파일 내용