> ## Documentation Index
> Fetch the complete documentation index at: https://docs.ale.run/llms.txt
> Use this file to discover all available pages before exploring further.
# 준비사항
> AWS EC2에 ale을 설치하기 위한 준비사항입니다.
***
## VPC 생성
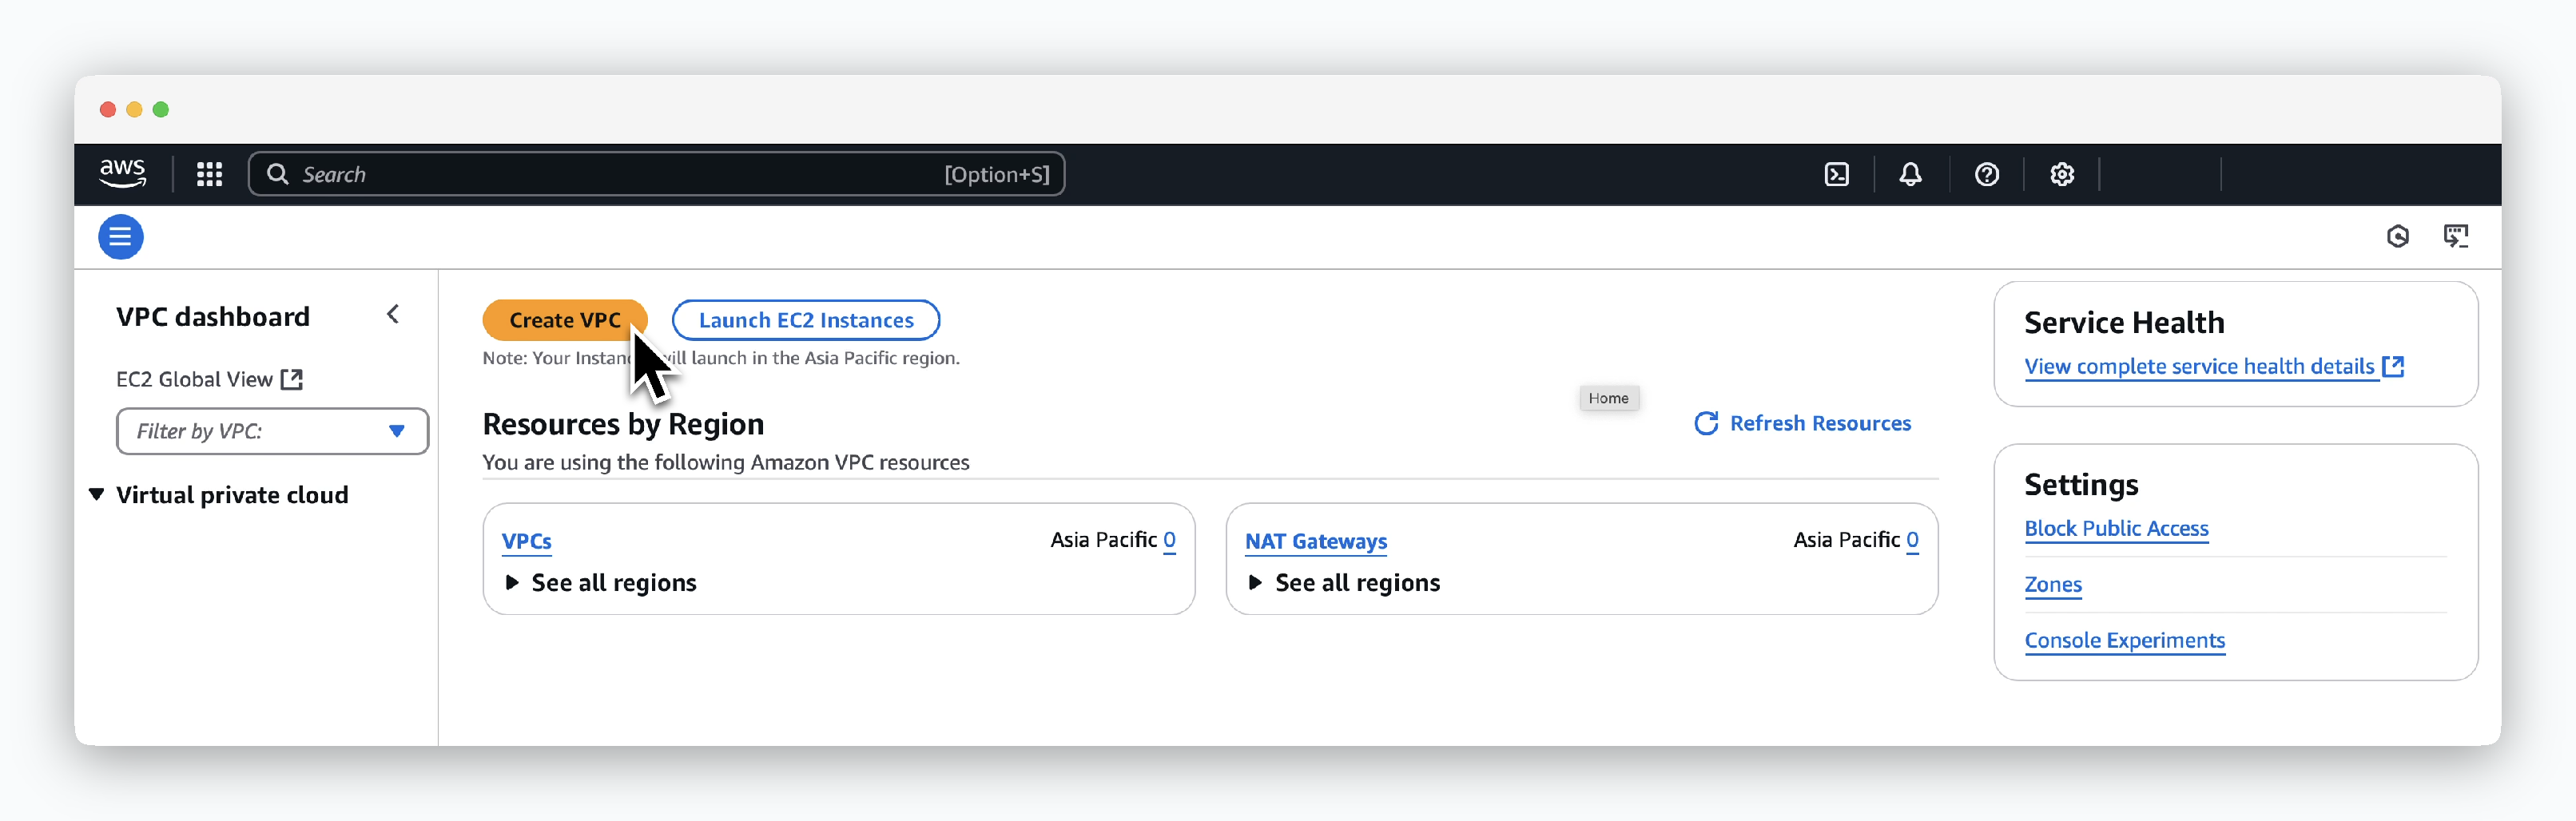 > VPC 대시보드에서 `Create VPC`를 클릭하세요.
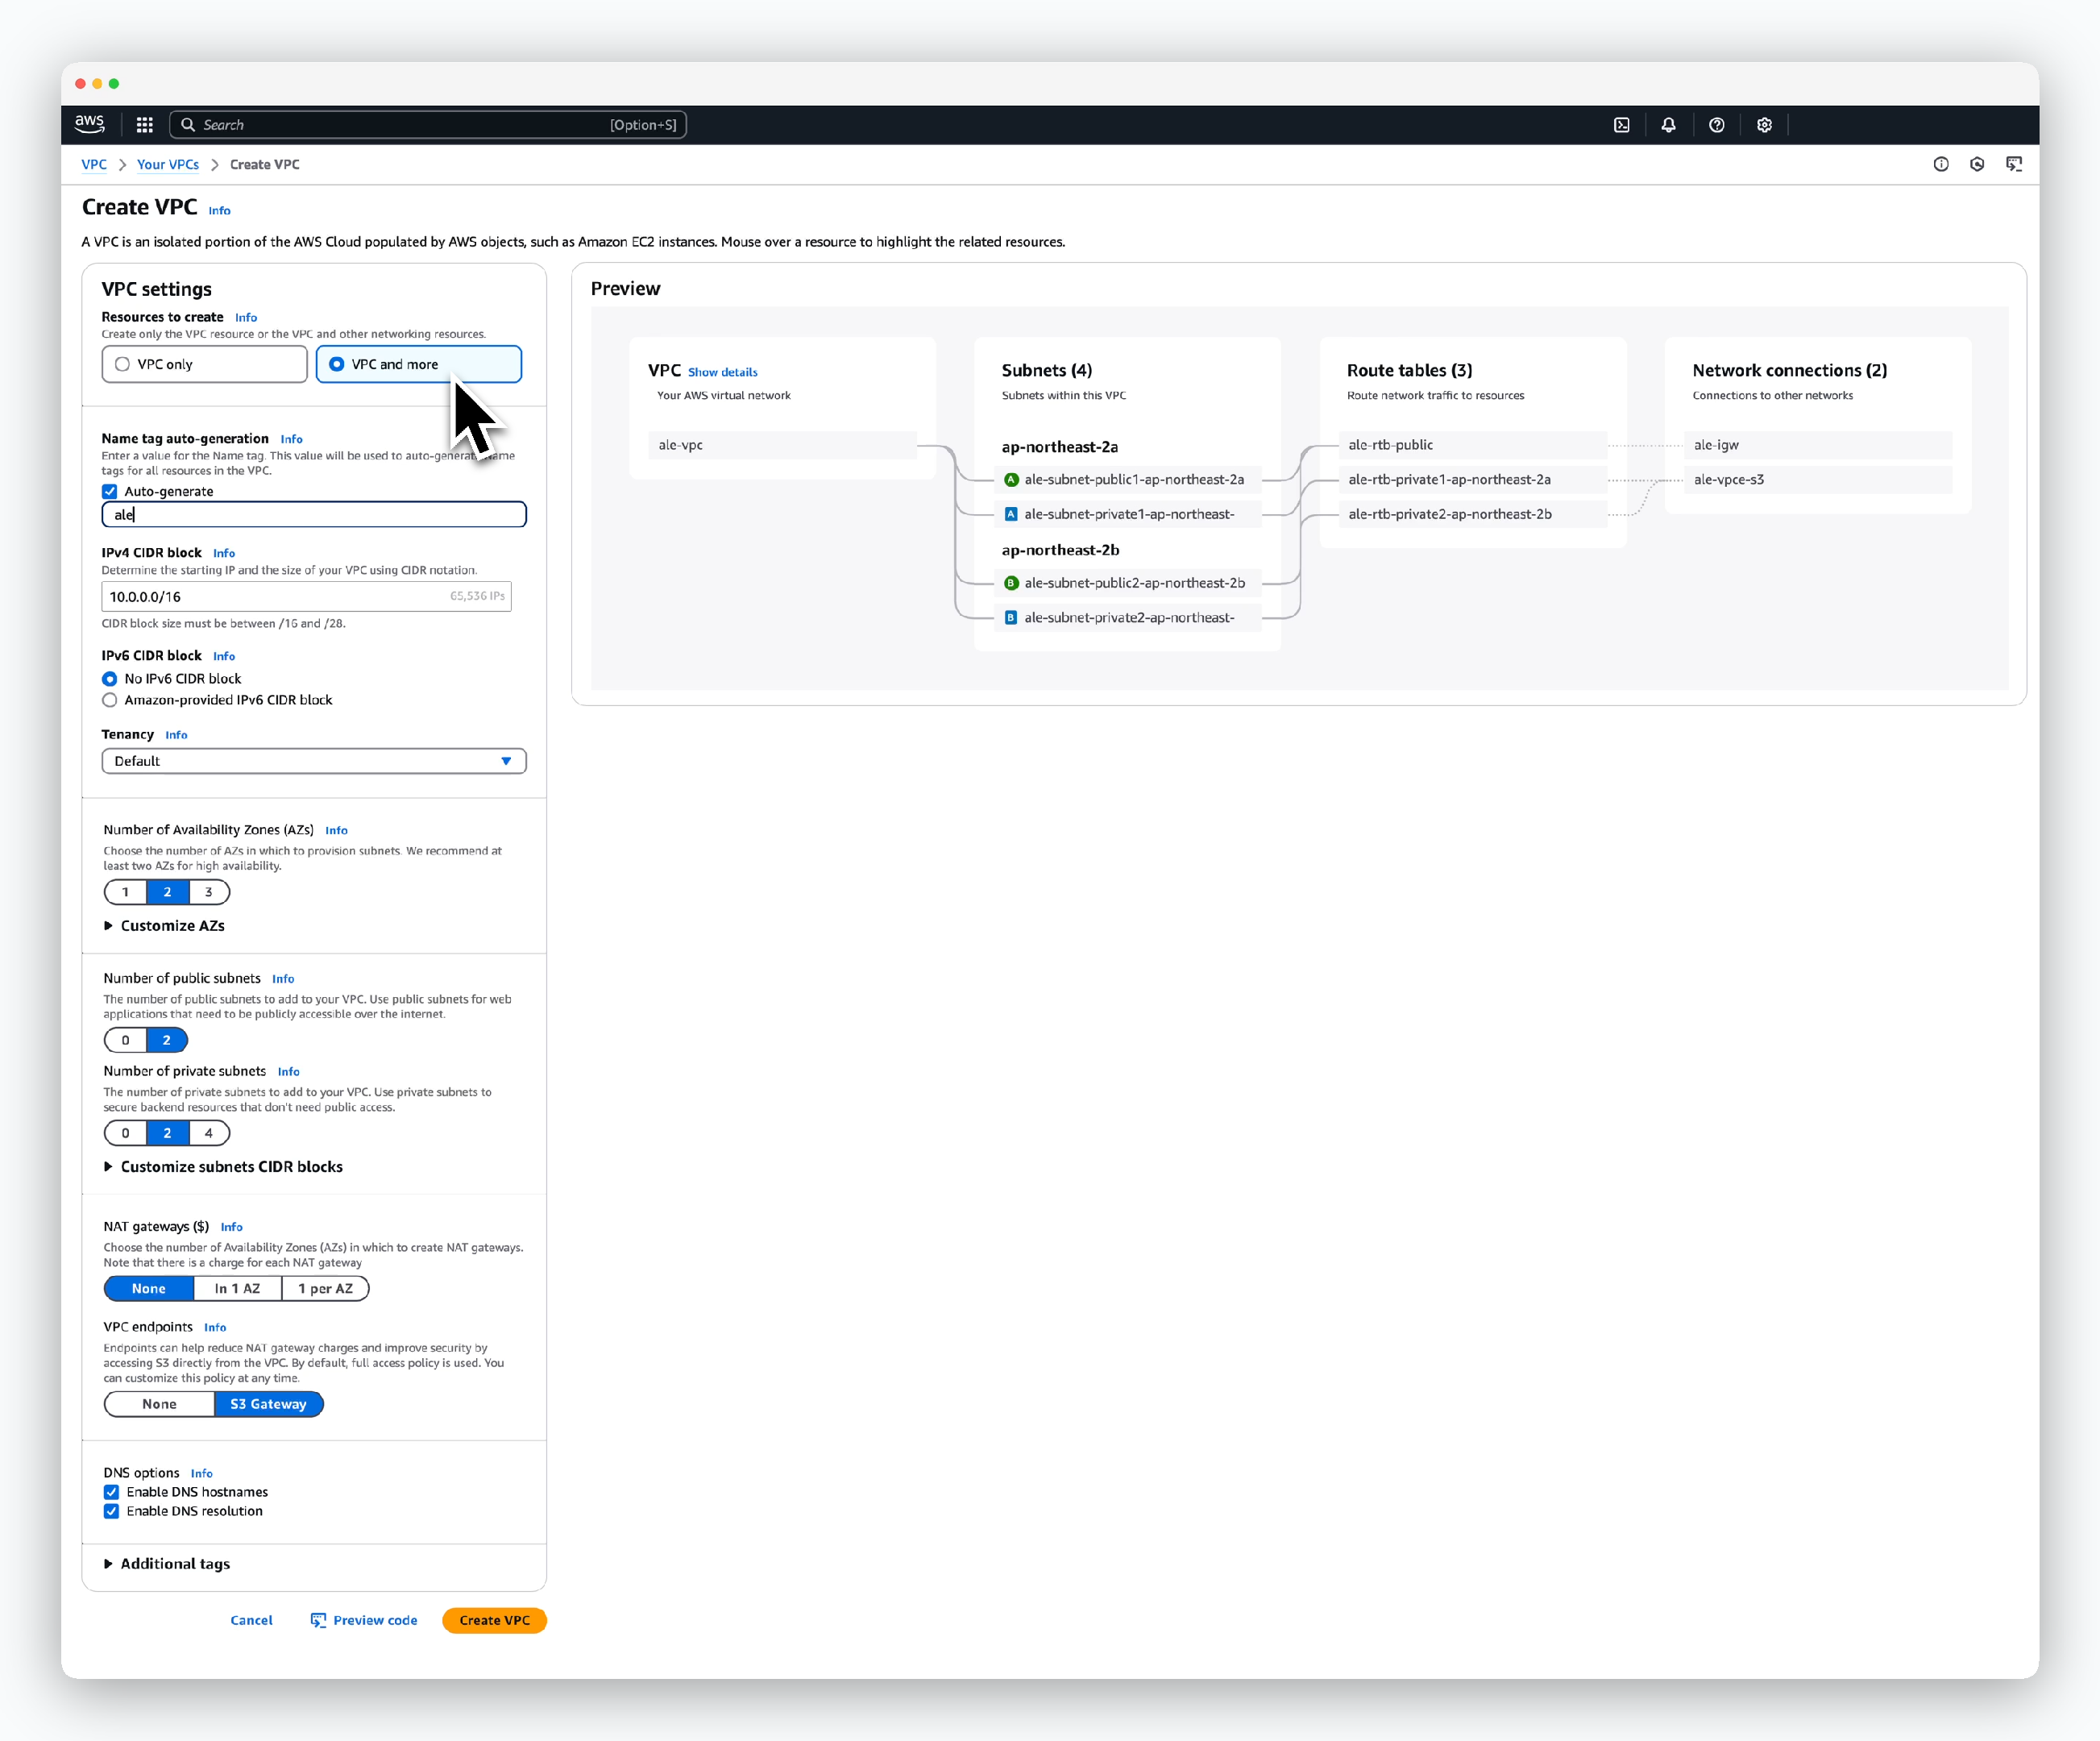 > 생성할 VPC 정보를 아래와 같이 설정하고 `Create VPC`를 클릭하세요.
* Resources to create: VPC and more
* Name tag auto-generation
* Auto-generate: 활성화
* Name tag: VPC 리소스 접두사
* IPv4 CIDR block: VPC 주소 범위
* Tenency: Default
* Number of Availability Zones: 2 이상의 값 선택
* Number of public subnets: AZ와 동일한 값
* Number of private subnets: AZ와 동일한 값
* NAT Gateway: None
* DNS options
* Enable DNS hostnames: 활성화
* Enable DNS resolution: 활성화
## EC2 Key Pair 생성
> 생성할 VPC 정보를 아래와 같이 설정하고 `Create VPC`를 클릭하세요.
* Resources to create: VPC and more
* Name tag auto-generation
* Auto-generate: 활성화
* Name tag: VPC 리소스 접두사
* IPv4 CIDR block: VPC 주소 범위
* Tenency: Default
* Number of Availability Zones: 2 이상의 값 선택
* Number of public subnets: AZ와 동일한 값
* Number of private subnets: AZ와 동일한 값
* NAT Gateway: None
* DNS options
* Enable DNS hostnames: 활성화
* Enable DNS resolution: 활성화
## EC2 Key Pair 생성
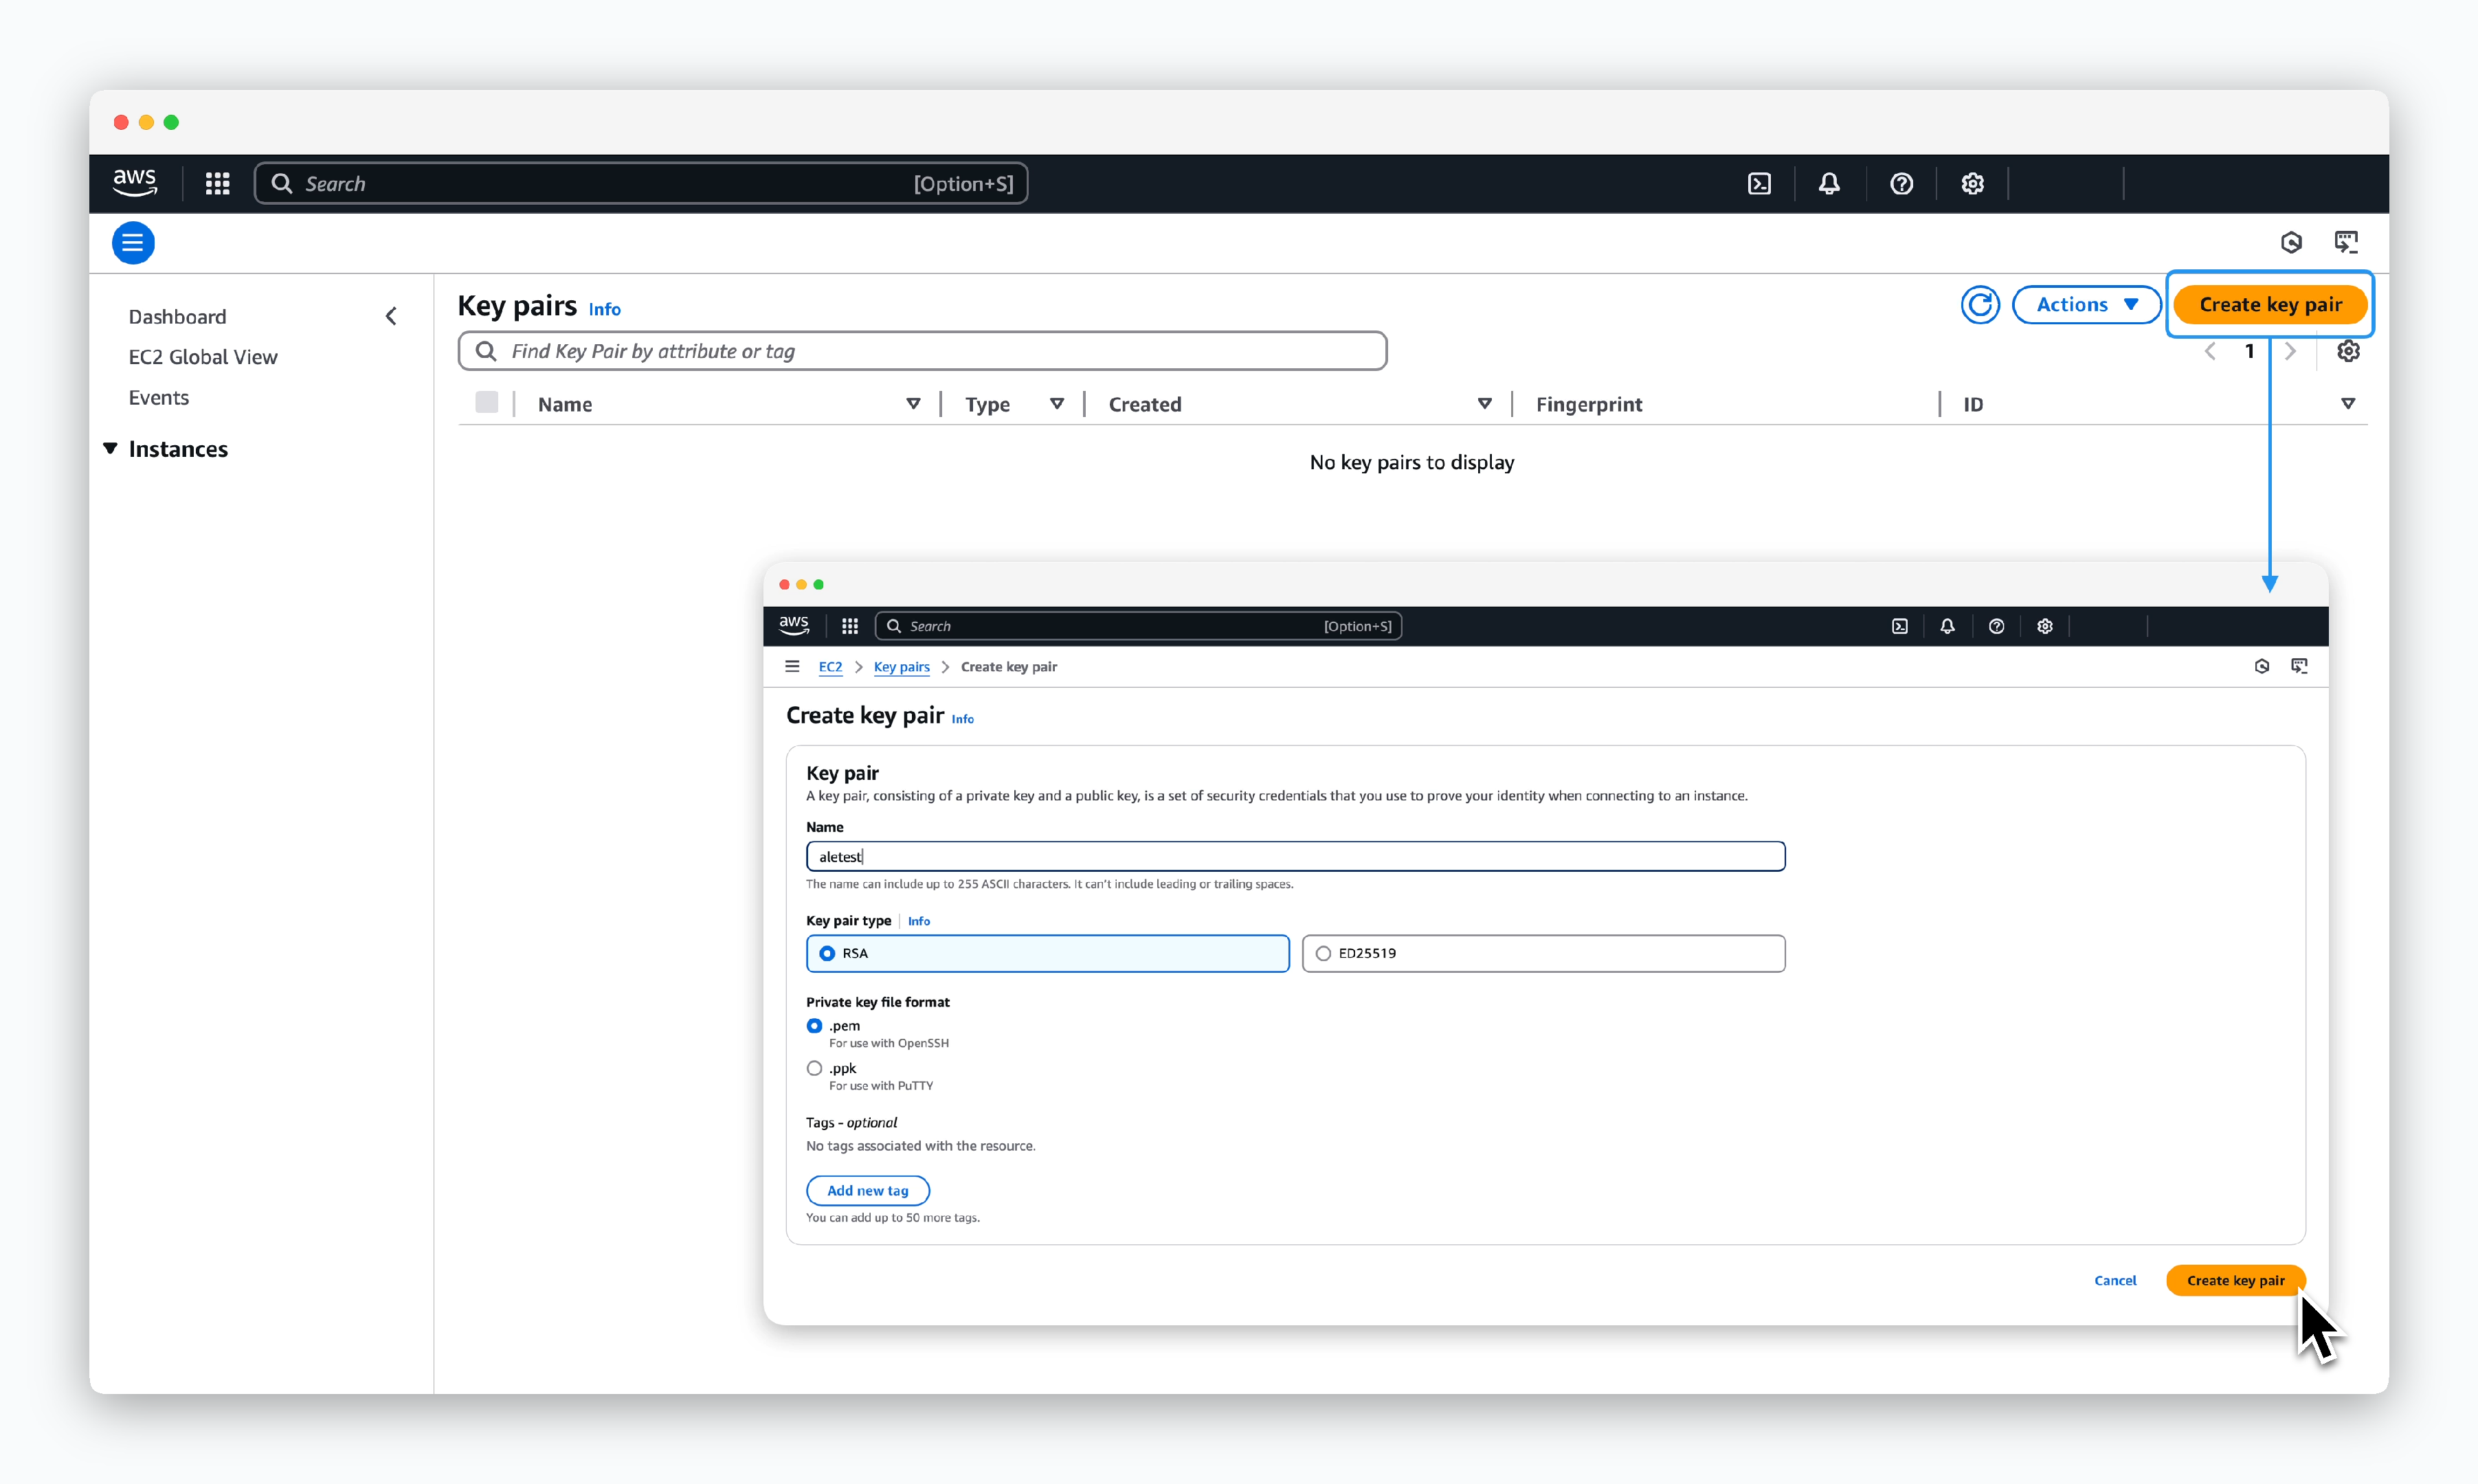 > `EC2 > Network & Security > Key Pairs`에서 `Create key pair`를 클릭한 후, 아래와 같이 키 페어의 정보를 입력 혹은 선택하고 Key를 생성하세요.
* Name: 키 페어 이름
* Key pair type: 키 페어 타입
* RSA
* ED25519
* Private key file format
* `.pem`: OpenSSH
* `.ppk`: PuTTY
키 페어가 정상적으로 생성되면 자동으로 해당 키 파일이 로컬에 다운로드 됩니다.
해당 파일이 외부 혹은 타인에게 노출되지 않도록 안전한 위치에 보관해주세요.
## AWS Elastic IP 할당
> `EC2 > Network & Security > Key Pairs`에서 `Create key pair`를 클릭한 후, 아래와 같이 키 페어의 정보를 입력 혹은 선택하고 Key를 생성하세요.
* Name: 키 페어 이름
* Key pair type: 키 페어 타입
* RSA
* ED25519
* Private key file format
* `.pem`: OpenSSH
* `.ppk`: PuTTY
키 페어가 정상적으로 생성되면 자동으로 해당 키 파일이 로컬에 다운로드 됩니다.
해당 파일이 외부 혹은 타인에게 노출되지 않도록 안전한 위치에 보관해주세요.
## AWS Elastic IP 할당
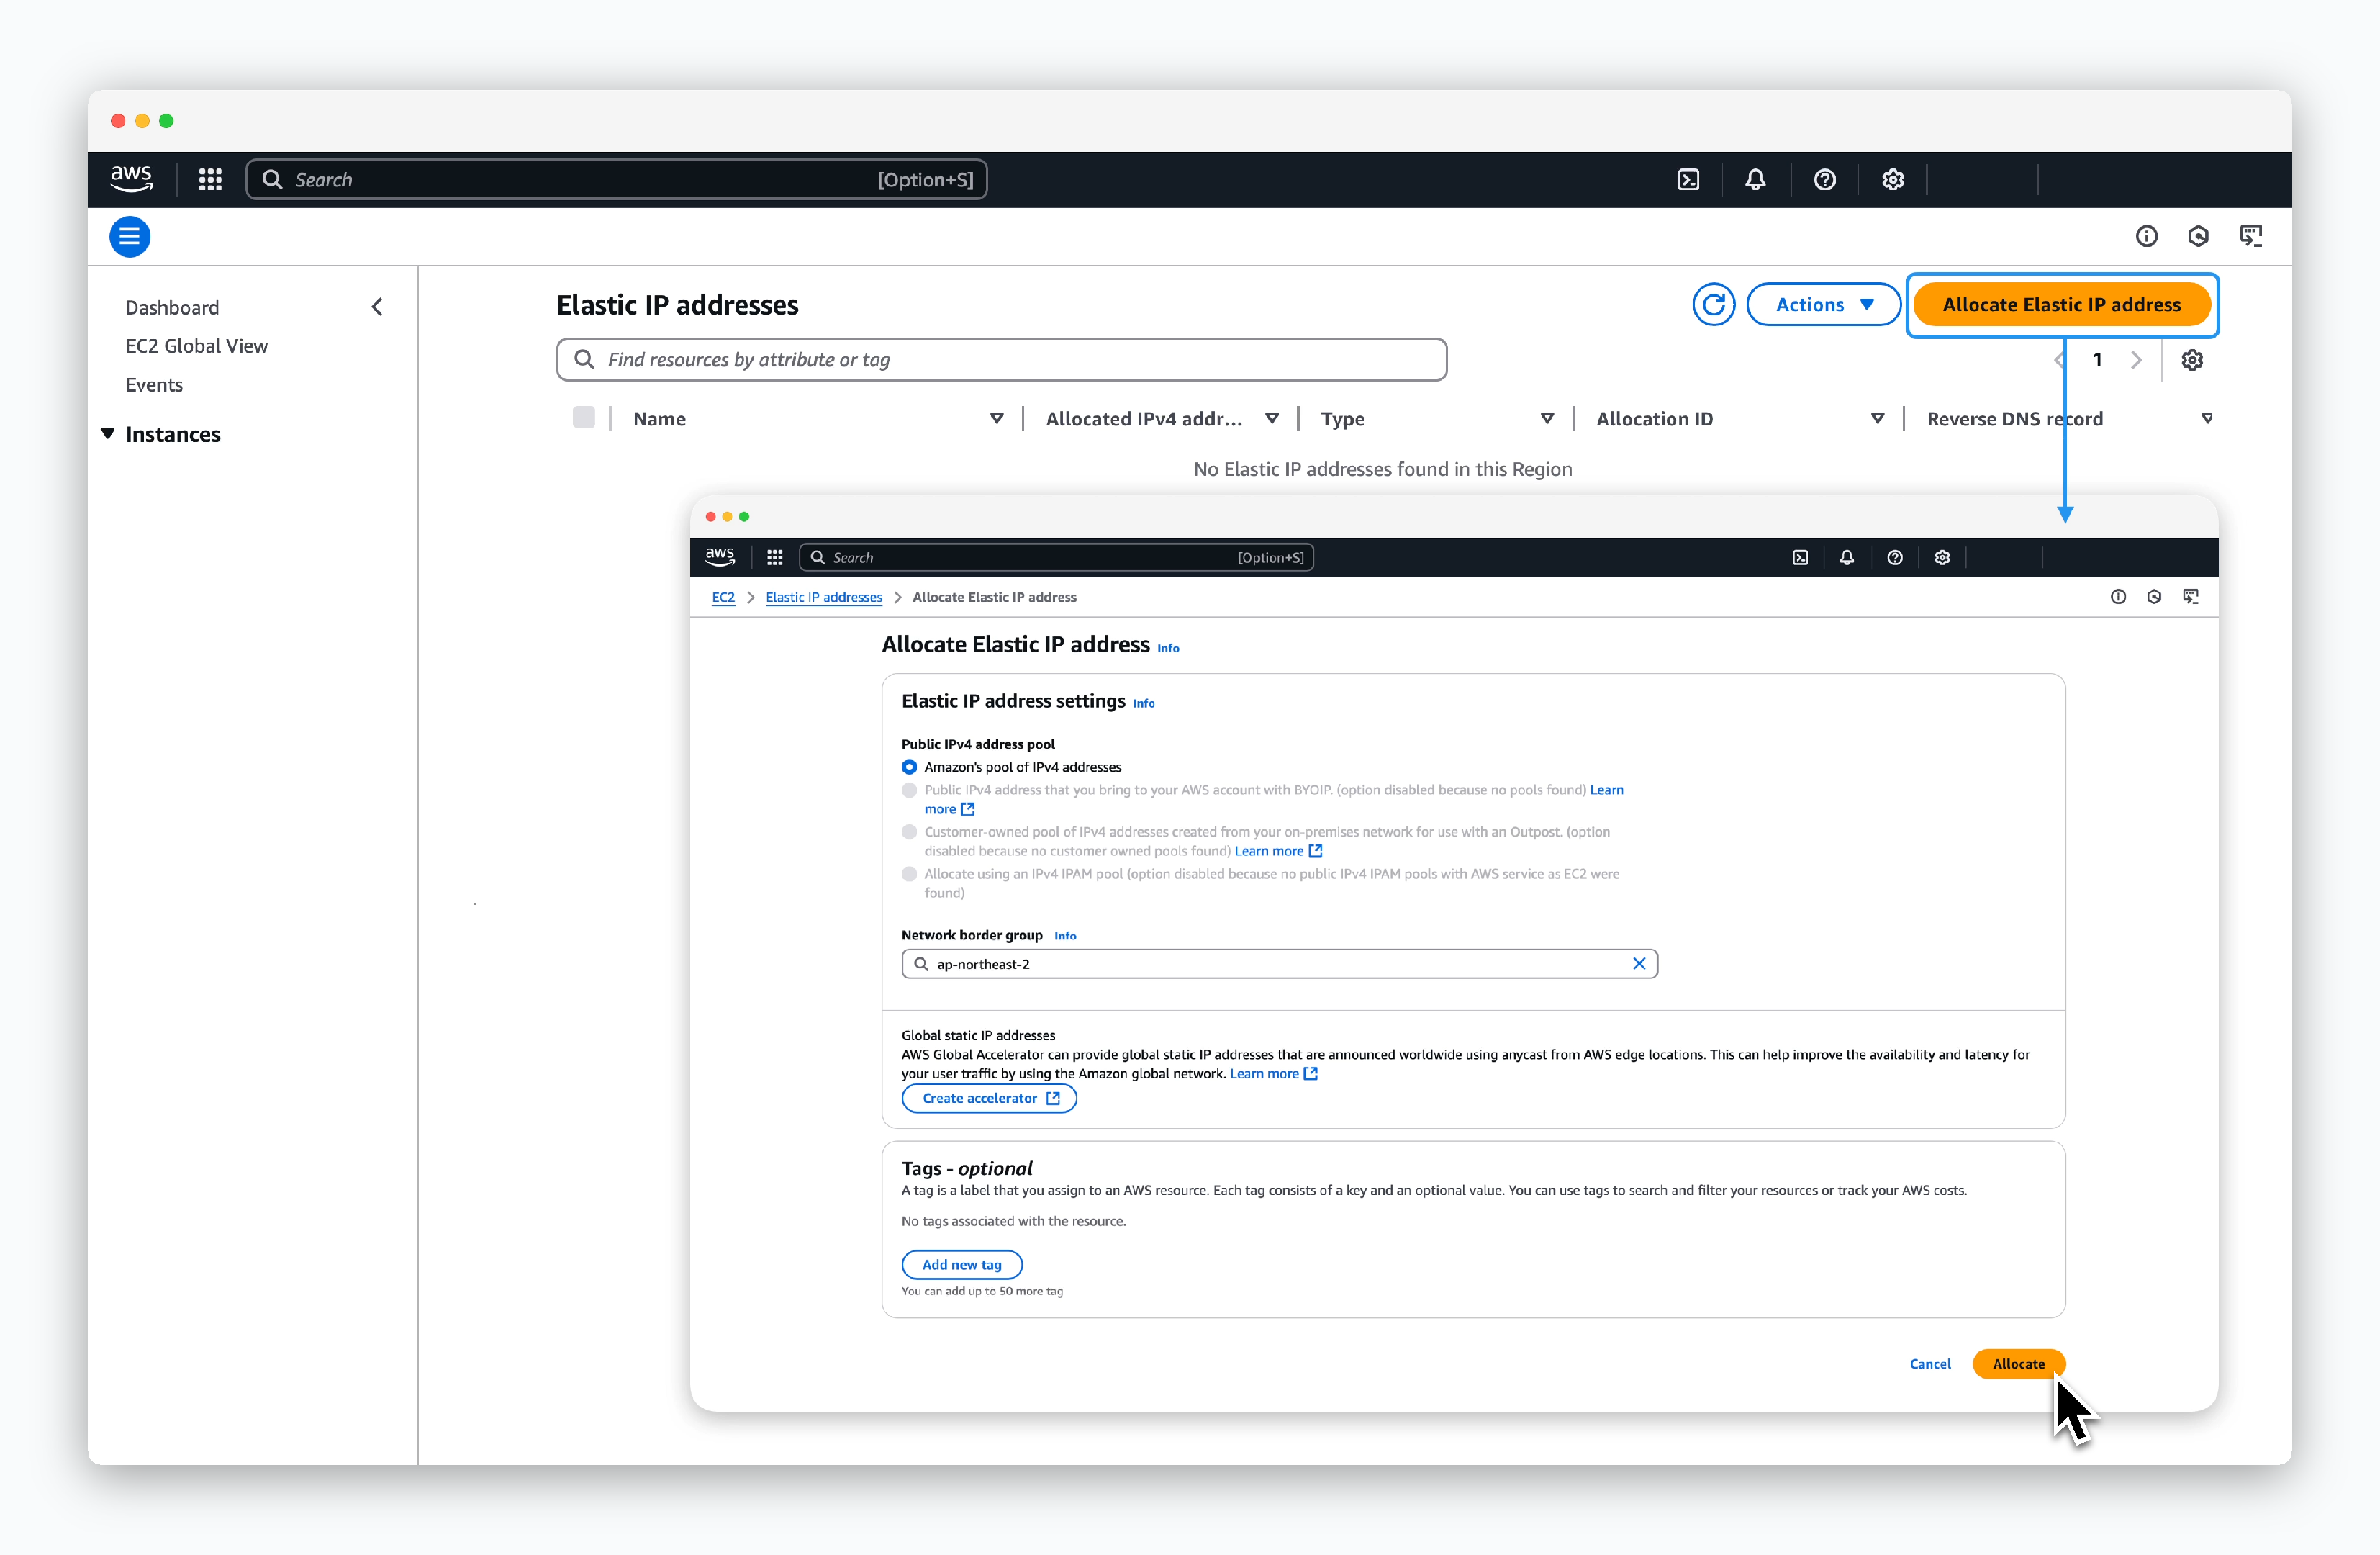 > `EC2 > Network & Security > Elastic IPs`에서 `Allocate Elastic IP address`를 클릭하고, 다음과 같이 각 항목을 선택한 후 `Allocate`를 클릭하세요.
* Public IPv4 address pool: Amazon's pool of IPv4 addresses
* Network border group: 리전
> `EC2 > Network & Security > Elastic IPs`에서 `Allocate Elastic IP address`를 클릭하고, 다음과 같이 각 항목을 선택한 후 `Allocate`를 클릭하세요.
* Public IPv4 address pool: Amazon's pool of IPv4 addresses
* Network border group: 리전