> ## Documentation Index
> Fetch the complete documentation index at: https://docs.ale.run/llms.txt
> Use this file to discover all available pages before exploring further.
# AWS EC2 세팅
> ale을 설치할 AWS EC2 세팅 가이드입니다.
`ale`의 원활한 동작을 위해 다음의 사항을 권장합니다.
* **t3.large(2vCPU, 8GiB)** 이상의 인스턴스 사용
* **amd64(x86\_64)** 아키텍쳐 OS 선택
* **60GiB** 이상의 storage
***
## EC2 생성하기
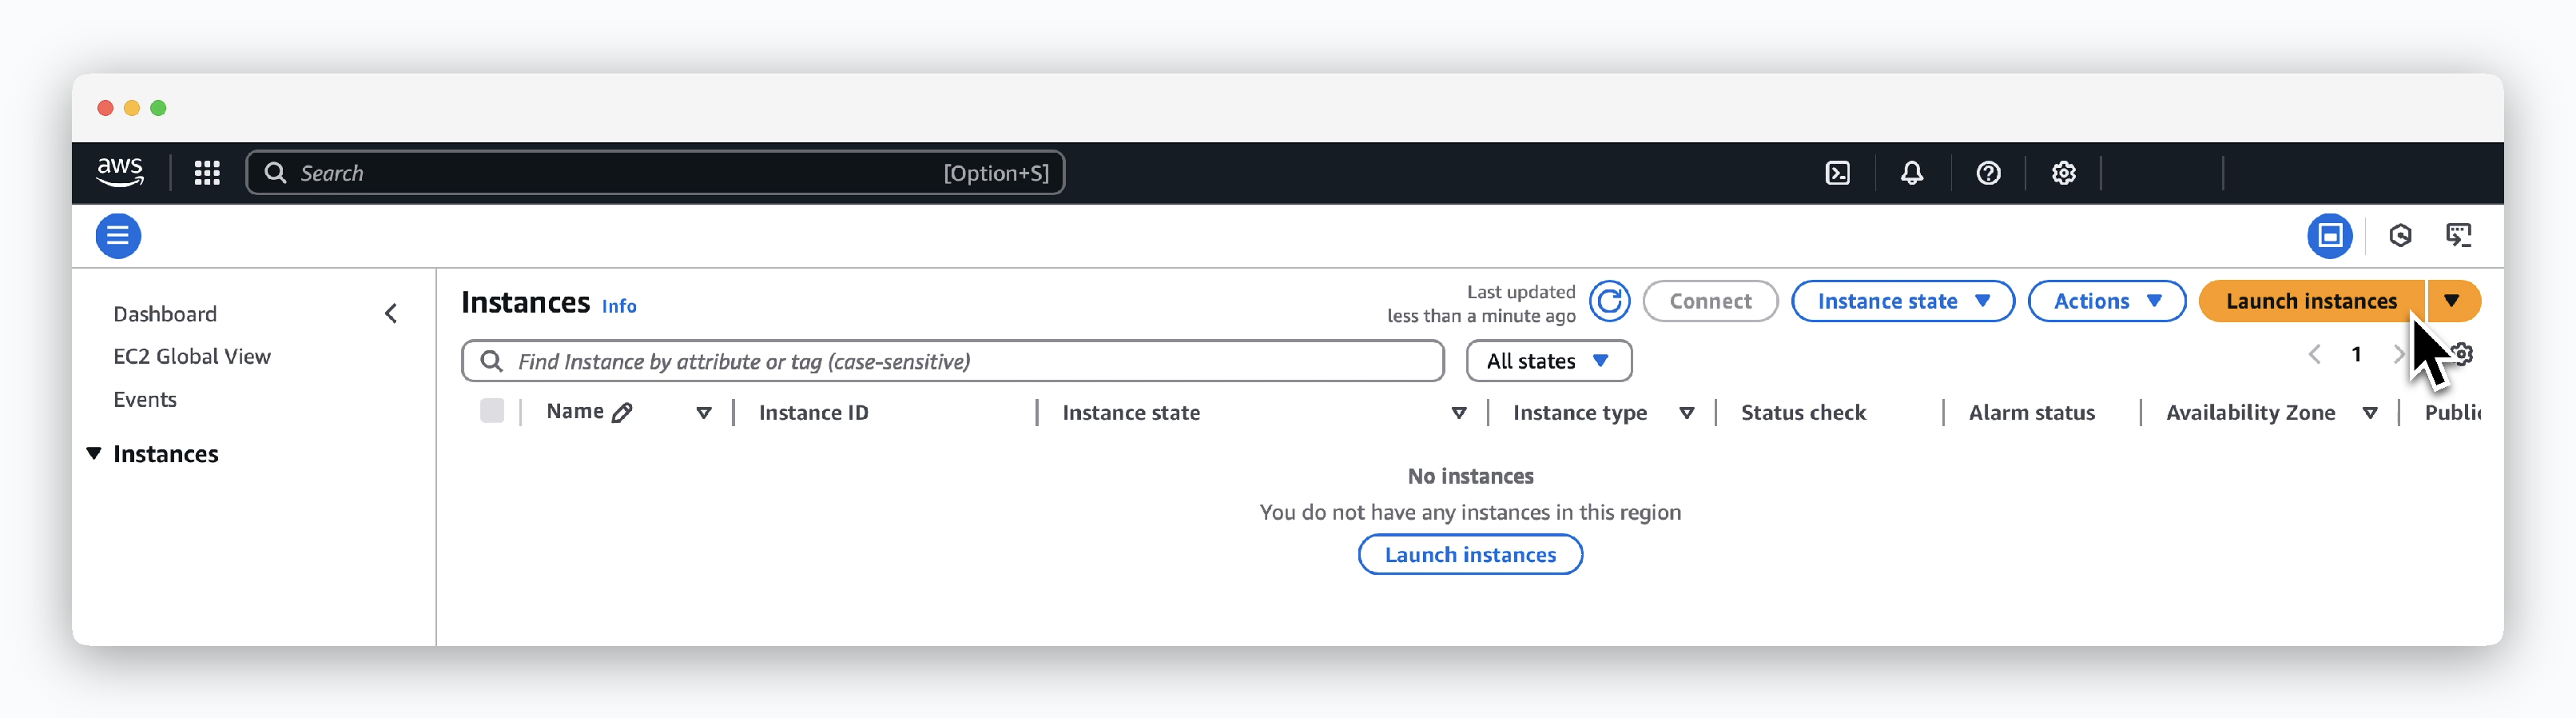 > `EC2 > Instances`에서 `Launch instances`를 클릭하세요.
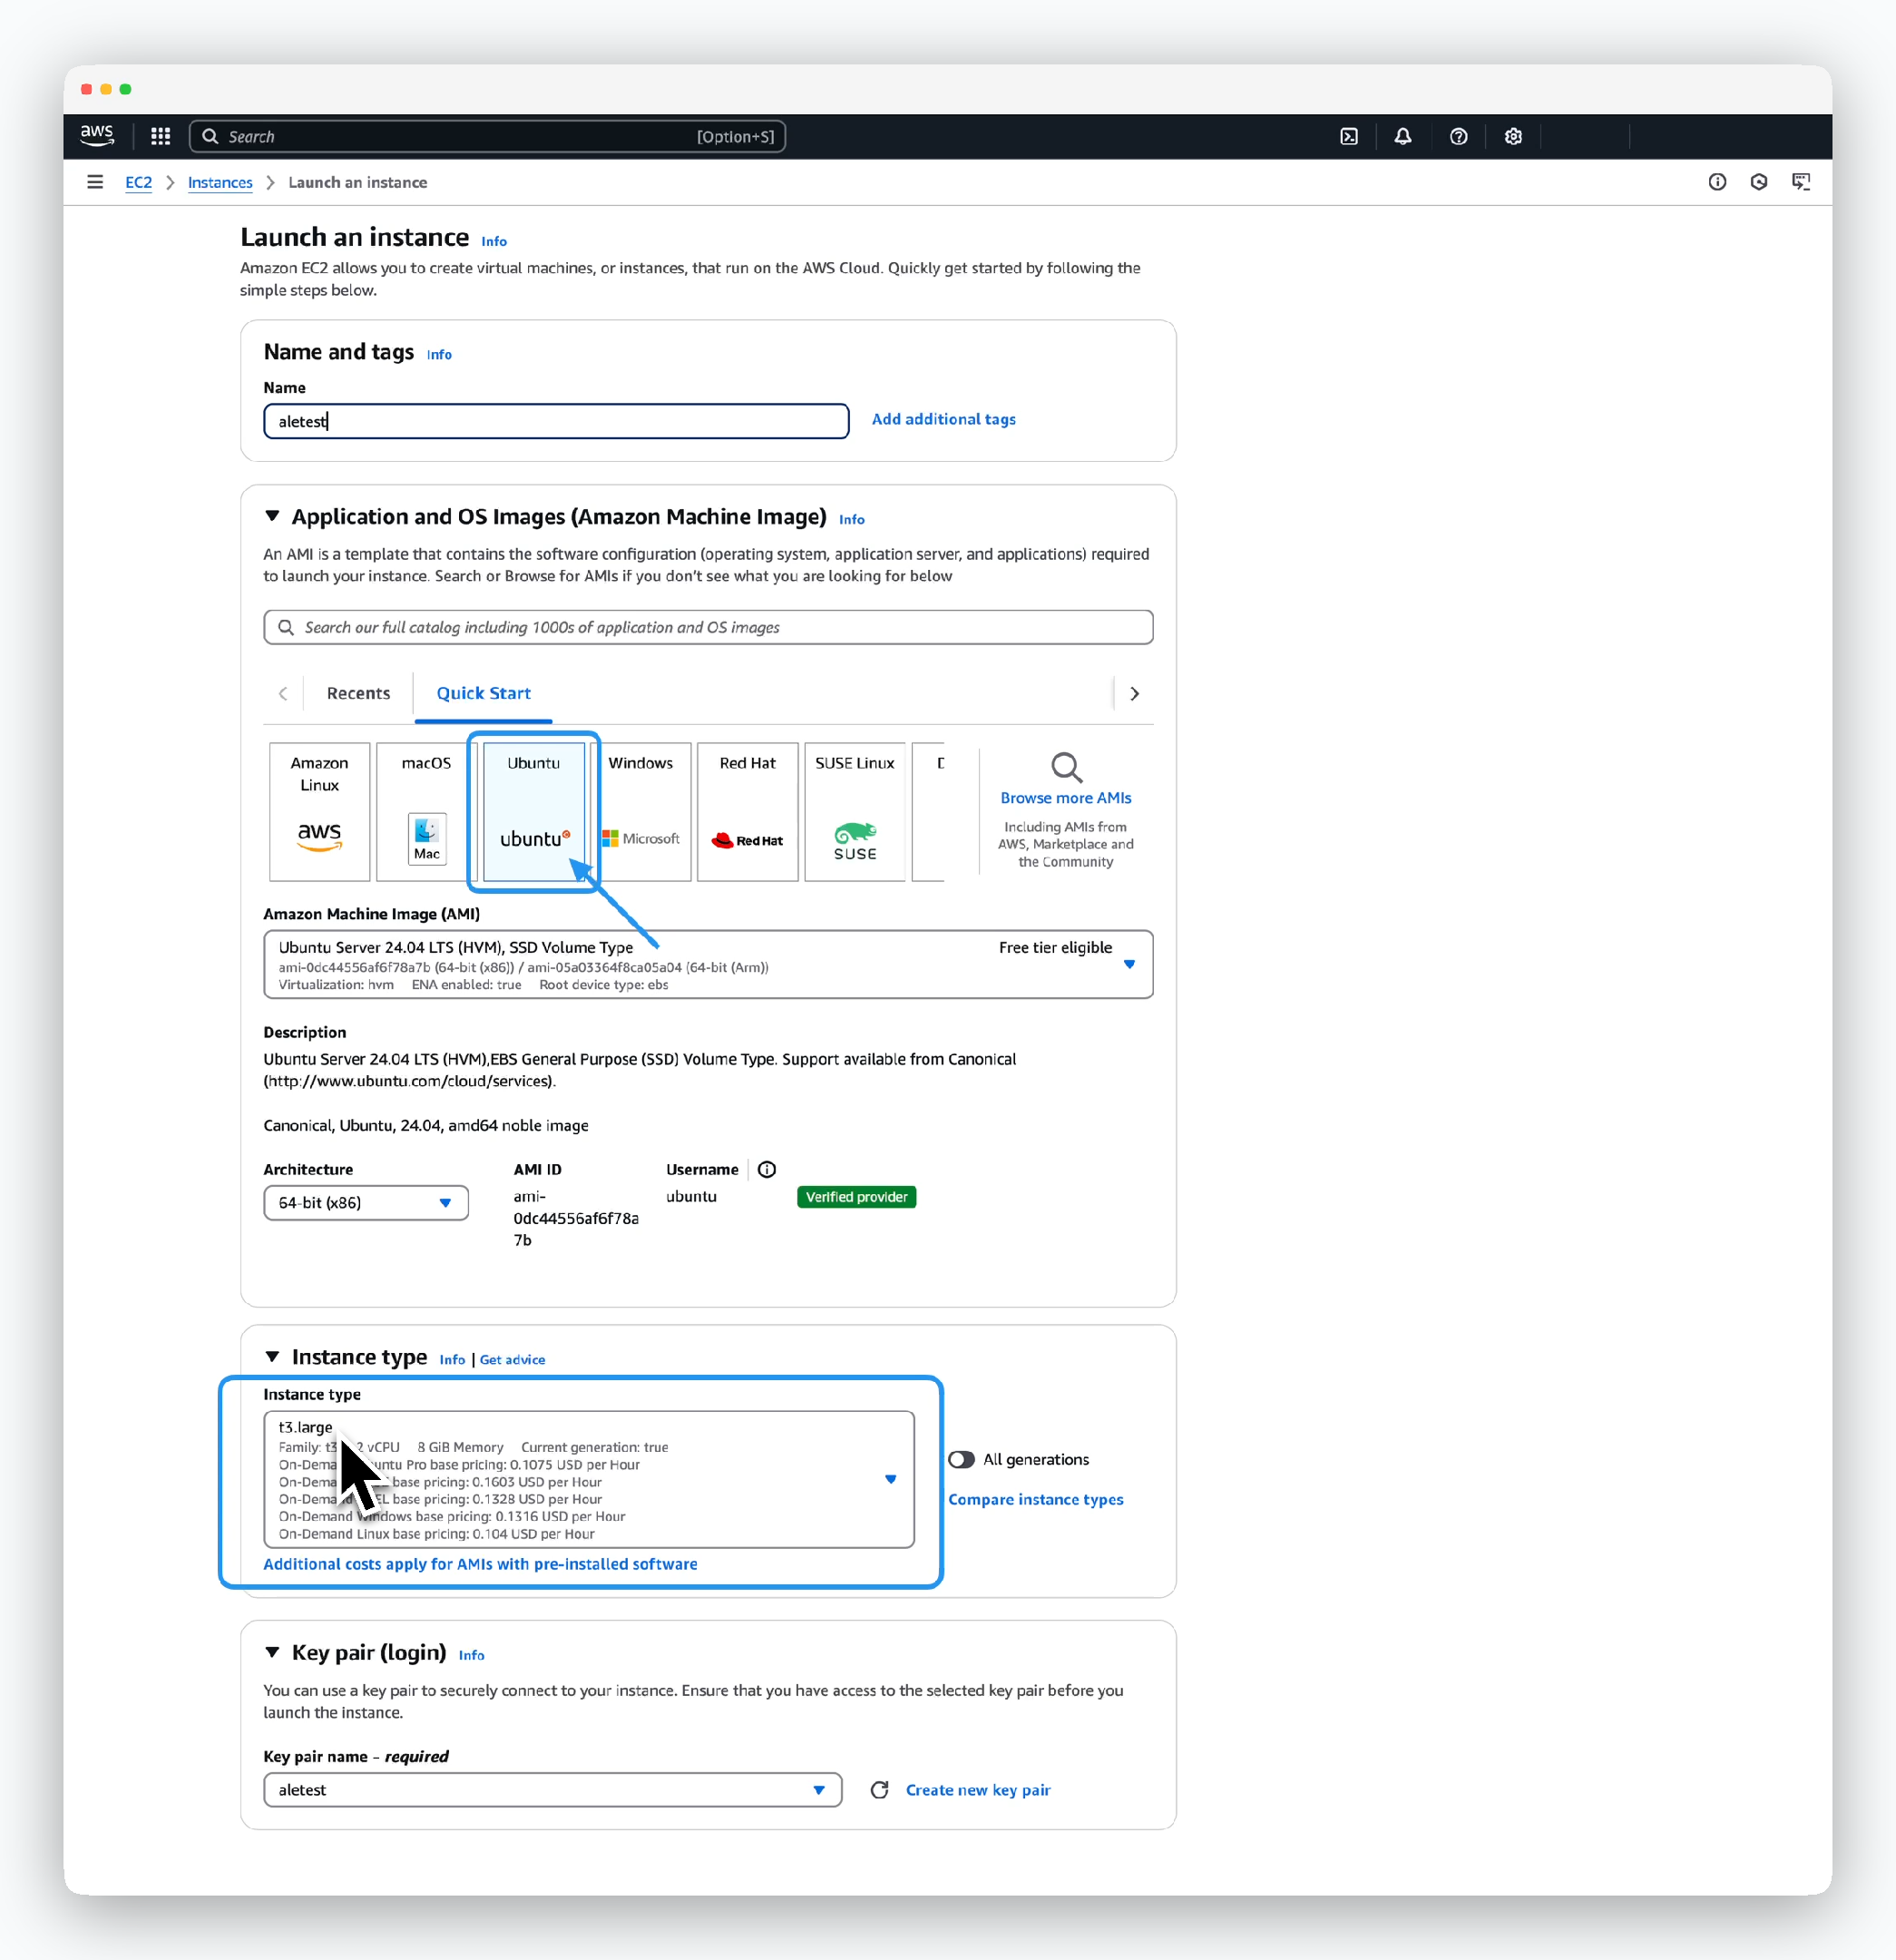 > 생성할 인스턴스의 정보를 아래와 같이 입력 혹은 선택하세요.
* Name and tags
* Name: 인스턴스 이름
* Application and OS Images (Amazon Machine Image)
* Amazon Machine Image (AMI): Ubuntu Server 24.04 LTS (amd64)
* Instance type
* t3.large의 사양 이상의 타입 선택
* Key pair (login)
* 전 단계에서 생성한 키 페어 선택
> 생성할 인스턴스의 정보를 아래와 같이 입력 혹은 선택하세요.
* Name and tags
* Name: 인스턴스 이름
* Application and OS Images (Amazon Machine Image)
* Amazon Machine Image (AMI): Ubuntu Server 24.04 LTS (amd64)
* Instance type
* t3.large의 사양 이상의 타입 선택
* Key pair (login)
* 전 단계에서 생성한 키 페어 선택
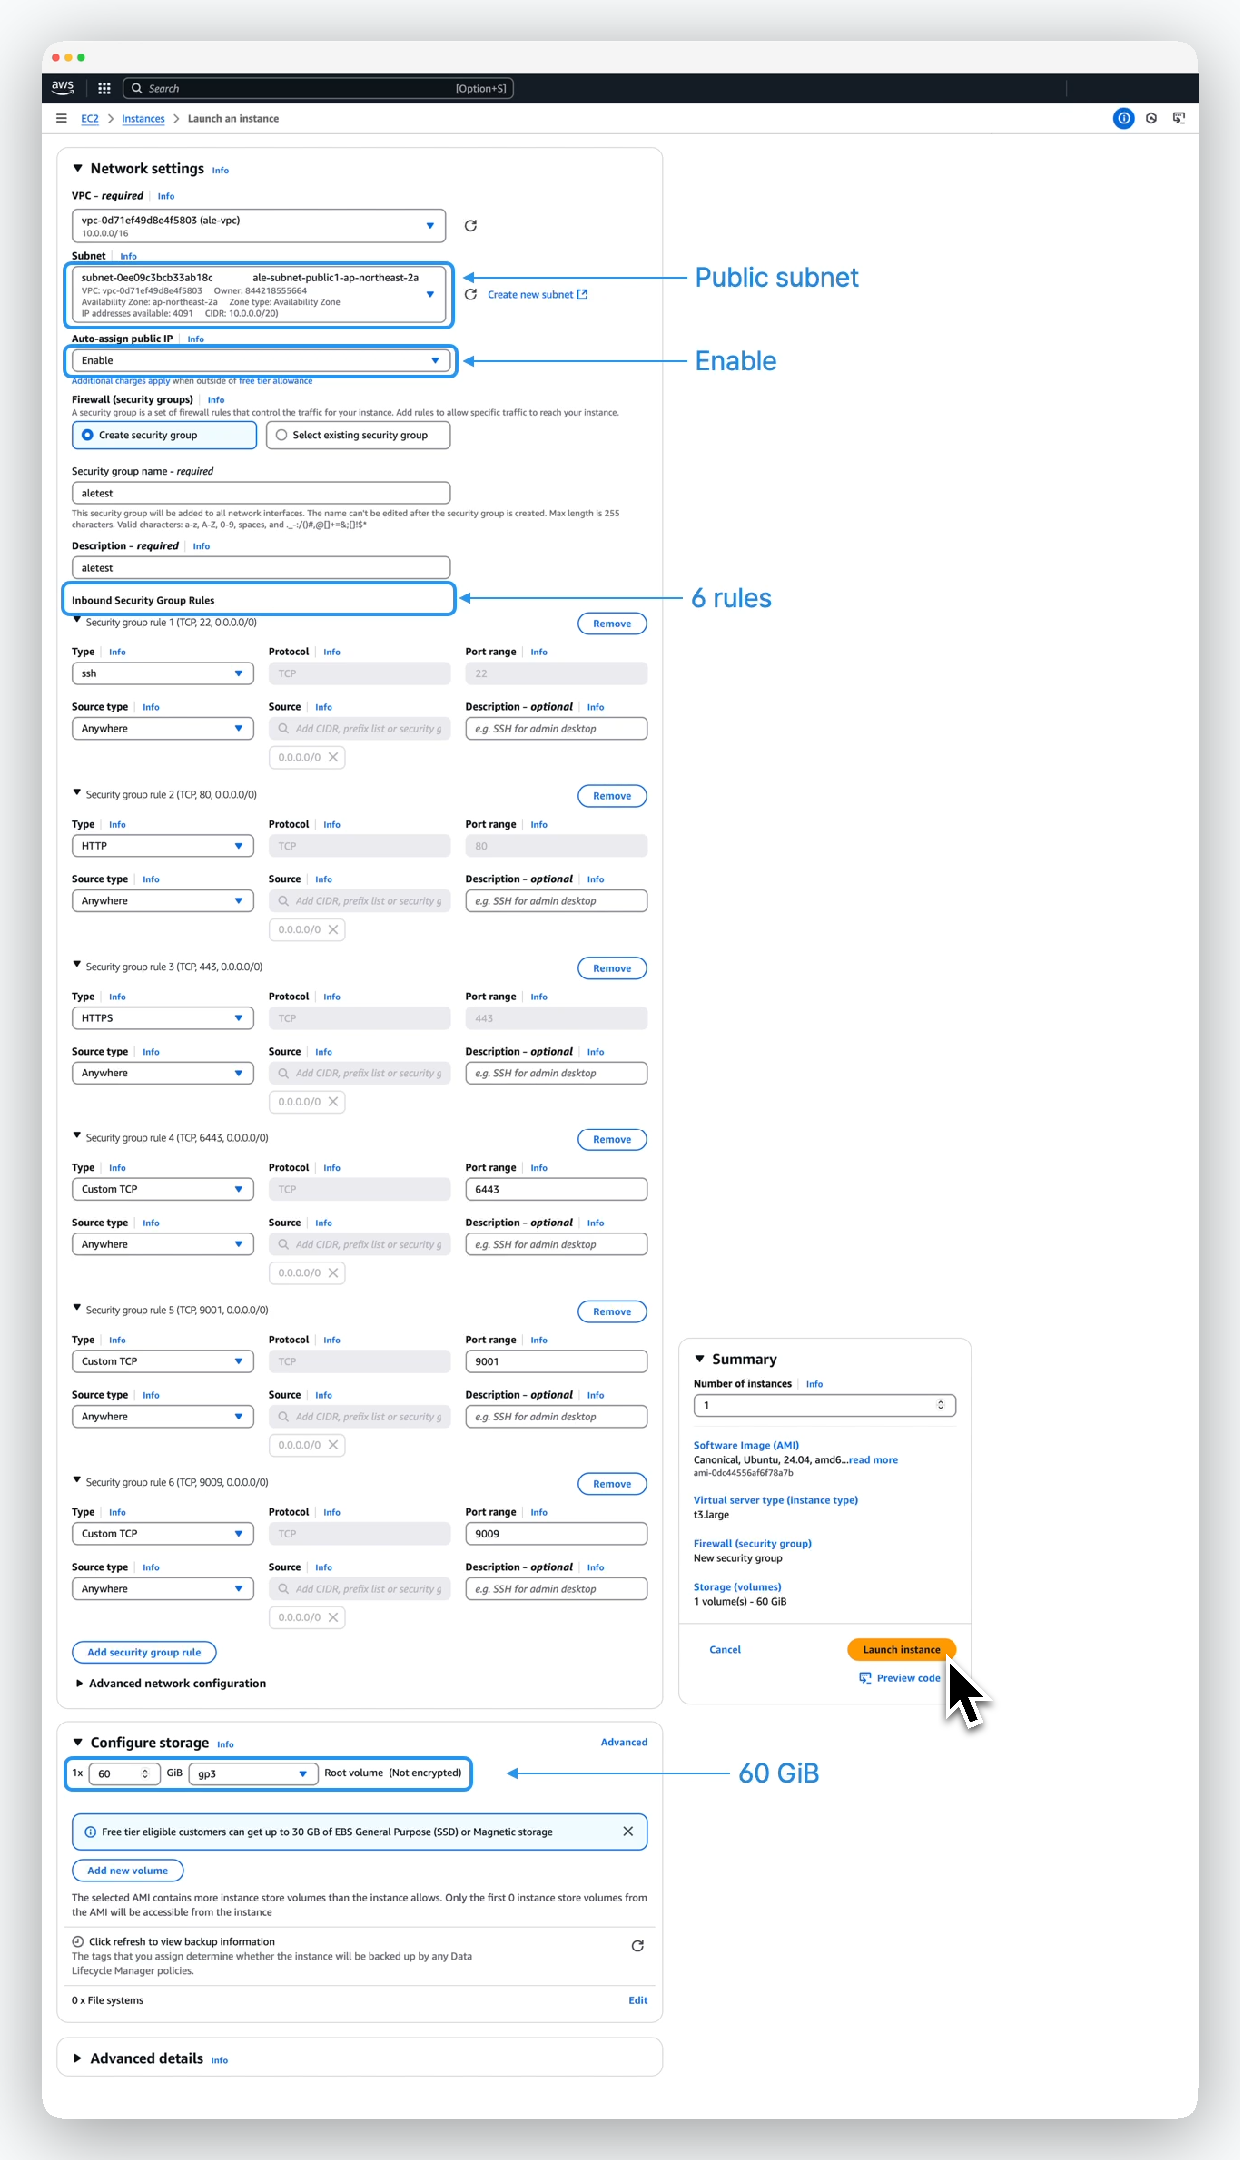 > 이어서 **6개의 Security group 규칙**과 스토리지 등을 설정하세요
* Network settings
* VPC: EC2 프로비저닝 대상 VPC. 인터넷과 통신 가능 필요
* Subnet: 인터넷 게이트웨이가 연결된 퍼블릭 서브넷 선택
* Auto-assign public IP: Enable
* Firewall (security groups)
* Create security group 선택 후 적절한 보안그룹 이름 입력
* Security group name: 보안그룹 이름
* Description: 보안그룹 설명
* Add security group rules
- Type: SSH
- Protocol: TCP
- Port range: 22
- Source: 0.0.0.0/0
* Type: HTTP
* Protocol: TCP
* Port range: 80
* Source: 0.0.0.0/0
* Type: HTTPS
* Protocol: TCP
* Port range: 443
* Source: 0.0.0.0/0
* Type: Custom TCP
* Protocol: TCP
* Port range: 6443
* Source: 0.0.0.0/0
* Type: Custom TCP
* Protocol: TCP
* Port range: 9001
* Source: 0.0.0.0/0
* Type: Custom TCP
* Protocol: TCP
* Port range: 9009
* Source: 0.0.0.0/0
* Configure storage
* 1 x 60GiB, gp3 선택
## Elastic IP address 연동하기
> 이어서 **6개의 Security group 규칙**과 스토리지 등을 설정하세요
* Network settings
* VPC: EC2 프로비저닝 대상 VPC. 인터넷과 통신 가능 필요
* Subnet: 인터넷 게이트웨이가 연결된 퍼블릭 서브넷 선택
* Auto-assign public IP: Enable
* Firewall (security groups)
* Create security group 선택 후 적절한 보안그룹 이름 입력
* Security group name: 보안그룹 이름
* Description: 보안그룹 설명
* Add security group rules
- Type: SSH
- Protocol: TCP
- Port range: 22
- Source: 0.0.0.0/0
* Type: HTTP
* Protocol: TCP
* Port range: 80
* Source: 0.0.0.0/0
* Type: HTTPS
* Protocol: TCP
* Port range: 443
* Source: 0.0.0.0/0
* Type: Custom TCP
* Protocol: TCP
* Port range: 6443
* Source: 0.0.0.0/0
* Type: Custom TCP
* Protocol: TCP
* Port range: 9001
* Source: 0.0.0.0/0
* Type: Custom TCP
* Protocol: TCP
* Port range: 9009
* Source: 0.0.0.0/0
* Configure storage
* 1 x 60GiB, gp3 선택
## Elastic IP address 연동하기
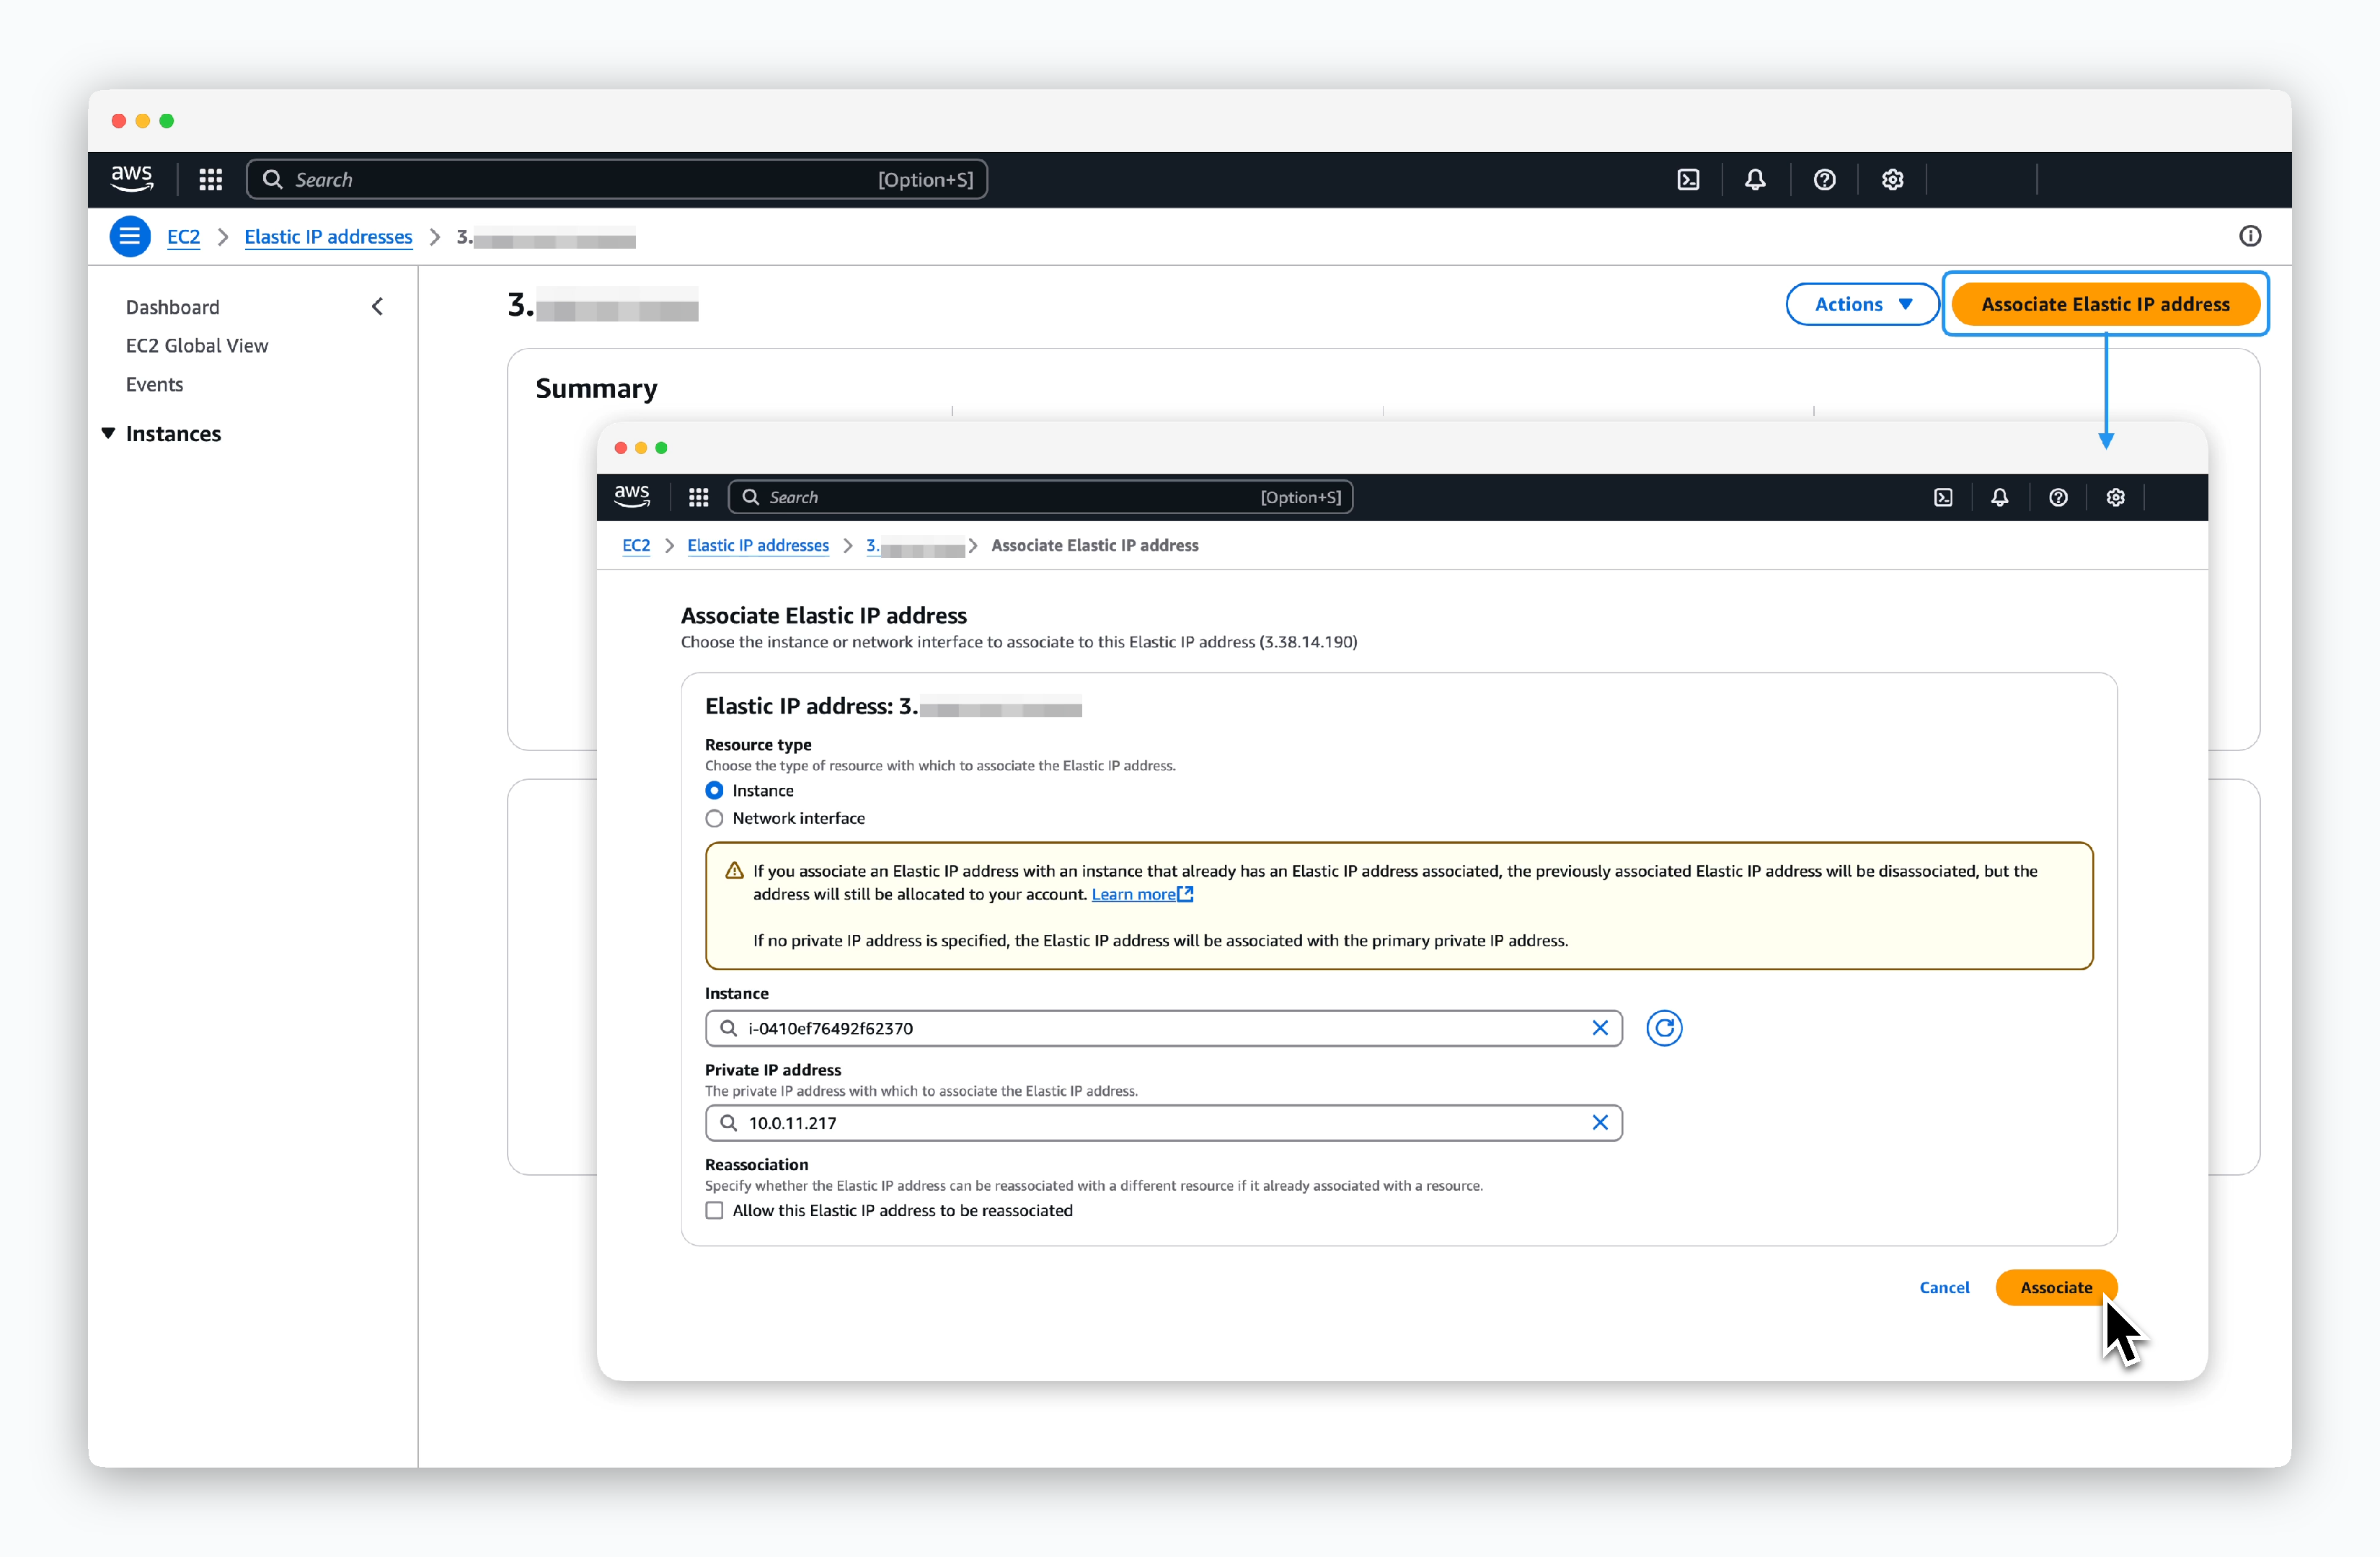 > `EC2 > Network & Security > Elastic IPs`에서 앞 단계에서 할당받은 IP를 클릭하고 `Associate Elastic IP address`를 클릭한 후, 아래의 정보를 입력하고 연동하세요.
* Resource type: Instance
* Instance: 앞 단계에서 생성한 EC2 인스턴스 선택
* Private IP: EC2 인스턴스의 Private IP 주소
## EC2 접속 및 필요 패키지 설치
> `EC2 > Network & Security > Elastic IPs`에서 앞 단계에서 할당받은 IP를 클릭하고 `Associate Elastic IP address`를 클릭한 후, 아래의 정보를 입력하고 연동하세요.
* Resource type: Instance
* Instance: 앞 단계에서 생성한 EC2 인스턴스 선택
* Private IP: EC2 인스턴스의 Private IP 주소
## EC2 접속 및 필요 패키지 설치
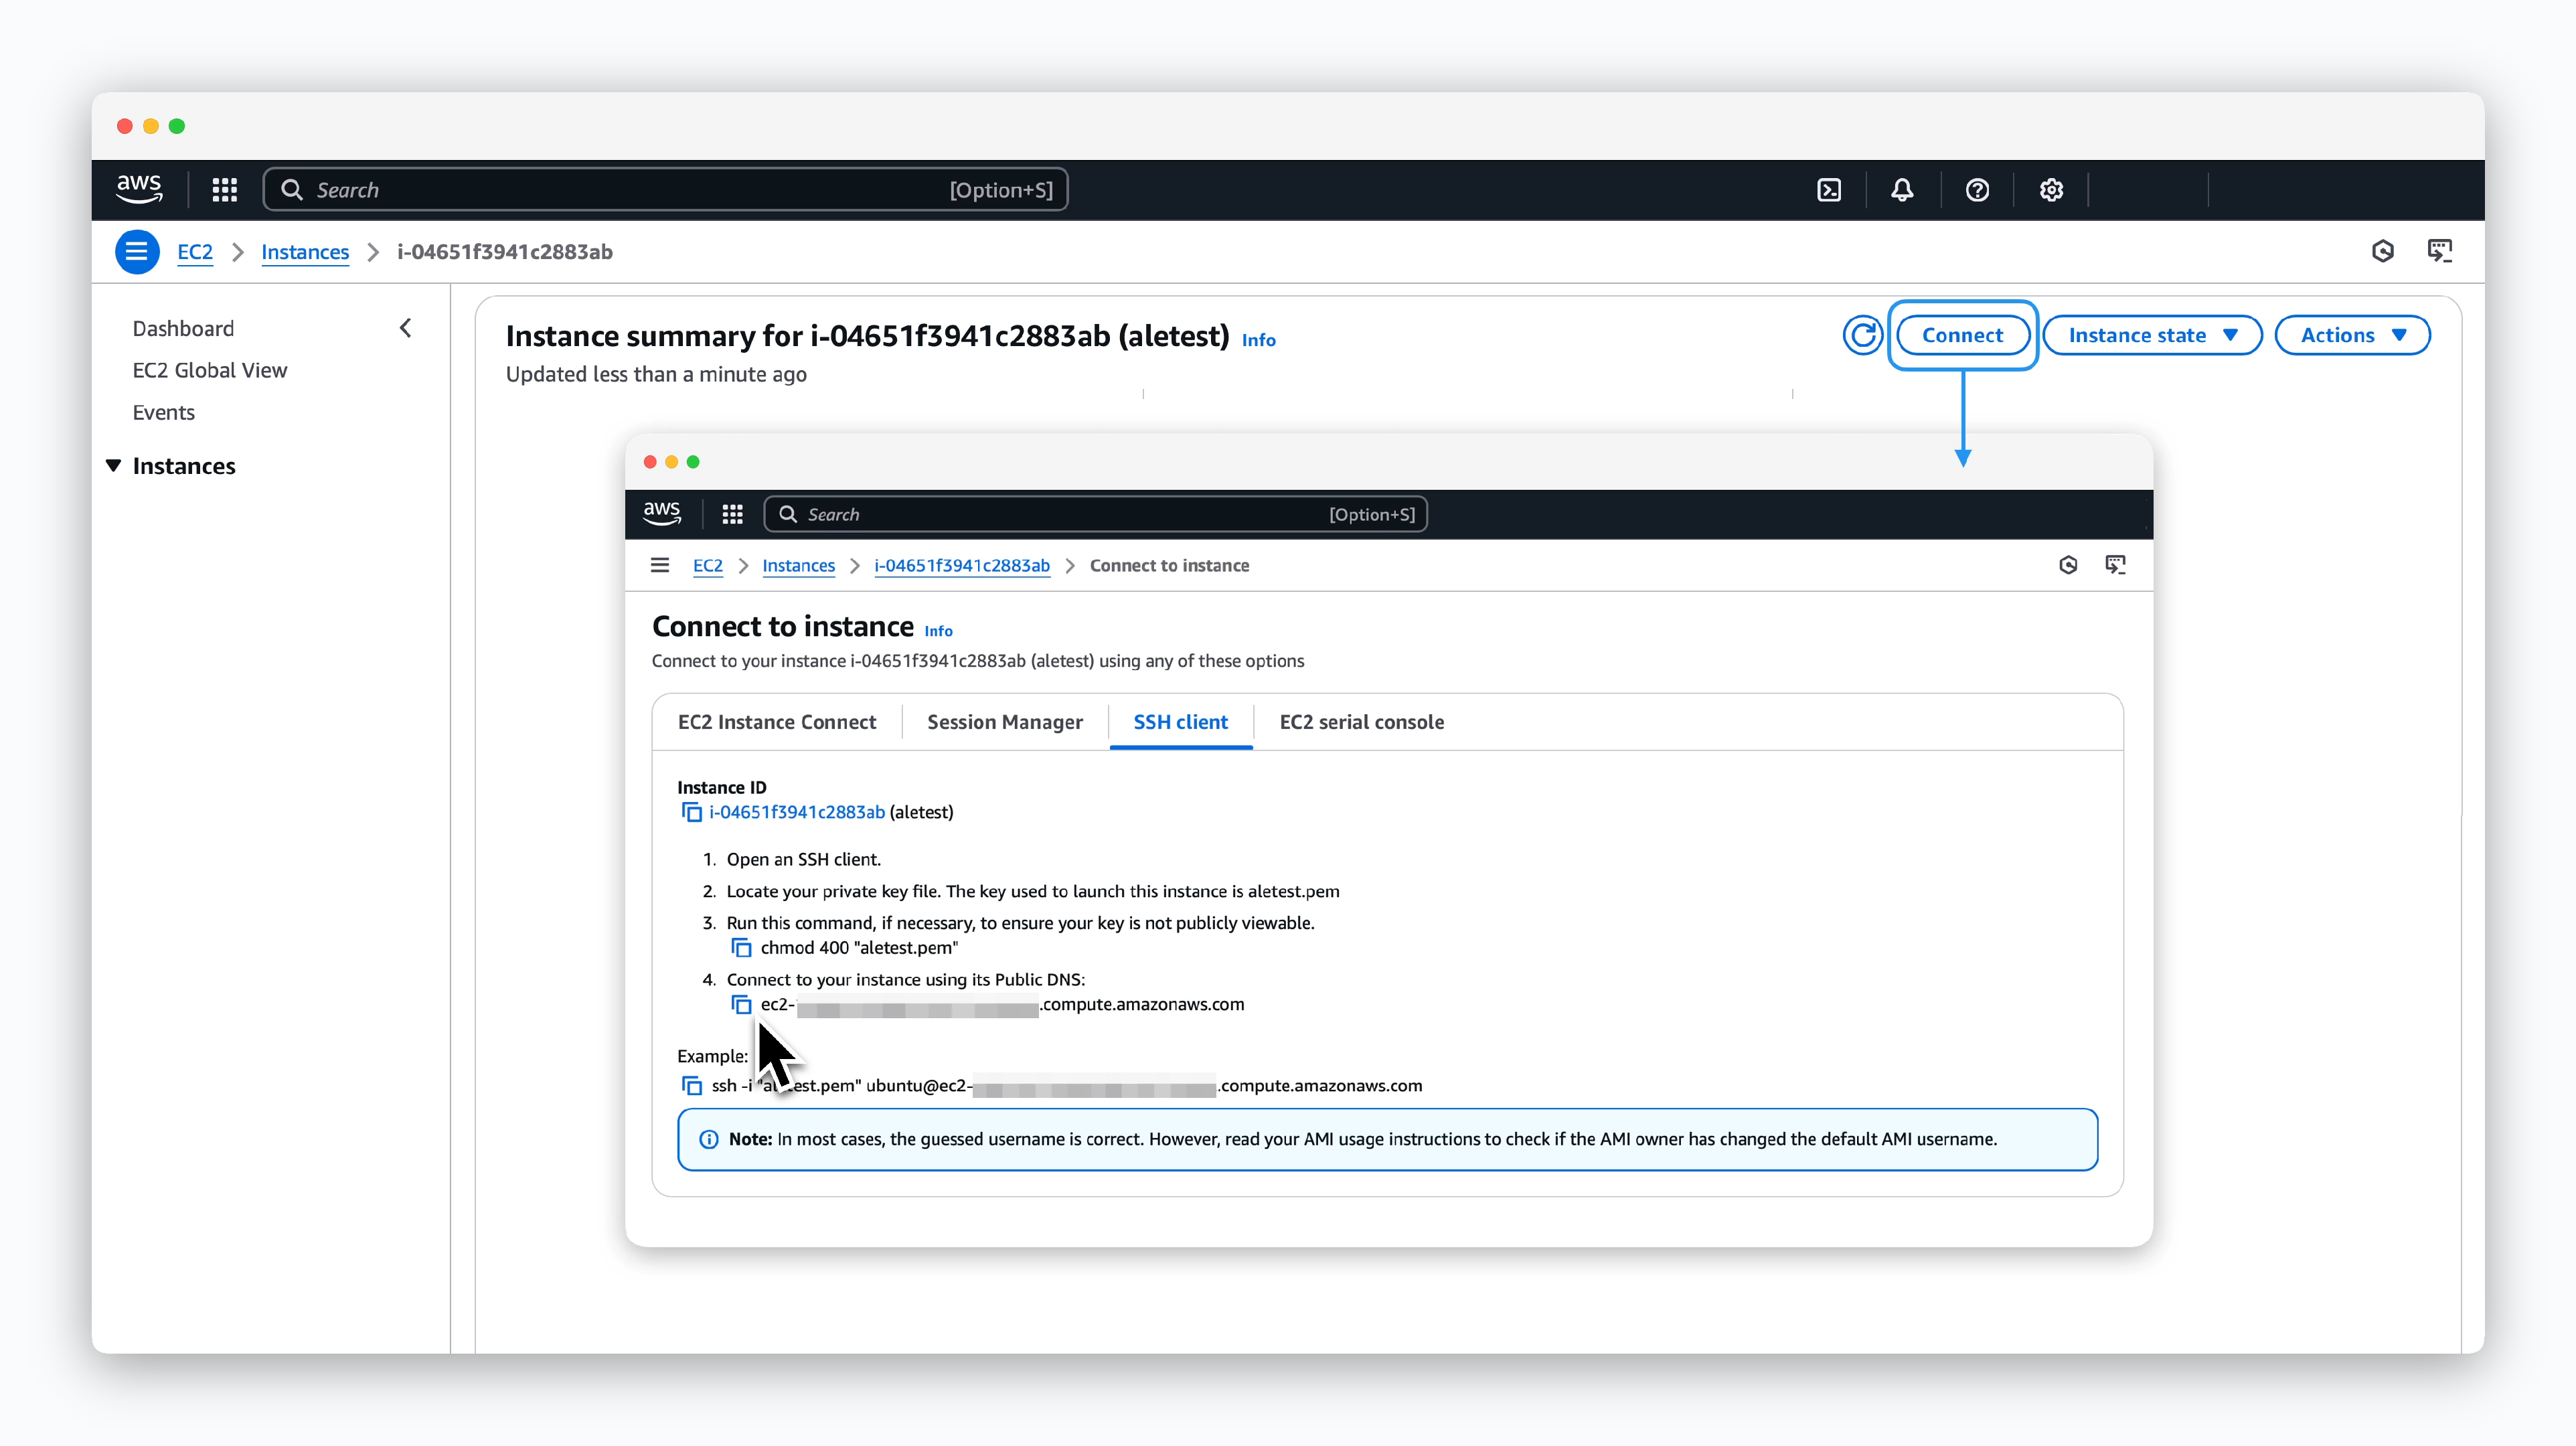 > EC2 상세 페이지에서 `Connect` 버튼을 클릭하고 SSH Client 탭의 SSH 접속 명령어를 확인합니다. 이어 터미널에서 명령어를 실행하여 EC2에 접속하고 아래를 따라 패키지를 설치하세요.
```bash theme={null}
sudo ufw disable
```
```bash theme={null}
curl -o- https://raw.githubusercontent.com/nvm-sh/nvm/v0.40.1/install.sh | bash
```
```bash theme={null}
source ~/.bashrc
nvm install 16
nvm alias default 16
node -v
```
```bash theme={null}
npm install pm2@latest -g
```
```bash theme={null}
sudo apt-get update
sudo apt-get install ca-certificates curl
sudo install -m 0755 -d /etc/apt/keyrings
sudo curl -fsSL https://download.docker.com/linux/ubuntu/gpg -o /etc/apt/keyrings/docker.asc
sudo chmod a+r /etc/apt/keyrings/docker.asc
```
```bash theme={null}
echo \
"deb [arch=$(dpkg --print-architecture) signed-by=/etc/apt/keyrings/docker.asc] https://download.docker.com/linux/ubuntu \
$(. /etc/os-release && echo "$VERSION_CODENAME") stable" | \
sudo tee /etc/apt/sources.list.d/docker.list > /dev/null
```
```bash theme={null}
sudo apt-get update
sudo apt-get install docker-ce docker-ce-cli containerd.io docker-buildx-plugin docker-compose-plugin
```
```bash theme={null}
curl -fsSL -o get_helm.sh https://raw.githubusercontent.com/helm/helm/main/scripts/get-helm-3
```
```bash theme={null}
chmod 700 get_helm.sh
./get_helm.sh
```
## EC2 환경변수 등록
```bash theme={null}
export AWS_ACCESS_KEY_ID=
export AWS_SECRET_ACCESS_KEY=
export AWS_REGION=
export AWS_HOSTED_ZONE_ID=
export AWS_DOMAIN=
export ACME_EMAIL=
```
> EC2 상세 페이지에서 `Connect` 버튼을 클릭하고 SSH Client 탭의 SSH 접속 명령어를 확인합니다. 이어 터미널에서 명령어를 실행하여 EC2에 접속하고 아래를 따라 패키지를 설치하세요.
```bash theme={null}
sudo ufw disable
```
```bash theme={null}
curl -o- https://raw.githubusercontent.com/nvm-sh/nvm/v0.40.1/install.sh | bash
```
```bash theme={null}
source ~/.bashrc
nvm install 16
nvm alias default 16
node -v
```
```bash theme={null}
npm install pm2@latest -g
```
```bash theme={null}
sudo apt-get update
sudo apt-get install ca-certificates curl
sudo install -m 0755 -d /etc/apt/keyrings
sudo curl -fsSL https://download.docker.com/linux/ubuntu/gpg -o /etc/apt/keyrings/docker.asc
sudo chmod a+r /etc/apt/keyrings/docker.asc
```
```bash theme={null}
echo \
"deb [arch=$(dpkg --print-architecture) signed-by=/etc/apt/keyrings/docker.asc] https://download.docker.com/linux/ubuntu \
$(. /etc/os-release && echo "$VERSION_CODENAME") stable" | \
sudo tee /etc/apt/sources.list.d/docker.list > /dev/null
```
```bash theme={null}
sudo apt-get update
sudo apt-get install docker-ce docker-ce-cli containerd.io docker-buildx-plugin docker-compose-plugin
```
```bash theme={null}
curl -fsSL -o get_helm.sh https://raw.githubusercontent.com/helm/helm/main/scripts/get-helm-3
```
```bash theme={null}
chmod 700 get_helm.sh
./get_helm.sh
```
## EC2 환경변수 등록
```bash theme={null}
export AWS_ACCESS_KEY_ID=
export AWS_SECRET_ACCESS_KEY=
export AWS_REGION=
export AWS_HOSTED_ZONE_ID=
export AWS_DOMAIN=
export ACME_EMAIL=
```
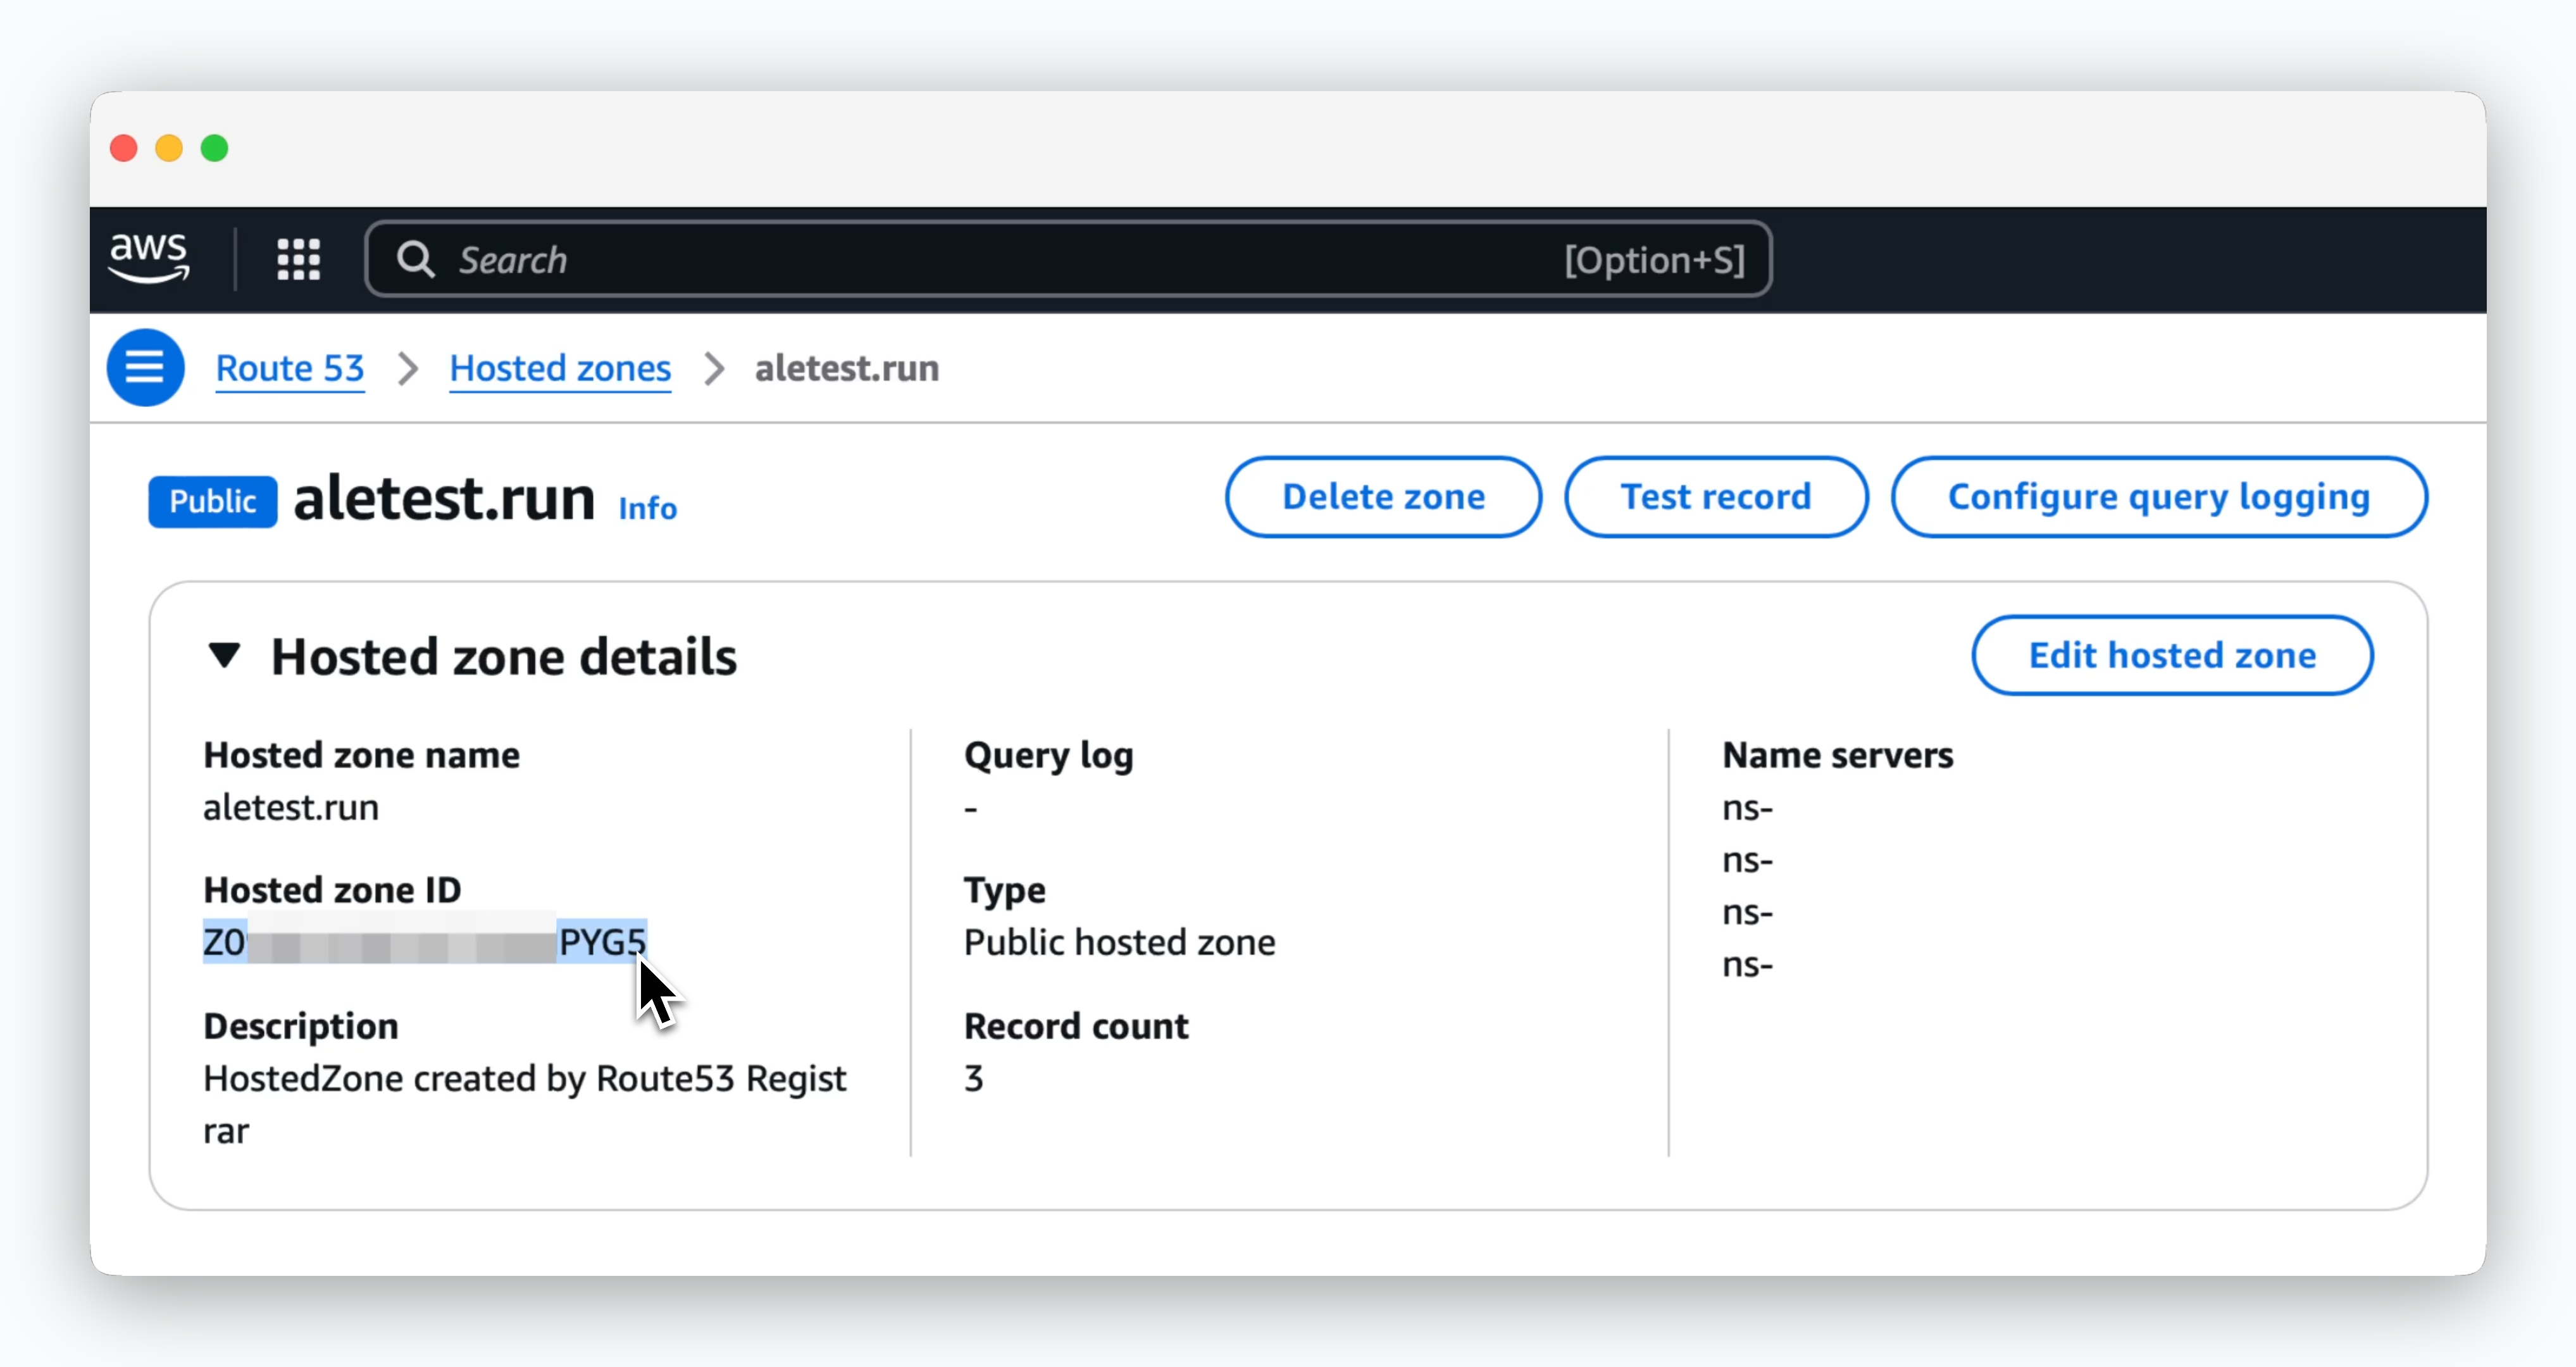 > **Route53 > 호스팅 영역 > 호스팅 영역 세부 정보** 에서 **호스팅 영역 ID** 값을 조회할 수 있습니다.