
eksctl YAML 명세 작성

다음의 내용을 참고하여 생성할 EKS 클러스터의 YAML 명세를 작성하고 적절한 위치에 저장합니다.
apiVersion: eksctl.io/v1alpha5
kind: ClusterConfig

metadata:
  name: $CLUSTER_NAME
  version: "1.30"
  region: ap-northeast-2

iam:
  withOIDC: true

vpc:
  clusterEndpoints:
    publicAccess: true
    privateAccess: true

addons:
  - name: vpc-cni
    version: 1.18.1
    attachPolicyARNs:
    - arn:aws:iam::aws:policy/AmazonEKS_CNI_Policy
    configurationValues: |-
      enableNetworkPolicy: "true"
  - name: coredns
  - name: kube-proxy

managedNodeGroups:
  - name: node-group-01
    amiFamily: AmazonLinux2
    instanceType: t3.large
    minSize: 2
    desiredCapacity: 2
    maxSize: 4
    privateNetworking: true
    disableIMDSv1: true
    volumeSize: 100
    labels:
      purpose: system
    iam:
      withAddonPolicies:
        albIngress: true
        ebs: true
        efs: true
        externalDNS: true

EKS 클러스터 및 노드 그룹 생성

다음의 명령어를 실행하여 EKS 클러스터를 생성하세요.
envsubst < [1번에서 생성한 yaml 파일명] | eksctl create cluster -f -
# 로컬에 저장한 매니페스트 YAML 파일 사용

Nginx Ingress Controller

Helm으로 Nginx Ingress Controller를 설치합니다.
helm repo add ingress-nginx https://kubernetes.github.io/ingress-nginx
helm repo update
helm install ingress-nginx ingress-nginx/ingress-nginx \
  --version 4.11.2 \
  --namespace ingress-nginx --create-namespace \
  --set controller.service.type=LoadBalancer \
  --set controller.service.annotations."service\.beta\.kubernetes\.io/aws-load-balancer-type"="nlb" \
  --set controller.service.annotations."service\.beta\.kubernetes\.io/aws-load-balancer-scheme"="internet-facing" \
  --set controller.service.annotations."service\.beta\.kubernetes\.io/aws-load-balancer-nlb-target-type"="ip" \
  --set controller.allowSnippetAnnotations=true \
  --set controller.admissionWebhooks.enabled=false

Cert manager

Helm으로 Cert manager를 설치합니다.
helm repo add jetstack https://charts.jetstack.io
helm repo update
helm install \
      cert-manager jetstack/cert-manager \
      --namespace cert-manager \
      --create-namespace \
      --version v1.15.3 \
      --set crds.enabled=true

Storage

AWS에서는 다양한 스토리지 옵션을 제공하며, ale의 기본 스토리지로 Amazon Elastic File System (EFS)과 Elastic Block Store (EBS) 중 사용 목적에 맞게 선택해서 사용할 수 있습니다.
1. 클러스터 IAM OIDC 제공업체 생성 여부를 확인하고 생성되어 있지 않은 경우 신규 생성합니다.
# 클러스터에 OIDC 제공업체가 생성되어있는지 확인
aws eks describe-cluster --name $CLUSTER_NAME --query "cluster.identity.oidc.issuer" --output text | cut -d '/' -f 5
aws iam list-open-id-connect-providers | grep $OIDC_ID | cut -d "/" -f4
# 클러스터에 OIDC 제공업체가 생성되어있지 않으면 아래 명령어로 생성
aws eks describe-cluster --name $CLUSTER_NAME --query "cluster.identity.oidc.issuer" --output text | cut
eksctl utils associate-iam-oidc-provider --cluster $CLUSTER_NAME --approve
OIDC_ID=$(aws eks describe-cluster --name $CLUSTER_NAME --query "cluster.identity.oidc.issuer" --output text | cut -d '/' -f 5)
2. EBS CSI 드라이버에 대한 IAM 역할을 생성합니다.
eksctl create iamserviceaccount \
    --name ebs-csi-controller-sa \
    --namespace kube-system \
    --cluster ${CLUSTER_NAME} \
    --role-name AmazonEKS_EBS_CSI_DriverRole \
    --role-only \
    --attach-policy-arn arn:aws:iam::aws:policy/service-role/AmazonEBSCSIDriverPolicy \
    --approve
3. EKS add-on으로 EBS CSI 드라이버를 적용합니다.
export ACCOUNT_ID=$(aws sts get-caller-identity --query "Account" --output text | xargs -L 1)
eksctl create addon \
    --name aws-ebs-csi-driver \
    --cluster ${CLUSTER_NAME} \
    --service-account-role-arn arn:aws:iam::${ACCOUNT_ID}:role/AmazonEKS_EBS_CSI_DriverRole \
    --force
4. gp2에 설정된 dafault 설정을 해제합니다.
kubectl patch storageclass gp2 \
	-p '{"metadata": {"annotations":{"storageclass.kubernetes.io/is-default-class":"false"}}}'
5. 신규 Storage Class(gp3)를 생성합니다. storageclass.kubernetes.io/is-default-class: "true" 어노테이션을 통해 기본값으로 지정됩니다.
cat <<EOF | kubectl apply -f -
apiVersion: storage.k8s.io/v1
kind: StorageClass
metadata:
  name: gp3
  annotations:
    storageclass.kubernetes.io/is-default-class: "true"
allowVolumeExpansion: true
provisioner: ebs.csi.aws.com
volumeBindingMode: Immediate
parameters:
  type: gp3
  allowAutoIOPSPerGBIncrease: 'true'
  encrypted: 'true'
EOF
6. PVC 생성 테스트를 위해 다음의 명령을 실행합니다.
cat <<EOF | kubectl apply -f -
apiVersion: v1
kind: PersistentVolumeClaim
metadata:
  name: pvc-test
spec:
  accessModes:
    - ReadWriteOnce
  storageClassName: gp3
  resources:
    requests:
      storage: 1Gi
EOF
7. 생성된 PVC의 상태를 확인합니다. 정상적으로 생성된 경우 STATUS가 Bound 여야 합니다.
kubectl get pvc pvc-test
NAME       STATUS   VOLUME                                     CAPACITY   ACCESS MODES   STORAGECLASS   VOLUMEATTRIBUTESCLASS   AGE
pvc-test   Bound    pvc-bf3fcf47-b712-4ae4-acd9-9d9aefc72e84   1Gi        RWO            gp3            <unset>                 3s
1. 클러스터 IAM OIDC 제공업체 생성 여부를 확인하고 생성되어 있지 않은 경우 신규 생성하세요.
# 클러스터에 OIDC 제공업체가 생성되어있는지 확인
OIDC_ID=$(aws eks describe-cluster --name $CLUSTER_NAME --query "cluster.identity.oidc.issuer" --output text | cut -d '/' -f 5)
aws iam list-open-id-connect-providers | grep $OIDC_ID | cut -d "/" -f4
# 클러스터에 OIDC 제공업체가 생성되어있지 않으면 아래 명령어로 생성
eksctl utils associate-iam-oidc-provider --cluster $CLUSTER_NAME --approve
OIDC_ID=$(aws eks describe-cluster --name $CLUSTER_NAME --query "cluster.identity.oidc.issuer" --output text | cut -d '/' -f 5)
2. EBS CSI 드라이버에 대한 IAM 역할을 생성하고 정책을 적용합니다.
eksctl create iamserviceaccount \
    --name efs-csi-controller-sa \
    --namespace kube-system \
    --cluster ${CLUSTER_NAME} \
    --role-name AmazonEKS_EFS_CSI_DriverRole \
    --role-only \
    --attach-policy-arn arn:aws:iam::aws:policy/service-role/AmazonEFSCSIDriverPolicy \
    --approve
TRUST_POLICY=$(aws iam get-role --role-name AmazonEKS_EFS_CSI_DriverRole --query 'Role.AssumeRolePolicyDocument' | \
    sed -e 's/efs-csi-controller-sa/efs-csi-*/' -e 's/StringEquals/StringLike/')
aws iam update-assume-role-policy --role-name AmazonEKS_EFS_CSI_DriverRole --policy-document "$TRUST_POLICY"
3. EKS add-on으로 EFS CSI 드라이버를 적용합니다.
export ACCOUNT_ID=$(aws sts get-caller-identity --query "Account" --output text | xargs -L 1)
eksctl create addon \
    --name aws-efs-csi-driver \
    --cluster ${CLUSTER_NAME} \
    --service-account-role-arn arn:aws:iam::${ACCOUNT_ID}:role/AmazonEKS_EFS_CSI_DriverRole \
    --force
4. EFS 파일시스템을 생성하기 위한 정보를 조회하고 환경변수로 세팅합니다.
VPC_ID=$(aws eks describe-cluster \
    --name $CLUSTER_NAME \
    --query "cluster.resourcesVpcConfig.vpcId" \
    --output text)
CIDR_RANGE=$(aws ec2 describe-vpcs \
    --vpc-ids $VPC_ID \
    --query "Vpcs[].CidrBlock" \
    --output text \
    --region $AWS_REGION)
5. 보안 그룹을 생성하고 2049(NFS) 포트의 인그레스 통신을 허용하는 규칙을 추가합니다.
SECURITY_GROUP_ID=$(aws ec2 create-security-group \
    --group-name EfsSecurityGroup \
    --description "EFS security group" \
    --vpc-id $VPC_ID \
    --output text)
aws ec2 authorize-security-group-ingress \
    --group-id $SECURITY_GROUP_ID \
    --protocol tcp \
    --port 2049 \
    --cidr $CIDR_RANGE
6. AWS EFS 파일 시스템을 생성하세요.
aws efs create-file-system \
    --region $AWS_REGION \
    --performance-mode generalPurpose \
    --query 'FileSystemId' \
    --output text
7. AWS EFS 관리 콘솔에서 생성된 파일시스템 페이지에 접속 후 Network 탭에서 Manage(관리) 버튼을 클릭합니다.
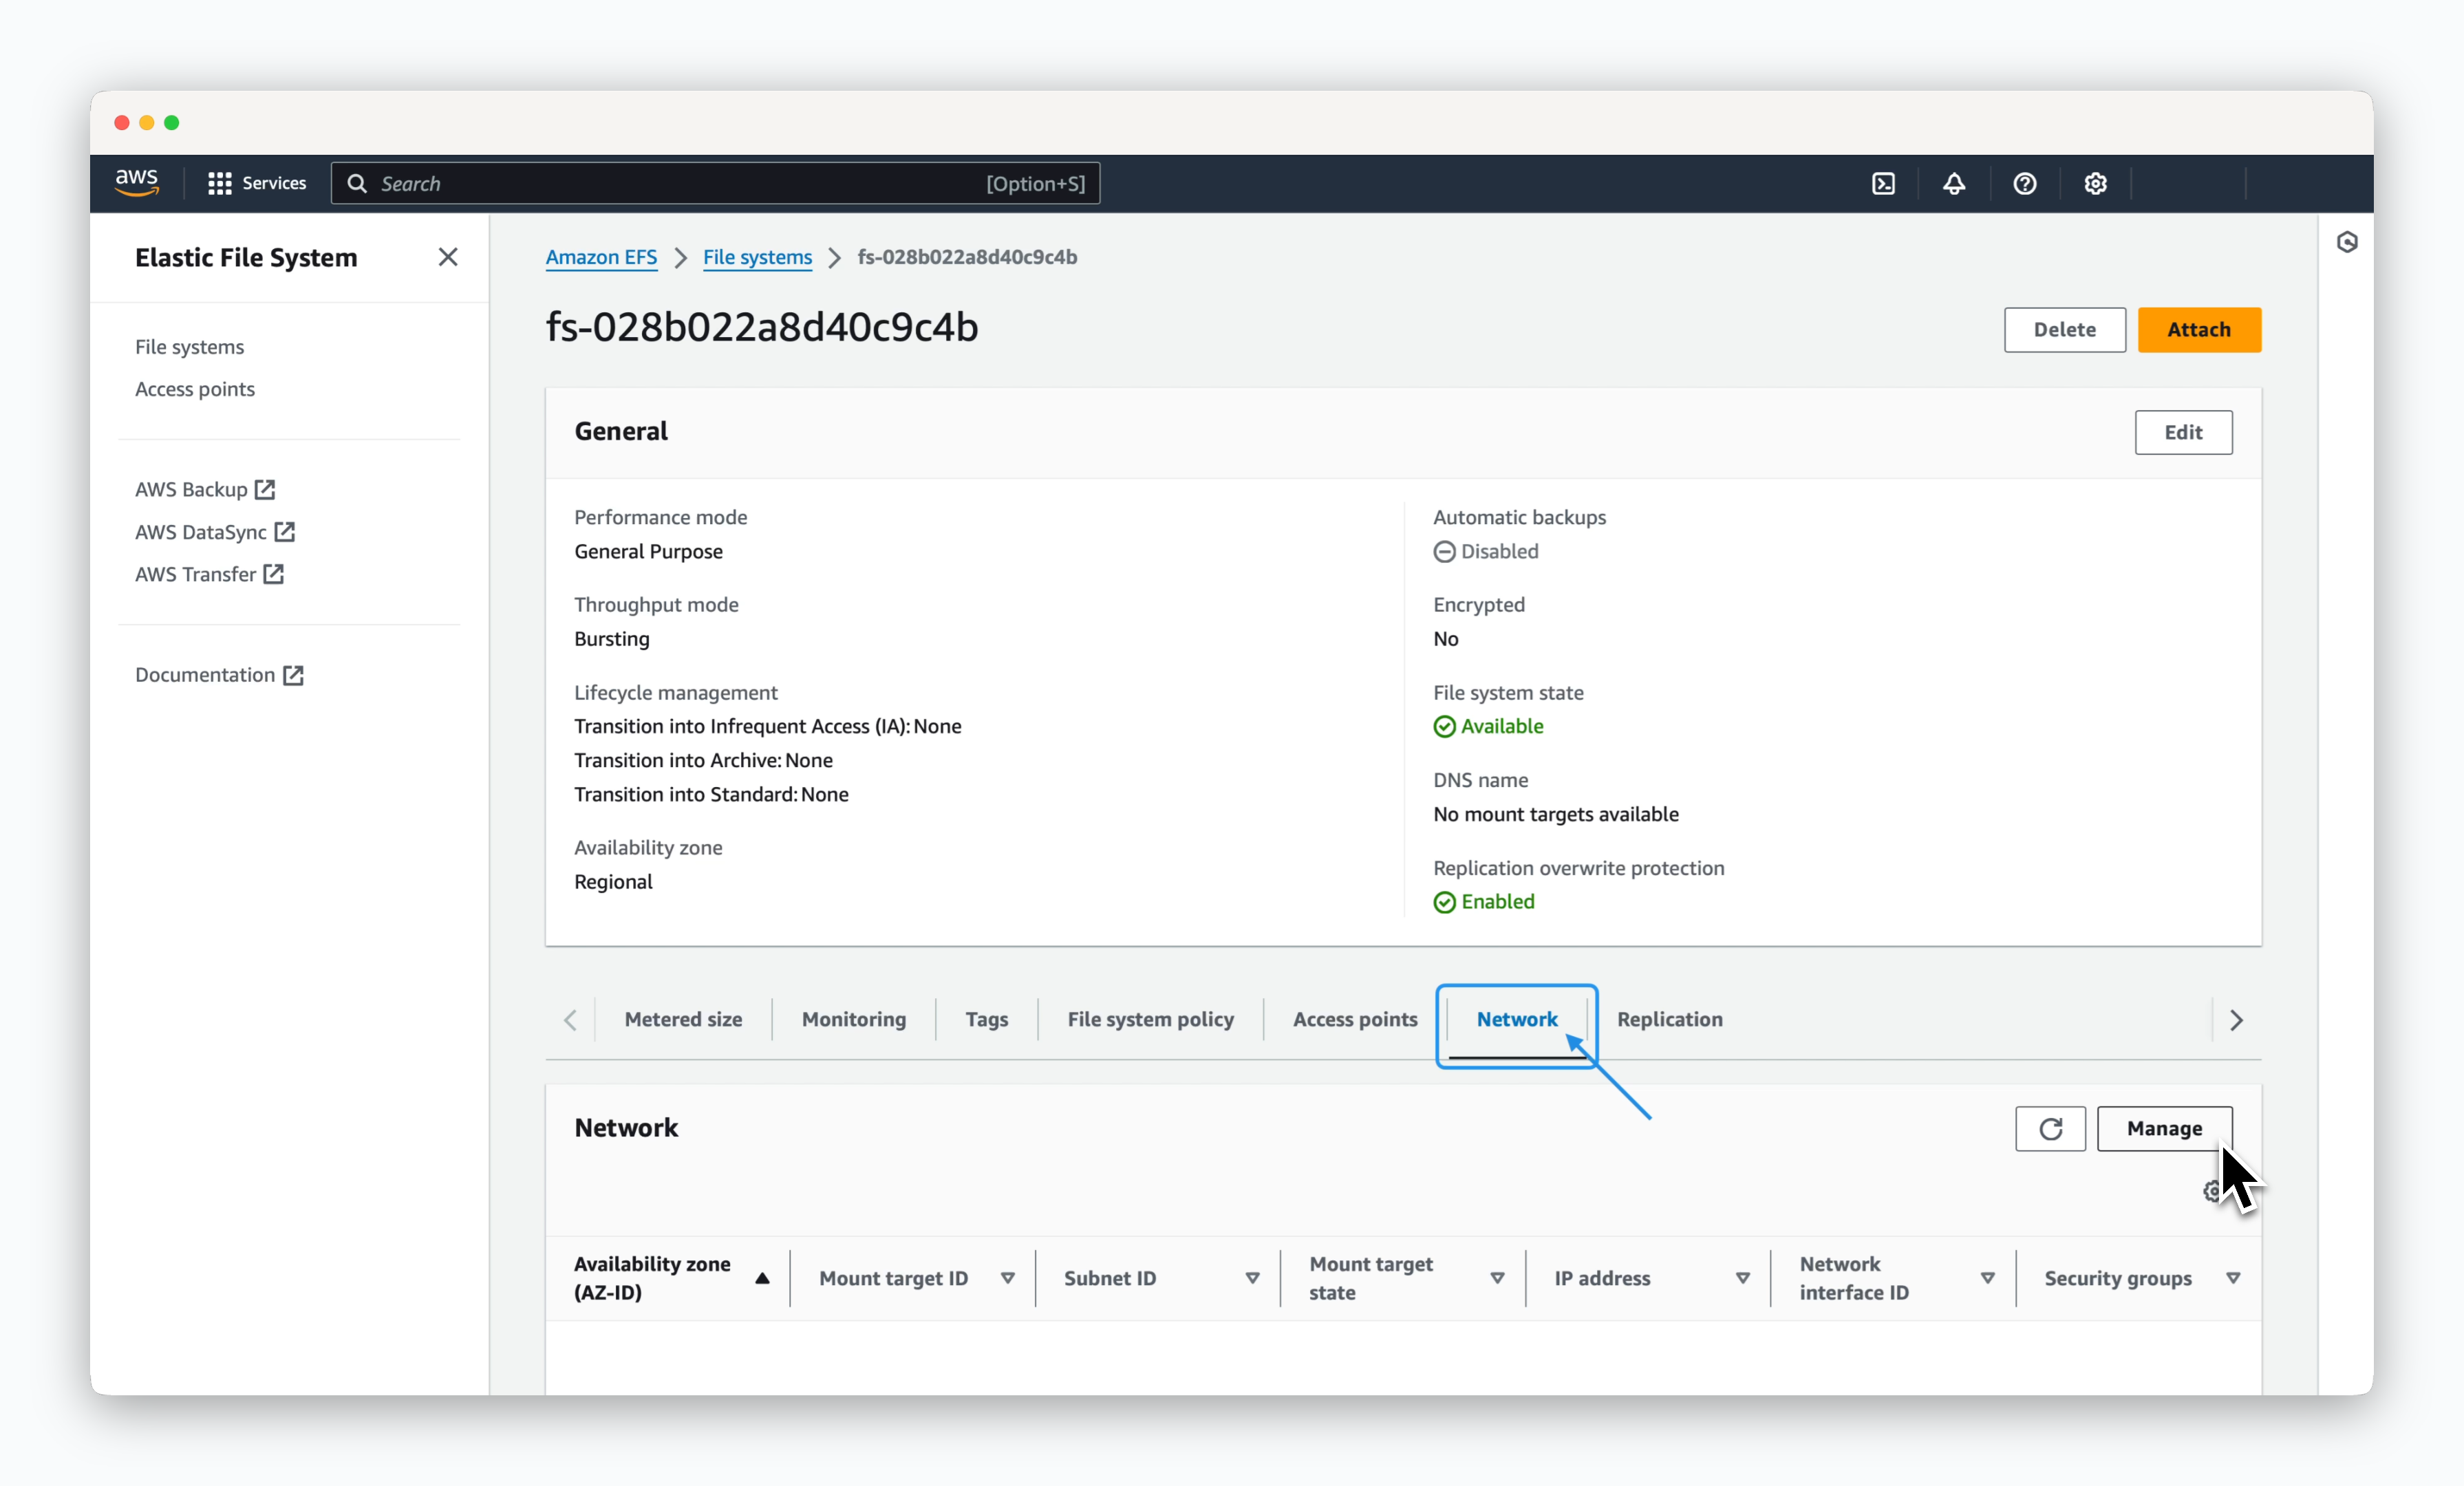
8. Kubernetes 클러스터의 노드가 위치한 AZ(가용영역)에 따라 탑재 대상을 추가하고 각 노드의 퍼블릭 서브넷을 선택합니다. 이어서 2049 포트에 대한 인바운드 허용 규칙이 추가된 Efs보안 그룹을 선택한 후 저장하세요.
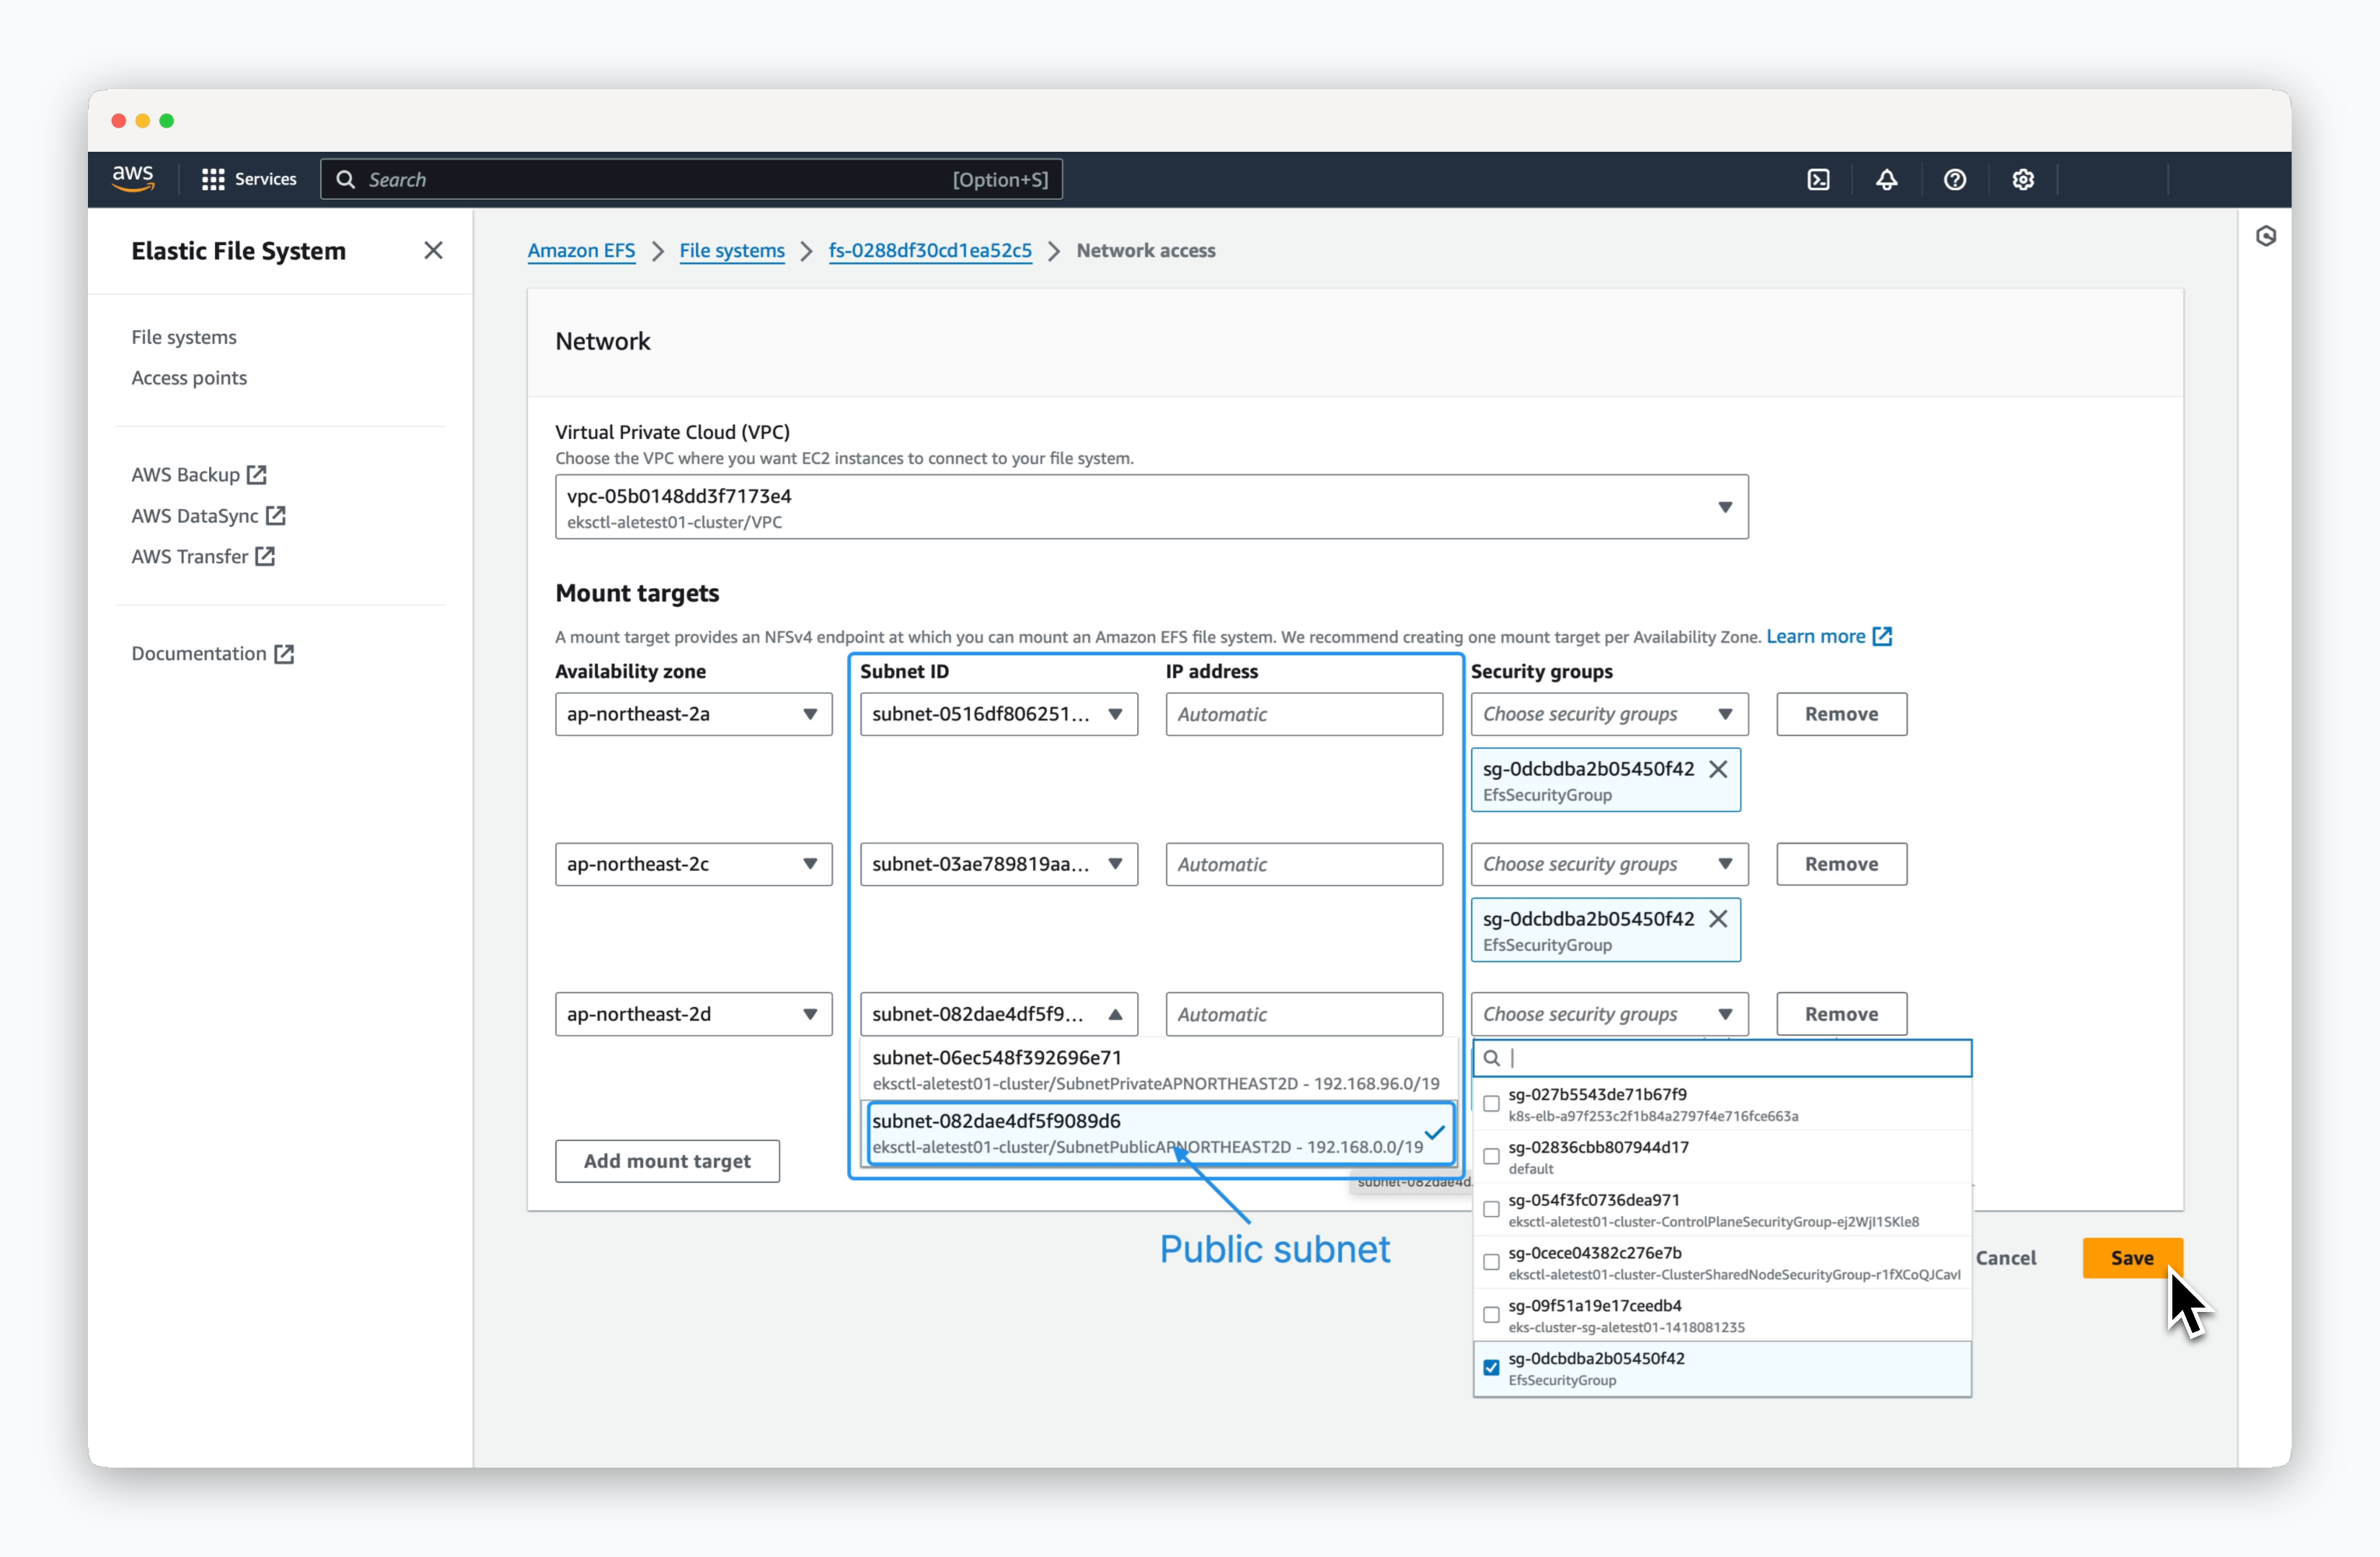
9. 신규 Storage Class(efs-sc)를 생성합니다. storageclass.kubernetes.io/is-default-class: "true" 어노테이션을 통해 기본값으로 지정됩니다.
cat <<EOF | kubectl apply -f -
apiVersion: storage.k8s.io/v1
kind: StorageClass
metadata:
  name: efs-sc
  annotations:
    storageclass.kubernetes.io/is-default-class: "true"
provisioner: efs.csi.aws.com
parameters:
  basePath: /dynamic_provisioning
  provisioningMode: efs-ap
  fileSystemId: [File System ID]
  directoryPerms: "755"
  gid: "1001"
  uid: "1001"
EOF
10. PVC 생성 테스트를 위해 다음의 명령을 실행합니다.
cat <<EOF | kubectl apply -f -
apiVersion: v1
kind: PersistentVolumeClaim
metadata:
  name: pvc-test
spec:
  accessModes:
    - ReadWriteMany
  storageClassName: efs-sc
  resources:
    requests:
      storage: 1Gi
EOF
11. 생성된 PVC의 상태를 확인합니다. 정상적으로 생성된 경우 STATUS가 Bound 여야 합니다.
kubectl get pvc pvc-test
NAME       STATUS   VOLUME                                     CAPACITY   ACCESS MODES   STORAGECLASS   VOLUMEATTRIBUTESCLASS   AGE
pvc-test   Bound    pvc-bf3fcf47-b712-4ae4-acd9-9d9aefc72e84   1Gi        RWX            efs-sc         <unset>                 3s

Kubernetes Metrics Server

클러스터 내 컨테이너 리소스 정보를 수집하기 위한 Metrics Server를 설치합니다.
Kubernetes Metrics Server를 설치하기 위해 다음의 명령어를 실행합니다.
helm repo add metrics-server https://kubernetes-sigs.github.io/metrics-server/
helm repo update
helm install metrics-server metrics-server/metrics-server -n kube-system --set "args={--kubelet-insecure-tls}"
Metrics Server가 정상적으로 작동하는지 확인하기 위해 다음의 명령어를 실행합니다.
kubectl get pods -n kube-system -l app.kubernetes.io/name=metrics-server
I